How To Integrate MongoDB with Your Node Application
As you work with Node.js, you may find yourself developing a project that stores and queries data. In this case, you will need to choose a database solution that makes sense for your application’s data and query types.
In this tutorial, you will integrate a MongoDB database with an existing Node application. NoSQL databases like MongoDB can be useful if your data requirements include scalability and flexibility. MongoDB also integrates well with Node since it is designed to work asynchronously with JSON objects.
To integrate MongoDB into your project, you will use the Object Document Mapper (ODM) Mongoose to create schemas and models for your application data. This will allow you to organize your application code following the model-view-controller (MVC) architectural pattern, which lets you separate the logic of how your application handles user input from how your data is structured and rendered to the user. Using this pattern can facilitate future testing and development by introducing a separation of concerns into your codebase.
At the end of the tutorial, you will have a working shark information application that will take a user’s input about their favorite sharks and display the results in the browser:
Prerequisites
- A local development machine or server running Ubuntu 18.04, along with a non-root user with sudo privileges and an active firewall. For guidance on how to set these up on an 18.04 server, please see this Initial Server Setup guide.
- Node.js and npm installed on your machine or server, following these instructions on installing with the PPA managed by NodeSource.
- MongoDB installed on your machine or server, following Step 1 of How To Install MongoDB in Ubuntu 18.04.
Step 1 — Creating a Mongo User
Before we begin working with the application code, we will create an administrative user that will have access to our application’s database. This user will have administrative privileges on any database, which will give you the flexibility to switch and create new databases as needed.
First, check that MongoDB is running on your server:
The following output indicates that MongoDB is running:
Output● mongodb.service - An object/document-oriented database Loaded: loaded (/lib/systemd/system/mongodb.service; enabled; vendor preset: enabled) Active: active (running) since Thu 2019-01-31 21:07:25 UTC; 21min ago . Next, open the Mongo shell to create your user:
This will drop you into an administrative shell:
OutputMongoDB shell version v3.6.3 connecting to: mongodb://127.0.0.1:27017 MongoDB server version: 3.6.3 . > You will see some administrative warnings when you open the shell due to your unrestricted access to the admin database. You can learn more about restricting this access by reading How To Install and Secure MongoDB on Ubuntu 16.04, for when you move into a production setup.
For now, you can use your access to the admin database to create a user with userAdminAnyDatabase privileges, which will allow password-protected access to your application’s databases.
In the shell, specify that you want to use the admin database to create your user:
Next, create a role and password by adding a username and password with the db.createUser command. After you type this command, the shell will prepend three dots before each line until the command is complete. Be sure to replace the user and password provided here with your own username and password:
This creates an entry for the user sammy in the admin database. The username you select and the admin database will serve as identifiers for your user.
The output for the entire process will look like this, including the message indicating that the entry was successful:
Output> db.createUser( . < . user: "sammy", . pwd: "your_password", . roles: [ < role: "userAdminAnyDatabase", db: "admin" >] . > . ) Successfully added user: < "user" : "sammy", "roles" : [ < "role" : "userAdminAnyDatabase", "db" : "admin" >] > With your user and password created, you can now exit the Mongo shell:
Now that you have created your database user, you can move on to cloning the starter project code and adding the Mongoose library, which will allow you to implement schemas and models for the collections in your databases.
Step 2 — Adding Mongoose and Database Information to the Project
Our next steps will be to clone the application starter code and add Mongoose and our MongoDB database information to the project.
In your non-root user’s home directory, clone the nodejs-image-demo repository from the DigitalOcean Community GitHub account. This repository includes the code from the setup described in How To Build a Node.js Application with Docker.
Clone the repository into a directory called node_project :
Change to the node_project directory:
Before modifying the project code, let’s take a look at the project’s structure using the tree command.
Tip: tree is a useful command for viewing file and directory structures from the command line. You can install it with the following command:
To use it, cd into a given directory and type tree . You can also provide the path to the starting point with a command like:
Type the following to look at the node_project directory:
The structure of the current project looks like this:
Output├── Dockerfile ├── README.md ├── app.js ├── package-lock.json ├── package.json └── views ├── css │ └── styles.css ├── index.html └── sharks.html We will be adding directories to this project as we move through the tutorial, and tree will be a useful command to help us track our progress.
Next, add the mongoose npm package to the project with the npm install command:
This command will create a node_modules directory in your project directory, using the dependencies listed in the project’s package.json file, and will add mongoose to that directory. It will also add mongoose to the dependencies listed in your package.json file. For a more detailed discussion of package.json , please see Step 1 in How To Build a Node.js Application with Docker.
Before creating any Mongoose schemas or models, we will add our database connection information so that our application will be able to connect to our database.
In order to separate your application’s concerns as much as possible, create a separate file for your database connection information called db.js . You can open this file with nano or your favorite editor:
First, import the mongoose module using the require function:
~/node_project/db.js
const mongoose = require('mongoose'); This will give you access to Mongoose’s built-in methods, which you will use to create the connection to your database.
Next, add the following constants to define information for Mongo’s connection URI. Though the username and password are optional, we will include them so that we can require authentication for our database. Be sure to replace the username and password listed below with your own information, and feel free to call the database something other than ‘ sharkinfo ‘ if you would prefer:
~/node_project/db.js
const mongoose = require('mongoose'); const MONGO_USERNAME = 'sammy'; const MONGO_PASSWORD = 'your_password'; const MONGO_HOSTNAME = '127.0.0.1'; const MONGO_PORT = '27017'; const MONGO_DB = 'sharkinfo'; Because we are running our database locally, we have used 127.0.0.1 as the hostname. This would change in other development contexts: for example, if you are using a separate database server or working with multiple nodes in a containerized workflow.
Finally, define a constant for the URI and create the connection using the mongoose.connect() method:
~/node_project/db.js
. const url = `mongodb://$:$@$:$/$?authSource=admin`; mongoose.connect(url, ); Note that in the URI we’ve specified the authSource for our user as the admin database. This is necessary since we have specified a username in our connection string. Using the useNewUrlParser flag with mongoose.connect() specifies that we want to use Mongo’s new URL parser.
Save and close the file when you are finished editing.
As a final step, add the database connection information to the app.js file so that the application can use it. Open app.js :
The first lines of the file will look like this:
~/node_project/app.js
const express = require('express'); const app = express(); const router = express.Router(); const path = __dirname + '/views/'; . Below the router constant definition, located near the top of the file, add the following line:
~/node_project/app.js
. const router = express.Router(); const db = require('./db'); const path = __dirname + '/views/'; . This tells the application to use the database connection information specified in db.js .
Save and close the file when you are finished editing.
With your database information in place and Mongoose added to your project, you are ready to create the schemas and models that will shape the data in your sharks collection.
Step 3 — Creating Mongoose Schemas and Models
Our next step will be to think about the structure of the sharks collection that users will be creating in the sharkinfo database with their input. What structure do we want these created documents to have? The shark information page of our current application includes some details about different sharks and their behaviors:
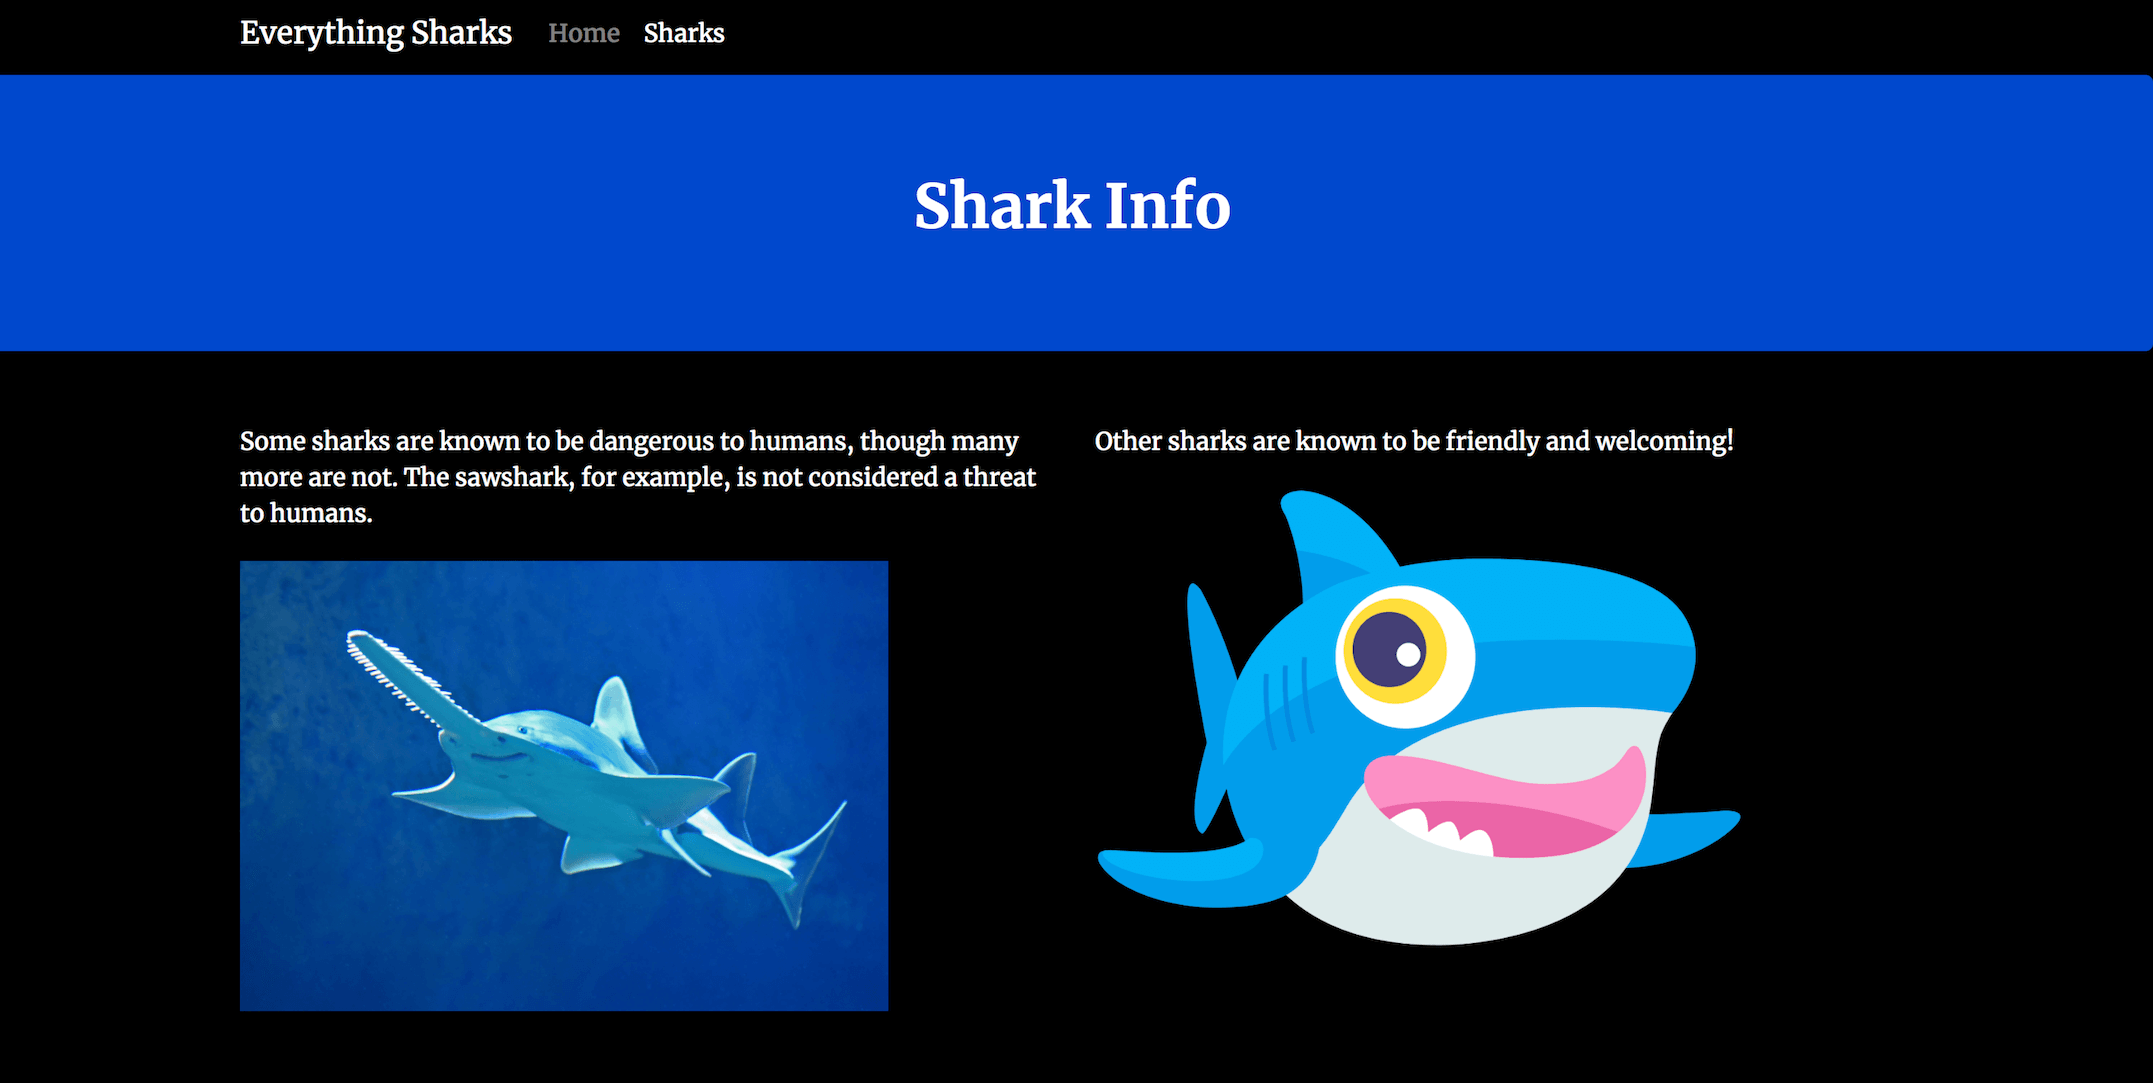
In keeping with this theme, we can have users add new sharks with details about their overall character. This goal will shape how we create our schema.
To keep your schemas and models distinct from the other parts of your application, create a models directory in the current project directory:
Next, open a file called sharks.js to create your schema and model:
Import the mongoose module at the top of the file:
~/node_project/models/sharks.js
const mongoose = require('mongoose'); Below this, define a Schema object to use as the basis for your shark schema:
~/node_project/models/sharks.js
const mongoose = require('mongoose'); const Schema = mongoose.Schema; You can now define the fields you would like to include in your schema. Because we want to create a collection with individual sharks and information about their behaviors, let’s include a name key and a character key. Add the following Shark schema below your constant definitions:
~/node_project/models/sharks.js
. const Shark = new Schema ( name: type: String, required: true >, character: type: String, required: true >, >); This definition includes information about the type of input we expect from users — in this case, a string — and whether or not that input is required.
Finally, create the Shark model using Mongoose’s model() function. This model will allow you to query documents from your collection and validate new documents. Add the following line at the bottom of the file:
~/node_project/models/sharks.js
. module.exports = mongoose.model('Shark', Shark) This last line makes our Shark model available as a module using the module.exports property. This property defines the values that the module will export, making them available for use elsewhere in the application.
The finished models/sharks.js file looks like this:
~/node_project/models/sharks.js
const mongoose = require('mongoose'); const Schema = mongoose.Schema; const Shark = new Schema ( name: type: String, required: true >, character: type: String, required: true >, >); module.exports = mongoose.model('Shark', Shark) Save and close the file when you are finished editing.
With the Shark schema and model in place, you can start working on the logic that will determine how your application will handle user input.
Step 4 — Creating Controllers
Our next step will be to create the controller component that will determine how user input gets saved to our database and returned to the user.
First, create a directory for the controller:
Next, open a file in that folder called sharks.js :
At the top of the file, we’ll import the module with our Shark model so that we can use it in our controller’s logic. We’ll also import the path module to access utilities that will allow us to set the path to the form where users will input their sharks.
Add the following require functions to the beginning of the file:
~/node_project/controllers/sharks.js
const path = require('path'); const Shark = require('../models/sharks'); Next, we’ll write a sequence of functions that we will export with the controller module using Node’s exports shortcut. These functions will include the three tasks related to our user’s shark data:
- Sending users the shark input form.
- Creating a new shark entry.
- Displaying the sharks back to users.
To begin, create an index function to display the sharks page with the input form. Add this function below your imports:
~/node_project/controllers/sharks.js
. exports.index = function (req, res) res.sendFile(path.resolve('views/sharks.html')); >; Next, below the index function, add a function called create to make a new shark entry in your sharks collection:
~/node_project/controllers/sharks.js
. exports.create = function (req, res) var newShark = new Shark(req.body); console.log(req.body); newShark.save(function (err) if(err) res.status(400).send('Unable to save shark to database'); > else res.redirect('/sharks/getshark'); > >); >; This function will be called when a user posts shark data to the form on the sharks.html page. We will create the route with this POST endpoint later in the tutorial when we create our application’s routes. With the body of the POST request, our create function will make a new shark document object, here called newShark , using the Shark model that we’ve imported. We’ve added a console.log method to output the shark entry to the console in order to check that our POST method is working as intended, but you should feel free to omit this if you would prefer.
Using the newShark object, the create function will then call Mongoose’s model.save() method to make a new shark document using the keys you defined in the Shark model. This callback function follows the standard Node callback pattern: callback(error, results) . In the case of an error, we will send a message reporting the error to our users, and in the case of success, we will use the res.redirect() method to send users to the endpoint that will render their shark information back to them in the browser.
Finally, the list function will display the collection’s contents back to the user. Add the following code below the create function:
~/node_project/controllers/sharks.js
. exports.list = function (req, res) Shark.find(>).exec(function (err, sharks) if (err) return res.send(500, err); > res.render('getshark', sharks: sharks >); >); >; This function uses the Shark model with Mongoose’s model.find() method to return the sharks that have been entered into the sharks collection. It does this by returning the query object — in this case, all of the entries in the sharks collection — as a promise, using Mongoose’s exec() function. In the case of an error, the callback function will send a 500 error.
The returned query object with the sharks collection will be rendered in a getshark page that we will create in the next step using the EJS templating language.
The finished file will look like this:
~/node_project/controllers/sharks.js
const path = require('path'); const Shark = require('../models/sharks'); exports.index = function (req, res) res.sendFile(path.resolve('views/sharks.html')); >; exports.create = function (req, res) var newShark = new Shark(req.body); console.log(req.body); newShark.save(function (err) if(err) res.status(400).send('Unable to save shark to database'); > else res.redirect('/sharks/getshark'); > >); >; exports.list = function (req, res) Shark.find(>).exec(function (err, sharks) if (err) return res.send(500, err); > res.render('getshark', sharks: sharks >); >); >; Keep in mind that though we are not using arrow functions here, you may wish to include them as you iterate on this code in your own development process.
Save and close the file when you are finished editing.
Before moving on to the next step, you can run tree again from your node_project directory to view the project’s structure at this point. This time, for the sake of brevity, we’ll tell tree to omit the node_modules directory using the -I option:
With the additions you’ve made, your project’s structure will look like this:
Output├── Dockerfile ├── README.md ├── app.js ├── controllers │ └── sharks.js ├── db.js ├── models │ └── sharks.js ├── package-lock.json ├── package.json └── views ├── css │ └── styles.css ├── index.html └── sharks.html Now that you have a controller component to direct how user input gets saved and returned to the user, you can move on to creating the views that will implement your controller’s logic.
Step 5 — Using EJS and Express Middleware to Collect and Render Data
To enable our application to work with user data, we will do two things: first, we will include a built-in Express middleware function, urlencoded() , that will enable our application to parse our user’s entered data. Second, we will add template tags to our views to enable dynamic interaction with user data in our code.
To work with Express’s urlencoded() function, first open your app.js file:
Above your express.static() function, add the following line:
~/node_project/app.js
. app.use(express.urlencoded( extended: true >)); app.use(express.static(path)); . Adding this function will enable access to the parsed POST data from our shark information form. We are specifying true with the extended option to enable greater flexibility in the type of data our application will parse (including things like nested objects). Please see the function documentation for more information about options.
Save and close the file when you are finished editing.
Next, we will add template functionality to our views. First, install the ejs package with npm install :
Next, open the sharks.html file in the views folder:
In Step 3, we looked at this page to determine how we should write our Mongoose schema and model:
Now, rather than having a two column layout, we will introduce a third column with a form where users can input information about sharks.
As a first step, change the dimensions of the existing columns to 4 to create three equal-sized columns. Note that you will need to make this change on the two lines that currently read . These will both become 4 «> :
~/node_project/views/sharks.html
.