
Установка расширения DevTools для Visual Studio Code
В этой статье описывается начальная настройка расширения DevTools. После установки DevTools вы будете готовы выполнить действия, описанные в статье Начало работы с расширением DevTools для Visual Studio Code.
Эта статья поможет вам:
- Установите расширение DevTools.
- Клонируйте репозиторий Demos, который включает в себя веб-приложение demo-to-do .
- Запустите веб-сервер, чтобы использовать URL-адреса localhost в расширении DevTools в Visual Studio Code.
Шаг 1. Установка Visual Studio Code
- Если это еще не сделано, в отдельном окне или вкладке перейдите в раздел Скачать Visual Studio Code и скачать и установить Visual Studio Code.
Шаг 2. Установка Microsoft Edge
Microsoft Edge является обязательным для расширения DevTools для Visual Studio Code.
В Windows устанавливается Microsoft Edge. В macOS или Linux установите Microsoft Edge следующим образом:
- Перейдите на страницу Edge в Microsoft.com.
Шаг 3. Установка расширения Microsoft Edge DevTools
Установите расширение Microsoft Edge DevTools для Visual Studio Code следующим образом:
- Откройте Visual Studio Code.
- На панели действий слева нажмите кнопку Расширения (). Или нажмите клавиши CTRL+SHIFT+X в Windows/Linux или COMMAND+SHIFT+X в macOS. Откроется панель Расширения Marketplace.
- В текстовом поле Поиск расширений в Marketplace введите Средства Microsoft Edge для VS Code.
- Выберите Средства Microsoft Edge для VS Code и нажмите кнопку Установить :
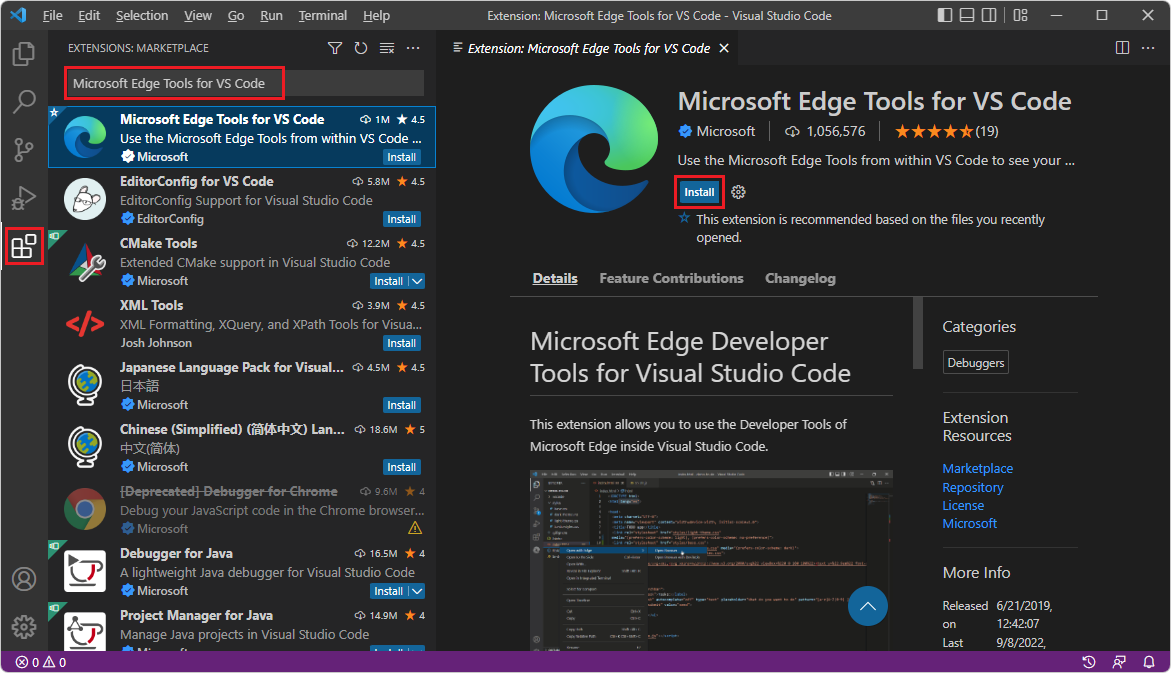
В качестве альтернативного подхода можно скачать расширение Microsoft Edge DevTools с веб-сайта Visual Studio Marketplace с помощью браузера. Перейдите в раздел Средства разработчика Microsoft Edge для Visual Studio Code.
Шаг 4. Установка Node.js и диспетчера пакетов узлов (npm)
Чтобы получить динамический анализ кода (в режиме реального времени), чтобы указать на проблемы, например с волнистыми подчеркиваниями, и предложить быстрые исправления, необходимо установить Node.js и диспетчер пакетов узлов (npm).
В расширении DevTools отображается всплывающее предложение по установке Node.js и npm. Текст предложения выглядит следующим образом: «Установка Node.js & npm? (рекомендуется, так как вы установили это расширение)».
- Щелкните ссылку во всплывающем окне, если оно откроется.
- Установите Node.js и npm из Node.js> Загрузки > LTS (долгосрочная стабильная версия) (или Current). В Windows загружается .msi файл, например node-v16.17.1-x64.msi .
- В области загрузки браузера щелкните Показать в папке. Запустите скачанный файл. Откроется мастер настройки Node.js. Нажмите кнопку Далее . Следуйте инструкциям. Убедитесь, что установлены Node.js и npm:
- В Visual Studio Code выберите Просмотр>терминала. В командной строке введите npm version . Для и для node отображается npm номер версии , указывающий, что диспетчер пакетов узлов и Node.js установлены для поддержки встроенного и динамического анализа проблем:
$ npm version
Шаг 5. Клонирование репозитория демонстраций
Клонирование репозитория Demos является необязательным. Репозиторий Демонстраций полезен для выполнения различных документации по devTools. При необходимости вместо клонирования репозитория можно открыть существующий каталог проекта, если он у вас есть.
В качестве другой альтернативы вместо клонирования всего каталога можно скачать только каталог demo-to-do . Например, перейдите по адресу https://download-directory.github.io/ и вставьте URL-адрес https://github.com/MicrosoftEdge/Demos/tree/main/demo-to-do. Файл .zip помещается в каталог загрузки. Распакуйте эти исходные файлы веб-страницы в подходящее расположение. В руководстве Начало работы с расширением DevTools для Visual Studio Code используется пример расположения:
Чтобы клонировать репозиторий Demos , чтобы использовать пример демонстрации для этого руководства, сделайте следующее:
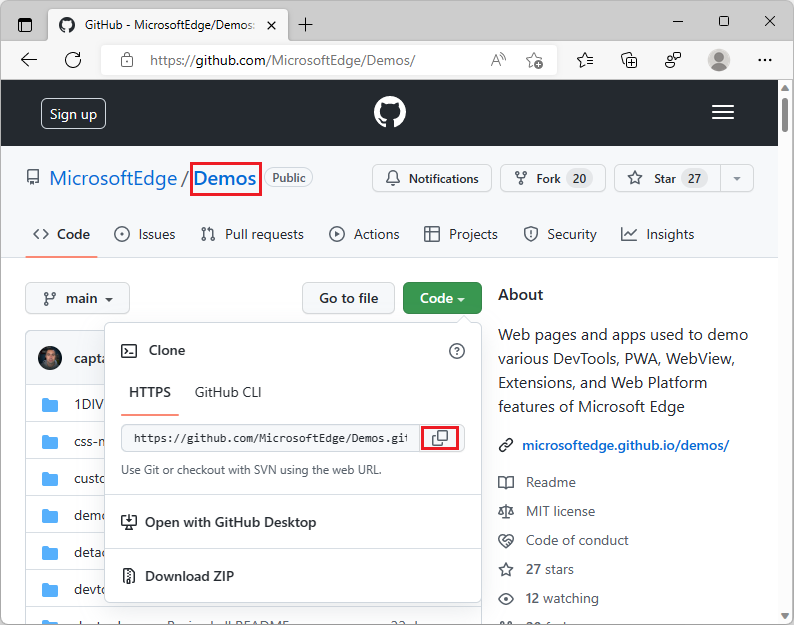
- Перейдите в репозиторий MicrosoftEdge/Demos.
- Если зеленая кнопка «Код» не отображается, щелкните Демонстрации в пути Microsoft Edge / Demos в левом верхнем углу, чтобы перейти на страницу main репозитория.
- Нажмите зеленую кнопку Код и нажмите кнопку Копировать . В этой статье предполагается, что вы используете функции системы управления версиями в Visual Studio Code. Или вы можете использовать один из других методов, которые предоставляются, если вы знаете, что вы хотите использовать этот подход:
- Открыть с помощью GitHub Desktop
- Открыть с помощью Visual Studio
- Скачать ZIP-файл
 ), а затем нажмите кнопку Клонировать репозиторий.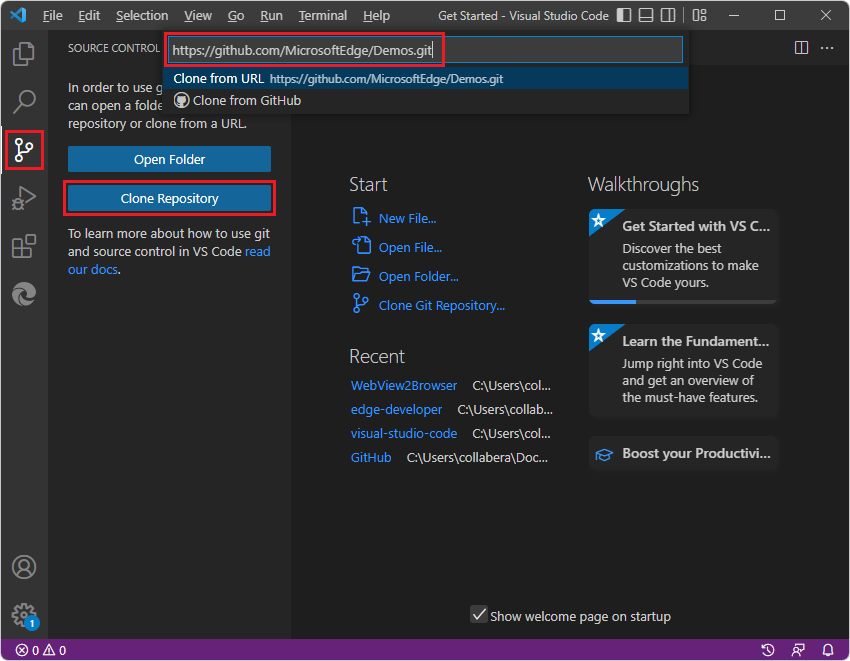
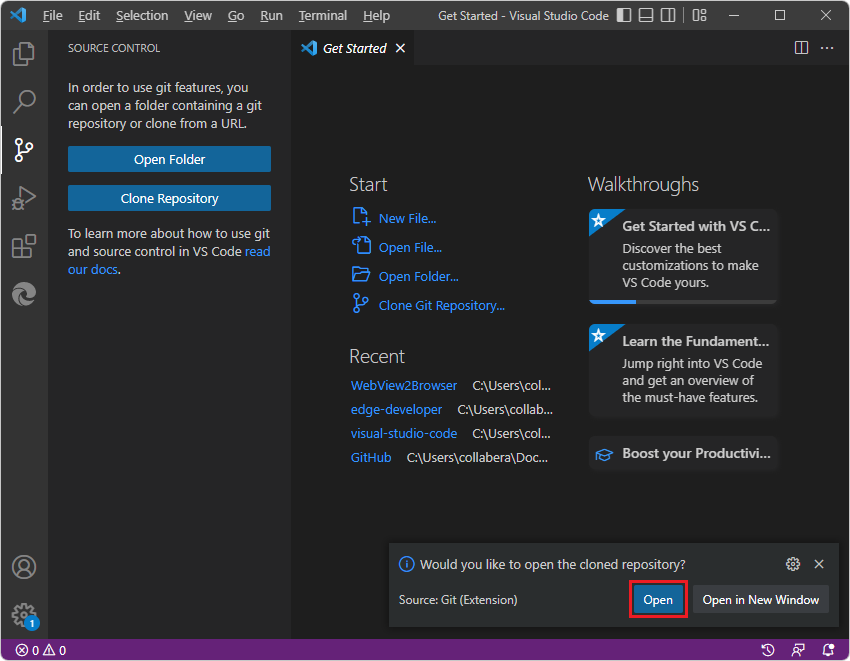
 ). Откроется панель Средства Microsoft Edge .
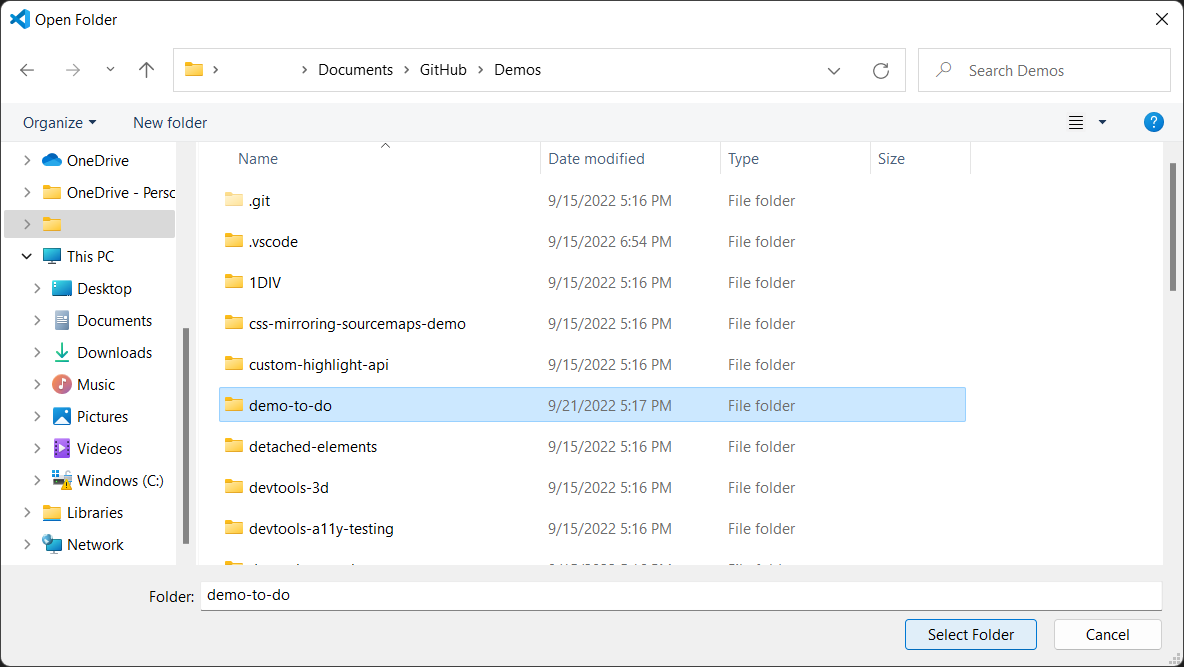 Пример расположения репозитория, в котором клонирован репозиторий Demos , показан выше. Папка demo-to-do клонированного репозитория Demos открывается в Обозреватель Visual Studio Code, и файл еще не launch.json существует: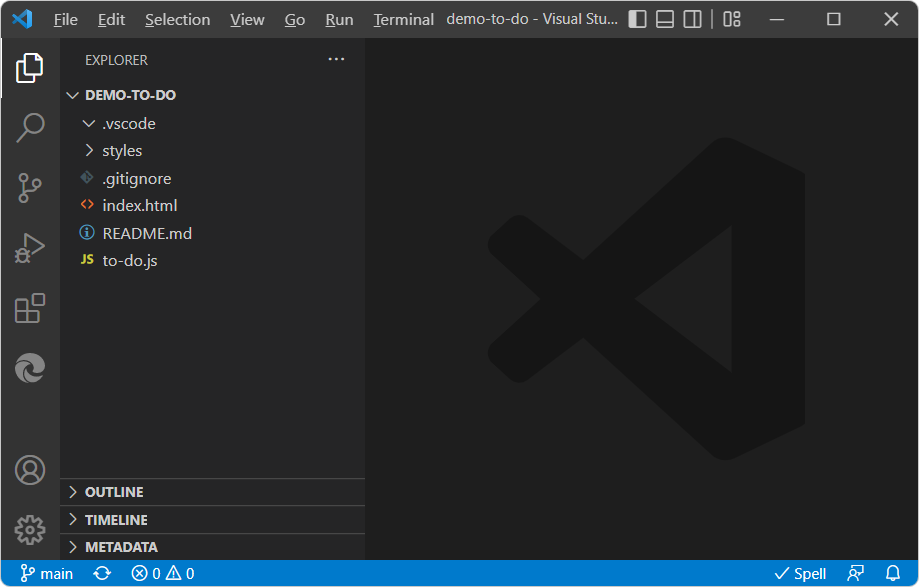
Шаг 6. Настройка сервера localhost
Если вы установили Node.js и npm, как описано выше, npx http-server это простой способ запуска локального веб-сервера. Вы можете перейти к приведенным ниже действиям или сначала прочитать эту справочную информацию.
Во многих случаях не требуется вводить URL-адрес или запускать локальный сервер. Например, вы можете:
- Откройте папку, содержащую исходные файлы веб-страницы, а затем щелкните файл правой .html кнопкой мыши.
- Введите локальный путь к файлу в адресной строке, например C:/Users/username/.vscode/extensions/ms-edgedevtools.vscode-edge-devtools-2.1.1/out/startpage/index.html (по умолчанию— страница Успешно).
- Введите URL-адрес удаленного сервера в адресной строке вкладки Edge DevTools: Браузер , например https://microsoftedge.github.io/Demos/demo-to-do/.
Если на веб-странице используются определенные API, требующие выполнения веб-страницы на веб-сервере, для использования средств разработки необходимо запустить локальный веб-сервер для тестирования. Если вы не обслуживаете проект на веб-сервере, а используете только локальные файлы, вы по-прежнему можете использовать средства разработки с возможностью отладки, щелкнув правой кнопкой мыши локальный .html файл. Функциональные возможности приложения, для которых требуется, чтобы ваше приложение было на сервере, не будут работать, а средства разработки будут иметь ограниченную служебную программу.
Настройка http-сервера
- В Visual Studio Code выберите Файл>Открыть папку>, откройте каталог, содержащий .html файлы , .css и .js для веб-страницы, например C:\Users\username\Documents\GitHub\Demos\demo-to-do\ . В приведенном выше примере пути:
- \Documents\GitHub\ — место, куда Demos был клонирован репозиторий.
- \Demos\ — это репозиторий GitHub, который используется в качестве примеров в документации разработчика Microsoft Edge.
- \demo-to-do\ — это один из примеров каталогов в репозитории.
- В Visual Studio Code выберите Просмотр>терминала. Или, чтобы веб-сервер работал независимо от состояния Visual Studio, откройте командную строку за пределами Visual Studio Code, например git bash .
- cd в папку, которую вы хотите обслуживать по протоколу HTTP. В оболочке Git bash используйте косую черту, например:
cd C:/Users/username/Documents/GitHub/Demos/demo-to-do/ Или, если вы используете другую командную строку в Windows, используйте обратные косые косые строки, например:
cd C:\Users\username\Documents\GitHub\Demos\demo-to-do\ Запуск сервера (npx http-server)
Эти действия запускают сервер в первый раз.
-
Введите команду npx http-server :
npx http-server Локальный веб-сервер запускается через порт 8080. Может появиться следующее сообщение:
Need to install the following packages: http-server@14.1.1 Ok to proceed? (y) 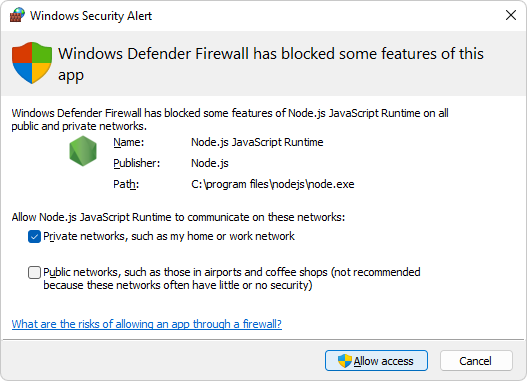
Starting up http-server, serving ./ Available on: http://10.0.1.8:8080 http://127.0.0.1:8080 Hit CTRL-C to stop the server 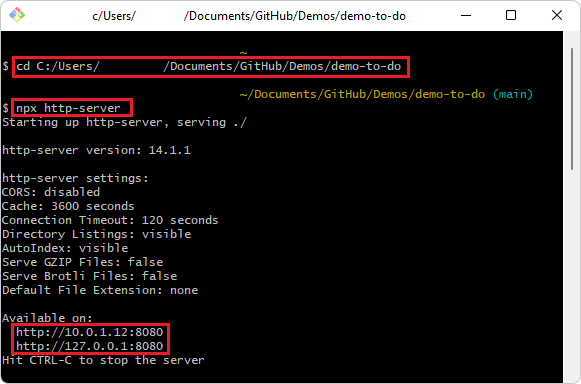
Отображаемые URL-адреса обычно эквивалентны стандартному URL-адресу http://localhost:8080 .
См. также
- Начало работы с расширением DevTools для Visual Studio Code
- Открытие средств разработки и браузера DevTools
- Расширение Средств разработки Microsoft Edge для Visual Studio Code
- Пример кода для средств разработки
- Клонирование репозитория — документация GitHub.
Руководство по Node.js, часть 9: работа с файловой системой
Сегодня, в девятой части перевода руководства по Node.js, мы поговорим о работе с файлами. В частности, речь пойдёт о модулях fs и path — о файловых дескрипторах, о путях к файлам, о получении информации о файлах, об их чтении и записи, о работе с директориями.

[Советуем почитать] Другие части цикла
Работа с файловыми дескрипторами в Node.js
Прежде чем вы сможете взаимодействовать с файлами, находящимися в файловой системе вашего сервера, вам необходимо получить дескриптор файла.
Дескриптор можно получить, воспользовавшись для открытия файла асинхронным методом open() из модуля fs :
const fs = require('fs') fs.open('/Users/flavio/test.txt', 'r', (err, fd) => < //fd - это дескриптор файла >)Обратите внимание на второй параметр, r , использованный при вызове метода fs.open() . Это — флаг, который сообщает системе о том, что файл открывают для чтения. Вот ещё некоторые флаги, которые часто используются при работе с этим и некоторыми другими методами:
- r+ — открыть файл для чтения и для записи.
- w+ — открыть файл для чтения и для записи, установив указатель потока в начало файла. Если файл не существует — он создаётся.
- a — открыть файл для записи, установив указатель потока в конец файла. Если файл не существует — он создаётся.
- a+ — открыть файл для чтения и записи, установив указатель потока в конец файла. Если файл не существует — он создаётся.
const fs = require('fs') try < const fd = fs.openSync('/Users/flavio/test.txt', 'r') >catch (err)
После получения дескриптора любым из вышеописанных способов вы можете производить с ним необходимые операции.
Данные о файлах
С каждым файлом связан набор данных о нём, исследовать эти данные можно средствами Node.js. В частности, сделать это можно, используя метод stat() из модуля fs .
Вызывают этот метод, передавая ему путь к файлу, и, после того, как Node.js получит необходимые сведения о файле, он вызовет коллбэк, переданный методу stat() . Вот как это выглядит:
const fs = require('fs') fs.stat('/Users/flavio/test.txt', (err, stats) => < if (err) < console.error(err) return >//сведения о файле содержатся в аргументе `stats` >)В Node.js имеется возможность синхронного получения сведений о файлах. При таком подходе главный поток блокируется до получения свойств файла:
const fs = require('fs') try < const stats = fs.statSync ('/Users/flavio/test.txt') >catch (err)
Информация о файле попадёт в константу stats . Что это за информация? На самом деле, соответствующий объект предоставляет нам большое количество полезных свойств и методов:
- Методы .isFile() и .isDirectory() позволяют, соответственно, узнать, является ли исследуемый файл обычным файлом или директорией.
- Метод .isSymbolicLink() позволяет узнать, является ли файл символической ссылкой.
- Размер файла можно узнать, воспользовавшись свойством .size .
const fs = require('fs') fs.stat('/Users/flavio/test.txt', (err, stats) => < if (err) < console.error(err) return >stats.isFile() //true stats.isDirectory() //false stats.isSymbolicLink() //false stats.size //1024000 //= 1MB >)Пути к файлам в Node.js и модуль path
Путь к файлу — это адрес того места в файловой системе, где он расположен.
В Linux и macOS путь может выглядеть так:
/users/flavio/file.txtВ Windows пути выглядят немного иначе:
C:\users\flavio\file.txtНа различия в форматах записи путей при использовании разных операционных систем следует обращать внимание, учитывая операционную систему, используемую для развёртывания Node.js-сервера.
В Node.js есть стандартный модуль path , предназначенный для работы с путями к файлам. Перед использованием этого модуля в программе его надо подключить:
const path = require('path')▍Получение информации о пути к файлу
Если у вас есть путь к файлу, то, используя возможности модуля path , вы можете, в удобном для восприятия и дальнейшей обработки виде, узнать подробности об этом пути. Выглядит это так:
const notes = '/users/flavio/notes.txt' path.dirname(notes) // /users/flavio path.basename(notes) // notes.txt path.extname(notes) // .txtЗдесь, в строке notes , хранится путь к файлу. Для разбора пути использованы следующие методы модуля path :
- dirname() — возвращает родительскую директорию файла.
- basename() — возвращает имя файла.
- extname() — возвращает расширение файла.
path.basename(notes, path.extname(notes)) //notes▍Работа с путями к файлам
Несколько частей пути можно объединить, используя метод path.join() :
const name = 'flavio' path.join('/', 'users', name, 'notes.txt') //'/users/flavio/notes.txt'Найти абсолютный путь к файлу на основе относительного пути к нему можно с использованием метода path.resolve() :
path.resolve('flavio.txt') //'/Users/flavio/flavio.txt' при запуске из моей домашней папкиВ данном случае Node.js просто добавляет /flavio.txt к пути, ведущем к текущей рабочей директории. Если при вызове этого метода передать ещё один параметр, представляющий путь к папке, метод использует его в качестве базы для определения абсолютного пути:
path.resolve('tmp', 'flavio.txt') // '/Users/flavio/tmp/flavio.txt' при запуске из моей домашней папкиЕсли путь, переданный в качестве первого параметра, начинается с косой черты — это означает, что он представляет собой абсолютный путь.
path.resolve('/etc', 'flavio.txt') // '/etc/flavio.txt'Вот ещё один полезный метод — path.normalize() . Он позволяет найти реальный путь к файлу, используя путь, в котором содержатся спецификаторы относительного пути вроде точки ( . ), двух точек ( .. ), или двух косых черт:
path.normalize('/users/flavio/..//test.txt') // /users/test.txtМетоды resolve() и normalize() не проверяют существование директории. Они просто находят путь, основываясь на переданным им данным.
Чтение файлов в Node.js
Самый простой способ чтения файлов в Node.js заключается в использовании метода fs.readFile() с передачей ему пути к файлу и коллбэка, который будет вызван с передачей ему данных файла (или объекта ошибки):
fs.readFile('/Users/flavio/test.txt', (err, data) => < if (err) < console.error(err) return >console.log(data) >)Если надо, можно воспользоваться синхронной версией этого метода — fs.readFileSync() :
const fs = require('fs') try < const data = fs.readFileSync('/Users/flavio/test.txt') console.log(data) >catch (err)
По умолчанию при чтении файлов используется кодировка utf8 , но кодировку можно задать и самостоятельно, передав методу соответствующий параметр.
Методы fs.readFile() и fs.readFileSync() считывают в память всё содержимое файла. Это означает, что работа с большими файлами с применением этих методов серьёзно отразится на потреблении памяти вашим приложением и окажет влияние на его производительность. Если с такими файлами нужно работать, лучше всего воспользоваться потоками.
Запись файлов в Node.js
В Node.js легче всего записывать файлы с использованием метода fs.writeFile() :
const fs = require('fs') const content = 'Some content!' fs.writeFile('/Users/flavio/test.txt', content, (err) => < if (err) < console.error(err) return >//файл записан успешно >)Есть и синхронная версия того же метода — fs.writeFileSync() :
const fs = require('fs') const content = 'Some content!' try < const data = fs.writeFileSync('/Users/flavio/test.txt', content) //файл записан успешно >catch (err)
Эти методы, по умолчанию, заменяют содержимое существующих файлов. Изменить их стандартное поведение можно, воспользовавшись соответствующим флагом:
fs.writeFile('/Users/flavio/test.txt', content, < flag: 'a+' >, (err) => <>)Тут могут использоваться флаги, которые мы уже перечисляли в разделе, посвящённом дескрипторам. Подробности о флагах можно узнать здесь.
Присоединение данных к файлу
Метод fs.appendFile() (и его синхронную версию — fs.appendFileSync() ) удобно использовать для присоединения данных к концу файла:
const content = 'Some content!' fs.appendFile('file.log', content, (err) => < if (err) < console.error(err) return >//готово! >)Об использовании потоков
Выше мы описывали методы, которые, выполняя запись в файл, пишут в него весь объём переданных им данных, после чего, если используются их синхронные версии, возвращают управление программе, а если применяются асинхронные версии — вызывают коллбэки. Если вас такое состояние дел не устраивает — лучше будет воспользоваться потоками.
Работа с директориями в Node.js
Модуль fs предоставляет в распоряжение разработчика много удобных методов, которые можно использовать для работы с директориями.
▍Проверка существования папки
Для того чтобы проверить, существует ли директория и может ли Node.js получить к ней доступ, учитывая разрешения, можно использовать метод fs.access() .
▍Создание новой папки
Для того чтобы создавать новые папки, можно воспользоваться методами fs.mkdir() и fs.mkdirSync() :
const fs = require('fs') const folderName = '/Users/flavio/test' try < if (!fs.existsSync(dir))< fs.mkdirSync(dir) >> catch (err)
▍Чтение содержимого папки
Для того чтобы прочесть содержимое папки, можно воспользоваться методами fs.readdir() и fs.readdirSync() . В этом примере осуществляется чтение содержимого папки — то есть — сведений о том, какие файлы и поддиректории в ней имеются, и возврат их относительных путей:
const fs = require('fs') const path = require('path') const folderPath = '/Users/flavio' fs.readdirSync(folderPath)Вот так можно получить полный путь к файлу:
fs.readdirSync(folderPath).map(fileName =>
Результаты можно отфильтровать для того, чтобы получить только файлы и исключить из вывода директории:
const isFile = fileName => < return fs.lstatSync(fileName).isFile() >fs.readdirSync(folderPath).map(fileName =>
▍Переименование папки
Для переименования папки можно воспользоваться методами fs.rename() и fs.renameSync() . Первый параметр — это текущий путь к папке, второй — новый:
const fs = require('fs') fs.rename('/Users/flavio', '/Users/roger', (err) => < if (err) < console.error(err) return >//готово >)Переименовать папку можно и с помощью синхронного метода fs.renameSync() :
const fs = require('fs') try < fs.renameSync('/Users/flavio', '/Users/roger') >catch (err)
▍Удаление папки
Для того чтобы удалить папку, можно воспользоваться методами fs.rmdir() или fs.rmdirSync() . Надо отметить, что удаление папки, в которой что-то есть, задача несколько более сложная, чем удаление пустой папки. Если вам нужно удалять такие папки, воспользуйтесь пакетом fs-extra, который весьма популярен и хорошо поддерживается. Он представляет собой замену модуля fs , расширяющую его возможности.
Метод remove() из пакета fs-extra умеет удалять папки, в которых уже что-то есть.
Установить этот модуль можно так:
npm install fs-extraВот пример его использования:
const fs = require('fs-extra') const folder = '/Users/flavio' fs.remove(folder, err => < console.error(err) >)Его методами можно пользоваться в виде промисов:
fs.remove(folder).then(() => < //готово >).catch(err => < console.error(err) >)Допустимо и применение конструкции async/await:
async function removeFolder(folder) < try < await fs.remove(folder) //готово >catch (err) < console.error(err) >> const folder = '/Users/flavio' removeFolder(folder)Модуль fs
Выше мы уже сталкивались с некоторыми методами модуля fs , применяемыми при работе с файловой системой. На самом деле, он содержит ещё много полезного. Напомним, что он не нуждается в установке, для того, чтобы воспользоваться им в программе, его достаточно подключить:
const fs = require('fs')После этого у вас будет доступ к его методам, среди которых отметим следующие, некоторые из которых вам уже знакомы:
- fs.access() : проверяет существование файла и возможность доступа к нему с учётом разрешений.
- fs.appendFile() : присоединяет данные к файлу. Если файл не существует — он будет создан.
- fs.chmod() : изменяет разрешения для заданного файла. Похожие методы: fs.lchmod() , fs.fchmod() .
- fs.chown() : изменяет владельца и группу для заданного файла. Похожие методы: fs.fchown() , fs.lchown() .
- fs.close() : закрывает дескриптор файла.
- fs.copyFile() : копирует файл.
- fs.createReadStream() : создаёт поток чтения файла.
- fs.createWriteStream() : создаёт поток записи файла.
- fs.link() : создаёт новую жёсткую ссылку на файл.
- fs.mkdir() : создаёт новую директорию.
- fs.mkdtemp() : создаёт временную директорию.
- fs.open() : открывает файл.
- fs.readdir() : читает содержимое директории.
- fs.readFile() : считывает содержимое файла. Похожий метод: fs.read() .
- fs.readlink() : считывает значение символической ссылки.
- fs.realpath() : разрешает относительный путь к файлу, построенный с использованием символов . и .. , в полный путь.
- fs.rename() : переименовывает файл или папку.
- fs.rmdir() : удаляет папку.
- fs.stat() : возвращает сведения о файле. Похожие методы: fs.fstat() , fs.lstat() .
- fs.symlink() : создаёт новую символическую ссылку на файл.
- fs.truncate() : обрезает файл до заданной длины. Похожий метод: fs.ftruncate() .
- fs.unlink() : удаляет файл или символическую ссылку.
- fs.unwatchFile() : отключает наблюдение за изменениями файла.
- fs.utimes() : изменяет временную отметку файла. Похожий метод: fs.futimes() .
- fs.watchFile() : включает наблюдение за изменениями файла. Похожий метод: fs.watch() .
- fs.writeFile() : записывает данные в файл. Похожий метод: fs.write() .
- fs.rename()
- fs.renameSync()
- fs.write()
- fs.writeSync()
В Node.js 10 имеется экспериментальная поддержка этих API, основанных на промисах.
Исследуем метод fs.rename() . Вот асинхронная версия этого метода, использующая коллбэки:
const fs = require('fs') fs.rename('before.json', 'after.json', (err) => < if (err) < return console.error(err) >//готово >)При использовании его синхронной версии для обработки ошибок используется конструкция try/catch :
const fs = require('fs') try < fs.renameSync('before.json', 'after.json') //готово >catch (err)
Основное различие между этими вариантами использования данного метода заключается в том, что во втором случае выполнение скрипта будет заблокировано до завершения файловой операции.
Модуль path
Модуль path, о некоторых возможностях которого мы тоже уже говорили, содержит множество полезных инструментов, позволяющих взаимодействовать с файловой системой. Как уже было сказано, устанавливать его не нужно, так как он является частью Node.js. Для того чтобы пользоваться им, его достаточно подключить:
const path = require('path')Свойство path.sep этого модуля предоставляет символ, использующийся для разделения сегментов пути ( \ в Windows и / в Linux и macOS), а свойство path.delimiter даёт символ, используемый для отделения друг от друга нескольких путей ( ; в Windows и : в Linux и macOS).
Рассмотрим и проиллюстрируем примерами некоторые методы модуля path .
▍path.basename()
Возвращает последний фрагмент пути. Передав второй параметр этому методу можно убрать расширение файла.
require('path').basename('/test/something') //something require('path').basename('/test/something.txt') //something.txt require('path').basename('/test/something.txt', '.txt') //something▍path.dirname()
Возвращает ту часть пути, которая представляет имя директории:
require('path').dirname('/test/something') // /test require('path').dirname('/test/something/file.txt') // /test/something▍path.extname()
Возвращает ту часть пути, которая представляет расширение файла:
require('path').extname('/test/something') // '' require('path').extname('/test/something/file.txt') // '.txt'▍path.isAbsolute()
Возвращает истинное значение если путь является абсолютным:
require('path').isAbsolute('/test/something') // true require('path').isAbsolute('./test/something') // false▍path.join()
Соединяет несколько частей пути:
const name = 'flavio' require('path').join('/', 'users', name, 'notes.txt') //'/users/flavio/notes.txt'▍path.normalize()
Пытается выяснить реальный путь на основе пути, который содержит символы, использующиеся при построении относительных путей вроде . , .. и // :
require('path').normalize('/users/flavio/..//test.txt') ///users/test.txt▍path.parse()
Преобразует путь в объект, свойства которого представляют отдельные части пути:
- root : корневая директория.
- dir : путь к файлу, начиная от корневой директории
- base : имя файла и расширение.
- name : имя файла.
- ext : расширение файла.
require('path').parse('/users/test.txt')В результате его работы получается такой объект:
▍path.relative()
Принимает, в качестве аргументов, 2 пути. Возвращает относительный путь из первого пути ко второму, основываясь на текущей рабочей директории:
require('path').relative('/Users/flavio', '/Users/flavio/test.txt') //'test.txt' require('path').relative('/Users/flavio', '/Users/flavio/something/test.txt') //'something/test.txt'▍path.resolve()
Находит абсолютный путь на основе переданного ему относительного пути:
path.resolve('flavio.txt') //'/Users/flavio/flavio.txt' при запуске из моей домашней папки.Итоги
Сегодня мы рассмотрели модули Node.js fs и path , которые используются для работы с файловой системой. В следующей части этой серии, на которой она завершается, мы обсудим модули os , events , http , поговорим о работе с потоками и с системами управления базами данных в Node.js.
Уважаемые читатели! Какими npm-пакетами вы пользуетесь при работе с файловой системой в Node.js?

- Блог компании RUVDS.com
- Веб-разработка
- JavaScript
- Node.JS
Build a Google Analytics dashboard clone in Node.js

If you’ve ever used Google Analytics, you know it doesn’t provide the cleanest or most visually pleasing interface. Although it gets the job done, it doesn’t provide many options for customization or personalization. Luckily, as software developers, we can build our own version of Google Analytics that is up to our design standards.
In this tutorial, we’ll use several APIs from Google to build our own dashboard in a Node.js project. Let’s get started!
To see the complete source code for this project, check out the GitHub repo.
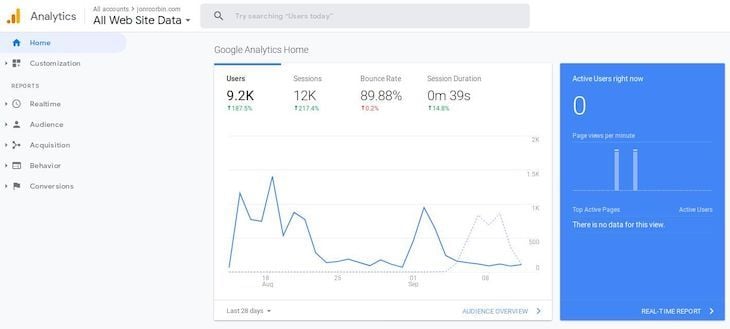
Table of contents
- Create a new Google API project
- Add the Google Analytics API
- Create a service account
- Building the backend Node.js API
- Building the frontend
- Adding frontend components
- Viewing real time statistics
- Conclusion
Create a new Google API project
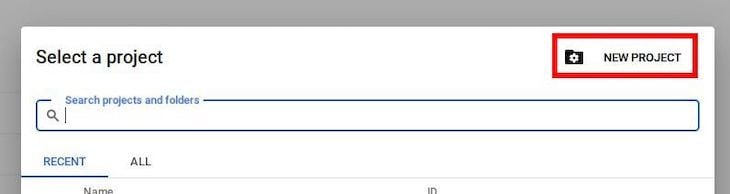
First, set up a Google Developer account if you don’t have one already. Create a new project by clicking on the My Project selection in the top lefthand corner of the page:

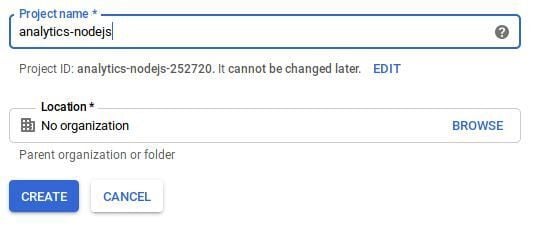
Then, click on NEW PROJECT to create a new project. You can name it whatever you’d like, but I’ll call mine analytics-nodejs :
Add the Google Analytics API
With our new project created, we’ll need to add some services that let us use the Google Analytics API. To do so, we’ll click the + ENABLE APIS AND SERVICES at the top of the page:

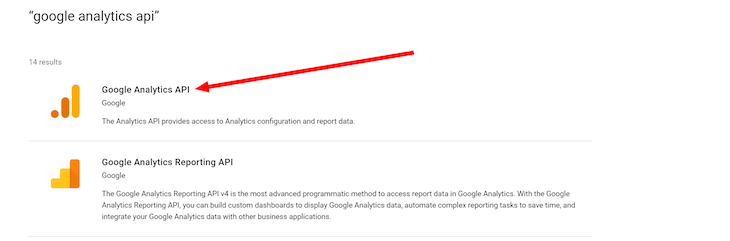
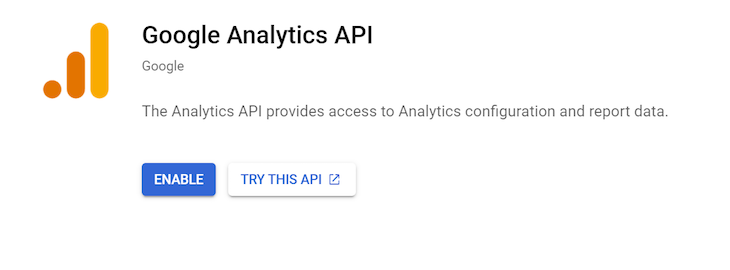
On the APIs & Services page, search for “google analytics api” and add it to your project. Be sure to select and enable the Google Analytics API and not the Google Analytics Reporting API, as demonstrated in the screenshots below:
Create a service account
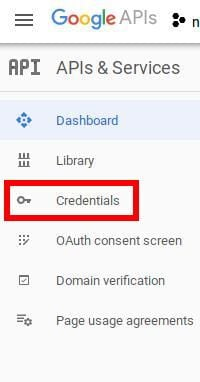
After adding the Analytics API, we need to create a service account so that our app can access the API. To do so, let’s head over to the credentials section from the console homescreen.
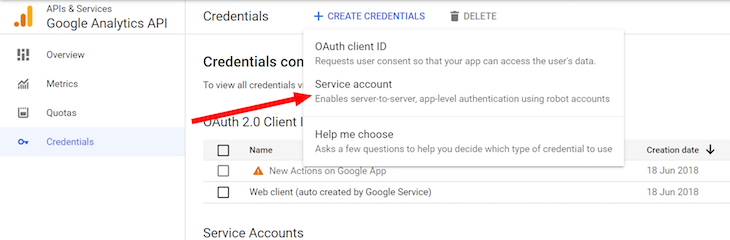
Click on the + CREATE CREDENTIALS dropdown and select the Service account key:
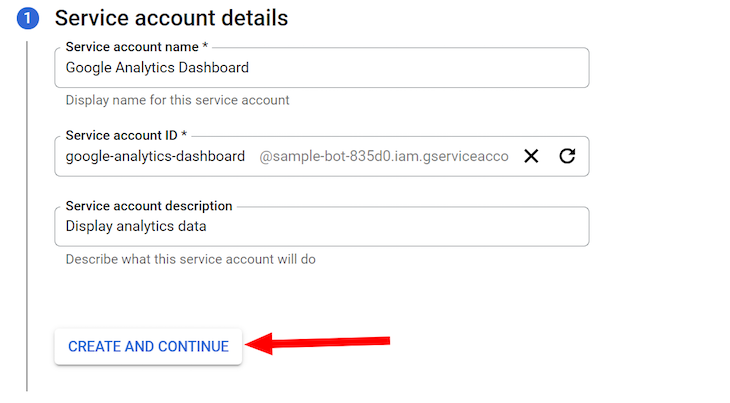
On the next screen, set the Service account name and description as shown below. The Service account ID is set automatically based on the account name. Afterwards, click CREATE AND CONTINUE. You can skip steps 2 and 3, which are optional, and click the DONE button to proceed:
With the service account created, you’ll be redirected to the Credentials page. Click the newly created entry under the SERVICE ACCOUNTS section:

Head over to the KEYS tab and click on Create new key:
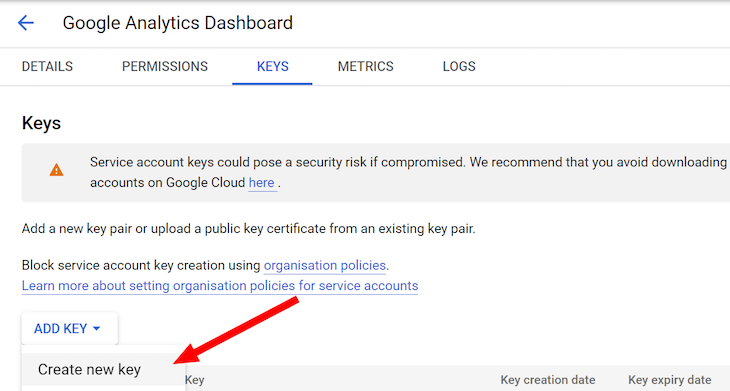
Select JSON in the resulting pop up and download the generated file to your computer by clicking the CREATE button:
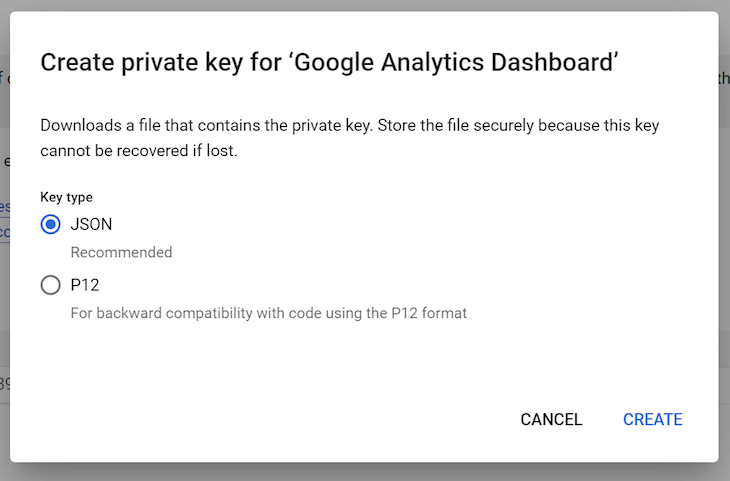
Once you click CREATE, a JSON file will be generated. Save it in a known location because we’ll need to access part of its contents later on.
Next, we’ll add a new user to our view in Google Analytics. Click on the Admin option in the lower left-hand corner, then click View Access Management in the View section:
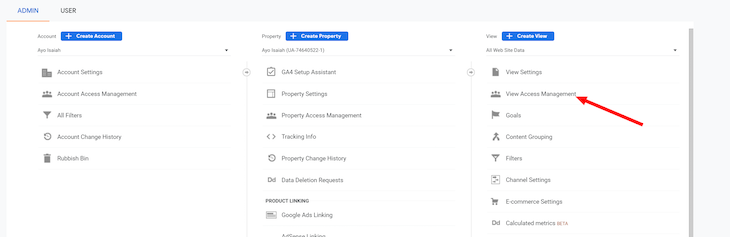
To add a new user, click the blue button with the white + symbol in the upper right-hand corner, then select Add users:
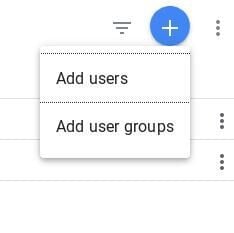
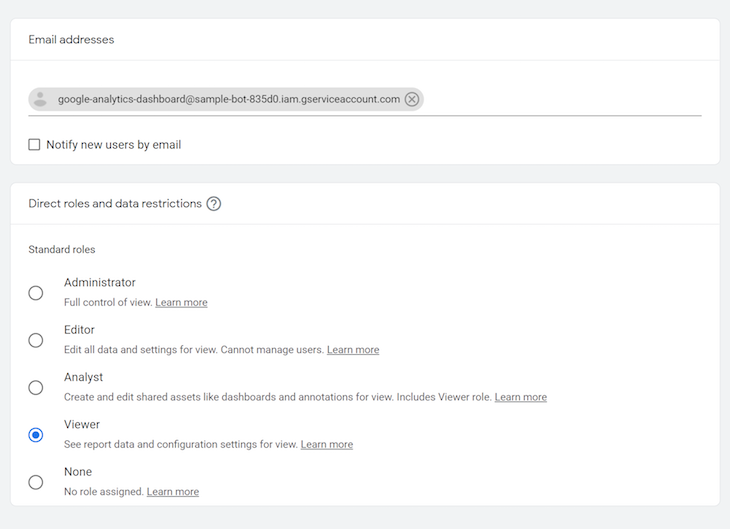
Paste in the value of the client_email field in your JSON file in the email address field, and make sure the role is set to Viewer. Click the Add button in the top right when you’re done:
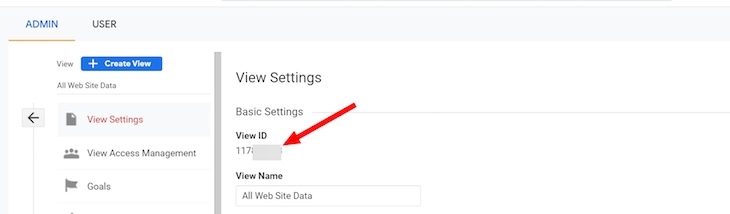
Finally, we need to get the Google Analytics View ID to use on the Node.js backend. From your admin settings, go to View Settings and copy the View ID for later. Better yet, just keep this page open in a separate tab:
Now, your Google APIs should be ready to go!
Building the backend Node.js API
We’ll use Node.js to set up the server aspects of our application. Let’s start by setting up our project; for this step, I’ll be using the Yarn package manager, but npm should work fine as well.
Setting up the Node.js application
First, create a new directory on your filesystem, navigate into it, and run yarn init -y to initialize the application with a package.json file. Next, run the command below to install the required dependencies:
$ yarn add cors dotenv express googleapis
We’ll also want to add concurrently and jest to our dev dependencies, which we’ll use in our scripts:
$ yarn add -D concurrently jest
Let’s set our scripts up now. In our package.json file, run the code below:
"scripts": < "test_server": "jest ./ --passWithNoTests", "test_client": "cd client && yarn test", "test": "concurrently \"yarn test_server\" \"yarn test_client\"", "start": "concurrently \"npm run server\" \"npm run client\"", "server": "node server.js", "client": "cd client && npm start", "build": "cd client && yarn build" >,
Finally, create a .env file in the root of your project directory to store the application secrets and configuration:
CLIENT_EMAIL="" PRIVATE_KEY="" VIEW_ID="" SERVER_PORT=3001 NODE_ENV="dev"
Now, we’re basically ready to start developing our server.
Setting up the server
First, create a new server file with touch server.js , then open it in your favorite editor. At the top of the file, we’ll want to define the following:
require('dotenv').config(); // Server const express = require('express'); const cors = require('cors'); const app = express(); app.use(cors()); const server = require('http').createServer(app); // Config const port = process.env.SERVER_PORT; if (process.env.NODE_ENV === 'production') < app.use(express.static('client/build')); >
We’re going to load in our environmental variables using require(‘dotenv’).config() , which handles the hard work for us, loading our variables from the .env file into process.env for later use.
Next, we define our server using the express package. We add the cors middleware to our Express app so that we can access it from our frontend later. Then, we wrap our app in require(‘http’).createServer so we can add Socket.IO later on.
Finally, we’ll add some configuration by setting a global constant port as a shorthand. We’ll change our static path based on our NODE_ENV variable.
Now, let’s make our server listen to our port by adding the code below to the bottom of our server.js file:
server.listen(port, () => < console.log(`Server running at localhost:$`); >);
Setting up our Google Analytics API library
Back in our terminal, let’s create a new directory called libraries/ using mkdir libraries and create our analytics handler, which I’ll call gAnalytics.js . To create our analytics handler, we’ll use touch libraries/gAnalytics.js and then switch back to the editor.
Over 200k developers use LogRocket to create better digital experiences

Learn more →
In gAnalytics.js , let’s define the configuration as follows:
// gAnalytics.js const clientEmail = process.env.CLIENT_EMAIL; const privateKey = process.env.PRIVATE_KEY.replace(new RegExp('\\\\n'), '\n'); const scopes = ['https://www.googleapis.com/auth/analytics.readonly'];
We need to pull in our client email and private key, which was pulled from the JSON credential file provided by the Google API Console, from the process.env file. We need to replace \\n in our private key, which is how dotenv will read it in, with \n . Finally, we’ll define some scopes for Google APIs. There are quite a few different options here, like the following:
https://www.googleapis.com/auth/analytics to view and manage the data https://www.googleapis.com/auth/analytics.edit to edit the management entities https://www.googleapis.com/auth/analytics.manage.users to manage the account users and permissions
Next, let’s set up Google Analytics using those variables:
// gAnalytics.js const < google >= require('googleapis'); const analytics = google.analytics('v3'); const viewId = process.env.VIEW_ID; const jwt = new google.auth.JWT(< email: clientEmail, key: privateKey, scopes, >);
Here, we required the google module to create analytics and jwt . We also pulled out the analytics viewId from process.env . Subsequently, a JWT is created for authorization purposes when we attempt to retrieve some data.
Now, we need to create functions to actually retrieve the data; let’s start by writing a function that fetches the data from Google Analytics:
// gAnalytics.js async function getMetric(metric, startDate, endDate) < await setTimeout[Object.getOwnPropertySymbols(setTimeout)[0]]( Math.trunc(1000 * Math.random()), ); const result = await analytics.data.ga.get(< auth: jwt, ids: `ga:$`, 'start-date': startDate, 'end-date': endDate, metrics: metric, >); const res = <>; res[metric] = < value: parseInt(result.data.totalsForAllResults[metric], 10), start: startDate, end: endDate, >; return res; >
First, we make our code async so that we can fetch many metrics at once. There’s a quota imposed by Google, so we need to add a random wait to it:
await setTimeout[Object.getOwnPropertySymbols(setTimeout)[0]]( Math.trunc(1000 * Math.random()), );
If you have many users trying to load data, you could run into scalability issues. However, we’re developing our application for a single user, so this approach will work for now.
We fetch the data using analytics.data.ga.get , which will return a rather large object with a ton of data. We’ll take out the important part, result.data.totalsForAlResults[metric] , which is a string that is first converted to an integer before being returned in an object along with the start and end dates.
Next, let’s add a way to get metrics in batches:
// gAnalytics.js function parseMetric(metric) < let cleanMetric = metric; if (!cleanMetric.startsWith('ga:')) < cleanMetric = `ga:$`; > return cleanMetric; > function getData(metrics = ['ga:users'], startDate = '30daysAgo', endDate = 'today') < // ensure all metrics have ga: const results = []; for (let i = 0; i < metrics.length; i += 1) < const metric = parseMetric(metrics[i]); results.push(getMetric(metric, startDate, endDate)); >return results; >
With the code above, we can easily request multiple metrics at once, returning just a list of getMetric promises. We also add a way to clean up the metric names passed to the function using parseMetric , adding ga: to the front of the metric if it wasn’t there already.
Finally, export getData at the bottom, and our library is good to go:
// gAnalytics.js module.exports = < getData >;
Tying it all together
Now, we’ll utilize our library in the application by adding some routes. Open up server.js in your editor and add the following snippet:
// gAnalytics.js app.get('/api', (req, res) => < const < metrics, startDate, endDate >= req.query; console.log(`Requested metrics: $`); console.log(`Requested start-date: $`); console.log(`Requested end-date: $`); Promise.all(getData(metrics ? metrics.split(',') : metrics, startDate, endDate)) .then((data) => < // flatten list of objects into one object const body = <>; Object.values(data).forEach((value) => < Object.keys(value).forEach((key) =>< body[key] = value[key]; >); >); res.send(< data: body >); console.log('Done'); >) .catch((err) => < console.log('Error:'); console.log(err); res.send(< status: 'Error getting a metric', message: `$` >); console.log('Done'); >); >);
The route allows our client to request a single or a list of metrics, then returns all the data once it’s retrieved, as observed by Promise.all , which waits until either all promises in the given list are completed or until one fails.
We can add a .then method that takes a data param, which is a list of data objects that we created in gAnalytics.getData . In the method, we iterate through all of the objects and combine them into a single body object. The object is sent back to the client in the form res.send(); . We’ve also added a .catch method, which will send back any error message and log the error.
Now let’s add the api/graph/ route, which we’ll use to graph; it will be very similar to our /api path but with its own nuances:
// gAnalytics.js app.get('/api/graph', (req, res) => < const < metric >= req.query; console.log(`Requested graph of metric: $`); // 1 week time frame let promises = []; for (let i = 7; i >= 0; i -= 1) < promises.push(getData([metric], `$daysAgo`, `$daysAgo`)); > promises = [].concat(. promises); Promise.all(promises) .then((data) => < // flatten list of objects into one object const body = <>; body[metric] = []; Object.values(data).forEach((value) => < body[metric].push(value[metric.startsWith('ga:') ? metric : `ga:$`]); >); console.log(body); res.send(< data: body >); console.log('Done'); >) .catch((err) => < console.log('Error:'); console.log(err); res.send(< status: 'Error', message: `$` >); console.log('Done'); >); >);
As you can see, we still rely on gAnalytics.getData and Promise.all , but instead, we get the data for the last seven days and compile it into one list to send back in the body.
That’s it for our server! Now, we’ll tackle building the frontend.
Building the frontend
Building the frontend is fun but can be quite challenging to develop and design. To build our frontend, we’ll use React.
Setup and structure
First, we need to create our boilerplate. We’re going to use the Create React App boilerplate; run npx create-react-app client in the root of your project directory. Once it’s finished, we’ll install our dependencies. Make sure you cd into the client/ folder and then run the command below:
$ yarn add@material-ui/core prop-types recharts
Next, we’ll clean up src/App.js before moving on to the structure. Open up src/App.js and remove everything, leaving behind only the code below:
// client/src/App.js import React from 'react'; import './App.css'; function App() ); > export default App;
You also need to delete serviceWorker.js and remove it from src/index.js . Afterwards, start the server by running the command below:
$ yarn start If you’re using Node.js ≥v17, you should edit the start script in your client/package.json file to point to the react-scripts —openssl-legacy-provider start command, avoiding errors.
More great articles from LogRocket:
- Don’t miss a moment with The Replay, a curated newsletter from LogRocket
- Learn how LogRocket’s Galileo cuts through the noise to proactively resolve issues in your app
- Use React’s useEffect to optimize your application’s performance
- Switch between multiple versions of Node
- Discover how to use the React children prop with TypeScript
- Explore creating a custom mouse cursor with CSS
- Advisory boards aren’t just for executives. Join LogRocket’s Content Advisory Board. You’ll help inform the type of content we create and get access to exclusive meetups, social accreditation, and swag.
For our application structure, we’ll set up everything right away and develop afterwards. Our src folder will use the following structure:
├── App.css ├── App.js ├── App.test.js ├── components │ ├── Dashboard │ │ ├── DashboardItem │ │ │ ├── DashboardItem.js │ │ │ └── DataItems │ │ │ ├── index.js │ │ │ ├── ChartItem │ │ │ │ └── ChartItem.js │ │ │ └── TextItem │ │ │ └── TextItem.js │ │ └── Dashboard.js │ └── Header │ └── Header.js ├── index.css ├── index.js ├── theme │ ├── index.js │ └── palette.js └── utils.js
From here on, every file reference will be relative to the src/ folder.
Adding frontend components
Head back to App.js and edit the folder to look like the code below:
// App.js import React from 'react'; import './App.css'; import Dashboard from './components/Dashboard/Dashboard'; import < ThemeProvider >from '@material-ui/styles'; import theme from './theme'; import Header from './components/Header/Header'; function App() < return (> ); > export default App;/>
The code above will pull in the necessary components and create our theme provider. Next, let’s edit that theme by adding the following code to theme/index.js :
import < createMuiTheme >from '@material-ui/core'; import palette from './palette'; const theme = createMuiTheme(< palette, >); export default theme;
Open up theme/palette.js and add the following:
import < colors >from '@material-ui/core'; const white = '#FFFFFF'; const black = '#000000'; export default < black, white, primary: < contrastText: white, dark: colors.indigo[900], main: colors.indigo[500], light: colors.indigo[100] >, secondary: < contrastText: white, dark: colors.blue[900], main: colors.blue['A400'], light: colors.blue['A400'] >, text: < primary: colors.blueGrey[900], secondary: colors.blueGrey[600], link: colors.blue[600] >, background: < primary: '#f2e1b7', secondary: '#ffb3b1', tertiary: '#9ac48d', quaternary: '#fdae03', quinary: '#e7140d', >, >;
With the code above, we’ve added themes to our components for different styling options. We also defined our theme colors, which you can change for your desired outcome. I went for a pastel theme.
Next, let’s create our header. Open up components/Header/header.js and change it to look like the following:
// components/Header/header.js import React from 'react'; import PropTypes from 'prop-types'; import < withStyles >from '@material-ui/core/styles'; import Paper from '@material-ui/core/Paper'; import AppBar from '@material-ui/core/AppBar'; const styles = (theme) => (< header: < padding: theme.spacing(3), textAlign: 'center', color: theme.palette.text.primary, background: theme.palette.background.primary, >, >); export const Header = (props) => < const < classes, text >= props; return (> ); >; Header.propTypes = < classes: PropTypes.object.isRequired, text: PropTypes.string.isRequired, >; export default withStyles(styles)(Header);
The code above will create a horizontal bar at the top of our page with the text being whatever we set the prop to. It also pulls in our styling, providing a visually pleasing outcome.
Now, let’s work on components/Dashboard/Dashboard.js , a much simpler component:
// components/Dashboard/Dashboard.js import React from 'react'; import PropTypes from 'prop-types'; import < withStyles >from '@material-ui/core/styles'; import Grid from '@material-ui/core/Grid'; import DashboardItem from './DashboardItem/DashboardItem'; import < isMobile >from '../../utils'; const styles = () => (< root: < flexGrow: 1, overflow: 'hidden', >, >); const Dashboard = (props) => < const < classes >= props; return (>); >; Dashboard.propTypes = < classes: PropTypes.object.isRequired, >; export default withStyles(styles)(Dashboard);spacing= justify="center" alignItems="center"> priority="primary" metric="Users" visual="chart" type="line" /> metric="Total Events" visual="chart" type="line"/>
We add a few Dashboard Item s as examples with different metrics from the Google Analytics API. We also need to create a utils.js file containing the following:
// utils.js export function numberWithCommas(x) < return x.toString().replace(/\B(?=(\d)+(?!\d))/g, ','); > export const isMobile = window.innerWidthThe code above will tell us if the user is on mobile or not. We want a responsive app, so we need to know whether the user is on mobile.
We have the DashboardItem component, which we will create by editing components/Dashboard/DashboardItem/DashboardItem.js . Go ahead and add the following code:
// components/Dashboard/DashboardItem/DashboardItem.js import React, < Component >from 'react'; import PropTypes from 'prop-types'; import < withStyles >from '@material-ui/core/styles'; import Paper from '@material-ui/core/Paper'; import Grid from '@material-ui/core/Grid'; import < TextItem, ChartItem, RealTimeItem >from './DataItems'; import < numberWithCommas, isMobile >from '../../../utils'; const styles = (theme) => (< paper: < marginLeft: theme.spacing(1), marginRight: theme.spacing(1), paddingTop: theme.spacing(10), textAlign: 'center', color: theme.palette.text.primary, height: 200, minWidth: 300, >, chartItem: < paddingTop: theme.spacing(1), height: 272, >, mainMetric: < background: theme.palette.background.quaternary, >, secondaryMetric: < background: theme.palette.background.secondary, >, defaultMetric: < background: theme.palette.background.tertiary, >, >); class DashboardItem extends Component < constructor(props) < super(props); const < classes, size, metric, priority, visual, type, >= this.props; this.state = < classNames: classes, size, metric, priority, visual, type, data: 'No data', >; > componentDidMount() < this.getMetricData(); this.getClassNames(); >getMetricData() < const < visual, metric >= this.state; const strippedMetric = metric.replace(' ', ''); let url; if (visual === 'chart') < url = `http://localhost:3001/api/graph?metric=$`; > else < url = `http://localhost:3001/api?metrics=$`; > fetch(url, < method: 'GET', mode: 'cors', >) .then((res) => (res.json())) .then((data) => < let value; let formattedValue; if (visual === 'chart') < value = data.data[strippedMetric]; formattedValue = value; >else < try < value = strippedMetric.startsWith('ga:') ? data.data[strippedMetric] : data.data[`ga:$`]; formattedValue = numberWithCommas(parseInt(value.value, 10)); > catch (exp) < console.log(exp); formattedValue = "Error Retrieving Value" >> this.setState(< data: formattedValue >); >); > getClassNames() < const < priority, visual >= this.state; const < classes >= this.props; let classNames = classes.paper; switch (priority) < case 'primary': classNames = `$$`; break; case 'secondary': classNames = `$ $`; break; default: classNames = `$ $`; break; > if (visual === 'chart') < classNames = `$$`; > this.setState(< classNames >); > getVisualComponent() < const < data, visual, type >= this.state; let component; if (data === 'No data') < component = />; > else < switch (visual) < case 'chart': component = xKey='start' valKey='value' type= />; break; default: component = />; break; > > return component; > render() < const < classNames, metric, size, >= this.state; const visualComponent = this.getVisualComponent(); return ( zeroMinWidth>> ); > > DashboardItem.propTypes = < size: PropTypes.number, priority: PropTypes.string, visual: PropTypes.string, type: PropTypes.string, classes: PropTypes.object.isRequired, metric: PropTypes.string.isRequired, >; DashboardItem.defaultProps = < size: null, priority: null, visual: 'text', type: null, >; export default withStyles(styles)(DashboardItem); The component is pretty massive, but it’s the bread and butter of our application, allowing us to have a highly customizable interface. Depending on the props passed, we can change the size, color, and type of visual. The DashboardItem component also fetches the data for itself, then passes it to its visual component. Let’s create those now!
Visual components: DataItems
For our DashboardItem to render properly, we need to create both the ChartItem and TextItem . Open up components/Dashboard/DashboardItem/DataItems/TextItem/TextItem.js and add the following to it:
// components/Dashboard/DashboardItem/DataItems/TextItem/TextItem.js import React from 'react'; import PropTypes from 'prop-types'; export const TextItem = (props) => < const < data >= props; let view; if (data === 'No data') < view = data; >else < view = `$over the past 30 days` > return (); >; TextItem.propTypes = < data: PropTypes.string.isRequired, >; export default TextItem;
The code above basically displays the text passed to it as the data prop. Now, let’s do the ChartItem by opening up components/Dashboard/DashboardItem/DataItems/ChartItem/ChartItem.js and adding the following code into it:
// components/Dashboard/DashboardItem/DataItems/ChartItem/ChartItem.js import React from 'react'; import PropTypes from 'prop-types'; import < ResponsiveContainer, LineChart, XAxis, YAxis, CartesianGrid, Line, Tooltip, >from 'recharts'; export const ChartItem = (props) => < const < data, xKey, valKey >= props; return (); >; ChartItem.propTypes = < data: PropTypes.array.isRequired, xKey: PropTypes.string, valKey: PropTypes.string, >; ChartItem.defaultProps = < xKey: 'end', valKey: 'value', >; export default ChartItem; > /> /> stroke="#8884d8" /> The code above will do exactly what it sounds like it does, render a chart. It uses the api/graph/ route that we added to our server earlier. Now, you need to run yarn start from the topmost directory and everything should boot up just fine.
Viewing real time statistics
One of the best parts of Google Analytics is the ability to see who is using your site in real time. We can do that in our application, too.
Sadly, at the time of writing, Google APIs has the Realtime API as a closed beta, but again, we’re software developers! Let’s make our own.
Adding Socket.IO
We’ll use Socket.IO because it allows for real-time communications between machines. First, add Socket.IO to your dependencies with yarn add socket.io . Now, open up your server.js file and add the following to the top of it:
const io = require('socket.io').listen(server);You can add this just below the server definition. At the bottom of the file above server.listen , add the following snippet:
io.sockets.on('connection', (socket) => < socket.on('message', (message) =>< console.log('Received message:'); console.log(message); console.log(Object.keys(io.sockets.connected).length); io.sockets.emit('pageview', < connections: Object.keys(io.sockets.connected).length - 1 >); >); >);The code above will allow our server to listen for sockets connecting to it and sending it a message. When it receives a message, it will then emit a 'pageview' event to all the sockets. Note that doing so isn’t usually best practice on account of safety concerns, but we’re only sending out the number of connections, which isn’t important information.
Create public script
For our clients to send our server a message, they need a script! Let’s create a script in client/public called realTimeScripts.js , which will contain the following:
const socket = io.connect(); socket.on('connect', function() < socket.send(window.location); >);We need to reference these two scripts in any of our webpages, and the connection will be tracked:
The /socket.io/socket.io.js is handled by the installation of socket.io , so there is no need to create this.
Create a new component
To view these connections, we need a new component. Let’s first edit DashboardItem.js by adding the following to getMetricData :
//. const strippedMetric = metric.replace(' ', ''); // Do not need to retrieve metric data if metric is real time, handled in component if (metric.toUpperCase() === "REAL TIME") < this.setState(< data: "Real Time" >) return; > //.The code above will set our state and return us out of the getMetricData function because we don’t need to fetch anything. Next, let’s add the following to getVisualComponent :
//. component = />; > else if (data === 'Real Time') < component = > else < switch (visual) < //.Now our visual component will be set to our RealTimeItem when the metric prop is "Real Time" .
We need to create the RealTimeItem component. Create the components/``Dashboard/DashboardItem/DataItems/RealTimeItem/RealTimeItem.js path and file. Now, add the following to it:
// components/Dashboard/DashboardItem/DataItems/RealTimeItem/RealTimeItem.js import React, < useState >from 'react'; import openSocket from 'socket.io-client'; const socket = openSocket('http://localhost:3001'); const getConnections = (cb) => < socket.on('pageview', (connections) =>cb(connections.connections)) > export const RealTimeItem = () => < const [connections, setConnections] = useState(0); getConnections((conns) =>< console.log(conns); setConnections(conns); >); return (); >; export default RealTimeItem;
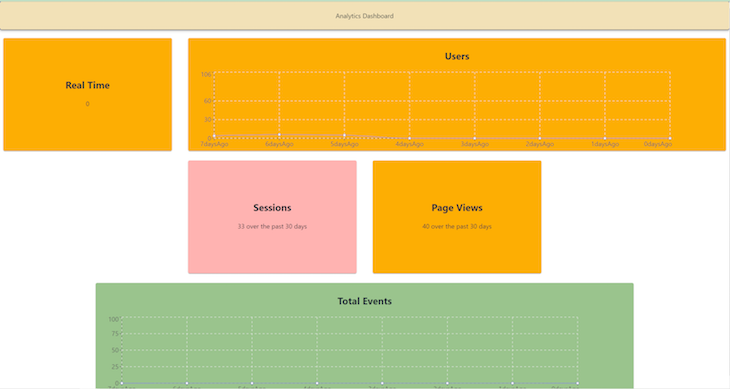
Doing so will add a real-time card to our dashboard. At this point, you should now have a fully functional dashboard that looks like this:
This is meant to be a highly extendable dashboard where you can add new data items in a similar way to how we added the real-time component.
Conclusion
In this tutorial, we built our own replica of the Google Analytics API using Node.js, adding our own customizations and personalizations. You can continue to develop our dashboard further by adding the ability to change sizes, switch between different chart types, and more!
Share this:
- Click to share on Twitter (Opens in new window)
- Click to share on Reddit (Opens in new window)
- Click to share on LinkedIn (Opens in new window)
- Click to share on Facebook (Opens in new window)
Краткое руководство. Создание первого приложения Vue.js с помощью Visual Studio
Область применения: Visual Studio Visual Studio для Mac
  Visual Studio Code
В рамках этого краткого (на 5–10 минут) знакомства с возможностями интегрированной среды разработки (IDE) Visual Studio вы создадите и запустите простое веб-приложение Vue.js.
Начиная с Visual Studio 2022, можно также создать проект Vue с помощью рекомендуемого типа проекта на основе ИНТЕРФЕЙСА командной строки. Сведения в этой статье относятся только к типу проектов Node.js (расширение файла NJSPROJ).
Необходимые компоненты
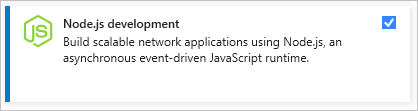
- У вас должна быть установлена среда Visual Studio и должна иметься рабочая нагрузка "Разработка Node.js". Установите Visual Studio 2019 бесплатно со страницы скачиваемых материалов Visual Studio, если еще не сделали этого. Если вам нужно установить рабочую нагрузку, но вы уже используете Visual Studio, выберите пункт Средства>Получить средства и компоненты. , после чего запустится Visual Studio Installer. Выберите рабочую нагрузку Разработка Node.js, а затем элемент Изменить.
- У вас должна быть установлена среда выполнения Node.js. Если он не установлен, мы рекомендуем установить версию LTS с веб-сайта Node.js для обеспечения лучшей совместимости с внешними платформами и библиотеками. Node.js построен для 32-разрядных и 64-разрядных архитектур. Средства Node.js в Visual Studio, включенные в рабочую нагрузку Node.js, поддерживают обе версии. Однако требуется только одна, поскольку программа установки Node.js поддерживает только одну установку за раз. Как правило, Visual Studio автоматически обнаруживает установленную среду выполнения Node.js. Если установленная среда выполнения не обнаружена, вы можете настроить проект так, чтобы он ссылался на установленную среду выполнения, на странице свойств (после создания проекта щелкните его узел правой кнопкой мыши, выберите пункт Свойства и укажите путь Node.exe). Можно использовать глобальную установку Node.js или указать путь к локальному интерпретатору в каждом из проектов Node.js.
Создание проекта
Сначала вы создадите проект веб-приложения Vue.js.
- Если у вас не установлена среда выполнения Node.js, установите версию LTS с веб-сайта Node.js. Дополнительные сведения см. в разделе Необходимые условия.
- Откройте Visual Studio.
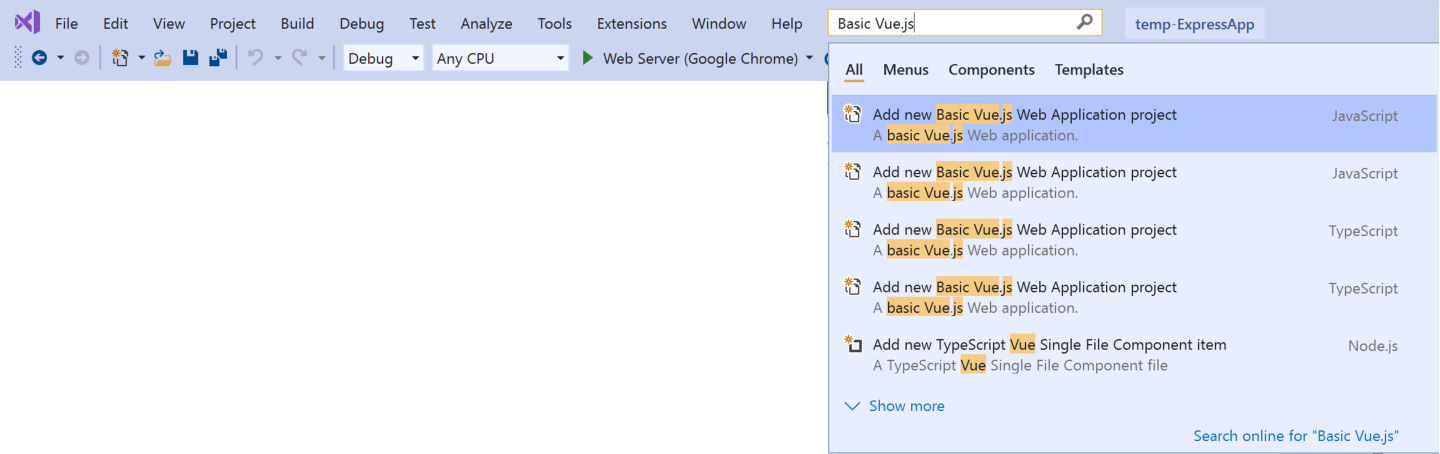
- Создание проекта Нажмите клавишу ESC, чтобы закрыть окно запуска. Нажмите CTRL + Q, чтобы открыть поле поиска, введите Basic Vue.js и выберите Простое веб-приложение Vue.js (JavaScript или TypeScript). В появившемся диалоговом окне введите имя basic-vuejs, а затем выберите команду Создать. Если шаблон проекта Простое веб-приложение Vue.js отсутствует, нужно добавить рабочую нагрузку Разработка Node.js. Подробные инструкции см. в разделе с предварительными требованиями. Visual Studio создаст новый проект. Новый проект откроется в обозревателе решений (в правой области).
- Отслеживайте установку пакетов npm, необходимых для приложения, в окне вывода (нижняя панель).
- В обозревателе решений откройте узел npm и проверьте установку всех необходимых пакетов npm. Если каких-либо пакетов не хватает (имеется значок с восклицательным знаком), можно щелкнуть правой кнопкой мыши узел npm и выбрать пункт Установить недостающие пакеты npm.
Изучение интегрированной среды разработки
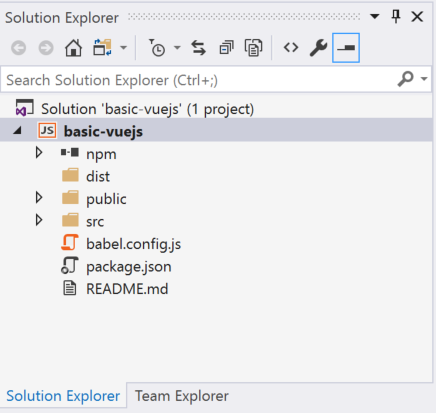
- Посмотрите на обозреватель решений в правой области.
- Полужирным шрифтом выделен ваш проект, имя которого вы указали в окне Новый проект. На диске этот проект представлен файлом NJSPROJ в папке проекта.
- Сверху представлено решение, имя которого по умолчанию совпадает с именем проекта. Решение, представленное на диске файлом SLN, является контейнером для одного или нескольких связанных проектов.
- В узле npm представлены все установленные пакеты npm. Вы можете щелкнуть узел npm правой кнопкой мыши, чтобы найти и установить пакеты npm с помощью диалогового окна.
- Чтобы установить пакеты npm или выполнить команды Node.js из командной строки, щелкните узел проекта правой кнопкой мыши и выберите пункт Открыть командную строку здесь.
Добавление VUE-файла в проект
- В обозревателе решений щелкните правой кнопкой мыши любую папку, например src/components, а затем выберите Добавить>Новый элемент. Если вы не видите все шаблоны элементов, выберите "Показать все шаблоны" и выберите шаблон элемента.
- Выберите Отдельный VUE-файл JavaScript или Отдельный VUE-файл TypeScript и нажмите кнопку Добавить. Среда Visual Studio добавит новый файл в проект.
Сборка проекта
- Затем выберите Сборка>Собрать решение для сборки проекта.
- Просмотрите результаты сборки в окне вывода и выберите Сборка в списке Показать выходные данные из.
В шаблоне проекта JavaScript Vue.js (и более ранних версиях шаблона TypeScript) используйте скрипт build npm, настроив событие после сборки. Если вы хотите изменить этот параметр, откройте файл проекта (.njsproj) в проводнике Windows и найдите следующую строку кода:
npm run build Выполнение приложения
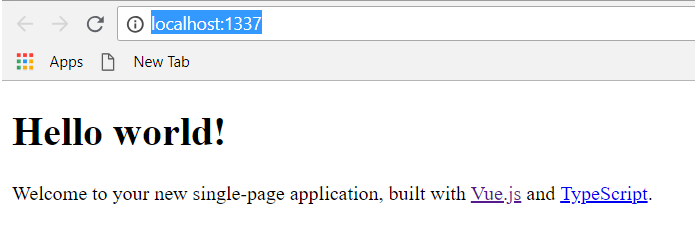
- Чтобы запустить приложение, нажмите клавиши CTRL+F5 (или выберите Отладка > Запуск без отладки). В консоли появится сообщение Запуск Development Server. Затем приложение откроется в браузере. Если сведения о работающем приложении не отображаются, обновите страницу.
- Закройте веб-браузер.
Поздравляем с завершением этого краткого руководства! Надеемся, что вы узнали нечто новое об использовании интегрированной среды разработки Visual Studio с Vue.js. Если вы хотите ознакомиться с возможностями этого продукта более подробно, продолжите работу с руководством из раздела Руководства в содержании.