
Все про файл functions.php для вордпресс
Файл functions.php для WordPress неоднократно упоминался в данном блоге при решении тех или иных задач. Однако при этом я говорил о нем вскользь, подразумевая, что вы хорошо знакомы с его работой. Сегодня же наоборот, решил детально рассмотреть все нюансы, которые касаются файла функций functions.php: зачем он вообще нужен, как правильно и безошибочно с ним работать и т.п. Инструмент на самом деле весьма актуальный как при работе с админкой, так и в процессе редактирования темы. Пусть информация и немного теоретическая, почитать будет полезно (особенно новичкам).
Статья имеет 3 подраздела:
- Особенности и задачи functions.php;
- Редактирование файла функций;
- Типовые ошибки и примеры использования.
Что такое файл functions.php и зачем он нужен?
Как правило, в данном файле задаются дополнительные функции для шаблона, позволяющие менять внешний вид вашего сайта. Однако на самом деле его возможности значительно шире, поскольку functions.php в WordPress автоматически загружается при инициализации системы. То есть при вызове любой страницы, как фронтенда (сайта), так и бэкенда (админки), соответствующие функции из данного файла будут выполнены.
Следовательно, с помощью файла functions.php вы можете решить целый спектр абсолютно разных задач:
- Наиболее простой вариант — изменение внешнего вида темы. Вспоминаются сразу хаки для ссылки читать далее где можно влиять на вид линка «read more» и формат анонса.
- Определение своих функций дабы позже вызывать их в других файлах шаблона, что экономит время на внедрение изменений на сайте (да, и вообще является нормальным принципом в программировании). Например, функция отображение первой картинки поста, которую после определения можно использовать в файлах темы для категорий, тегов, архивов.
- Настройка админки под себя — скрытие определенных пунктов из меню, изменение разных параметров отображения для других пользователей и т.п. Сразу вспоминается статья про скрытие custom fields для не админов. Также с помощью functions.php в WordPress можно создать специальную страницу настроек темы.
- Переопределение каких-то параметров системы — изменение размеров миниатюр для шаблона, а также разного рода хаки и фильтры. Например, с помощью данного файла можно подправить отображение комментариев в wp_list_comments.
Вообще файл functions.php в WordPress по логике и скорости работы напоминает плагины. Хотя при этом у них есть принципиальные отличия. Модули используются, как правило, для решения каких-то конкретных задач и применяются к любой теме вашего сайта. Плюс для работы их нужно активировать. Что касается файла шаблона functions.php, то он может содержать много разных функций и выполняется только для той темы, в которой определен. То есть при смене шаблона, все ваши текущие наработки будут отключены, а система начнет считывать информацию из другого файла функций (об этом следует помнить).
Где находится functions.php и как его редактировать?
Файл функций расположен в корневой директории темы (вместе с index.php, single.php и другими). То есть вы заходите в папку wp-content/themes/название_темы/, и он будет там. Это не то же самое что одноименный файл ядра, который находится в системной директории /wp-includes/, нужный нам объект — в папке шаблона.
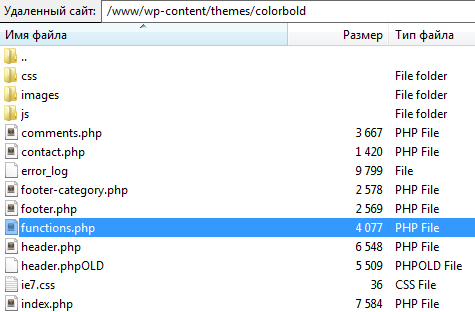
Сейчас в WordPress файл шаблона functions.php можно найти в 99% популярных тем, но раньше он был не везде. Если в вашей теме нет functions.php, то вы спокойно можете его создать.
Есть два способа редактирования файла функций:
- через WP админку;
- с помощью текстового редактора.
Первый вариант достаточно простой и наглядный. Вы заходите в меню «Внешний вид» — «Редактор» и выбираете соответствующий файл для правки.
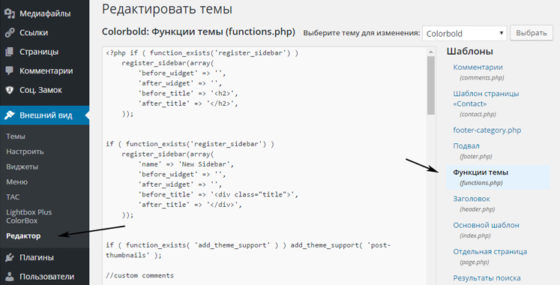
После внесения изменений нажмите кнопку «Обновить файл» в самом низу. Преимущество данного метода в том, что вам не нужно использовать какие-то дополнительные программы для работы, все происходит внутри панели администрирования. Однако не всегда это возможно сделать.
Если файл functions.php закрыт для записи, то воспользоваться встроенным редактором WordPress у вас не получится. В таком случае запускаете FTP клиент, например, Mozilla и скачиваете файл функций на локальный компьютер.
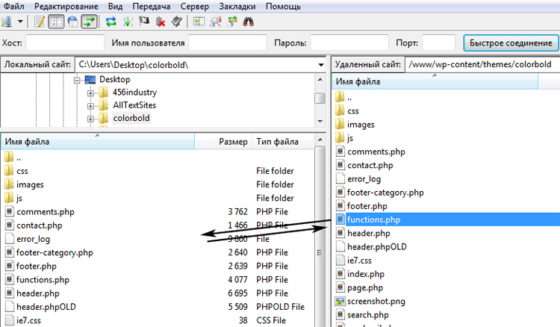
Для работы с php файлом советую использовать специальные бесплатные редакторы — Notepad++ или Sublime Text. При этом важно чтобы кодировка редактируемого файла была UTF-8 без BOM. Вот как можно ее выбрать в Notepad++:
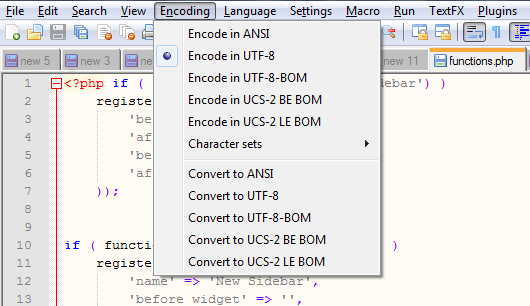
Если этого не сделать, то из-за BOM может возникнуть глюк в WordPress. Для Sublime Text 2 в меню «File» есть опция «Reopen With Encoding», позволяющая открыть файл в нужной кодировке. Однако при запуске functions.php автоматически срабатывает UTF-8 (т.к. файл сохранен именно в ней), поэтому ничего дополнительно делать не нужно.
После внесения изменений в файл, загружаете его обратно на FTP в ту же самую корневую папку активного шаблона. Второй метод, как видите, чуть более сложный, но иногда без него не обойтись. Если вдруг, редактируя functions.php в WordPress админке вы допустили ошибку, то весь сайт может перестать работать (увидите белый экран). В таком случае исправить код можно будет лишь, скачав файл функций на локальный компьютер и отредактировав его в текстовом редакторе.
Вставка сниппетов (примеры кода и типичные ошибки)
Дабы у вас не возникало ошибок при работе с functions.php в WordPress, давайте рассмотрим основные правила вставки кода и возможные ошибки. Первым делом обратите внимание на глобальную структуру любого PHP файла:
// . разный PHP код и функции . ?>
Здесь в начале идет специальный открывающий тег и в конце закрывающий. Важно чтобы не было никаких пробелов перед открывающимся и после закрывающегося тегов! Хотя в некоторых случаях вы можете встретить запись, когда последнего тега нет (для PHP это нормально). Давайте рассмотрим парочку примеров.
Ситуация 1
Допустим, вы нашли в интернете готовый сниппет для решения определенной задачи. И в описании сказано, что нужно вставить этот код в файл функций functions.php. В качестве примера выберем код удаления WP версии из wp_head:
remove_action('wp_head','wp_generator'); ?>
Так размещать неправильно:
// . разный PHP код и функции . remove_action('wp_head','wp_generator'); ?> ?>
Возникает ошибка, поскольку система встречает тег открытия из найденного сниппета (так правильно):
// . разный PHP код и функции . remove_action('wp_head','wp_generator'); ?>
Следующий вариант также будет работать (между PHP блоками не должно быть пробелов):
// . разный PHP код и функции . ?> remove_action('wp_head','wp_generator'); ?>
Ситуация 2
Допустим вы хотите обновить jQuery в WordPress для чего нашли соответствующий код:
function my_update_jquery () { wp_deregister_script('jquery'); wp_register_script('jquery', 'https://ajax.googleapis.com/ajax/libs/jquery/1/jquery.min.js', false, false, true); wp_enqueue_script('jquery'); } add_action('wp_enqueue_scripts', my_update_jquery);
Неправильный вариант использования:
// . разный PHP код и функции . ?> function my_update_jquery () < wp_deregister_script('jquery'); wp_register_script('jquery', 'https://ajax.googleapis.com/ajax/libs/jquery/1/jquery.min.js', false, false, true); wp_enqueue_script('jquery'); >add_action('wp_enqueue_scripts', my_update_jquery);
Нельзя размещать код после закрывающего PHP тега. Вам нужно поставить всю функцию внутрь конструкции:
// . разный PHP код и функции . function my_update_jquery () { wp_deregister_script('jquery'); wp_register_script('jquery', 'https://ajax.googleapis.com/ajax/libs/jquery/1/jquery.min.js', false, false, true); wp_enqueue_script('jquery'); } add_action('wp_enqueue_scripts', my_update_jquery); ?>
Кстати, если в functions.php закрывающего тега ?> нет (что допускается), то добавляете нужный сниппет просто в конец файла.
Ситуация 3
Нельзя вставлять сниппет внутрь другой функции. Допустим, в файле шаблона functions.php у вас имеется следующий код:
// . разный PHP код . function some_name() { // Открывающий тег функции // разный код внутри функции } // Закрывающий тег ?>
Неправильный вариант вставки:
// . разный PHP код . function some_name() { // разный код внутри функции function my_update_jquery () { wp_deregister_script('jquery'); wp_register_script('jquery', 'https://ajax.googleapis.com/ajax/libs/jquery/1/jquery.min.js', false, false, true); wp_enqueue_script('jquery'); } add_action('wp_enqueue_scripts', my_update_jquery); } // Закрывающий тег ?>
Добавить код можно только после закрывающего тега «>» первой функции. Вот так будет правильно:
// . разный PHP код . function some_name() { // разный код внутри функции } // Закрывающий тег function my_update_jquery () { wp_deregister_script('jquery'); wp_register_script('jquery', 'https://ajax.googleapis.com/ajax/libs/jquery/1/jquery.min.js', false, false, true); wp_enqueue_script('jquery'); } add_action('wp_enqueue_scripts', my_update_jquery); ?>
Ситуация 4
Рассмотрим для ознакомления еще один вариант, когда внутри функции вы можете встретить конструкцию , которая не будет нарушать общий порядок работы самого файла.
// . разный PHP код . function oxygen_metabox() { $oxygen_post_location = get_post_meta( $post->ID, '_oxygen_post_location', true ); ?> echo __( 'Featured', 'oxygen' ) ?>
_e( 'Post location on the home page', 'oxygen' ); ?> } // . разный PHP код . ?>
Тут нужно учитывать 2 нюанса. Во-первых, не должно быть ошибок в последовательности открывающих и закрывающих PHP тегов — каждый открытый блок должен быть закрыт. Во-вторых, внутри функции пробелы и переносы строк между тегами не критичны. В любом случае нужно быть очень внимательным в процессе редактирования. Плюс редакторов Notepad++ и Sublime Text в том, что они подсвечивают теги/функции, и так проще ориентироваться в коде.
Итого. Надеюсь, данное руководство по WordPress файлу functions.php вам пригодится. Данный инструмент в веб-разработке под WP весьма и весьма полезен. Нужно только внимательно с ним работать, так как ошибки могут привести к проблемам в работе сайта. Дабы ничего не нарушить я предпочитаю редактировать файл через текстовые редакторы, предварительно сохранив оригинальный вариант на всякий случай.
Если у вас остались вопросы по работе с functions.php в вордпресс, пишите их в комментариях.
P.S. Постовой. Продвижение и оптимизация сайта — важные знания для вебмастеров.
А вы знаете самые популярные сайты? — ТОП10 сайтов в мире (по посещаемости).
Понравился пост? Подпишись на обновления блога по  RSS,
RSS,  Email или
  twitter!

Оцените статью:
(голосов — 10, средний балл: 6,40 из 7)
 Категории: Возможности; Хаки и секреты;
 Теги: админка wp, вордпресс веб-разработка, новичкам, пишем функцию для wp, правка функций wp, правка шаблона, функции wordpress.
Похожие статьи:
- Как убрать пункты меню в WordPress админке
- Упрощаем админку wordpress
- Улучшаем страницу с результатами поиска в wordpress
- Похожие статьи в wordpress без плагинов с использованием категорий блога
- Скрываем custom fields для не админов, функция remove_meta_box()
How to Find, Access, and Edit functions.php in WordPress

If you’re just getting started with WordPress development, one of the most important files you should familiarize yourself with is the functions.php file. There are actually three possible functions.php files that you might use on your WordPress website, and each plays a different role. Knowing where these files live, what their purpose is, and how and when to modify them will help you when troubleshooting issues and give you more control over your site’s functionality.
In this article, we’ll cover everything you need to know about WordPress functions.php files. You’ll learn what functions.php does and how to find and edit it. We’ll even include a few useful code snippets to try out.
You can start at the beginning and read through or jump to a specific section using the table of contents below:
- What is functions.php in WordPress?
- Where is the functions.php file located?
- How to access functions.php
- Accessing functions.php in your WordPress Admin Interface
- Accessing functions.php via FTP
- Accessing functions.php in your cPanel
- Editing functions.php in your WordPress Theme File Editor
- Editing functions.php with a text editor
- Editing functions.php directly in cPanel
- Do I need to create a child theme to edit functions.php?
- How do I restore functions.php from a backup if I don’t have access to my WordPress dashboard?
- Can I add JavaScript to my functions.php file?
What is functions.php in WordPress?
In WordPress, the functions.php file is where vital code lives that determines the way your site works. There are actually at least two functions.php files in every WordPress website — one included with WordPress core and one included with your theme. If you’re using a child theme, you should also have a functions.php in your child theme folder.
The functions.php file in WordPress core contains important code that’s required for WordPress to function. You should almost never modify the code in WordPress core’s functions.php file.
Your theme’s functions.php file is where all the theme-specific features of your website live — like custom menu locations, widget areas, custom header and footer content and functionality, post excerpt length, and more.
Your theme’s functions.php file behaves in much the same way as a WordPress plugin. The difference is that functions.php should be used for code that is theme-specific, while plugins should be used for functionality that will remain even when you switch themes.
Where is the functions.php file located?
We’ve talked about what the functions.php file does both in WordPress core and in the theme files, but how do you find the functions.php file? Where is functions.php in WordPress?
All of your WordPress files are located in your site’s root directory and in various subfolders. Your root directory is usually named something like public_html or www, but may have a different name. If you aren’t sure where to find your WordPress installation folder on your server, contact your web host.
Once you’ve found where your WordPress files are located on your server, you can start looking for your functions.php files. We’ve mentioned that there are up to three locations for functions.php: WordPress core, your theme folder, and your child theme folder. In this section we’ll go over where to find each one.
Where is functions.php in WordPress core?
If you’re looking for the location of functions.php in WordPress core, you’ll find it in the wp-includes folder of your WordPress installation.

While you should never edit functions.php in WordPress core, you may find yourself needing to inspect it for one reason or another. The most likely scenario for poking around in functions.php in WordPress core is if you suspect that malware has been injected into it.
Before even opening functions.php, you should make a backup of your WordPress site in case you accidentally make a change to the file that causes a critical error. If you find that functions.php has been corrupted or hacked, chances are you may have other areas of WordPress that are affected. The best thing to do is simply replace WordPress with a fresh installation, rather than trying to remove all the offending scripts one-by-one.
Where is functions.php in my WordPress theme folder?
Your theme’s functions.php file is located in the main directory of your theme folder: wp-content → themes → yourtheme.
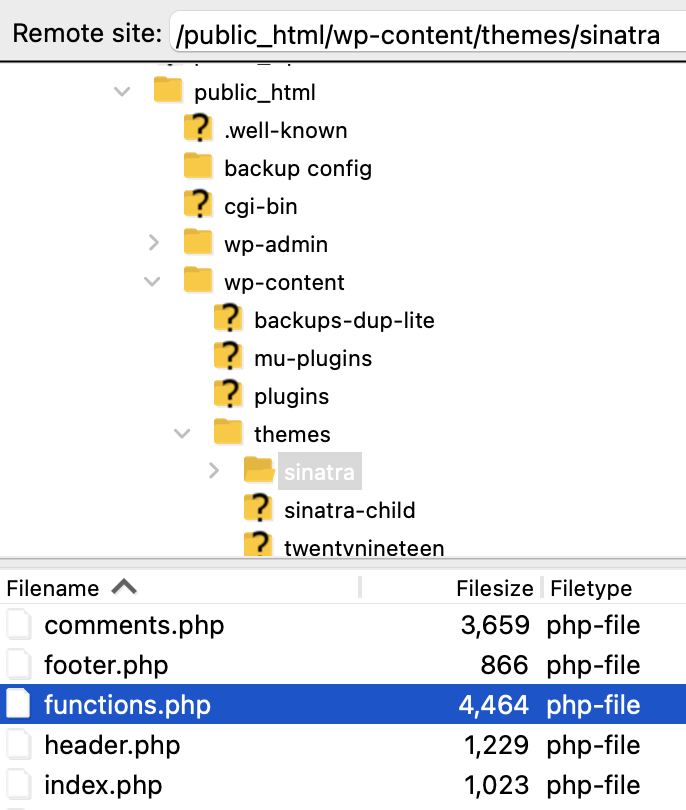
Where is functions.php in the WordPress child theme folder?
The WordPress child theme functions.php file is located in the main directory of your child theme folder: wp-content → themes → yourtheme-child.

How do I access functions.php?
Knowing where to find functions.php is only half the job. Now comes the question of how to access functions.php in WordPress. While the functions.php file in WordPress core can only be accessed through secure file transfer protocol (SFTP) or through cPanel, your theme and child theme functions.php files can also be accessed in the WordPress Theme File Editor.
Accessing functions.php in the WordPress Theme File Editor
If you need to access your theme or child theme’s functions.php file, you can do so directly from the WordPress Theme File Editor. In your WordPress dashboard, go to Appearance → Theme File Editor.
You’ll be taken to the Edit Themes page. From here, under the dropdown next to Select theme to edit, choose your theme and click Select. You’ll see a list of files available to edit under the Theme Files column at the far right of your screen. Click functions.php to open the file.

If you’re in your parent theme’s functions.php file, you’ll see a warning notice on the bottom of the screen above the Update File button that says, “Caution: This is a file in your current parent theme.”
Note: If you’re not the theme developer, you should make your changes in your child theme’s functions.php file to avoid having your edits overwritten in future theme updates. Accessing functions.php via SFTP
Step 1: Install your SFTP client. If you don’t have an SFTP client already, you’ll need to download one. There are some great free and premium options out there, including:
Application System Free or Premium WinSCP Windows Free Filezilla Windows, Mac, Linux Free and premium options Cyberduck Windows, Mac Free Transmit Mac Premium In this example, we’ll be using Filezilla. Other SFTP clients should work in a similar fashion.
Step 2: Retrieve your SFTP credentials. To log into your server via SFTP you’ll need the following details:
- Host (your server’s IP address or url)
- SFTP username
- Password
- Port number
These details can usually be found in your hosting control panel. This information might be generated for you or your host may prompt you to create an SFTP username and password. If you don’t know where to find these credentials or have trouble figuring out how to create them, search your host’s help documentation for instructions or contact their support team.
Step 3: Enter your SFTP credentials.
Enter your host’s IP address or url, your SFTP username, password, and the port number (usually 22 or 2222, but some hosts may use a different port).

Note: You might get a ‘host key unknown’ alert if your SFTP client uses trust on first use (TOFU) authentication. Check ‘Always trust this host, add this key to the cache’ if you plan on using your SFTP client to access the site again. Click OK to proceed.

Step 4: Navigate to your website’s root directory.
Once you’ve logged in, you’ll see two file trees displayed at the button of your screen — one on the left and one on the right. The right side lists the directories on your web server (remote). The left side lists the directories on your computer (local).
Your root directory is usually in a folder labeled www or public_html, but it might use a different name. If you aren’t sure what folder to look in, ask your hosting provider. You’ll know you’re in the correct folder if you see the wp-admin, wp-content, and wp-includes folders near the top of your file list.
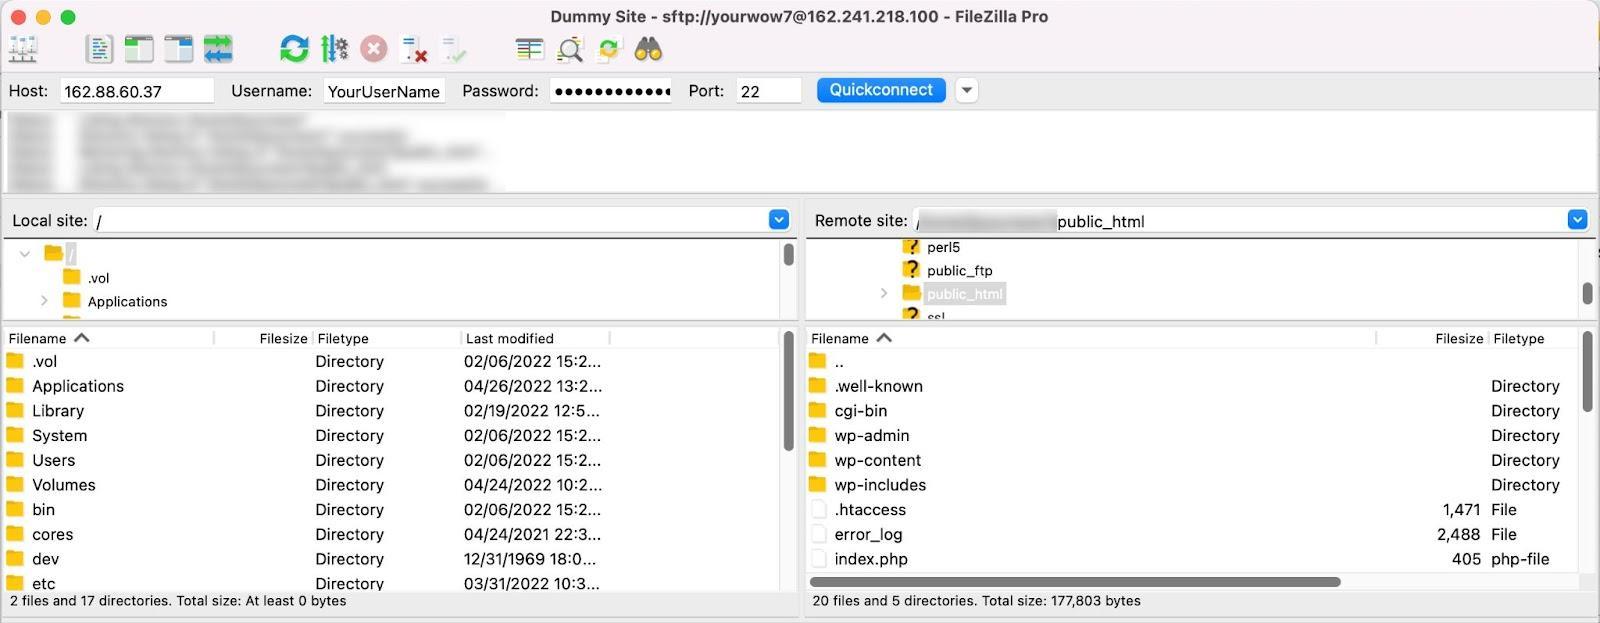
Step 5: Navigate to functions.php in WordPress core, your parent theme, or child theme. If you’re looking for functions.php in WordPress core, you’ll navigate to the wp-includes folder.
If you’re looking for functions.php in your theme directory, you’ll navigate to wp-content → themes → yourtheme.
To find your child theme’s functions.php file, go to wp-content → themes → yourtheme-child.
Step 6: Download functions.php. Now that you know where functions.php is located and have accessed it, you might want to inspect or edit the file. Before you can do that, you’ll need to download it. Right click on your functions.php file and select Download. Your file will be downloaded to your local machine.

Accessing functions.php in cPanel
If your host uses cPanel, you can access functions.php through its file manager. If you don’t know how to find cPanel in your host’s dashboard, contact their customer support for help.
Step 1: Open cPanel’s File Manager. Once you’re in cPanel, navigate to the Files section and click on File Manager.
Step 2: Open your website’s root folder. The root folder is commonly called www or public_html, but it may have another name. Root folder naming conventions differ on some hosts, so if you aren’t sure what folder to look in, ask your hosting provider.
You’ll know you’re in the correct folder if you see the wp-admin, wp-content, and wp-includes folders near the top of your file list.
Step 3: Find and download functions.php. The functions.php file for WordPress core is located in your wp-includes folder.
Your theme’s functions.php file is located in wp-content → themes → yourtheme.
If you’re looking for your child theme’s functions.php file, you can find it in wp-content → themes → yourtheme-child.
When you’ve found the functions.php file you’re looking for, right click on functions.php and click Download, or single-click functions.php and then click the Download option from the top menu.
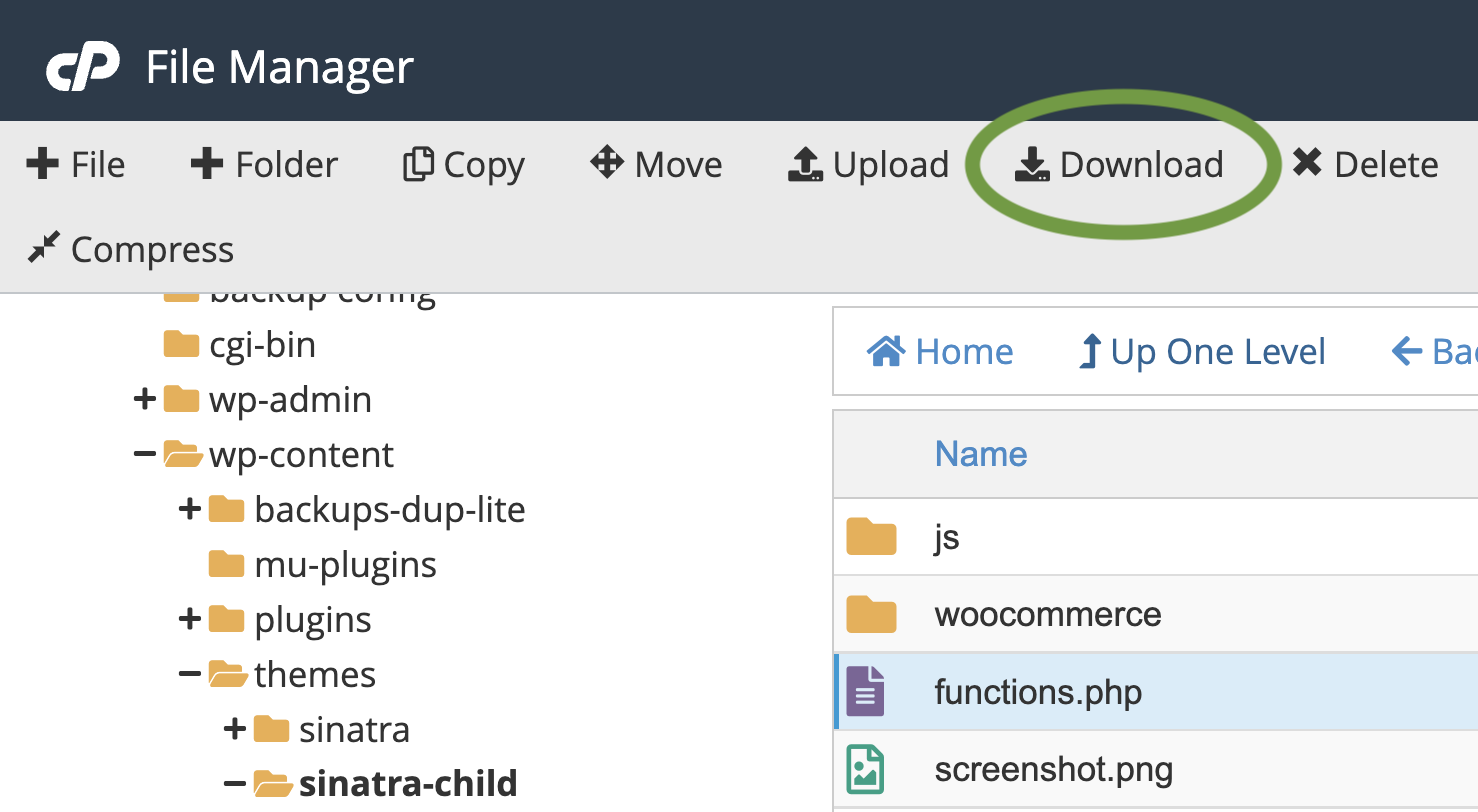
If you rename your file when you save it, make sure to name it back to functions.php before re-uploading it. And before you make changes to and overwrite functions.php, back up your WordPress site.
When should I edit functions.php in WordPress?
Before we dive in to how to edit functions.php, we should talk about if and when you should edit it. There are many reasons you might want to edit PHP code in WordPress, but adding that code to your functions.php file is not always the best option and should only be done under certain circumstances, which we’ll discuss below.
When to edit functions.php in WordPress core
Never. You shouldn’t edit functions.php in WordPress core. At most, you might replace it if you find that it’s been corrupted, but deleting or adding code to WordPress core functions.php is likely to break your site. So, you can open it, inspect it, replace it with a fresh copy if you need to, but don’t mess around on any live websites.
When to edit functions.php in your theme
When it comes to your theme’s functions.php file, you may or may not need to edit it. If you’re creating your own theme, you’ll most certainly want to add some custom code to functions.php. Just about every theme has code in its functions.php file that gives it a unique set of features and capabilities. Besides your stylesheets, these functions are a huge part of what makes one theme different from another.
If you’re adding code to your theme’s functions.php file that isn’t specific to your theme and could be used independently of your theme, consider making it a plugin instead. This way you can use that feature across multiple themes and even submit it to the WordPress.org plugin library where it might benefit other WordPress users.
Before creating your plugin, check the plugin library to make sure what you’re creating doesn’t already exist. If a quality solution exists already, you might want to save your development energy for a different custom feature on your site.
When to edit functions.php in your child theme
If you’re using a theme from a developer, and want to modify the functions.php file, you should always use a child theme to make those changes. When theme developers issue a new version of their theme and you update to the latest one, your current theme is overwritten by the new files — including functions.php.
Child themes are unaffected by parent theme updates, so you’ll retain all your custom code if you make changes in a child theme’s functions.php file.
Before adding code, consider whether using a plugin would be a better solution. Is the code you’re adding specific to your theme? Edit your child theme’s functions.php file. Is the code you’re adding something you want to still have if you change themes in the future (e.g. Google Analytics tracking code or Facebook pixel)? Use a plugin.
Explore the benefits of Jetpack
How to edit functions.php in WordPress
You should always take steps to protect your site from any mistakes you might make while editing functions.php. So before you start making edits, back up your site and consider creating a staging site to test them first. This way your live site is not disrupted if you accidentally add some code to functions.php that causes major issues or — even worse — crashes your site completely.
Now that you’ve backed up your site, you can move on to editing your functions.php file.
How to edit functions.php in the WordPress Theme File Editor
Editing functions.php in the WordPress Theme File Editor is a little risky. If you’re using this tool because you don’t have access to cPanel or SFTP, then you’ll be in a pretty bad situation if your edits cause a fatal error that prevents you from accessing your WordPress dashboard.
If you want to edit functions.php in the Theme File Editor, make sure that you have direct access to the server and your backups so you can restore your backup file quickly.
You can find the WordPress Theme File Editor under Appearance → Theme File Editor in your WordPress admin panel.
You’ll be taken to the Edit Themes screen, where you should select your child theme, then select the functions.php file from the Theme Files column at the right of your screen.
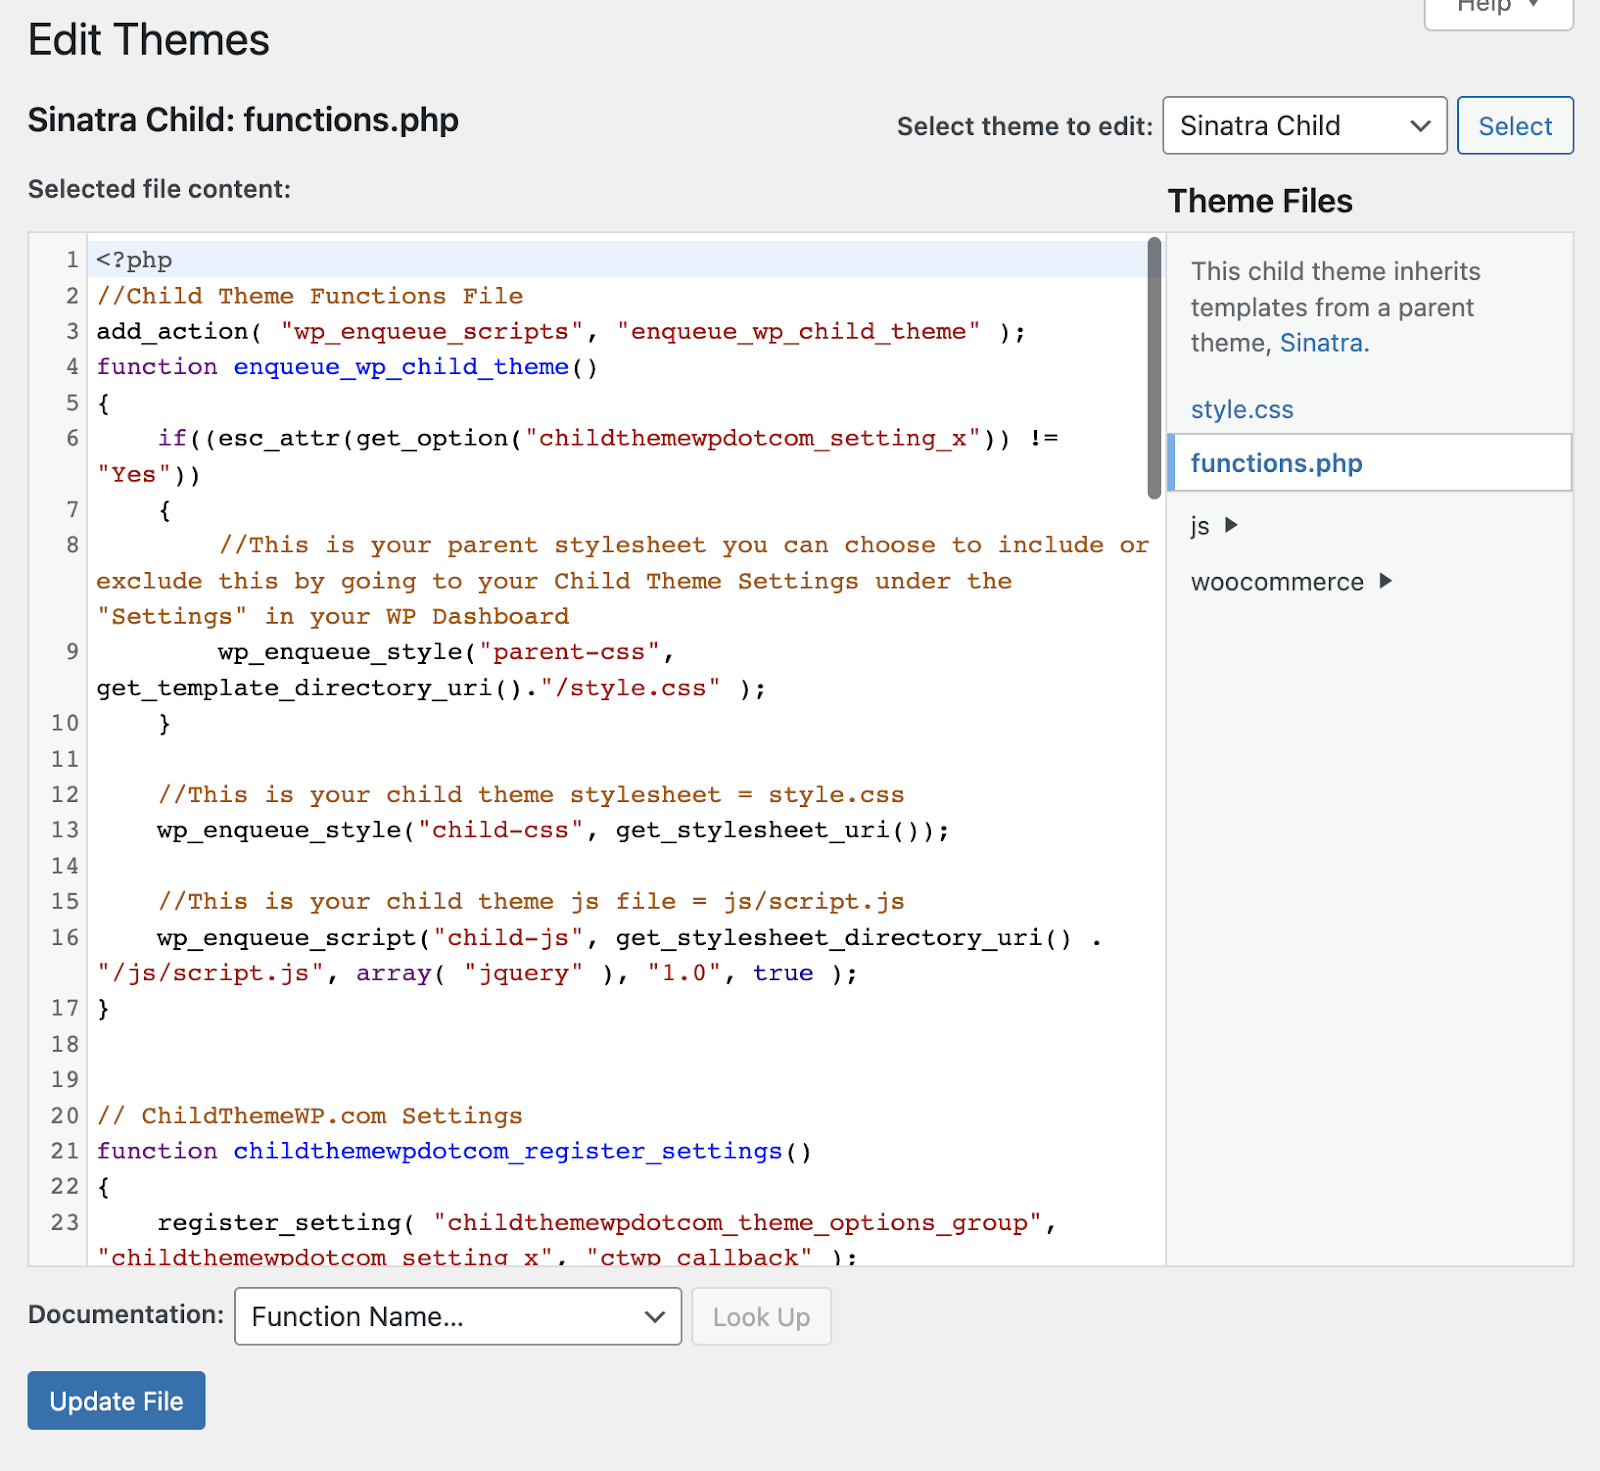
If you’ve selected the parent theme instead, you’ll see a warning at the bottom of your screen that says, “Caution: This is a file in your current parent theme.” You don’t want to make edits to your parent theme’s functions.php file because your changes will be overwritten the next time you update your theme.
If you see functions in your file that you don’t understand, WordPress includes a handy documentation lookup feature just above the Update File button. Click the dropdown and search for the function name that you want to learn more about and click Look Up. You’ll be directed to the WordPress.org documentation for that function.
When you’re done with your changes, click Update File. Check the front and back end of your site to make sure everything is still working as intended. If you encounter a fatal error and need to restore functions.php from your backup, you can do that in cPanel or via SFTP.
Editing functions.php with a text editor
The best way to edit functions.php is in your code editing software of choice. Since you’re editing a copy that’s offline on your local computer, you don’t have to be connected to the internet to work on your file. You’ll also have more control over when you commit your changes to your live site.
You can edit your code whenever you like and upload your changes at a time when your website normally gets the least traffic. That way, if there are any issues, the fewest number of visitors will be impacted.
Step 1: Open functions.php in your text editor. If you aren’t familiar with using a text editor, there are several free options to choose from.
Free source code and plain text editors:
Application System Notepad++ Windows Atom.io Windows, Mac, Linux Sublime Windows, Mac, Linux TextEdit
*make sure you’re in plain text modeMac (default application) Notepad Windows (default application) Step 2: Edit functions.php and save to your local machine. Your display may look different depending on what program you use to edit your functions.php file. This is what PHP code looks like in atom.io:

Add or change whatever information you need to, then save your file.
Step 3: Log into your web server via SFTP or cPanel. Navigate to your theme or child theme folder and find the functions.php file.
Step 4: Change the file name of functions.php on your web server. In case your edited version contains errors, you don’t want to overwrite your original functions.php file. You’ve made a backup, of course, but instead of having to pull the functions.php file from your backup, you’ll have your original file on-hand.
You want to be able to restore the functions.php file quickly if something goes wrong, so renaming it to something like ‘functions-orginal.php’ will make sure that the contents of the original file are preserved on your server.

Step 5: Upload functions.php from your local machine to your webserver. Using SFTP or cPanel, upload your functions.php file to your theme or child theme’s main directory.
Step 6: Visit your website to make sure it’s working correctly. Once you’ve uploaded your functions.php file, you should check to make sure that everything is working on your site. Visit the front end and log in to the WordPress dashboard to make sure everything is accessible and displays and functions correctly.
Step 7: Delete the old, renamed functions.php file. Once you’ve established that your site is working properly, you can delete functions-original.php (or whatever you renamed it to). If you find an issue down the road, you should still have your functions.php file from the backup you made.
Editing functions.php directly in cPanel
If you don’t have or don’t want to use a source code editor, you can edit functions.php directly in cPanel (if your host uses cPanel). Like editing in the WordPress Theme File Editor, it’s a little more risky than working on your local machine. If your internet connection is disrupted while you’re editing, you could lose your changes. You also run the risk of potentially overwriting your original functions.php file.
Step 1: Find functions.php in cPanel. In cPanel, click on File Manager.
Navigate to your root folder (usually public_html or www, but it could have a different name).
Step 2: Make a copy of functions.php. In your File Manager main menu, click + Folder to add a new folder. You’ll want to make a copy of your functions.php file and save it here as a backup.
Name your new folder something easy to identify like ‘backup functions’ so you can easily find it later. Click Create New Folder.
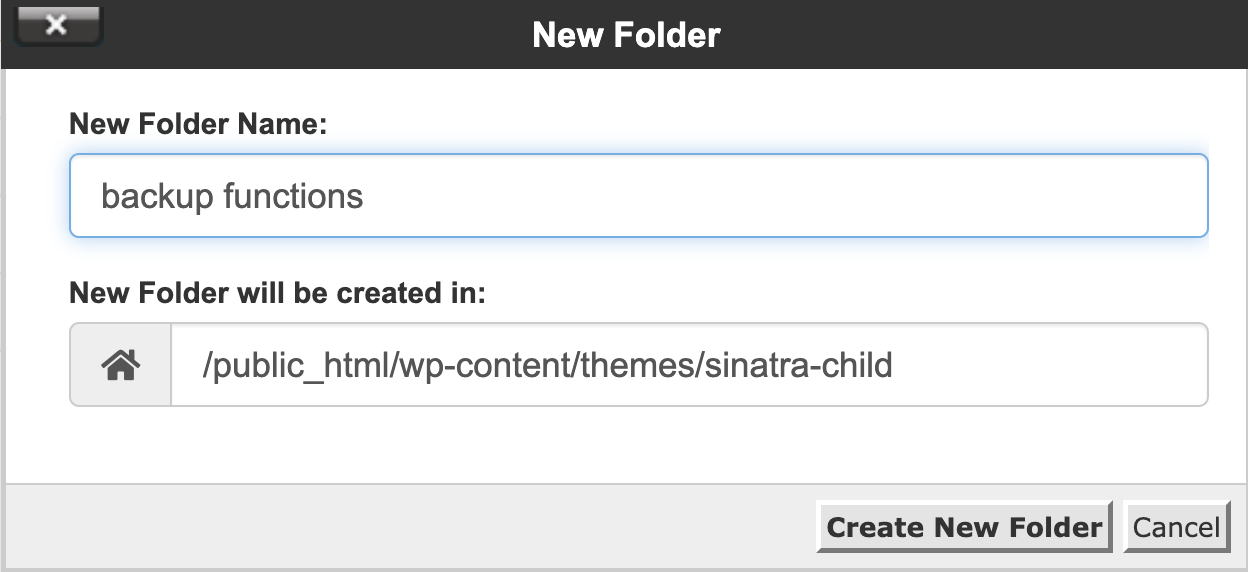
Step 3: Find functions.php in your theme or child theme folder and copy it to the backup folder. In your theme or child theme folder, scroll down to functions.php and right click on the file name. Select Copy.

A dialog box will appear asking you to enter the path you want to copy the file to. The path to the folder you’re currently in will be pre-populated, so if the file path to your backup folder differs from what you see, type in the correct path. Click Copy File(s).
Step 4: Navigate back to functions.php in the theme or child theme directory. Now that you have a backup, you can go back to the functions.php file in the theme or child theme directory and start editing.
Right click on functions.php, then click Edit.
Step 5: Edit functions.php. You should now see the contents of your functions.php file on your screen. It should look something like this:

Add or change whatever information you need, then save your file.
Using a plugin to add functions to your WordPress site
Instead of directly modifying the functions.php file, you can use a plugin like Code Snippets to add functions to your website. If you need to add a fair number of functions to your site, it can be easy to lose track of which functions you still need and which you don’t.
Code Snippets provides a graphical user interface (GUI) for managing your blocks of PHP code. You can add descriptions so that you know what the code is supposed to do, and turn blocks of code on and off, much like activating and deactivating a plugin.
Since you’re not making changes to functions.php, it’s a much safer method of adding PHP functions to your WordPress site.
How to protect functions.php from security exploits
The functions.php file is often a target of hackers, so keeping it safe should be a high priority. Take the following steps to help you secure your functions.php file:
1. Install a security plugin
By using a security plugin, you’ll enjoy advanced protection from hackers across multiple areas of your site.
Jetpack Security is an inexpensive option that helps keep your site safe from malicious attacks. It includes malware scanning and one-click fixes, brute force attack protection, downtime monitoring, an activity log so you know if and when your site was hacked, and login protection via two-factor authentication (2FA).

Jetpack Security also monitors your site for any changes to core WordPress files, outdated or insecure plugins, and other vulnerabilities so that you can catch them before a hacker finds them and takes advantage.
Plus, it provides real-time WordPress backups so you can quickly restore a clean version if anything goes wrong — even if you can’t log into your site.
2. Deny access to WordPress core functions.php via the .htaccess file
If your website is hosted on an Apache server, you can edit your .htaccess file to help protect your WordPress core functions.php file by blocking access to the entire wp-includes folder.
Step 1: Download .htaccess
Using SFTP or cPanel, navigate to the root folder of your website. Right click on .htaccess and select Download to download the file to your local computer.
Step 2: Add code to block access to the wp-includes folder
In a source code or plain text editor, open .htaccess and add the following code:
RewriteEngine On RewriteBase / RewriteRule ^wp-admin/includes/ - [F,L] RewriteRule !^wp-includes/ - [S=3] RewriteRule ^wp-includes/[^/]+\.php$ - [F,L] RewriteRule ^wp-includes/js/tinymce/langs/.+\.php - [F,L] RewriteRule ^wp-includes/theme-compat/ - [F,L] Save your file. Make sure that your editor program does not include a file extension. If you’re using Notepad++ or Text Edit, it may add a .txt file extension. The file should simply be named ‘.htaccess.’
Step 3: Upload the edited .htaccess back to the root folder
Upload your edited .htaccess file back to your website’s root folder. You’ll be asked if you want to overwrite the existing file. Click Ok.
Now your .htaccess file should block external access to any files in your wp-includes folder, including functions.php.
3. Deny access to functions.php using functions.php
You can block direct access to your functions.php file by adding the following code snippet directly to functions.php.
if (!empty($_SERVER[‘SCRIPT_FILENAME’]) && ‘functions.php’ == basename($_SERVER[‘SCRIPT_FILENAME’]))
4. Hide functions.php outside of the root directory
Hackers know the default location of all standard WordPress files. Changing the location of sensitive files to a restricted access folder outside the root directory can keep it out of reach of hackers. This process is a little more involved than just adding some code to your .htaccess file, but it’s worth the extra effort for the additional layer of protection to your website.
In just a few steps, you can secure functions.php outside of the root folder.
Step 1 : Download your current functions.php file
If you’re moving your theme’s functions.php file, you’ll find it under wp-content → themes → yourtheme. Your child theme’s file will be in wp-content → themes → yourtheme-child.
Once you’ve found your functions.php file, download it to your computer via SFTP or cPanel.
Step 2 : Create a new directory outside of the root folder
Navigate outside of your root directory to the next file folder level up. You should see the name of your root folder as well as several other folders. In this directory, right click and select Create directory.

Give your directory a name that’s easy to remember as the location of your functions.php file.
Step 3: Upload functions.php to your new folder
Upload the functions.php file you downloaded earlier into your new folder via SFTP or cPanel.

Check your new folder and functions.php file permissions and make sure they’re set to 600.
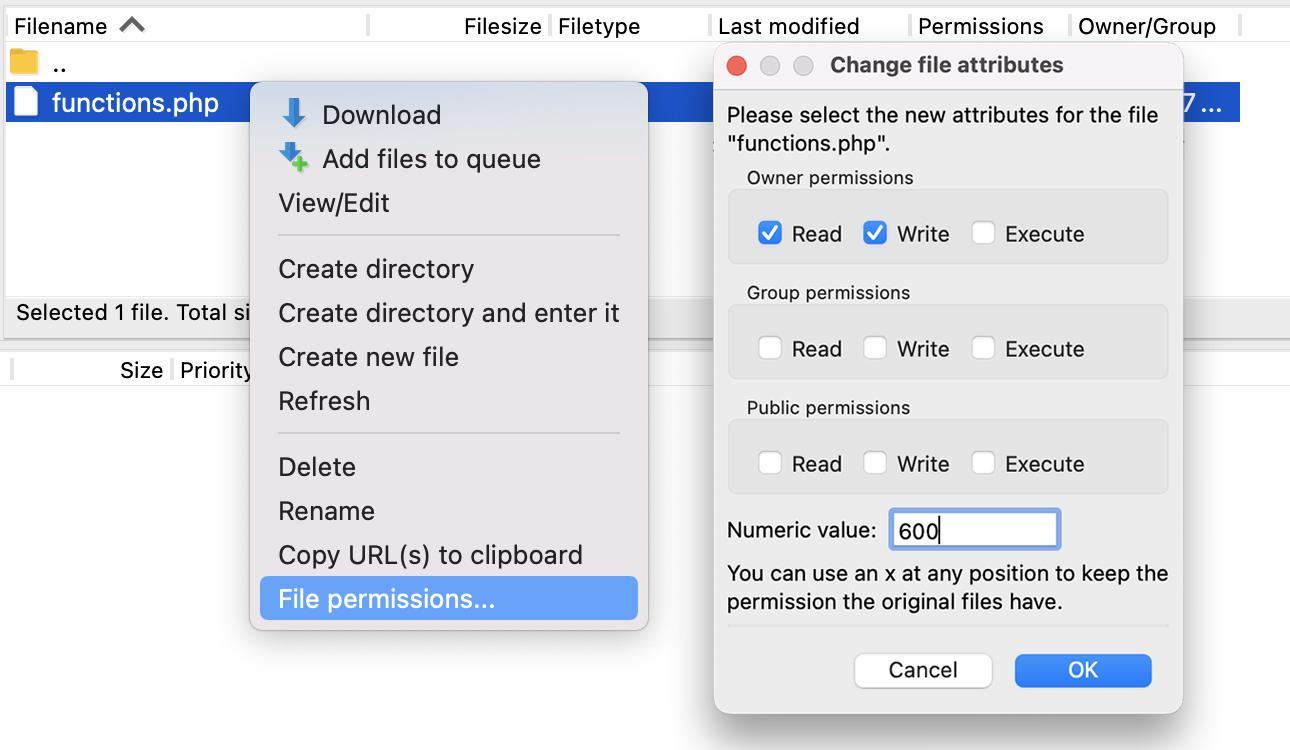
Step 4 : Point WordPress to the new functions.php file
You should have a functions.php file in your new directory as well as the original functions.php file that is still in your theme folder. In order for WordPress to find and use the correct file, you’ll want to delete all the information in your theme file’s functions.php file and the following code snippet:
Note: Your file path will look different, as you’ll be using your server’s directory names.
In cPanel, you can open the root directory’s functions.php file and edit it directly or you can edit the copy you downloaded to your local machine earlier using a source code editor. For this example, we’ve edited the copy we downloaded earlier using Atom.io.
Save your funtions.php file and upload it back to your theme directory.

You’ll be asked if you want to overwrite the file. Click Ok.
Now, WordPress should reference your new functions.php file in its secure location outside of the root folder.
4. Change the name of your functions.php file
Changing the name of your functions.php file is another step you can take to keep it safe from hackers. You’ll need to host this file outside of your root folder, so if you’ve followed the process in Hide functions.php outside of the root directory, you’ll only need to take a few additional steps.
Step 1: In your secure directory outside the root folder, change the file name of functions.php
Go to the functions.php folder hosted outside of your root directory and change the file name to something unique, like ‘keep-out.php’ or ‘these-are-not-the-functions-you-are-looking-for.php’. Okay, that last one’s a little long, but it doesn’t really matter what you call it as long as you include it in the file path in the theme folder copy of functions.php.
Step 2: Edit the code in functions.php in your root directory to reflect the name change
Now that you’ve changed the name to something other than functions.php, you’ll need to make sure your theme directory copy of functions.php is pointing to the right file name.
Download the root folder copy of functions.php to your local computer and edit it with your text editor. Change the functions.php file name to your new file name, then save your file.
Step 3: Upload functions.php back to the theme directory
You’ll be asked if you want to overwrite the existing file. Click Ok.
Now WordPress should point to your renamed functions file.
Additional layers of security for functions.php
You can add some additional protection to your website as a whole, including your functions.php file, by making similar changes to your wp-config file like renaming it, hosting it outside the root directory, and denying public access.
If you see suspicious code in your functions.php files and are worried you may have been hacked already, you’ll want to read up on how to detect and remove malware from your WordPress website.
What code can I add to functions.php in WordPress?
There are a lot of different code snippets that you can add to your WordPress functions.php file. However, you’re often better served by using a plugin (or writing your own plugin) for many functions. If the code you want to add is specific to your theme, then you can add that PHP code to your child theme’s functions.php file.
Below are a handful of useful functions you might insert into your child theme’s functions.php file:
Adding a new admin user in functions.php
If you’ve lost admin access to your WordPress dashboard and can’t recover your username or password via email, you can create a new admin user through your hosting account. Either via SFTP or cPanel, you can download your functions.php file and add the following code to create a new admin user for your site.
function qode_add_new_admin_account() < $user = 'your-username'; $password = 'your-password'; $email = 'your-email'; if ( ! username_exists( $user ) && ! email_exists( $email ) ) < $user_id = wp_create_user( $user, $password, $email ); $user = new WP_User( $user_id ); $user->set_role( 'administrator' ); > > add_action( 'init', 'qode_add_new_admin_account' );In the above code, replace ‘your-username’, ‘your-password’, and ‘your-email’ with your own credentials. Save your functions.php file and re-upload it to your theme folder. This will create a new admin user with the username, password, and email address that you’ve assigned in the code.
After you’ve uploaded your file, navigate to your site’s login page and use your new username and password to log in. Once your login is successful and you’ve confirmed that you have admin privileges, you should remove the code that you added to create your new admin account from functions.php.
Adding and removing image sizes in functions.php
When you upload an image to the WordPress Media Library, multiple variations of your image are generated. WordPress has default thumbnail, small, medium, and large sizes that are used in addition to your full size image. Your theme will generally pull the optimal image size for individual parts of your site.
If you’re creating your own theme or need to make modifications to a child theme to accommodate additional custom image sizes, you can do so in your functions.php file.
Use the following code and change your custom image size name from ‘custom-small-square’ and ‘custom-landscape’ to whatever name you’d like to use. The numbers next to your custom image size name represent the image size in pixels, so enter the pixel values with width first and height second.
function register_custom_image_sizes() < if ( ! current_theme_supports( 'post-thumbnails' ) ) < add_theme_support( 'post-thumbnails' ); >add_image_size( 'custom-small-square', 450, 450, true ); add_image_size( 'custom-landscape', 1000, 600 ); > add_action( 'after_setup_theme', 'register_custom_image_sizes' );Keep in mind that additional custom image sizes can weigh down your site and impact load times. If you have some WordPress default image sizes that your theme doesn’t use, you may want to delete and disable those to make room for your custom sizes.
If you want to disable WordPress default image sizes, you can place this code snippet into your functions.php file:
add_filter( 'intermediate_image_sizes_advanced', 'prefix_remove_default_images' ); // This will remove the small, medium, and large default image sizes. function prefix_remove_default_images( $sizes ) < unset( $sizes['small']); // 150px unset( $sizes['medium']); // 300px unset( $sizes['large']); // 1024px return $sizes; >If you only need to disable one or two sizes, you can only add those sizes to the code above and delete the code that you don’t need.
Use functions.php to allow additional file types in uploads
WordPress only allows a few different file types to be uploaded in your WordPress dashboard. This is a reasonable security measure, but you might encounter a situation where you need to upload a file type that’s not natively allowed.
To add more allowed file types to WordPress, add the following code to your child theme’s functions.php:
function additional_upload_file_types($mime_types) < $mime_types['stl''] = 'application/sla'; $mime_types['stl'] = 'application/vnd.ms-pki.stl'; $mime_types['stl'] = 'application/x-navistyle'; return $mime_types; >add_filter('upload_mimes', 'additional_upload_file_types', 1, 1);For the above example, we used the stl file type, which is a CAD file type. It’s an unusual file type to upload to a website outside of certain niche industries, but if your site is for an industrial designer, engineering firm, or even an orthodontics lab, you might find the ability to upload STL files really useful.
You can replace the $mime_type variable with whatever file extension suits the needs of your website. You’ll also need to include the media type and subtype after that (e.g. ‘application/sla’ or ‘image/octet-stream’). Here’s a complete list of mime types that you can refer to.
Frequently asked questions about editing the functions.php file in WordPress
We’ve covered what the functions.php file is, how to find functions.php, how to access it, how to edit it, and a few code snippets you can add to your functions.php file. We’ll wrap things up with a few helpful answers to frequently asked questions.
Do I really need to use a child theme to edit functions.php?
The short answer? Yes.
If you’re a theme developer, you’ll definitely want to add your theme-specific functions directly to your theme’s functions.php file. If you’re modifying a theme from another developer that will get regular updates, however, you’ll absolutely want to use functions.php within a child theme.
Most theme developers will periodically make updates to their themes for security and performance reasons, or to add new features. If you change the parent theme’s functions.php file, those changes will all be overwritten when you update to your theme’s latest version. All your hard work and customizations — poof! Gone.
Child themes aren’t touched when the parent theme updates, so if you make changes to your child theme’s functions.php file, your changes will be preserved any time you update your parent theme.
I edited functions.php and now I don’t have access to my WordPress dashboard. Help!
In the unfortunate event that you edited the functions.php file and caused a critical error on your site that kept you from accessing the WordPress dashboard, don’t worry — all is not lost!
There are a few things you can do to restore access to your site. You can edit functions.php via SFTP and a text editor or directly in cPanel if you know which bit of code caused the issue. Alternatively, you can restore functions.php from a backup or download a fresh copy of functions.php from your theme developer.
I know what code I messed up. I just need to access and edit functions.php to fix it.
See How to edit functions.php above for instructions on how to access and edit your theme or child theme’s functions.php file.
I have no clue what I did to my functions.php file, but I have a backup.
If you have a backup on hand, you can access your files either on your web host’s server or your remote server (depending on where you have opted to store these files), and use them to replace your corrupt functions.php file via SFTP or cPanel.
If you feel more comfortable restoring your entire site backup rather than trying to restore just the functions.php file, our article, “How to Restore WordPress from a Backup” goes in depth on the different methods you can use to restore your WordPress site.
I have no idea what code caused the problem and I didn’t make a backup.
If you don’t have a backup, you can download a fresh copy of the theme you’re using from your theme developer, extract the functions.php file, and overwrite the broken functions.php file on your server via SFTP or cPanel.
Note: If you’re using a theme that hasn’t been updated in awhile, you may encounter issues in overwriting functions.php with a version that’s from a much more recent update. If you encounter issues, you might be better off just manually updating your entire theme to the latest version. Alternatively, you can contact your theme developer to get the theme files for your current version and use that version of functions.php.
Can I add JavaScript to my functions.php file?
Yes, you can add code to your functions.php file that will add your custom JavaScript to either specific pages, posts, or all pages and posts on your site. This article on adding JavaScript to WordPress covers all the different ways you can add JS to your functions.php file.
This entry was posted in Learn. Bookmark the permalink.
Rob is the Marketing Lead for Jetpack. He has worked in marketing and product development for more than 15 years, primarily at Automattic, Mailchimp, and UPS. Since studying marketing at Penn State and Johns Hopkins University, he’s focused on delivering products that delight people and solve real problems.
Explore the benefits of Jetpack
What Is functions.php in WordPress and How You Can Customize It
In WordPress, the functions.php file plays a pivotal role in shaping your website’s behavior and appearance. This theme functions file is your gateway for injecting custom code, altering themes, and enhancing your site’s functionality.
This WordPress tutorial will walk you through what the functions.php file is, where to find it, how to access it, and provide examples of common customizations you can make. After reading this article, you can harness the full potential of functions.php and tailor your WordPress site to your specific needs.
What Is functions.php?
functions.php is a fundamental PHP file in your WordPress theme’s directory. This file acts as the bridge between your chosen theme and your unique requirements. Think of it as a command center where you can add WordPress functions, hooks, and filters to extend and enhance your website’s functionality.
Users can add custom code snippets to their WordPress functions.php file to modify the primary menu appearance, include custom post thumbnails or featured images in RSS feed content, or add a custom header.
The functions.php file also serves as a hub for utilizing WordPress hooks, allowing you to seamlessly integrate and extend WordPress functionalities. This includes modifying post content, adding custom post types, or removing the WordPress version number.
Where Is the functions.php File Located?
The WordPress functions.php file is located within the theme folder of your WordPress installation. Specifically, you can find it in the following directory path: wp-content/themes/your-theme/.
- wp-content is the directory where WordPress stores most of its content, including themes and plugins.
- themes is the directory where all your installed themes are located.
- your-theme represents the name of your current WordPress theme. Each theme has its own functions.php file.
Replace your-theme with the actual WordPress theme name you are using. For example, if you’re using the popular Twenty Twenty-One theme, you’ll find it at: /wp-content/themes/twentytwentyone/functions.php.
If you’re using a child theme that inherits its functionality and styling from a parent theme, the WordPress functions.php file can also be in your child theme’s directory. The file path for a child theme’s functions.php is: /wp-content/themes/your-child-theme/functions.php.
Important! Some WordPress themes, such as the latest Twenty Twenty-Three, do not automatically include the functions.php file. Contact the theme’s support team if you can’t find the file within the theme folder.
How to Access the functions.php File?
This section will explore two methods to access the functions.php file in WordPress.
How to Access the functions.php File Using Theme File Editor?
Using the built-in Theme File Editor, WordPress lets you access and edit the functions.php file directly from your WordPress admin interface. This method offers a convenient way to make modifications without needing external tools. Here’s how to access this file:
- Log in to your WordPress dashboard using your username and password.
- Once logged in, navigate to the Appearance section on the left-hand menu and select Theme File Editor.
- In the Theme File Editor, you’ll see a list of files associated with your active theme on the right side. Locate and click on the functions.php file to open it for editing.
- The functions.php file will open in the code editor within your browser. Here, you can make your desired customizations by adding or modifying PHP code snippets.
- After making the edits, click the Update File button to save your changes.
How to Access the functions.php File Using File Manager?
If the Theme Editor menu is unavailable in your WordPress dashboard, you can still access the functions.php file through the File Manager. For Hostinger’s managed WordPress hosting customers, here’s how to access the file using this method:
- Access hpanel.hostinger.com in your browser and log in to your account.
- On the top menu, click on Websites. Then, hit Manage for the relevant site.
- Select File Manager to open the current domain’s directory.
- In the File Manager, navigate to your WordPress root directory, typically labeled public_html.
- Locate the wp-content folder and open it. Inside, you’ll find the themes folder.
- Identify and access the folder corresponding to your active theme. You’ll find the functions.php file within the root folder of the theme.
- To edit, right-click on the functions.php file and select the Edit option. It will open the file in a web text editor.
- After making your desired edits, save the existing file before closing the text editor.
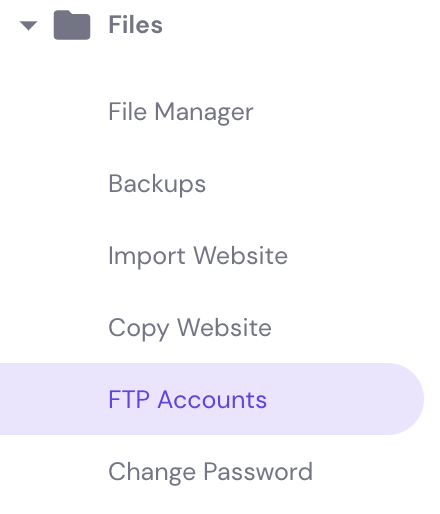
Alternatively, you can access your theme’s file folder and the WordPress functions.php file using a File Transfer Protocol (FTP) client, such as FileZilla. You can find your FTP credentials by navigating to the Files → FTP Account menu on the left sidebar in hPanel.
Common functions.php Custom Functions
Before making any modifications to your WordPress theme functions file, we recommend creating a backup of your website. It ensures you can restore your site to its previous state if anything goes wrong during the customization process.
Furthermore, creating a WordPress child theme is the best practice if you plan to make extensive changes to the functions.php file. Directly modifying the parent theme can result in losing customizations when the theme is updated. A child theme provides a safe and separate space for theme setup and customizations.
It’s also important to note that customizations to the functions file are theme-dependent, meaning you can’t apply the previous customizations if you switch themes.
Now, let’s explore some common custom PHP functions you can implement in the functions.php file to enhance your WordPress website.
Add Google Analytics Tracking Code
One of the most common customizations in the functions.php file is adding a Google Analytics tracking code to your WordPress website. It lets you gather valuable data about your site’s traffic, conversions, and user behavior.
Obtain your unique tracking code from your Google Analytics account to get started. Once you have the tracking code, open your functions.php file using the WordPress editor or a File Manager and insert the following code:
// Add Google Analytics Tracking Code function add_google_analytics() < ?> add_action('wp_head', 'add_google_analytics');In the code snippet above, replace the YOUR_ANALYTICS_ID_HERE placeholder with your Google Analytics Tracking ID.
Add RSS Feed Support
Really Simple Syndication (RSS) feeds are a valuable feature for bloggers and content publishers. They enable users to subscribe and stay updated with your content easily.
To start adding RSS feed support to your WordPress site, you can utilize the code snippet below in your functions.php file:
// Add RSS Feed Support function custom_add_feed() < add_theme_support('automatic-feed-links'); >add_action('after_setup_theme', 'custom_add_feed');Create Custom WordPress Login Error Message
Customizing the login error messages on your WordPress site can enhance the user experience and provide clear instructions to users when login issues occur. Here’s the code snippet to create a custom login error message using the WordPress functions.php file:
// Create Custom Login Error Message function custom_login_error_message() < return 'Your custom error message goes here.'; >add_filter('login_errors', 'custom_login_error_message');Change the Post Excerpt Length
The post excerpt summarizes the content on your blog’s homepage, in archives, and sometimes in widgets. By default, WordPress limits the length of post excerpts. However, you can customize this length to suit your website’s design and content strategy.
To modify the post excerpt length in WordPress, open your functions.php file and insert the custom code below:
// Change Post Excerpt Length function custom_excerpt_length($length) < return 40; // Change this number to set your desired excerpt length. >add_filter('excerpt_length', 'custom_excerpt_length', 999);In the provided code snippet, replace 40 with the desired number of words for the excerpt length.
Add File Type Upload Support
By default, WordPress restricts uploading certain file types, including SVG images. This restriction can result in the “Sorry, this file type is not permitted for security reasons” error when attempting to upload unsupported file types.
Fortunately, you can enable support for additional file types in WordPress by modifying the functions.php file, as shown in the code snippet below:
// Add File Type Upload Support function custom_allow_file_types($allowed_types) < $allowed_types['svg'] = 'image/svg+xml'; // Replace 'svg' with your desired file type extension. return $allowed_types; >add_filter('upload_mimes', 'custom_allow_file_types');Make sure to replace svg with the file type extension you wish to allow.
Customize WordPress Image Sizes
WordPress allows you to define custom image sizes to suit your website’s design and layout requirements. You can create new image sizes or adjust existing ones to ensure your media content displays correctly.
To create new image sizes in WordPress, add the following code snippet to your functions.php file:
// Add Custom Image Sizes function custom_image_sizes() < add_image_size('custom-thumbnail', 300, 200, true); add_image_size('custom-medium', 600, 400, true); >add_action('after_setup_theme', 'custom_image_sizes');Two custom image sizes are defined: custom-thumbnail and custom-medium. You can adjust the dimensions as needed for your specific use case.
If you want to remove the default image sizes that you won’t be using, employ the code example below instead:
// Remove Default Image Sizes function remove_default_image_sizes($sizes) < unset($sizes['medium_large']); return $sizes; >add_filter('intermediate_image_sizes_advanced', 'remove_default_image_sizes');In this example, the medium_large size is removed, but you can modify the code to remove other default sizes if necessary.
Tips for Customizing functions.php
Customizing the WordPress functions file offers extensive possibilities for enhancing your website’s functionality and appearance.
To become a more proficient WordPress developer and ensure a smooth and efficient WordPress theme customization process, consider these essential tips:
1. Use a Child Theme
When customizing the functions.php file, it’s essential to consider the long-term maintainability of your WordPress site. Creating a WordPress child theme is highly recommended to safeguard your modifications and prevent potential issues, as it acts as a protective layer for your customizations.
Without a child theme, any changes you make directly to the functions.php file of the parent theme may be lost when the theme is updated. These updates often include bug fixes, security enhancements, and new features for your website. Using a child theme’s functions file allows you to preserve your custom code while benefiting from updates to the parent theme.
2. Maintain Clean and Organized Code
Clean and organized code serves as the foundation of a well-functioning WordPress website. When customizing the WordPress core functions file, adhering to the WordPress Coding Standards is crucial. These standards help ensure that your code remains consistent, error-free, and easily understandable to other developers who may collaborate on your project.
Properly formatted and structured code reduces the likelihood of errors and enhances code readability. It allows you and others to swiftly identify specific code sections, understand their purposes, and make necessary adjustments without confusion.
3. Add Comments to Code Snippets
Comments are non-executable lines of text within your code snippets that provide explanations for you and other theme developers who may work on the project. They serve as invaluable documentation for your WordPress functions.php file customizations.
Adding code comments helps clarify why certain code was added or modified, what specific functions or features it enhances, and how it interacts with other parts of your WordPress site. Additionally, comments make it easier to troubleshoot issues or make updates in the future, as they help you quickly understand the purpose of each code snippet.
4. Test in a Staging Environment
Before implementing code modifications on your live website, testing them in a staging environment is advisable. It is a separate, identical copy of your website that is not accessible to the public.
The staging environment provides a safe and controlled space for testing changes, identifying potential issues, and fine-tuning customizations before they go live. This prevents disruptions to your live website’s user experience.
5. Implement Version Control
Utilizing version control systems (VCS) like Git is a valuable practice when customizing your WordPress functions.php file. Version control enables you to track, manage, and document the changes made to your codebase over time.
It provides a structured way to collaborate with other developers, maintain a history of modifications, and swiftly address issues or roll back changes if needed. By using VCS for your WordPress theme, you can capture snapshots of your code at various stages of development.
Conclusion
The WordPress functions.php file is a powerful tool for customizing your website’s functionality and appearance. In this article, you’ve learned where to find this file and how to access it using the Theme File Editor or a File Manager.
We also explored common customizations you can do using the functions file, such as adding a Google Analytics tracking code, fine-tuning RSS feeds, and modifying default image sizes.
Knowing how to properly use functions.php will help enhance your WordPress experience. Use child themes, keep your code tidy, and consider testing in a staging environment. By following these best practices, you’ll reduce the possibility of errors and ensure any changes you make function properly.
WordPress functions.php FAQ
This section will answer the most common questions about the functions PHP WordPress file:
What Does the functions.php File Do in WordPress?
The functions file in WordPress acts as a critical theme-specific file responsible for housing your functions, custom code snippets, and hooks to modify a theme’s behavior and appearance. It enables WordPress users to extend and enhance their websites by injecting custom functionalities and features.
How Do I Add Code Snippets to the functions.php File?
To add code snippets to the WordPress functions PHP file, access it using the Theme Editor menu or a File Manager application. Insert your custom code between the and ?> tags, ensuring it follows proper syntax. Save the file to apply your modifications.
Is It Safe to Edit the functions.php File?
Yes, editing the WordPress functions.php file is generally safe, but caution is essential. Mistakes in the code can break your site. To minimize risks, create backups, use a child theme, and follow best coding practices. Avoid editing the parent theme directly to preserve customizations during theme updates.
Is There an Alternative Way to Edit the functions.php File?
Yes, there’s an alternative way to edit or add functions using the Code Snippets WordPress plugin. The plugin provides a user-friendly interface for adding or editing code in separate files without directly modifying theme files. This method is particularly handy if you want your custom code to remain functional even if you change themes.
The author
Ariffud is a Technical Content Writer with an educational background in Informatics. He has extensive expertise in Linux and VPS, authoring over 200 articles on server management and web development. Follow him on LinkedIn.
WordPress functions.php File: The Ultimate Guide + Helpful Code Snippets

Not sure what the WordPress functions.php file is or what you can do with it? In a nutshell, the WordPress functions.php file gives you a way to add code snippets to your site. You can use these snippets in all kinds of helpful ways, so understanding how the functions.php file works can help you build a better WordPress site. In our ultimate guide to the WordPress functions.php file, you’re going to learn everything that you need to know about this file. Once you know all about the functions.php file, we’ll also share 17 helpful functions.php code snippets to help you start customizing your site.
What Does the WordPress functions.php File Do?
- Change core WordPress behavior, such as how many posts to show on the search results page or what content to include in your site’s RSS feed.
- Create your own custom shortcodes.
- Add new content or scripts to your site, such as injecting a script from your live chat service on certain pages or editing your site’s footer.
This is just scratching the surface…
Because the functions.php file lets you add custom PHP code snippets to your site rather than static HTML, the sky’s the limit when it comes to the types of modifications that you can make.
Where Is the WordPress functions.php File Located?
The WordPress functions.php file is located in your active theme’s folder, along with other theme files. To find the file, you can connect to your server using FTP or a file manager tool and browse to …/wp-content/themes/[active-theme-name]/functions.php
For example, if you’re using the popular OceanWP theme, the functions.php file would be located at …/wp-content/themes/oceanwp/functions.php
In recent versions of WordPress, WordPress has gotten better at handling these errors in a more graceful way, such as showing the “There has been a critical error on your website” message or checking for PHP errors before saving your changes.
But still – to avoid any issues from happening, we always recommend following these best practices…
Test Your functions.php Code on a Staging Site
Before adding any functions.php code snippets to your live WordPress site, we always recommend testing them on a staging version of your site first. This lets you check for any potential errors and verify that the code snippet is working as intended.
Info
A “staging site” is an identical copy of your live website that’s in a safe, private sandbox. It lets you test changes without needing to use maintenance mode on your live site.
If you’re hosting elsewhere, you can check out our guide on setting up a WordPress staging site.
Back Up Your Site Before Making Changes to functions.php
In addition to testing on a staging site, you’ll also want to back up your live website before adding the code snippet to your live site’s functions.php file.
This is a good best practice to follow when editing any WordPress files.
If anything goes wrong with the code snippet, you can restore to this backup point to instantly get your site working again.
If you host with Kinsta, Kinsta automatically backs up your site every day and you can also manually create a backup at any time. If you host elsewhere, you can read our guide on how to back up a WordPress site.
Always Use a Child Theme If You’re Editing the functions.php File
Because the WordPress functions.php file is located in your WordPress theme’s code, your theme will overwrite the functions.php file when you update your theme.
To avoid having the changes that you made to your theme’s functions.php file overwritten, you should always use a WordPress child theme and add your code snippets to the functions.php file in the child theme.
By using a child theme, you’re still able to update the parent theme when needed, but all of your functions.php customizations will never be overwritten.
2 functions.php File Alternatives That Might Be Better
While the WordPress functions.php file offers an easy way to add code snippets to your site, there are some functions.php alternatives that offer a better solution in most situations:
- Using a code manager plugin
- Storing code snippets in a custom plugin
These alternatives can have a few advantages over using the functions.php file:
- Not tied to your theme – this means that if you ever change themes, your functions.php customizations will still be there.
- Better organization – these alternatives make it easier to organize your code snippets, which can be helpful if you plan to add a lot of code snippets to your site.
- More control – in the case of a code manager plugin, you get helpful options such as enabling/disabling a snippet using a toggle button, only running snippets on the frontend or backend, and more.
Use a Code Manager Plugin
A code manager plugin is a plugin that gives you a user-friendly interface to add and edit code snippets that would otherwise go in the functions.php file.
One of the most popular options is the free Code Snippets plugin, but you can find other plugins that offer similar functionality.
With Code Snippets, you can add your functions.php code snippets from the WordPress dashboard, complete with options to…

- Add a title and description.
- Organize your snippets using tags.
- Only run the snippet on a certain part of your site.
You can then see all of your snippets in a list and easily enable/disable them as needed.

Because Code Snippets is a plugin, all of your code snippets will still be there even if you change WordPress themes.
Create a Custom Feature Plugin
Another alternative to the WordPress functions.php file is to just create your own custom plugin to house the code snippets.
While this might sound complicated, it’s actually a lot simpler than it might seem.
Here’s how it works:
- Create a folder on your local computer for your plugin.
- Create a single .php file inside that folder and edit it with your favorite text editor.
- Add the code template below to the file.
- Add your functions.php code snippets to the file
Then, you just need to install and activate the plugin on WordPress. Here are 2 ways to do that:
- Connect to your server via FTP/SFTP and upload the custom plugin folder to the wp-content/plugins folder. Then, go to the Plugins list and activate the plugin.
- Use your computer to create a .zip file of the folder. Then, go to Plugins → Add New and upload the .zip file to install it just like any other plugin.
How To Access the WordPress functions.php File: 2 Options
There are different ways that you can access and edit the WordPress functions.php file. Here are 2 of the most versatile methods that will work at any host:
- WordPress in-dashboard theme code editor.
- SFTP and your own code editor.
1. Use the WordPress In-Dashboard Theme Code Editor
By default, WordPress lets you edit all of your theme’s code from your WordPress dashboard, including the functions.php file:

- Open your WordPress dashboard.
- Go to Appearance → Theme File Editor.
- Select the Theme Functions (functions.php) file in the Theme Files list on the right-hand side.
- Add your edits in the code editor.
- Click the Update File button to save your changes.
With that being said, many people like to disable WordPress in-dashboard file editing to improve security. In that case, you can use the next method.
2. Use SFTP + Your Own Code Editor
For another way to edit the WordPress functions.php file, you can connect to your server via FTP/SFTP and edit the file that way.

- Download an FTP client if you haven’t done so already – we’ll use the free FileZilla client for the screenshots.
- Connect to your server using your FTP credentials – here’s how to use SFTP to connect.
- Use the folder structure to navigate to …/wp-content/themes/[your-active-child-theme]
- Right-click on the functions.php file and select Edit.
This should download the file to your local computer and automatically open it in a text editor. You can now add your code snippets to the file.

When you’re finished, save your changes and close the file.
FileZilla should then show a prompt to re-upload the edited version to your server.

Top Useful Functions to Add to Your WordPress functions.php File
Now that you know how to edit the WordPress functions.php file, let’s go over some of the most useful functions.php code snippets that you can add to your site.
Show Last Modified Date on Blog Posts
By default, most themes show the date that you published a blog post. However, if you’re regularly updating and refreshing old content, you might want to also show the last modified date (or replace the publish date with the last modified date).
Not only does this let your human visitors know that you’re still updating the content, but it also shows Google that your content is fresh.
function show_last_updated( $content ) < $u_time = get_the_time('U'); $u_modified_time = get_the_modified_time('U'); if ($u_modified_time >= $u_time + 86400) < $updated_date = get_the_modified_time('F jS, Y'); $updated_time = get_the_modified_time('h:i a'); $custom_content .= 'Recently updated on '. $updated_date . ' at '. $updated_time .'
'; > $custom_content .= $content; return $custom_content; > add_filter( 'the_content', 'show_last_updated' );For more details, check out our full post showing the last modified date on WordPress.
Disable the WordPress Toolbar for Certain Users
By default, WordPress shows the WordPress toolbar for all logged-in users using the built-in WordPress user roles. This isn’t necessarily the case for custom roles, such as the Customer user role for WooCommerce stores.
If you want to change this, you can use a functions.php code snippet to hide the WordPress toolbar for certain user roles.
This example would hide the admin toolbar for users with the author user role.
add_filter( 'show_admin_bar', function( $show ) < if ( current_user_can( 'author' ) ) < return false; >return $show; > );Delay Posts from Appearing In RSS Feed
By default, content appears in your RSS feed as soon as you publish it. This can give content scrapers a chance to scrape your content and index it in Google before Google even indexes your original post.
To avoid having someone else get the credit for your content, you can delay posts from appearing in your RSS feed.
While this won’t completely stop content scrapers, it does mean that you can give Google time to index your content first.
Here’s the code snippet – you can change the number – “30” in this example – to the number of minutes you want the delay to be:
function kinsta_delay_feed_content($where) < global $wpdb; if ( is_feed() ) < // timestamp in WP-format $now = gmdate('Y-m-d H:i:s'); // value for wait; + device $wait = '30'; // integer // http://dev.mysql.com/doc/refman/5.0/en/date-and-time-functions.html#function_timestampdiff $device = 'MINUTE'; //MINUTE, HOUR, DAY, WEEK, MONTH, YEAR // add SQL-sytax to default $where $where .= " AND TIMESTAMPDIFF($device, $wpdb->posts.post_date_gmt, '$now') > $wait "; > return $where; > add_filter('posts_where', 'kinsta_delay_feed_content');Exclude Certain Categories From RSS Feed
In addition to delaying content from appearing in the RSS feed, you also might have situations where you want to exclude entire categories of blog posts from appearing in your site’s RSS feed.
To achieve this, you can use the following functions.php code snippet:
function kinsta_exclude_category_rss($query) < if ($query->is_feed) < $query->set('cat','-38'); > return $query; > add_filter('pre_get_posts','kinsta_exclude_category_rss');Make sure to replace the example category ID – “38” – with the actual category IDs that you want to exclude (and don’t remove the minus sign)
Here’s how to find the ID number:
- Go to Posts → Categories to see a list of all the categories on your site.
- Click Edit under the category that you want to exclude.
- Look at the URL of the edit page in your browser address bar. The category ID is the number that comes after ?taxonomy=category&tag_ID=X.
For example, if the URL is https://yoursite.com/wp-admin/term.php?taxonomy=category&tag_ID=38&post_type=post, then the category ID is 38.
WordPress post revisions sitewide is to edit your site’s wp-config.php file, you might want to store different numbers of revisions for different post types – e.g. blog posts versus WooCommerce products.
This functions.php code snippet lets you do just that. To make it your own, change the post type – “post” in this example – to the actual post type that you want to control and the number – “5” in this example – to the number of revisions that you want to store.
function kinsta_post_revisions_by_type( $revisions, $post ) < if( 'post' == $post->post_type ) < $revisions = 5; >return $revisions; > add_filter( 'wp_revisions_to_keep', 'kinsta_post_revisions_by_type', 10, 2 );* Note – you’re editing the “post” that comes immediately after the “if” statement. For example, to target products, that line would look like this:
if( 'product' == $post->post_type )Disable the WordPress Search Function
If your site doesn’t need search functionality, you might want to disable the WordPress search function to prevent potential abuse.
For example, even if you don’t show a search box on your site, bots can still use the search function by adding ?s=[search-term] to your URL.
To do this, you can add the following code snippet:
function kinsta_disable_wp_search( $query, $error = true ) < if ( is_search() ) < $query->is_search = false; $query->query_vars[s] = false; $query->query[s] = false; // to error if ( $error == true ) $query->is_404 = true; > > add_action( 'parse_query', 'kinsta_disable_wp_search' ); add_filter( 'get_search_form', create_function( '$a', "return null;" ) );If someone tries to use the search function directly, your site will return a 404 page instead.
Create Your Own Custom Shortcodes (E.g. Current Year)
WordPress shortcodes are really handy shortcuts that let you embed dynamic content in your site.
While many WordPress plugins rely on shortcodes to help power their functionality, you can also create your own custom shortcodes using the WordPress functions.php file and the add_shortcode() function.
For example, one common use case is to create a shortcode that displays the current year. This lets you automatically show the current year in all your content without needing to manually update everything every January 1st.
To create such a shortcode, you can use the following code:
function year_shortcode() < $year = date('Y'); return $year; >add_shortcode('currentyear', 'year_shortcode');Then, when you add the [currentyear] shortcode to your content, it will automatically be replaced with the actual year – e.g. 2023.
Allow Shortcodes in Post Titles
By default, WordPress won’t execute any shortcodes that you place in your post’s title field. If you want to use shortcodes in WordPress post titles, you can enable this functionality by adding a simple code snippet to the WordPress functions.php file.
For example, when combined with the previous code snippet, this would let you automatically include the current year in the post title by adding the [currentyear] shortcode.
add_filter( 'the_title', 'do_shortcode' );Hide Login Errors to Improve Security
By default, WordPress will show an explainer message on failed login attempts. This message can give away some information, such as whether or not a certain email address is registered on your site (even if the password is incorrect).
To avoid leaking any potentially sensitive information, you can hide these login errors by adding the following code snippet to your functions.php file.
function kinsta_hide_login_errors() < return 'These are not valid credentials'; >add_filter( 'login_errors', 'kinsta_hide_login_errors' );This snippet replaces the default login error text with the following message – These are not valid credentials.
You can customize the text according to your preferences – but try to avoid using dashes, slashes, or other characters as it can cause an error (unless you “escape” these characters),
Change the Excerpt Length
By default, the WordPress excerpt shows the first 55 words of a post.
If you want to adjust this, you can add the following code snippet to the functions.php file.
function kinsta_change_excerpt_length($length) < return 90; >add_filter('excerpt_length', 'kinsta_change_excerpt_length');The code snippet above will change the excerpt length to 90 words. If you’d prefer a different number, you can change “90” to the exact number of words that you want to use.
Remove the WordPress Version Number
To make it harder for malicious actors to detect which version of WordPress you’re using, some users like to remove the WordPress version number from appearing anywhere in your site’s frontend code.
To do this, you can add the following code snippets to your functions.php file.
function kinsta_hide_version() < return ''; >add_filter('the_generator', 'kinsta_hide_version');Set Up WordPress Pagination
If you’re not happy with how pagination works in your theme, you can use a functions.php code snippet to adjust pagination behavior or even create your own pagination system.
If you’re interested in this type of modification, we have a full guide to WordPress pagination that includes some example functions.php code snippets for you.
Change How Many Results to Include on Search Listing Page
WordPress gives you an in-dashboard option to control how many posts to list on archive pages (Settings → Reading).
However, this changes the number for all archive pages. What if you just want to use a different number for the search results page?
For that, you can add this snippet to your functions.php file – make sure to change the number (“12” in this example) to the actual number of results that you want to display before paginating additional results.
function kinsta_search_results_list() < if ( is_search() ) set_query_var('posts_per_archive_page', 12); >add_filter('pre_get_posts', 'kinsta_search_results_list');Include Featured Images in the WordPress RSS Feed
If you want to include your posts’ featured images in your RSS feed content, you can add the following snippet to your functions.php file.
function kinsta_featured_image_rss($content) < global $post; if ( has_post_thumbnail( $post->ID ) )< $content = '' . get_the_post_thumbnail( $post->ID, 'full', array( 'style' => 'margin-bottom: 15px;' ) ) . '' . $content; > return $content; > add_filter('the_excerpt_rss', 'kinsta_featured_image_rss'); add_filter('the_content_feed', 'kinsta_featured_image_rss');As written, the above code snippet will insert the image at full size. To use a different thumbnail size, you can change “full” to a different thumbnail size – e.g. “large” or “medium”.
Add Upload Support for File Types (E.g. SVG)
By default, WordPress blocks you from uploading certain file types, such as SVG files.
To enable support for these blocked file types, you can add the following code snippet to the WordPress functions.php file:
function kinsta_myme_types($mime_types) < $mime_types['svg'] = 'image/svg+xml'; return $mime_types; >add_filter('upload_mimes', 'kinsta_myme_types', 1, 1);This code snippet only enables SVG uploads, but you can modify it to add support for other file types if needed.
Hide WordPress Update Nags for Non-Administrators
By default, WordPress will show dashboard-wide messages to all users with dashboard access when there’s a new update available.
Even if a user’s role doesn’t allow them to apply the update, the dashboard message will tell that user to contact the administrator.
To adjust this, you can use this code snippet to hide update notifications for all non-Administrator users:
function kinsta_hide_update_nag() if ( ! current_user_can( 'update_core' ) ) remove_action( 'admin_notices', 'update_nag', 3 ); > > add_action('admin_menu','kinsta_hide_update_nag');Change Automatic JPEG Optimization Quality
Though not everyone knows about this feature, WordPress automatically compresses JPEG images when creating thumbnails for your site after you upload images.
Since WordPress 4.5, WordPress has set the default quality level to 82 (with 100 being zero compression).
If you want to make this quality level higher or lower, you can add the following code snippet to your functions.php file – make sure to change the number (“90” in this example) to the actual quality level that you want to use:
add_filter( 'jpeg_quality', create_function( '', 'return 90;' ) );Best Practices for Organizing Your WordPress functions.php File
If you’re just using the WordPress functions.php file to add a couple of code snippets, you probably don’t need to worry about organization.
But if you’re adding a lot of code snippets to your site, it can quickly get unwieldy and complex if you’re not following some functions.php file organization best practices.
Here are a few best practices to keep your code snippets organized…
Add Code Comments to Explain Everything
When you first add a code snippet to your functions.php file, you know exactly what the snippet does and why you added it. But when you look back at the functions.php file a year later, things might not be so clear.
To avoid this, you’ll want to add code comments to each snippet that explain what the snippet does and why you added it.
Code comments are text that isn’t executed by WordPress, but that human users can read to understand what the code snippet is doing.
To add a single-line code comment, you can use this format:
// This is a single-line code commentTo add a multiple-line code comment, you can use this format:
/** * This is a code comment that spans multiple lines * This text is also in the same comment * This is the last line in the code comment */Here’s an example of how you might use code comments – you can see that the comment before each snippet explains what the snippet does.

Use Include Files to Separate Snippets Into Different Files
If you really have a lot of code snippets, you can store them in separate files instead of using just the functions.php file.
Then, you can include those code snippets in the functions.php file using include or require. Mike Schinkel has a good example of how you might do this on StackExchange.
Consider One of the functions.php Alternatives from Above
If you find your functions.php file getting a bit cluttered, you might prefer one of the functions.php alternatives that we detailed earlier.
For example, the free Code Snippets plugin makes it very easy to organize everything because you can add each code snippet separately, complete with its own title and description. You can also use tags to organize your snippets.
Summary
The WordPress functions.php file is a theme-specific file that lets you add PHP code snippets to your website.
If you want to add code snippets to the functions.php file, you should always use a child theme so that your changes don’t get overwritten when you update your theme. We also recommend backing up your site before adding snippets and testing them on a staging site whenever possible.
As an alternative to using the functions.php file, you can also consider a code manager plugin or creating your own custom plugin to house your snippets.
Now that you know how the WordPress functions.php file works, you can start customizing your site in all kinds of helpful ways.
The example functions.php snippets above give you some good places to get started, but the sky’s the limit when it comes to what you can do.
Save time and costs, plus maximize site performance, with $275+ worth of enterprise-level integrations included in every Managed WordPress plan. This includes a high-performance CDN, DDoS protection, malware and hack mitigation, edge caching, and Google’s fastest CPU machines. Get started with no long-term contracts, assisted migrations, and a 30-day money-back guarantee.
Check out our plans or talk to sales to find the plan that’s right for you.
Jeremy Holcombe
- Website