
Android studio как собрать screencap
В данной заметке будут рассмотрены средства реализации автоматического тестирования. Рассматриваются только инструменты, входящие в Android SDK или распространяющиеся под Open Source лицензией.
Концепция автоматического тестирования
Задача — с наибольшей точностью автоматизировать действия, которые выполняет тестировщик. Давайте их рассмотрим. В наличии есть несколько приложений и несколько Android устройств. Для каждого приложения и каждого устройства выполняются следующие шаги:
- Установка приложения на устройство
- Запуск приложения
- Тестирование приложения выбранным способом
- Удаление приложения
- Сброс состояния устройства
На каждом шаге нужно собрать и проанализировать данные, например логи и скриншоты. Затем на основе этих данных сформировать результат тестирования.
Далее рассматриваются средства, позволяющие автоматизировать перечисленные шаги.
Управление Android устройствами
Для начала нужно выделить компьютер на котором будет запускаться автоматическое тестирование и настроить на нем Android SDK . Примеры приводятся для компьютера с установленной ОС Linux.
На всех тестируемых устройствах нужно отключить экран блокировки и максимально увеличить время ожидания. Для некоторых методов тестирования нужно отключить смену ориентации экрана.
В Android SDK имеются две утилиты для управления устройствами: adb и MonkeyRunner.
Я постараюсь подробно описать автоматизацию действий, использующихся при тестировании. Тем, кто знаком с ADB и MonkeyRunner имеет смысл сразу переходить к разделу « Способы автоматизированного тестирования ».
Управление с помощью утилиты ADB
ADB (Android Debug Bridge) – утилита для управления Android устройствами из командной строки. Официальная документация по ADB: developer.android.com/tools/help/adb.html
Утилита adb находится в директории /platform-tools/ . Путь к данной директории рекомендуется прописать в переменной окружения PATH .
Проверка работы ADB
Устанавливаем и настраиваем Android SDK, подключаем к компьютеру Android устройства и выполняем команду:
Команда выдаст список всех подключенных устройств. Если список устройств не пуст, значит ADB настроен и работает.
Работа с несколькими устройствами
Чтобы указать ADB с каким устройством нужно работать, следует прописать серийный номер устройства после ключа -s :
Серийный номер устройства можно посмотреть командой adb devices . Ключ -s позволяет работать одновременно с несколькими подключенными устройствами. В дальнейшем ключ -s в командах я указывать не буду.
Основные команды ADB
Открыть консоль на устройстве:
Запустить команду на устройстве:
В Android присутствуют многие стандартные утилиты Linux: ls, cat, dmesg,…
Установить приложение из apk файла:
adb install example.apk
Название package можно получить из apk файла командой:
aapt dump badging example.apk | grep «package»
Загрузить файл с устройства на компьютер:
Загрузить файл с компьютера на устройство:
В большинство директорий на устройстве разрешен доступ только на чтение. Доступ на запись разрешен в директорию /sdcard (из нее нельзя запускать программы) и /data/local/tmp/ .
adb shell am start -n /
Запускает указанную activity. Название activity, которая запускается при выборе приложения в меню можно получить из apk файла командой:
aapt dump badging example.apk | grep «launchable-activity»
Чтение логов в Android производится утилитой logcat.
Считать логи с устройства (блокируется до нажатия Ctrl-C):
Очистить буфер логов на устройстве:
Считать буфер логов на устройстве (выдает текущее содержимое буфера, не блокируется):
adb logcat -c # очищаем буфер логов
adb logcat -d > file.log # сохраняем текущее содержимое буфера логов в file.log
Снятие скриншотов с помощью утилиты screencap
Утилита screencap сохраняет текущее содержимое экрана в графический файл:
adb shell screencap /sdcard/screen.png
adb pull /sdcard/screen.png screen.png
adb shell rm /sdcard/screen.png
Утилита screencap имеется на телефонах с Android 4.x и выше. На предыдущих версиях Android снятие скриншотов можно производить с помощью MonkeyRunner.
Пример BASH скрипта для тестирования приложения c помощью ADB
# Пример BASH скрипта для автоматического тестирования приложения c помощью ADB
# 1. Устанавливает приложение
# 2. Запускает приложение
# 3. Тестирует приложение с помощью monkey
# 4. Удаляет приложение
# На каждом шаге собираются и сохраняются log-файлы.
# 1. Устанавливаем приложение
adb uninstall $PACKAGE # удаляем приложение
adb logcat -c # очищаем буфер логов
adb install $APK # устанавливаем приложение
adb logcat -d > log/install.log # записываем логи установки приложения
# 2. Запускаем приложение
adb shell am start -n $PACKAGE/$ACTIVITY # запускаем приложение
sleep 10 # ожидаем 10 сек чтобы приложение полностью загрузилось
adb logcat -d > log/start.log
# 3. Тестируем приложение
# тестируем приложение с помощью monkey
adb shell monkey —pct-touch 70 -p $PACKAGE -v 1000 —throttle 500
adb logcat -d > log/test.log
# 4. Удаляем приложение
adb uninstall $PACKAGE
adb logcat -d > log/uninstall.log
- Логирование в Android приложениях с автоматическим формированием имени места вызова логирующей функции
- Как отлаживаться в Android
- Как создать Android-сервис с использованием Qt
- Анализ памяти для Android приложений с помощью DDMS
- Работа с утилитой ADB: основные команды, чтение логов, создание скриншотов
- Как подключить внутренний диск Android в режиме записи (каталог /system)
- Автоматизация тестирования Android-приложений с помощью MonkeyRunner
- Тестирование Android-приложений с помощью Robotion
- В чем отличия версий SDK в Android
- Как перезапускать сервис в Android, если его работа по какой-то причине была завершена
- Энергоэффективный способ определять местоположение в Android
- Первичная настройка Android Studio в Linux на примере версии SDk 3.2.1
Создание андроид-приложения (APK)
Постройте сами вместо того, чтобы загружать
AAPS is not available as download due to regulation for medical devices. It is legal to build the app for your own use, but you must not give a copy to others! См. раздел FAQ .
Важные Примечания
- Используйте Android Studio версии 2020.3.1 или новее для построения apk.
- Windows 10 для 32-разрядных систем не поддерживается в Android Studio 2020.3.1
Рекомендуемые спецификации компьютеров для сборки файла apk
Имейте в виду, что и 64-разрядная процессор, и 64-разрядная ОС являются обязательным условием. Если ваша система не соответствует этому условию, вы должны изменить аппаратное или программное обеспечение или всю систему. It is strongly recommended to use SSD (Solid State Disk) instead of HDD (Hard Disk Drive) because it will take less time when you are building the APS installation apk file. Recommended is just recommended and it is not a mandatory. However, you may still use a HDD when you are building apk file but note that the building process can take a long time to complete, although once started, you can leave it running unattended.
Эта статья разделена на две части.
- В обзорной части находится объяснение того, какие шаги необходимы для создания файла APK.
- В пошаговой инструкции вы найдете снимки экранов установки. Поскольку версии Android Studio — среды разработки программного обеспечения, в которой мы будем создавать APK — меняются очень быстро, точного соответствия вашей сборке вы не увидите, но общее представление о том, как это делается, получите. Android Studio работает на Windows, Mac OS X и Linux, и между каждой платформой возможны незначительные различия. If you find that something important is wrong or missing, please inform the facebook group «AAPS users» or in the Discord chat Android APS so that we can have a look at this.
Общие замечания
В целом, шаги, необходимые для создания файла APK таковы:
- Установите Git
- Установите Android Studio
- Задайте путь к git в параметрах Android Studio
- Download AAPS code
- Загрузите Android SDK
- Постройте приложение (сгенерируйте подписанный apk)
- Перенесите файл apk на телефон
- Идентифицируйте ресивер при использовании xDrip+
Пошаговое руководство
Подробное описание шагов, необходимых для создания файла APK.
Установите git (если у вас его нет)
Следуйте инструкциям на странице установки git .
Установите Android Studio
The following screenshots have been taken from Android Studio Version Arctic Fox | 2020.3.1. Screens can change in future versions of Android Studio. Но у вас должно получиться. Здесь можно найти помощь участников .
Одна из наиболее важных заповедей при установке Android Studio: ** Будьте терпеливы! ** Во время установки и настройки Android Studio загружает многие элементы, которые отнимают время.
Download Android Studio from here and install it on your computer.
On first start you will find the setup wizard:
Выберите «Не импортировать настройки», так как вы не использовали их раньше.
Решите, хотите ли вы совместно использовать данные с Google или нет.

На следующем экране нажмите кнопку «Далее».
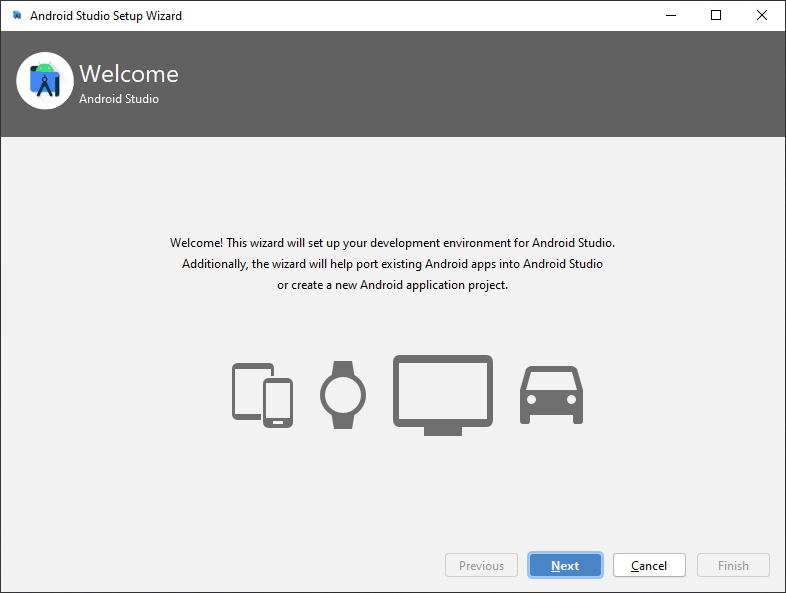
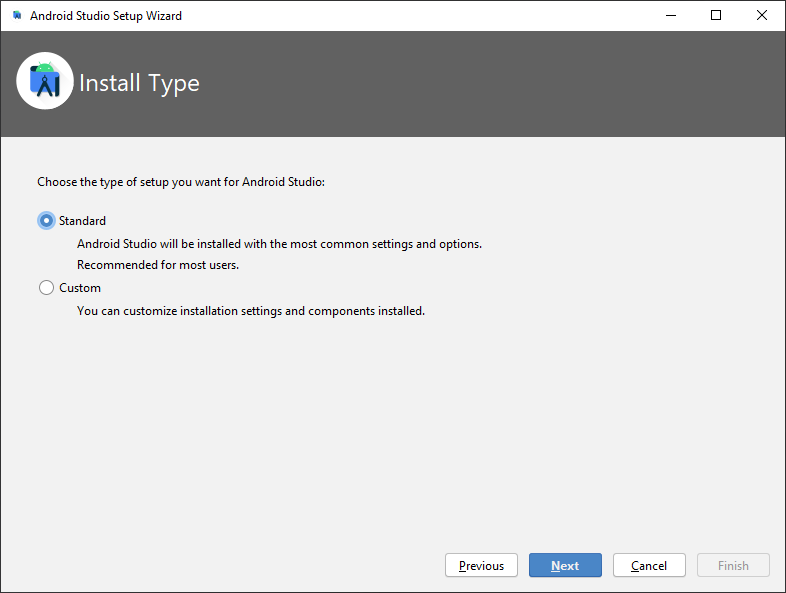
Выберите «Стандартная» установка и нажмите «Далее».
Для интерфейса выберите тему, которая вам нравится. (В этом руководстве мы использовали «Светлую».) Затем нажмите кнопку «Далее».
Note: This is just the color scheme. You can select whatever you like (i.e. «Darcula» for dark mode). This selection has no influence on building the APK but the following screenshots might look different.

Нажмите «Далее» в диалоге «Подтвердить настройки».

Click on all three license agreement parts and select «Agree». When you have agreed to all, the «Finish» button will be enabled and you can «Finish».

Подождите, пока Android Studio скачивает дополнительные компоненты и будет терпеливы. После того, как все загрузится кнопка «Готово», станет синей. Теперь нажмите на кнопку.

Download AAPS code
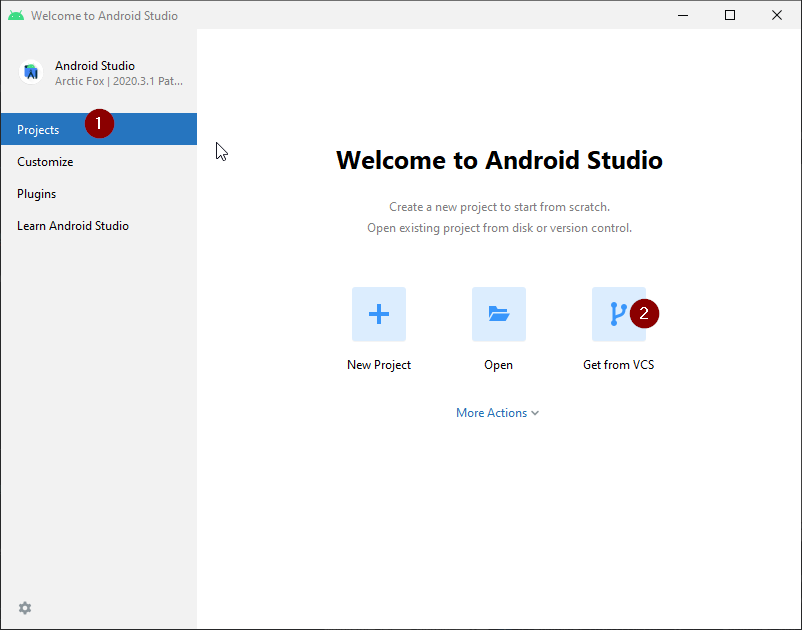
- On the Android Studio welcome screen select «Projects» (1) on the left and then «Get from VCS» (2).
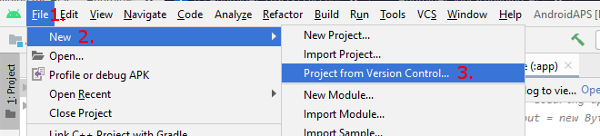
- If you already opened Android Studio and do not see the welcome screen anymore select File (1) > New (2) > Project from Version Control… (3)
- We will now tell Android Studio were to get the code from:
- Make sure you have selected «Repository URL» on the left (1).
- Check if «Git» is selected as version control (2).
- Copy and paste the URL https://github.com/nightscout/AndroidAPS to the main AAPS repository into the URL textbox (3).
- Choose the directory where you want to save the cloned code (4).
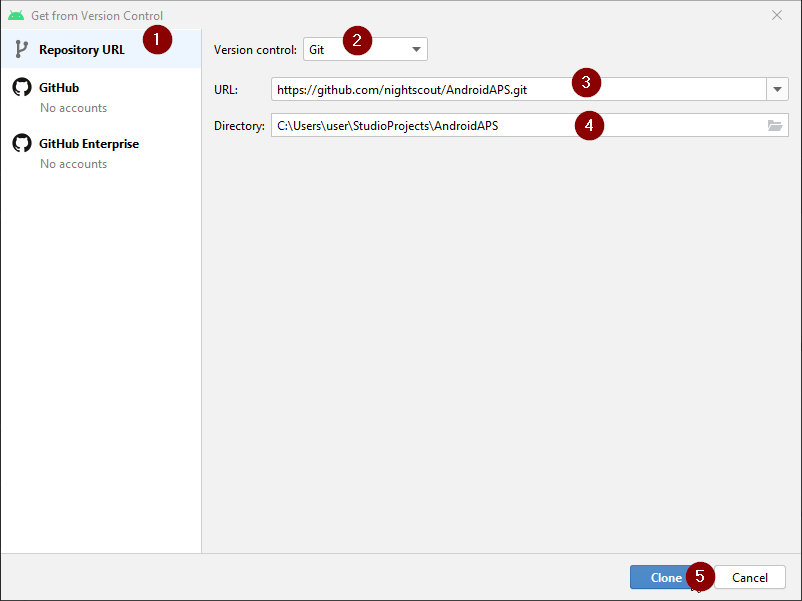
- If you already opened Android Studio and do not see the welcome screen anymore select File (1) > New (2) > Project from Version Control… (3)
- Нажмите кнопку «Клонировать» (5).

- Не нажимайте «Background», пока клонируется репозиторий!
- After the repository is cloned successfully, Android Studio will open the cloned project.
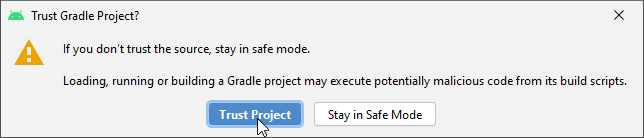
- You will be asked whether you want to trust the project. Click on «Trust project»!
- In the status bar at the bottom you will see the information that Android Studio is running background tasks.

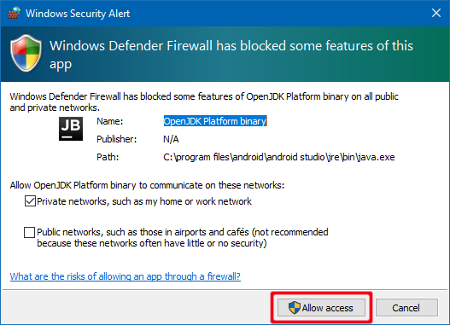
- Windows only: Grant access if your firewall is asking for permission.
- Once the background tasks are finished you will probably see an error saying that errors occurred (1) or (2) or (3).
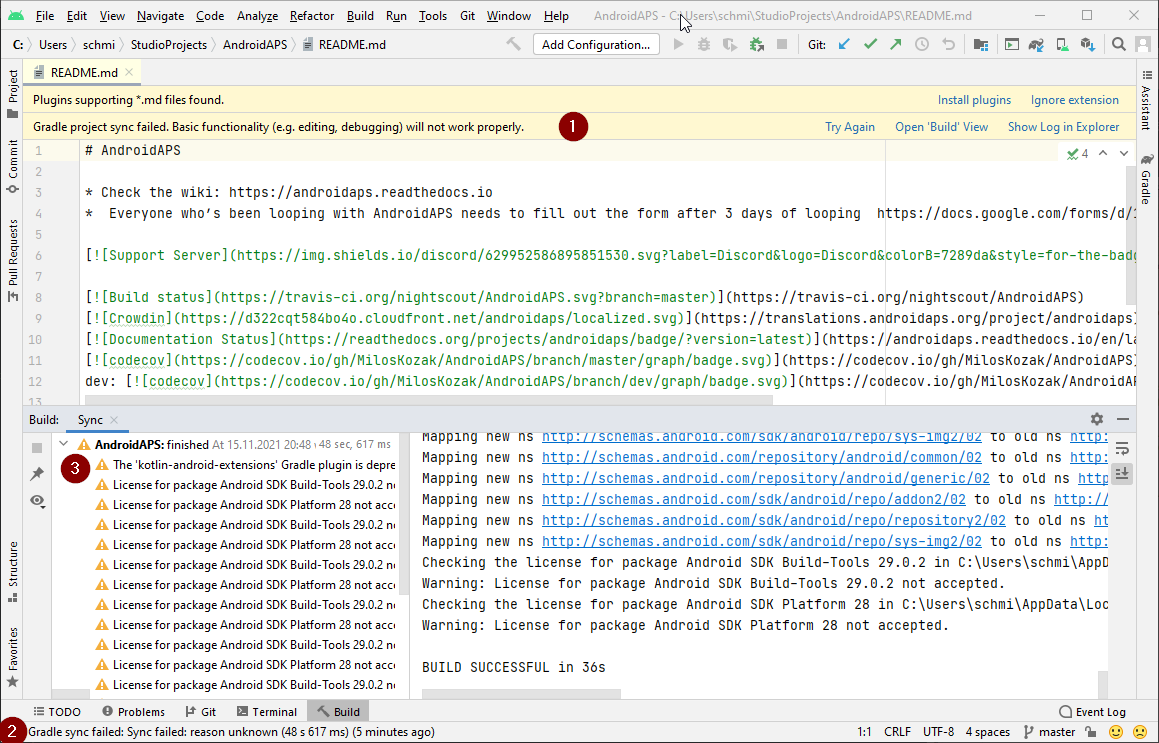 Don’t worry, this will be solved soon!
Задайте путь к git в параметрах
Make sure git is installed on your computer and you have restarted your computer since installing.
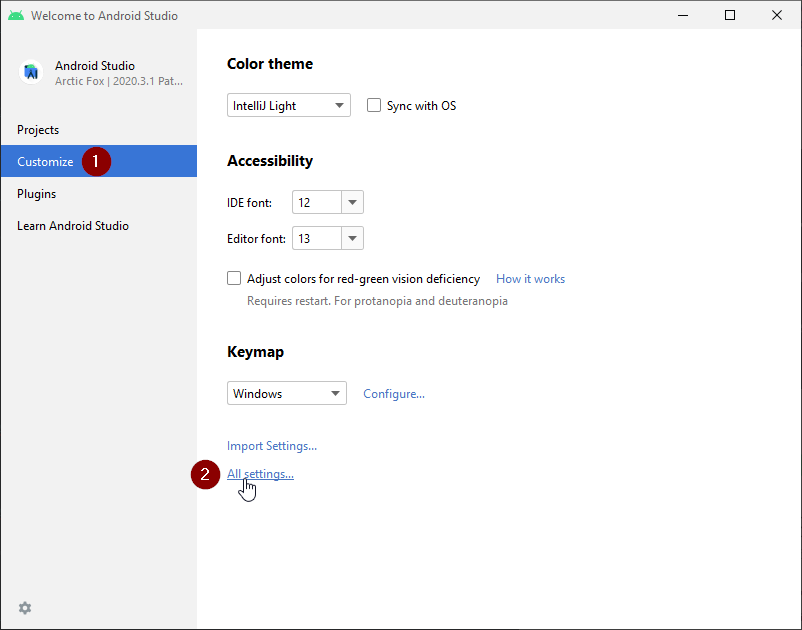
On the Android Studio welcome screen click «Customize» (1) on the left and then select the link «All settings…» (2):
Windows
- As windows user, make sure you have restarted your computer after installing Git .
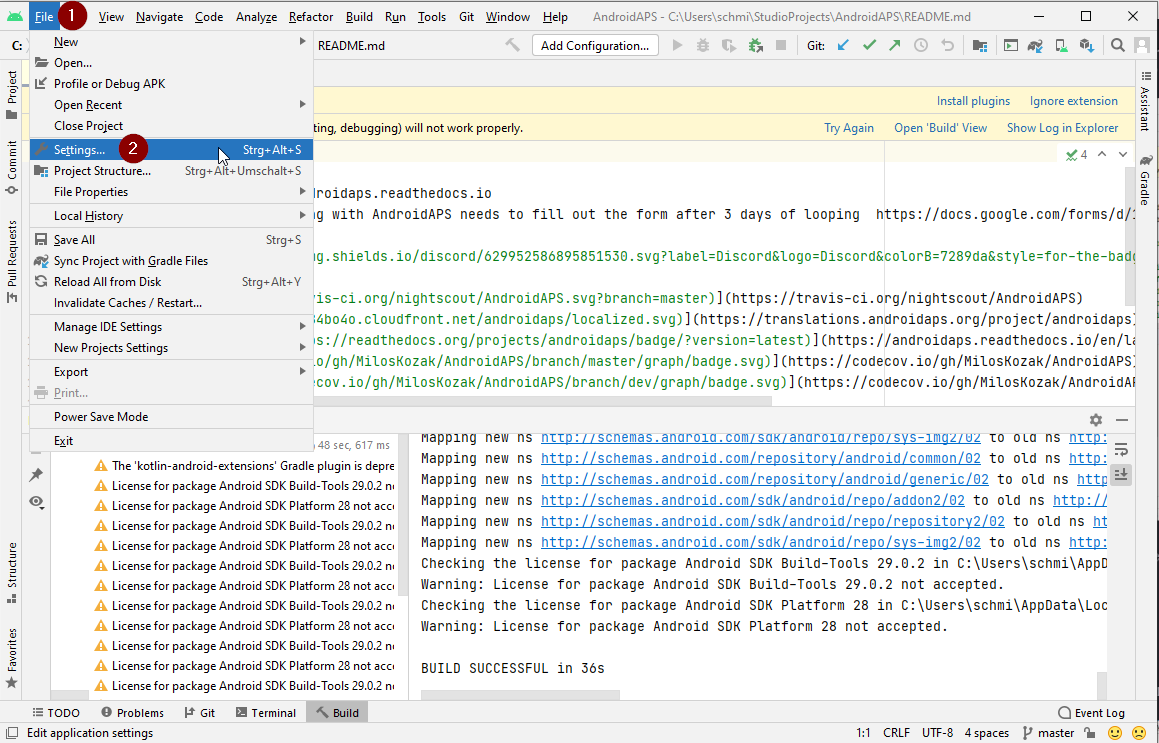
- In the menu, go to File (1) > Settings (2) (or Android Studio > Preferences on Mac).
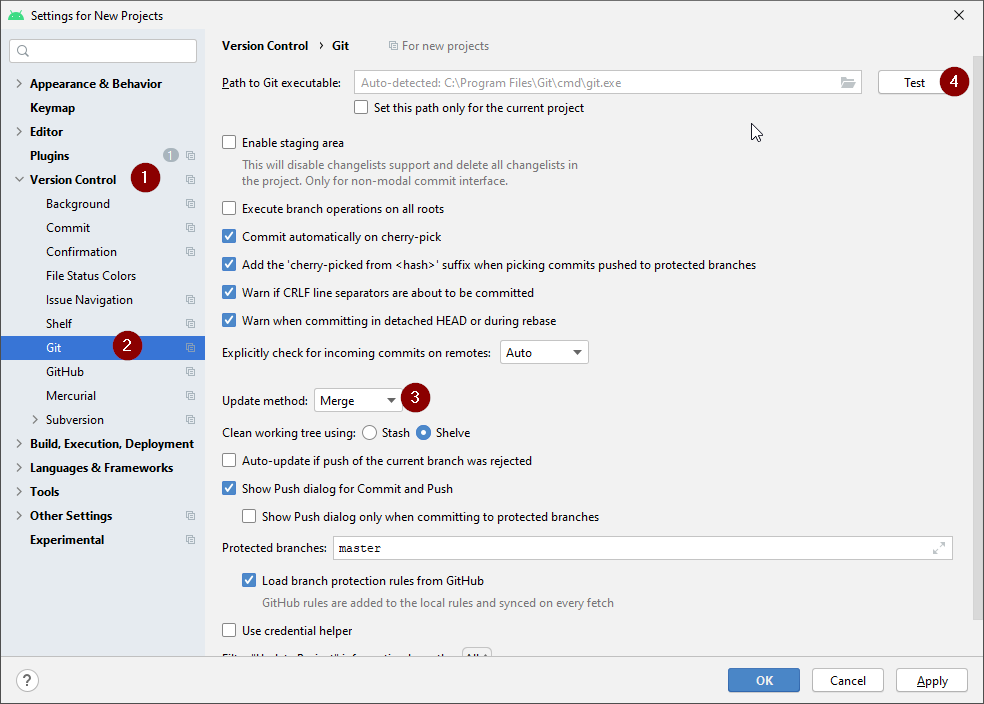
- Double-click «Version Control» (1) to open the sub-menu.
- Нажмите Git (2).
- Make sure update method «Merge» (3) is selected.
- Проверьте, может ли Android Studio найти путь к файлу git.exe автоматически, нажав кнопку «Тест» (4).
- If automatic setting is successful git version will be displayed next to the path.

- Eventually git.exe cannot be found automatically or the Test will result in an error (1):
 In this case click on the folder icon (2).
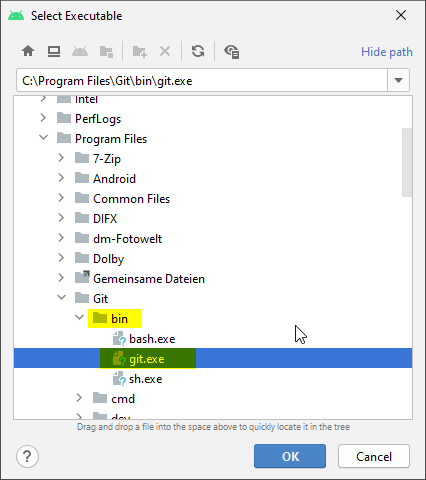
 - Use search function in windows explorer to find «git.exe» if you are unsure where git has been installed. You are looking for a file named «git.exe», located in \bin folder.
- Select path to git.exe and make sure you selected the one in ** \bin\ ** folder (3) and click «OK» (4).
- Check your selected git path again with the «Test» button as described above.
- When the git version is displayed next to the path (see screenshot above), close settings window by clicking «OK» button (5).
Mac
- Any git version should work. For example https://git-scm.com/download/mac.
- Use homebrew to install git: $ brew install git .
- For details on installing git see the official git documentation.
- If you install git via homebrew there is no need to change any preferences. Just in case: They can be found here: Android Studio — Preferences.
Загрузите Android SDK
- In the menu, go to File (1) > Settings (2) (or Android Studio > Preferences on Mac).
- Double-click on Languages & Frameworks to open its submenu (1).
- Select Android SDK (2).
- Tick the box left of «Android 9.0 (Pie)» (3) (API Level 28).

- Confirm changes by clicking OK.
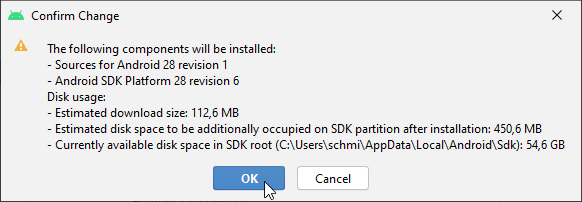
- Wait until the SDK download and installation is finished.
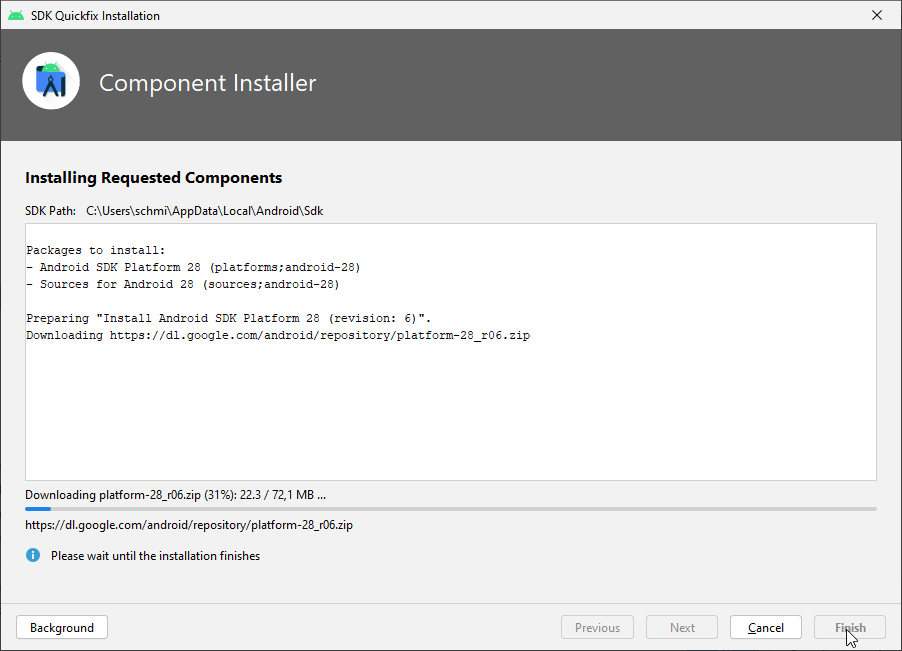
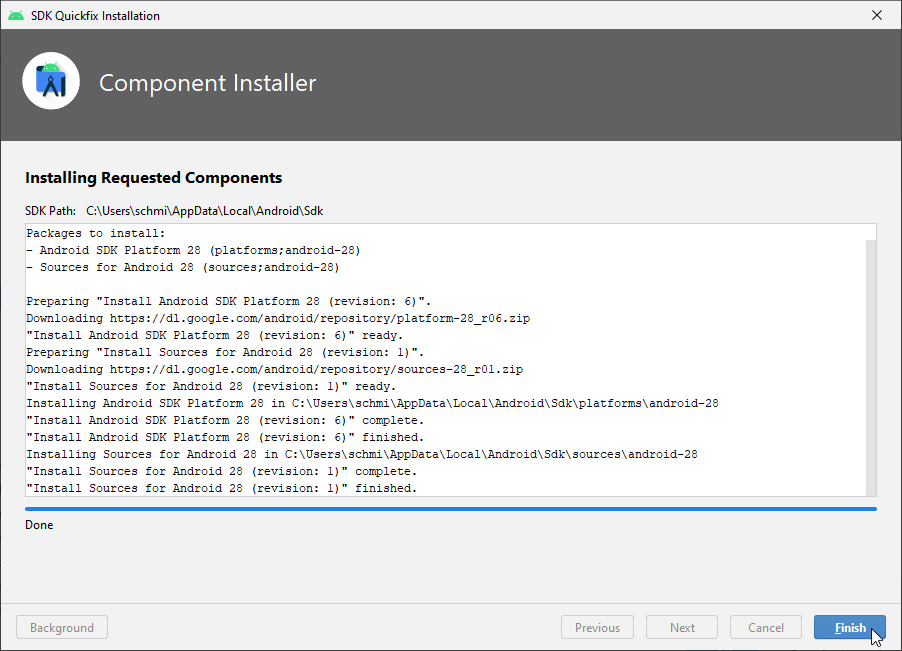
- When SDK installation is completed the «Finish» button will turn blue. Click this button.
- Android Studio might recommend to update the gradle system. Never update gradle! This will lead to difficulties!
- If you see an information on the lower right side of your Android Studio window that Android Gradle Plugin is ready to update click on the text «upgrade» (1).
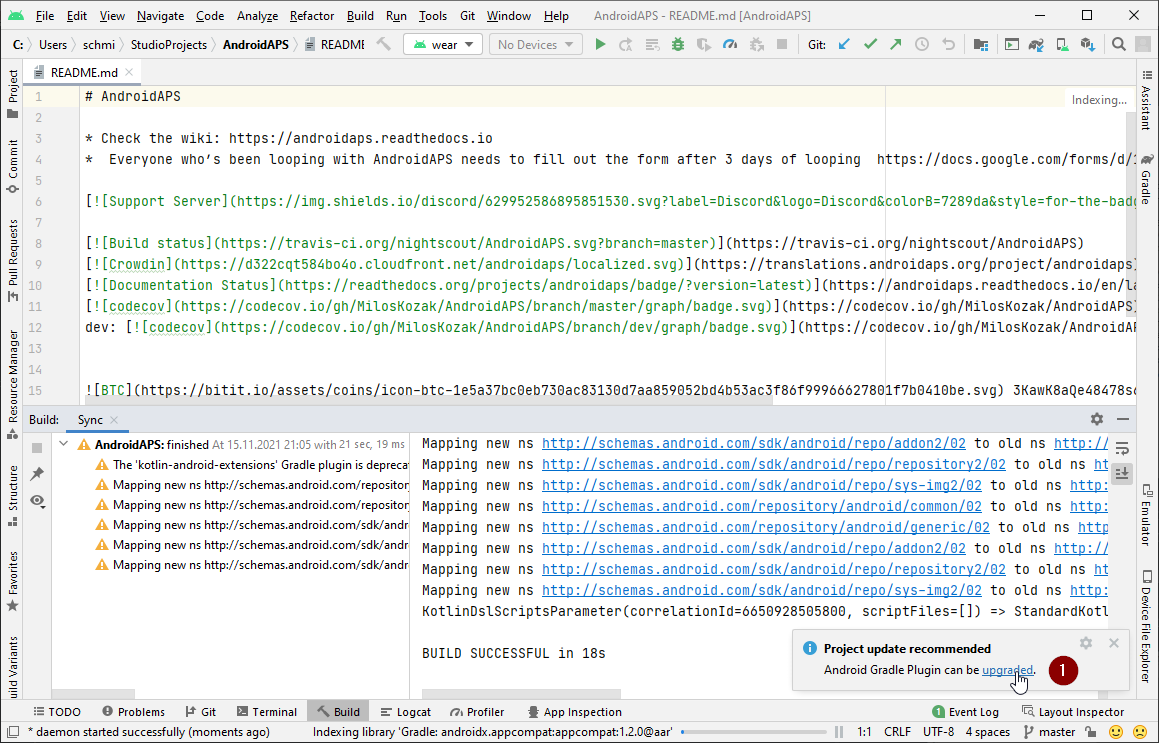
- In the dialog box the select «Don’t remind me again for this project» (2).
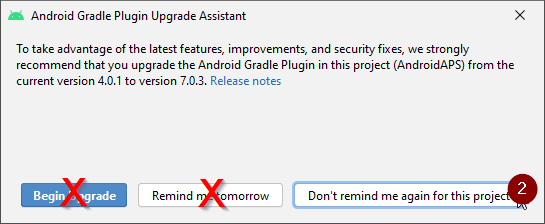
- Restart Android Studio before you continue.
Создание подписанного APK
Signing means that you indicate your app to be your own creation but in a digital way as a kind of digital fingerprint within the app itself. That is necessary because Android has a rule that it only accepts signed code to run for security reasons. For more information on this topic, follow this link.
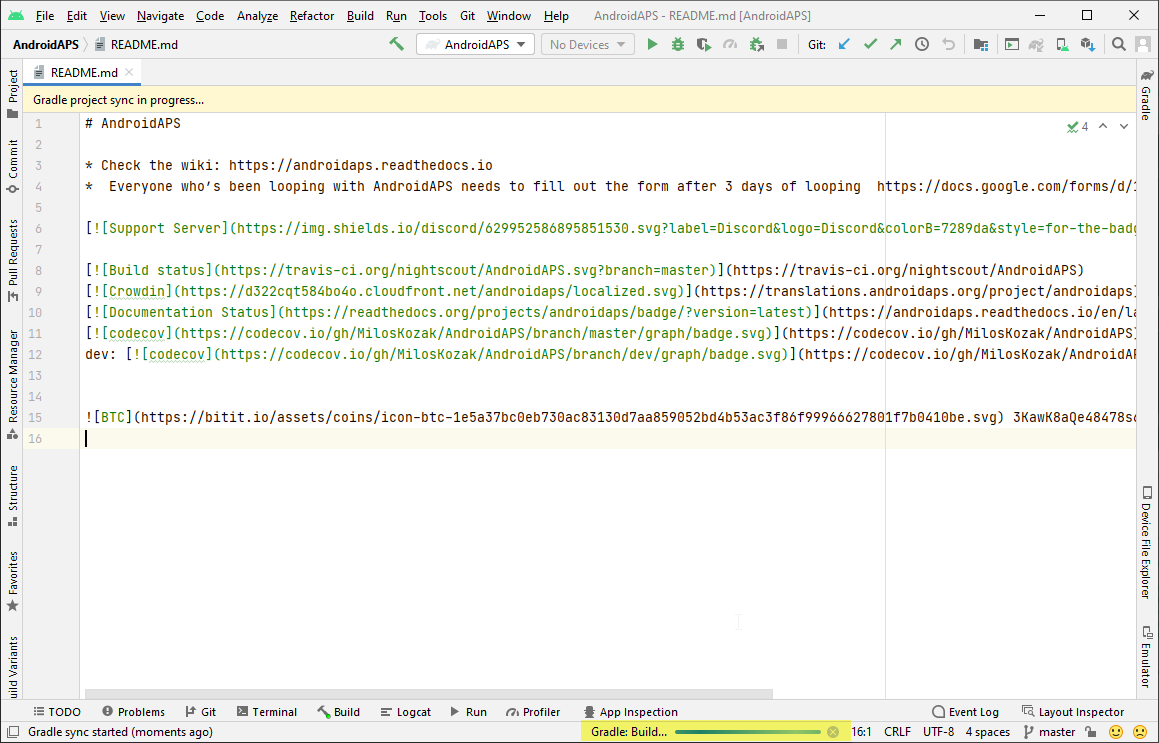
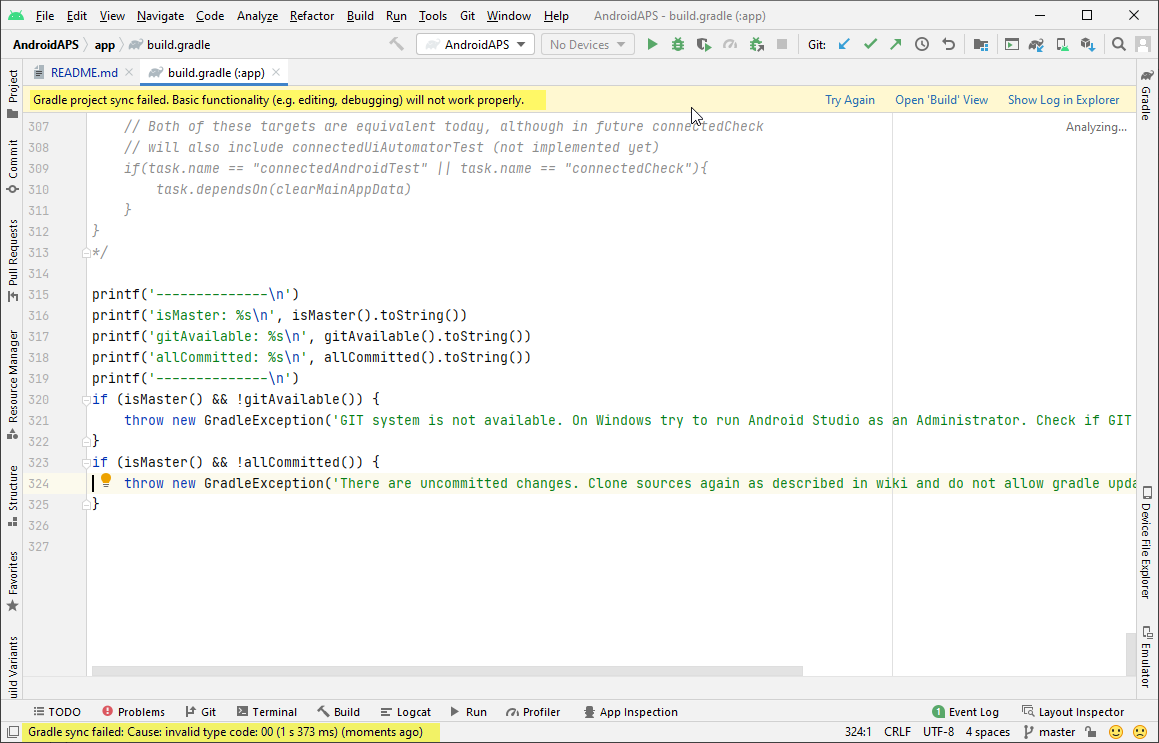
- After Android Studio is started, wait until all background tasks are finished.
- Warning: If errors occur, do not continue with the following steps. \ Consult the troubleshooting section for known problems!
- Click «Build» (1) in the menu bar and select «Generate Signed Bundle / APK…» (2).

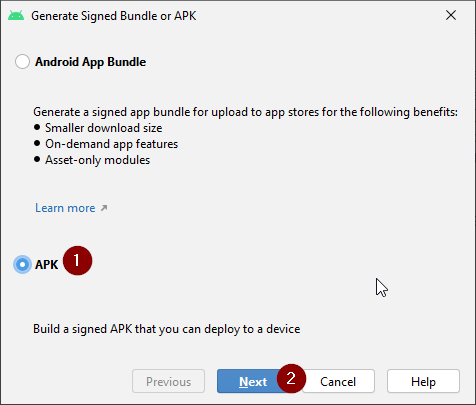
- Select «APK» (1) instead of «Android App Bundle» and click «Next» (2).
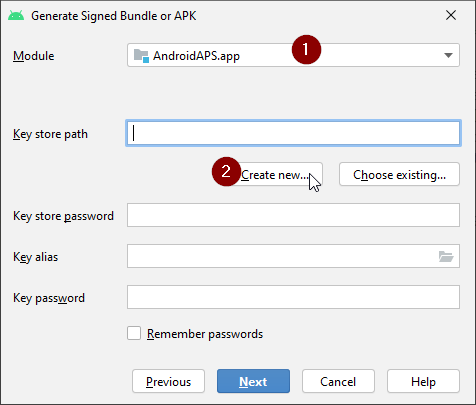
- Make sure that module is set to «AndroidAPS.app» (1).
- Click «Create new…» (2) to start creating your key store. Note: A key store in this case is nothing more than a file in which the information for signing is stored. It is encrypted and the information is secured with passwords.
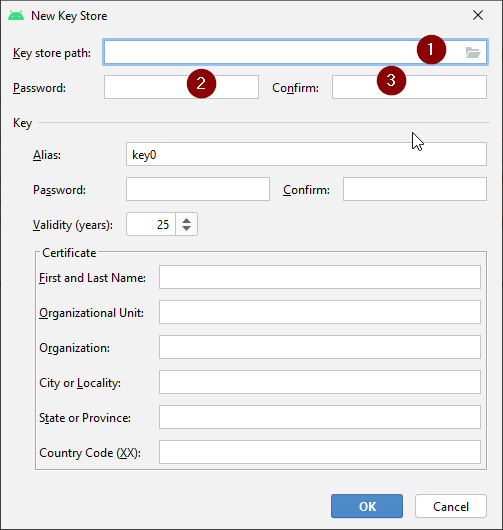
- Click the folder symbol to select a path on your computer for your key store.
- Select the path where your key store shall be saved (1).
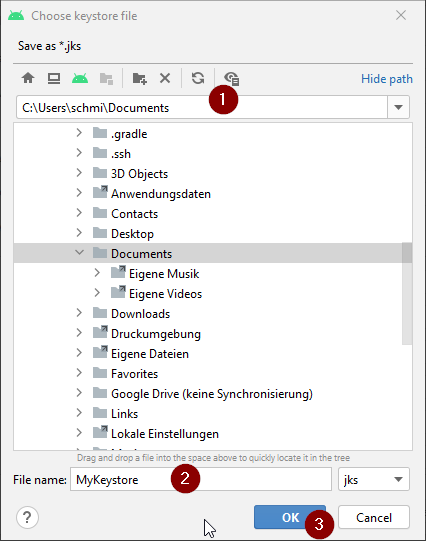 Warning: Do not save in same folder as project. You must use a different directory! A good location would be your home folder.
 - Type a file name for your key store (2) and confirm with «OK» (3).
- Enter (2) and confirm (3) the password for your key store.
 Note: Passwords for key store and key do not have to be very sophisticated. Make sure to remember those or make a note in a safe place. In case you will not remember your passwords in the future, see troubleshooting for lost key store .
 - Enter an alias (4) for your key. Choose whatever you like.
- Enter (5) and confirm (6) the password for your key
- Validity (7) is 25 years by default. You do not have to change the default value.
- First and last name must be entered (8). All other information is optional.
- Click «OK» (9) when you are done.
- Make sure the box to remember passwords is checked (1). So you don’t have to enter them again next time you build the apk (i.e. when updating to a new AAPS version).
- Click «Next» (2).

- Select build variant «fullRelease» (1) and press «Finish».
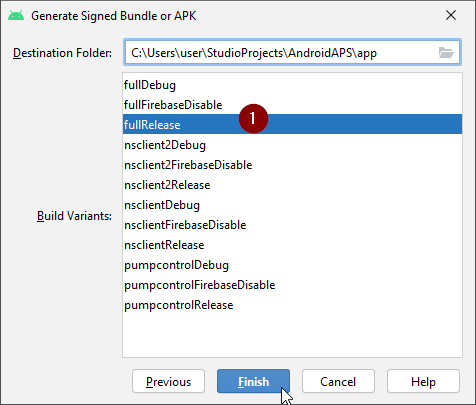
- Android Studio will show «Gradle Build running» at the bottom. This takes some time, depending on your computer and internet connection. Be patient!

- Android Studio will display the information «Generate Signed APK» after build is finished.
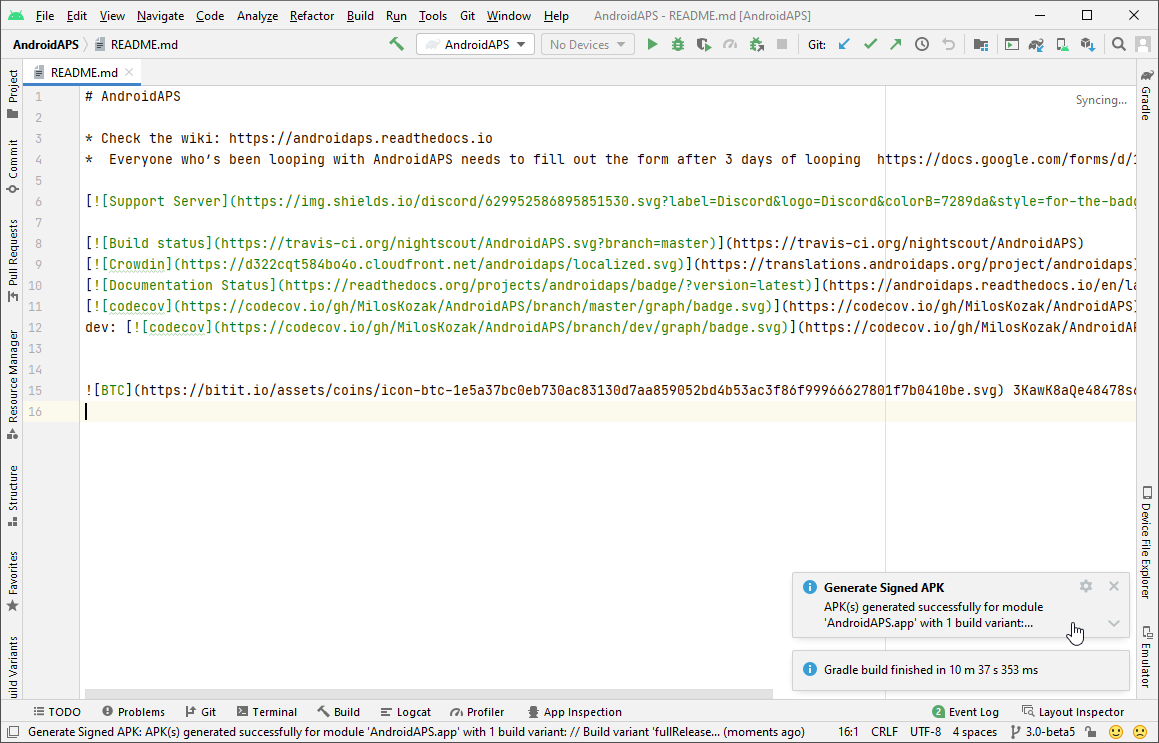
- In case build was not successful refer to the troubleshooting section .
- Click on the notification to expand it.
- Click on the link «locate».
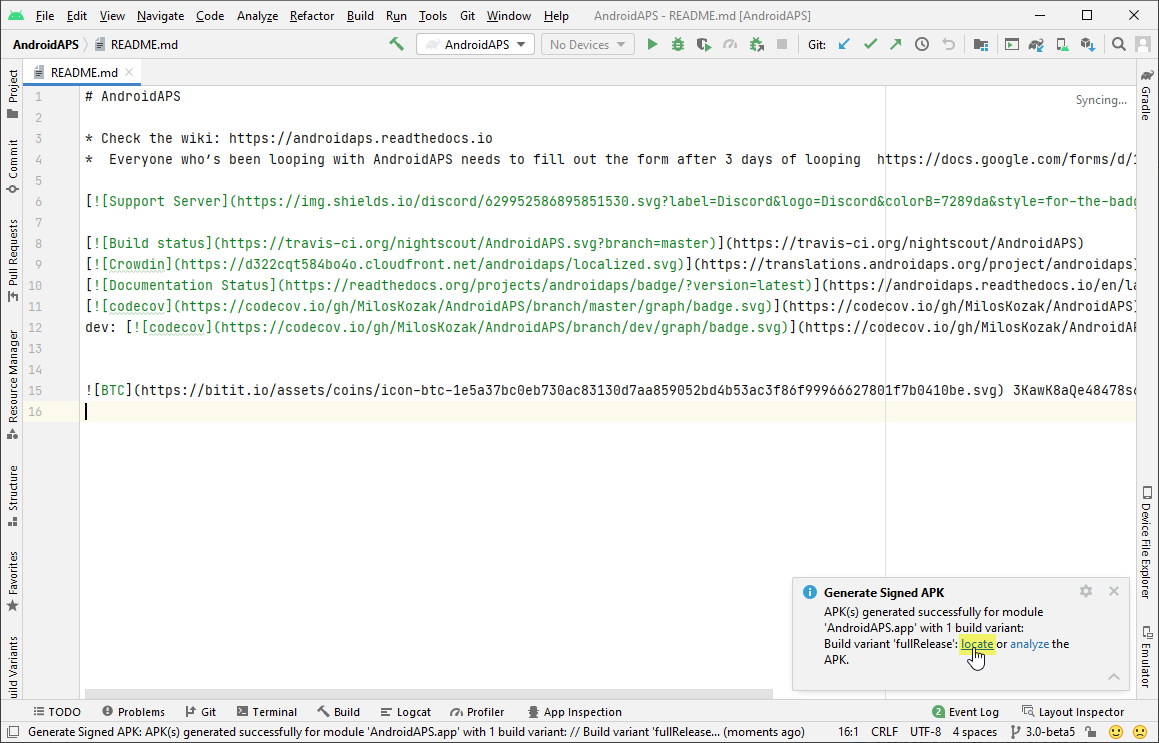
- If the notification is gone, you can always open the «Event log» and select the same link there.
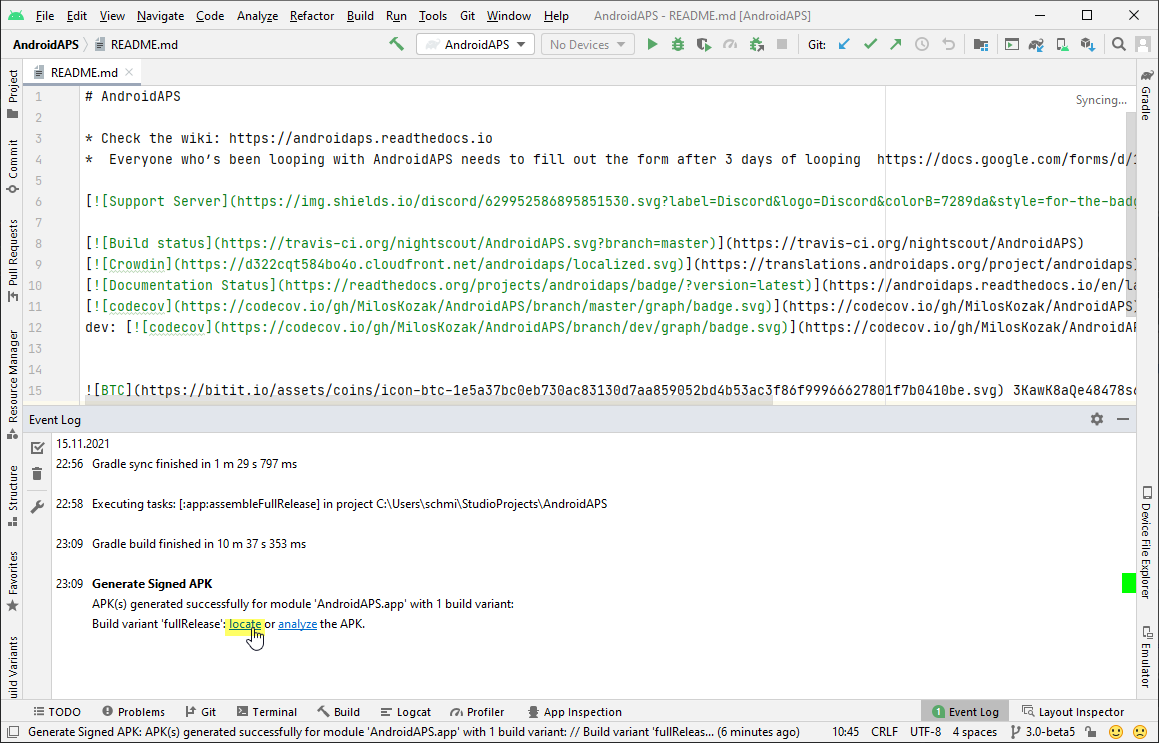
- If the notification is gone, you can always open the «Event log» and select the same link there.
- Your file manager/explorer will open. Navigate to the directory «full» (1) > «release» (2).
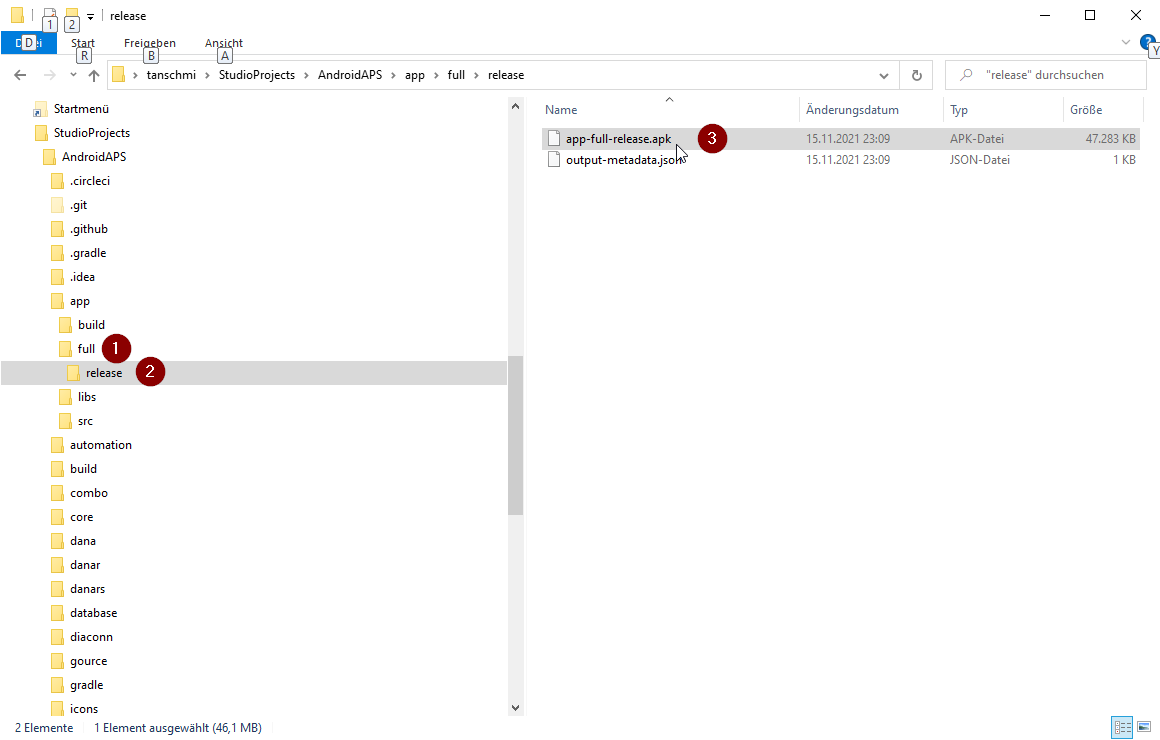
- «app-full-release.apk» (3) is the file you are looking for!
Перенос приложения на смартфон
Easiest way to transfer app-full-release.apk to your phone is via USB cable or Google Drive. Please note that transfer by mail might cause difficulties and is not the preferred way.
On your phone you have to allow installation from unknown sources. Manuals how to do this can be found on the internet (i.e. here or here).
APK Editor Studio
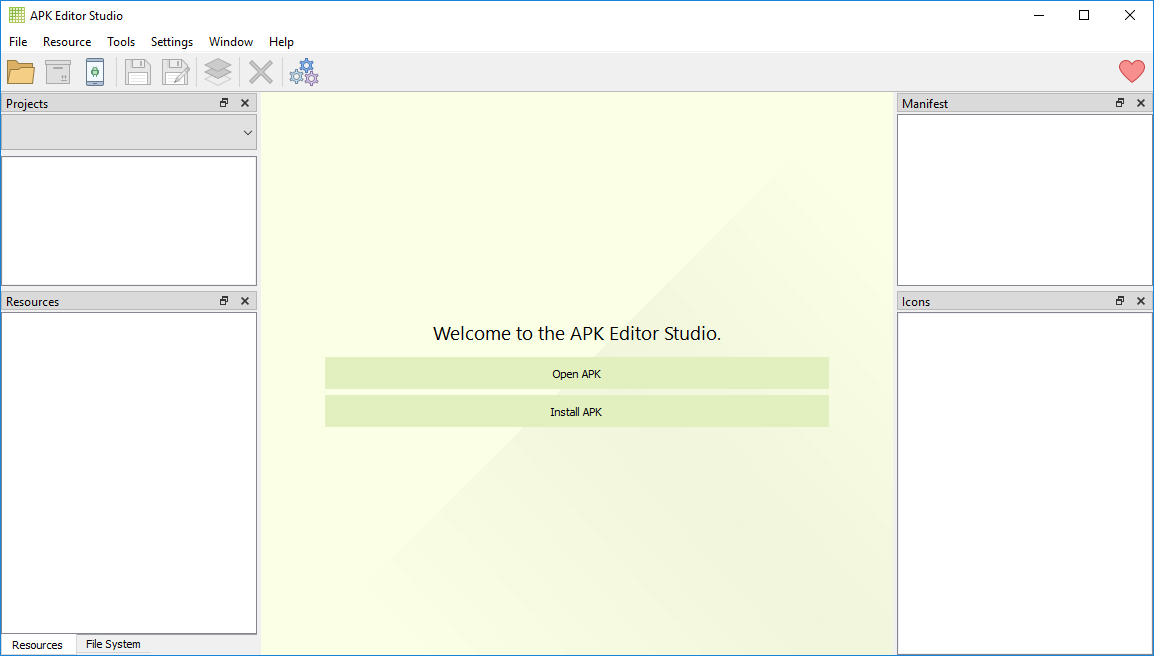

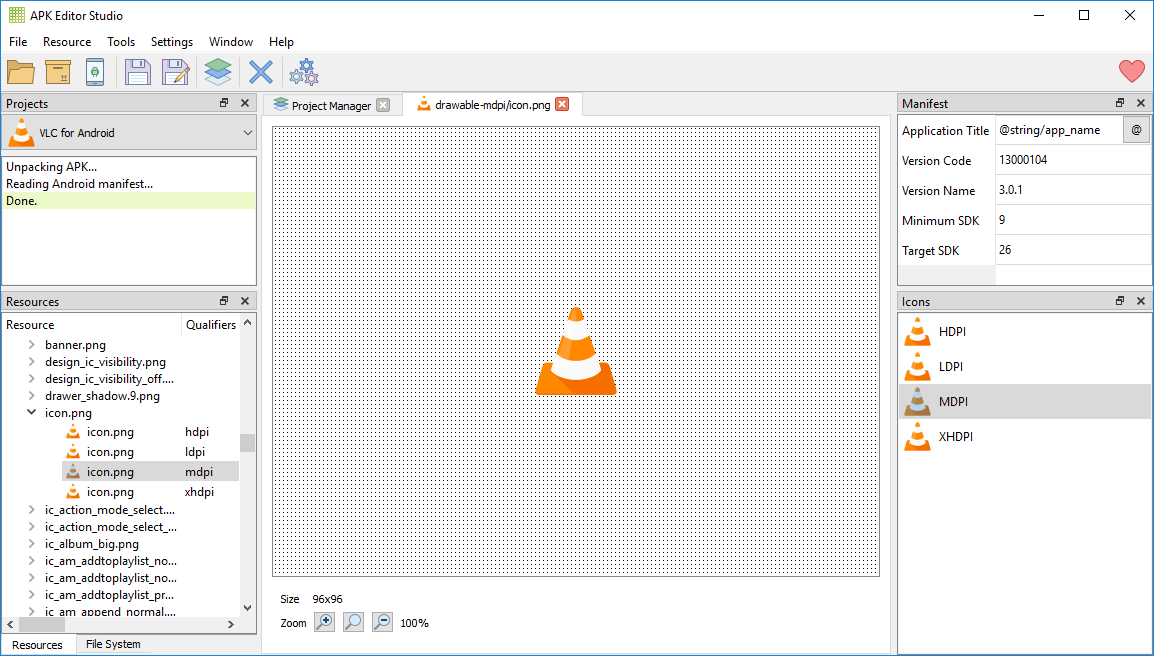
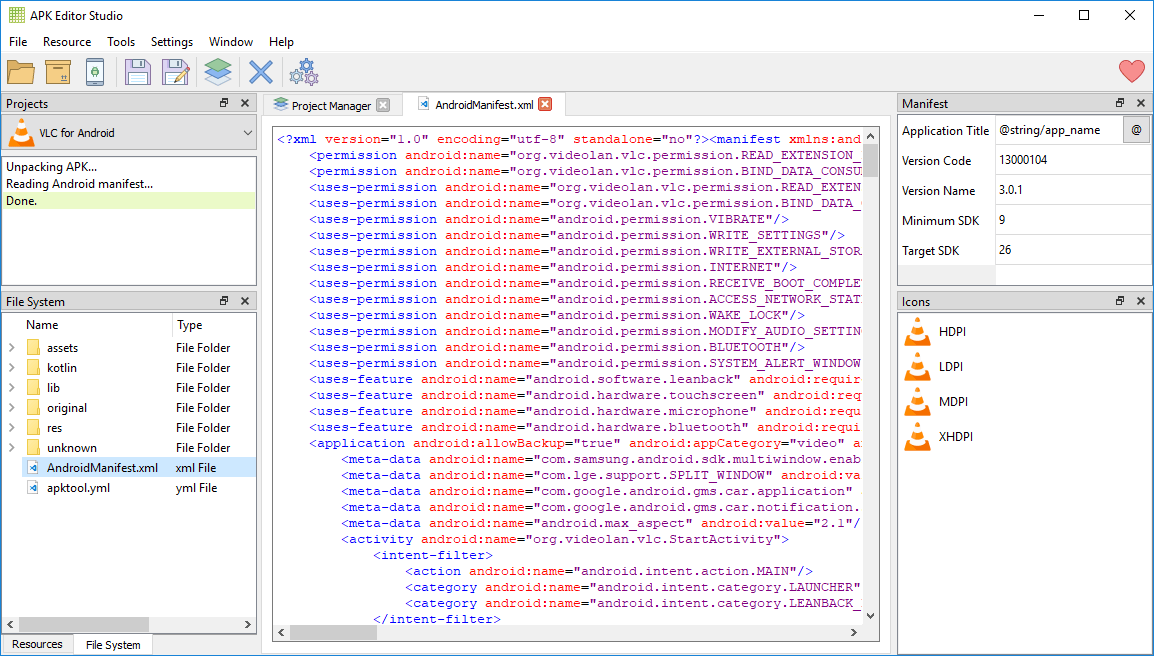
APK Editor Studio – это мощный и в то же время простой в использовании инструмент для декомпиляции APK. Он позволяет Вам легко распаковывать, редактировать и заменять ресурсы APK. При помощи APK Editor Studio Вы сможете заменить иконку и имя приложения Android, изучить его внутреннюю структуру, удалить ненужные разрешения, автоматически подписать APK, установить его на Ваше устройство, а также многое другое. Благодаря множеству удобных встроенных инструментов Вы можете как вносить небольшие изменения, так и создавать полноценные модификации APK.
3
платформы
Доступно для Windows, macOS и Linux
Android Studio Screen Capture
I would like to take screen shot of my app and I would like to share that screen shot in mail,blue tooth,social medias etc.. I don’t know how to perform screen shot and to share it how it can be done?
4,621 10 10 gold badges 38 38 silver badges 53 53 bronze badges
asked Aug 1, 2015 at 10:20
vimal kumar vimal kumar
315 6 6 silver badges 22 22 bronze badges
wich emulator r u using?
Aug 1, 2015 at 10:22
running in lollipop device
Aug 1, 2015 at 10:26
so u need to screen capture through adb?
Aug 1, 2015 at 10:27
if you r using a mobile device as emulator u can take screenshot using the inbuild function fo the device. it is available in most of the devices. if you r using any other emulator, u might need to do screen capture thru adb. if u r using a mobile device give me its brand and model number.
Aug 1, 2015 at 10:30
I to knew that.I would like to include the screen shot option in my app for example am having a button like screen shot while clicking the screen shot button it should be attached to our mail.
Aug 1, 2015 at 10:33
2 Answers 2
to include screenshot function your app, you need to grand superuser permission. In other words, third party apps can only take screenshot on rooted device, oru your app should be installed as a system app.
answered Aug 1, 2015 at 10:36
Rishad Appat Rishad Appat
1,786 1 1 gold badge 15 15 silver badges 30 30 bronze badges
am having all those permission to perform changes in my app kindly tell me the way to do it
Aug 1, 2015 at 10:46
1.Start the app in Debug Mode.
2.click Android to open the Android DDMS tool window.
3. Click Screen Capture on the left side of the Android DDMS tool window.
4. Optional: To add a device frame around your screenshot, enable the Frame and
take the screenshot option.
and Save It
You can even try printscreen or snipping tool in windows.. and edit the view as
you want
The newly manufactures Android smartphones are already receiving very easy methods to take screenshot on them. So, you do not require any third party application or software for this purpose rather you will have to use the easy and reliable method to do so, which is also the time saving feature in this time-valued world.
So, I will share the easy method to take screenshot on Samsung Galaxy trend,
Method – Take Screenshot using Hardware Combination Method
STEP 1 – You will notice Power Key on the right side of the phone and Volume keys on the left hand side.
STEP 2 – Now press and hold the two keys for about 2 seconds.
Your screenshot will be taken and stored in the phone’s memory.