
Руководство по Node.js, часть 1: общие сведения и начало работы
Мы начинаем публикацию серии материалов, которые представляют собой поэтапный перевод руководства по Node.js для начинающих. А именно, в данном случае «начинающий» — это тот, кто обладает некоторыми познаниями в области браузерного JavaScript. Он слышал о том, что существует серверная платформа, программы для которой тоже пишут на JS, и хотел бы эту платформу освоить. Возможно, вы найдёте здесь что-то полезное для себя и в том случае, если уже знакомы с Node.js.
Кстати, в прошлом году у нас был похожий по масштабам проект, посвящённый bash-скриптам. Тогда мы, после публикации всех запланированных материалов, собрали их в виде PDF-файла. Так же планируется поступить и в этот раз.
Сегодня мы обсудим особенности Node.js, начнём знакомство с экосистемой этой платформы и напишем серверный «Hello World».
[Советуем почитать] Другие части цикла
Обзор Node.js
Node.js — это опенсорсная кроссплатформенная среда выполнения для JavaScript, которая работает на серверах. С момента выпуска этой платформы в 2009 году она стала чрезвычайно популярной и в наши дни играет весьма важную роль в области веб-разработки. Если считать показателем популярности число звёзд, которые собрал некий проект на GitHub, то Node.js, у которого более 50000 звёзд, это очень и очень популярный проект.
Платформа Node.js построена на базе JavaScript движка V8 от Google, который используется в браузере Google Chrome. Данная платформа, в основном, используется для создания веб-серверов, однако сфера её применения этим не ограничивается.
Рассмотрим основные особенности Node.js.
▍Скорость
Одной из основных привлекательных особенностей Node.js является скорость. JavaScript-код, выполняемый в среде Node.js, может быть в два раза быстрее, чем код, написанный на компилируемых языках, вроде C или Java, и на порядки быстрее интерпретируемых языков наподобие Python или Ruby. Причиной подобного является неблокирующая архитектура платформы, а конкретные результаты зависят от используемых тестов производительности, но, в целом, Node.js — это очень быстрая платформа.
▍Простота
Платформа Node.js проста в освоении и использовании. На самом деле, она прямо-таки очень проста, особенно это заметно в сравнении с некоторыми другими серверными платформами.
▍JavaScript
В среде Node.js выполняется код, написанный на JavaScript. Это означает, что миллионы фронтенд-разработчиков, которые уже пользуются JavaScript в браузере, могут писать и серверный, и клиентский код на одном и том же языке программирования без необходимости изучать совершенно новый инструмент для перехода к серверной разработке.
В браузере и на сервере используются одинаковые концепции языка. Кроме того, в Node.js можно оперативно переходить на использование новых стандартов ECMAScript по мере их реализации на платформе. Для этого не нужно ждать до тех пор, пока пользователи обновят браузеры, так как Node.js — это серверная среда, которую полностью контролирует разработчик. В результате новые возможности языка оказываются доступными при установке поддерживающей их версии Node.js.
▍Движок V8
В основе Node.js, помимо других решений, лежит опенсорсный JavaScript-движок V8 от Google, применяемый в браузере Google Chrome и в других браузерах. Это означает, что Node.js пользуется наработками тысяч инженеров, которые сделали среду выполнения JavaScript Chrome невероятно быстрой и продолжают работать в направлении совершенствования V8.
▍Асинхронность
В традиционных языках программирования (C, Java, Python, PHP) все инструкции, по умолчанию, являются блокирующими, если только разработчик явным образом не позаботится об асинхронном выполнении кода. В результате если, например, в такой среде, произвести сетевой запрос для загрузки некоего JSON-кода, выполнение потока, из которого сделан запрос, будет приостановлено до тех пор, пока не завершится получение и обработка ответа.
JavaScript значительно упрощает написание асинхронного и неблокирующего кода с использованием единственного потока, функций обратного вызова (коллбэков) и подхода к разработке, основанной на событиях. Каждый раз, когда нам нужно выполнить тяжёлую операцию, мы передаём соответствующему механизму коллбэк, который будет вызван сразу после завершения этой операции. В результате, для того чтобы программа продолжила работу, ждать результатов выполнения подобных операций не нужно.
Подобный механизм возник в браузерах. Мы не можем позволить себе ждать, скажем, окончания выполнения AJAX-запроса, не имея при этом возможности реагировать на действия пользователя, например, на щелчки по кнопкам. Для того чтобы пользователям было удобно работать с веб-страницами, всё, и загрузка данных из сети, и обработка нажатия на кнопки, должно происходить одновременно, в режиме реального времени.
Если вы создавали когда-нибудь обработчик события нажатия на кнопку, то вы уже пользовались методиками асинхронного программирования.
Асинхронные механизмы позволяют единственному Node.js-серверу одновременно обрабатывать тысячи подключений, не нагружая при этом программиста задачами по управлению потоками и по организации параллельного выполнения кода. Подобные вещи часто являются источниками ошибок.
Node.js предоставляет разработчику неблокирующие базовые механизмы ввода вывода, и, в целом, библиотеки, использующиеся в среде Node.js, написаны с использованием неблокирующих парадигм. Это делает блокирующее поведение кода скорее исключением, чем нормой.
Когда Node.js нужно выполнить операцию ввода-вывода, вроде загрузки данных из сети, доступа к базе данных или к файловой системе, вместо того, чтобы заблокировать ожиданием результатов такой операции главный поток, Node.js инициирует её выполнение и продолжает заниматься другими делами до тех пор, пока результаты выполнения этой операции не будут получены.
▍Библиотеки
Благодаря простоте и удобству работы с менеджером пакетов для Node.js, который называется npm, экосистема Node.js прямо-таки процветает. Сейчас в реестре npm имеется более полумиллиона опенсорсных пакетов, которые может свободно использовать любой Node.js-разработчик.
Рассмотрев некоторые основные особенности платформы Node.js, опробуем её в действии. Начнём с установки.
Установка Node.js
Node.js можно устанавливать различными способами, которые мы сейчас рассмотрим.
Так, официальные установочные пакеты для всех основных платформ можно найти здесь.
Существует ещё один весьма удобный способ установки Node.js, который заключается в использовании менеджера пакетов, имеющегося в операционной системе. Например, менеджер пакетов macOS, который является фактическим стандартом в этой области, называется Homebrew. Если он в вашей системе есть, вы можете установить Node.js, выполнив эту команду в командной строке:
brew install nodeСписок менеджеров пакетов для других операционных систем, в том числе — для Linux и Windows, можно найти здесь.
Популярным менеджером версий Node.js является nvm. Это средство позволяет удобно переключаться между различными версиями Node.js, с его помощью можно, например, установить и попробовать новую версию Node.js, после чего, при необходимости, вернуться на старую. Nvm пригодится и в ситуации, когда нужно испытать какой-нибудь код на старой версии Node.js.
Я посоветовал бы начинающим пользоваться официальными установщиками Node.js. Пользователям macOS я порекомендовал бы устанавливать Node.js с помощью Homebrew. Теперь, после того, как вы установили Node.js, пришло время написать «Hello World».
Первое Node.js-приложение
Самым распространённым примером первого приложения для Node.js можно назвать простой веб-сервер. Вот его код:
const http = require('http') const hostname = '127.0.0.1' const port = 3000 const server = http.createServer((req, res) => < res.statusCode = 200 res.setHeader('Content-Type', 'text/plain') res.end('Hello World\n') >) server.listen(port, hostname, () => < console.log(`Server running at http://$:$/`) >)Для того чтобы запустить этот код, сохраните его в файле server.js и выполните в терминале такую команду:
node server.jsДля проверки сервера откройте какой-нибудь браузер и введите в адресной строке http://127.0.0.1:3000 , то есть — тот адрес сервера, который будет выведен в консоли после его успешного запуска. Если всё работает как надо — на странице будет выведено «Hello World».
Разберём этот пример.
Для начала, обратите внимание на то, что код содержит команду подключения модуля http.
Платформа Node.js является обладателем замечательного стандартного набора модулей, в который входят отлично проработанные механизмы для работы с сетью.
Метод createServer() объекта http создаёт новый HTTP-сервер и возвращает его.
Сервер настроен на прослушивание определённого порта на заданном хосте. Когда сервер будет готов, вызывается соответствующий коллбэк, сообщающий нам о том, что сервер работает.
Когда сервер получает запрос, вызывается событие request , предоставляющее два объекта. Первый — это запрос ( req , объект http.IncomingMessage), второй — ответ ( res , объект http.ServerResponse). Они представляют собой важнейшие механизмы обработки HTTP-запросов.
Первый предоставляет в наше распоряжение сведения о запросе. В нашем простом примере этими данными мы не пользуемся, но, при необходимости, с помощью объекта req можно получить доступ к заголовкам запроса и к переданным в нём данным.
Второй нужен для формирования и отправки ответа на запрос.
В данном случае ответ на запрос мы формируем следующим образом. Сначала устанавливаем свойство statusCode в значение 200 , что указывает на успешное выполнение операции:
res.statusCode = 200Далее, мы устанавливаем заголовок Content-Type :
res.setHeader('Content-Type', 'text/plain')После этого мы завершаем подготовку ответа, добавляя его содержимое в качестве аргумента метода end() :
res.end('Hello World\n')Мы уже говорили о том, что вокруг платформы Node.js сформировалась мощная экосистема. Обсудим теперь некоторые популярные фреймворки и вспомогательные инструменты для Node.js.
Фреймворки и вспомогательные инструменты для Node.js
Node.js — это низкоуровневая платформа. Для того чтобы упростить разработку для неё и облегчить жизнь программистам, было создано огромное количество библиотек. Некоторые из них со временем стали весьма популярными. Вот небольшой список библиотек, которые я считаю отлично сделанными и достойными изучения:
- Express. Эта библиотека предоставляет разработчику предельно простой, но мощный инструмент для создания веб-серверов. Ключом к успеху Express стал минималистический подход и ориентация на базовые серверные механизмы без попытки навязать некое видение «единственно правильной» серверной архитектуры.
- Meteor. Это — мощный фулстек-фреймворк, реализующий изоморфный подход к разработке приложений на JavaScript и к использованию кода и на клиенте, и на сервере. Когда-то Meteor представлял собой самостоятельный инструмент, включающий в себя всё, что только может понадобиться разработчику. Теперь он, кроме того, интегрирован с фронтенд-библиотеками, такими, как React, Vue и Angular. Meteor, помимо разработки обычных веб-приложений, можно использовать и в мобильной разработке.
- Koa. Этот веб-фреймворк создан той же командой, которая занимается работой над Express. При его разработке, в основу которой легли годы опыта работы над Express, внимание уделялось простоте решения и его компактности. Этот проект появился как решение задачи внесения в Express серьёзных изменений, несовместимых с другими механизмами фреймворка, которые могли бы расколоть сообщество.
- Next.js. Этот фреймворк предназначен для организации серверного рендеринга React-приложений.
- Micro. Это — весьма компактная библиотека для создания асинхронных HTTP-микросервисов.
- Socket.io. Это библиотека для разработки сетевых приложений реального времени.
Краткая история Node.js
В этом году Node.js исполнилось уже 9 лет. Это, конечно, не так уж и много, если сравнить этот возраст с возрастом JavaScript, которому уже 23 года, или с 25-летним возрастом веба, существующем в таком виде, в котором мы его знаем, если считать от появления браузера Mosaic.
9 лет — это маленький срок для технологии, но сейчас возникает такое ощущение, что платформа Node.js существовала всегда.
Я начал работу с Node.js с ранних версий платформы, когда ей было ещё только 2 года. Даже тогда, несмотря на то, что информации о Node.js было не так уж и много, уже можно было почувствовать, что Node.js — это очень серьёзно.
Теперь поговорим о технологиях, лежащих в основе Node.js и кратко рассмотрим основные события, связанные с этой платформой.
Итак, JavaScript — это язык программирования, который был создан в Netscape как скриптовый язык, предназначенный для управления веб-страницами в браузере Netscape Navigator.
Частью бизнеса Netscape была продажа веб-серверов, которые включали в себя среду, называемую Netscape LiveWire. Она позволяла создавать динамические веб-страницы, используя серверный JavaScript. Как видите, идея использования JS для серверной разработки гораздо старше чем Node.js. Этой идее почти столько же лет, сколько и самому JavaScript, но во времена, о которых идёт речь, популярности серверный JS не снискал.
Одним из ключевых факторов, благодаря которому платформа Node.js стала столь распространённой и популярной, является время её появления. Так, за несколько лет до этого JavaScript начали считать серьёзным языком. Случилось это благодаря приложениям Web 2.0, вроде Google Maps или Gmail, которые продемонстрировали миру возможности современных веб-технологий.
Благодаря конкурентной войне браузеров, которая продолжается и по сей день, серьёзно возросла производительность JavaScript-движков. Команды разработчиков, стоящих за основными браузерами, каждый день работают над повышением производительности их решений, что благотворно влияет на JavaScript в целом. Один из таких движков — это уже упомянутый V8, используемый в браузере Chrome и применяемый в Node.js. Он является одним из результатов стремления разработчиков браузеров к высокой производительности JS-кода.
Конечно же, популярность Node.js основана не только на удачном стечении обстоятельств и на том, что эта платформа появилась в правильное время. Она представила миру инновационный подход к серверной разработке на JavaScript. Рассмотрим основные вехи истории Node.js.
▍2009
- Появление Node.js
- Создание первого варианта npm.
▍2010
▍2011
- Выход npm 1.0.
- Большие компании, такие, как LinkedIn и Uber, начали пользоваться Node.js.
▍2012
- Быстрый рост популярности Node.js.
▍2013
- Появление Ghost, первой крупной платформы для публикаций, использующей Node.js.
- Выпуск Koa.
Getting Started on Heroku with Node.js
This tutorial can help you deploy a Node.js app to Heroku in minutes.
The tutorial assumes that you have:
- A verified Heroku Account
- Node.js and npm installed locally
- An Eco dynos plan subscription (recommended)
Using dynos to complete this tutorial counts towards your usage. To complete this tutorial, we recommend using our low-cost plans. Eligible students can apply for platform credits through our new Heroku for GitHub Students program.
Set Up
The Heroku CLI requires Git, the popular version control system. If you don’t have Git installed, complete these tasks before proceeding.
- Git installation
- First-time Git setup
In this step you install the Heroku Command Line Interface (CLI). You use the CLI to manage and scale your applications, provision add-ons, view your application logs, and run your application locally.
Download and run the installer for your platform.
$ brew tap heroku/brew && brew install herokuDownload the appropriate installer for your Windows installation:
When installation completes, you can use the heroku command from your terminal.
On Windows, start the Command Prompt (cmd.exe) or Powershell to access the command shell.
To log in to the Heroku CLI, use the heroku login command.
$ heroku login heroku: Press any key to open up the browser to login or q to exit › Warning: If browser does not open, visit › https://cli-auth.heroku.com/auth/browser/*** heroku: Waiting for login. Logging in. done Logged in as me@example.com This command opens your web browser to the Heroku login page. If your browser is already logged in to Heroku, click the Log in button.
This authentication is required for the heroku and git commands to work correctly.
If you’re behind a firewall that requires use of a proxy to connect with external HTTP/HTTPS services, you can set the HTTP_PROXY or HTTPS_PROXY environment variables in your local development environment before running the heroku command.
Before you continue, check that you have the prerequisites installed properly. Type each command below, and make sure that each one displays the version that you installed. (Your versions can be different from the example.) If no version is returned, install the prerequisites.
To declare app dependencies and subsequent steps, you must complete this local setup.
This tutorial works for any version of Node greater than 18.
$ node --version v20.9.0 npm is installed with Node, so check that it’s there. If you don’t have it, install a more recent version of Node.
$ npm --version 10.1.0 Now check that you have git installed. If not, install it, and test again.
$ git --version git version 2.42.0 Prepare the App
In this step, you prepare a sample application that’s ready to be deployed to Heroku.
If you’re new to Heroku, we recommend that you complete this tutorial using the Heroku-provided sample application.
However, if you have an existing application that you want to deploy instead, read this article to learn how to prepare it for Heroku deployment.
To clone a local version of the sample application that you can then deploy to Heroku, execute these commands in your local command shell or terminal.
$ git clone https://github.com/heroku/node-js-getting-started.git $ cd node-js-getting-started You now have a functioning Git repository that contains a simple application and a package.json file, which Node’s dependency manager uses.
Deploy the app
In this step, you deploy the app to Heroku.
Using dynos to complete this tutorial counts towards your usage. To control costs, Delete your app as soon as you‘re done.
By default, apps use Eco dynos if you’re subscribed to Eco. Otherwise, it defaults to Basic dynos. If you plan to deploy many small apps to Heroku, we recommend the Eco dynos plan, which is shared across all Eco dynos in your account. Learn more here. Eligible students can apply for platform credits through our Heroku for GitHub Students program.
Create an app on Heroku, which prepares Heroku to receive your source code.
$ heroku create Creating app. done, ⬢ shrouded-anchorage-35377 https://shrouded-anchorage-35377.herokuapp.com/ | https://git.heroku.com/shrouded-anchorage-35377.git When you create an app, you also create a Git remote called heroku . It’s associated with your local Git repository.
Heroku generates a random name for your app, in this case shrouded-anchorage-35377 . Or you can pass a parameter to specify your own app name.
Deploy your code.
$ git push heroku main Enumerating objects: 554, done. Counting objects: 100% (554/554), done. Delta compression using up to 20 threads Compressing objects: 100% (412/412), done. Writing objects: 100% (554/554), 248.74 KiB | 124.37 MiB/s, done. Total 554 (delta 109), reused 548 (delta 106), pack-reused 0 remote: Compressing source files. done. remote: Building source: remote: remote: -----> Building on the Heroku-22 stack remote: -----> Determining which buildpack to use for this app remote: -----> Node.js app detected remote: remote: -----> Creating runtime environment remote: remote: NPM_CONFIG_LOGLEVEL=error remote: NODE_VERBOSE=false remote: NODE_ENV=production remote: NODE_MODULES_CACHE=true remote: remote: -----> Installing binaries remote: engines.node (package.json): 20.x remote: engines.npm (package.json): unspecified (use default) remote: remote: Resolving node version 20.x. remote: Downloading and installing node 20.9.0. remote: Using default npm version: 10.1.0 remote: remote: -----> Installing dependencies remote: Installing node modules (package.json) remote: remote: added 160 packages, and audited 161 packages in 4s remote: remote: 64 packages are looking for funding remote: run `npm fund` for details remote: remote: found 0 vulnerabilities remote: remote: -----> Build remote: remote: -----> Caching build remote: - node_modules remote: remote: -----> Pruning devDependencies remote: remote: up to date, audited 74 packages in 450ms remote: remote: 9 packages are looking for funding remote: run `npm fund` for details remote: remote: found 0 vulnerabilities remote: remote: -----> Build succeeded! remote: -----> Discovering process types remote: Procfile declares types -> web remote: remote: -----> Compressing. remote: Done: 43.4M remote: -----> Launching. remote: Released v3 remote: https://shrouded-anchorage-35377.herokuapp.com/ deployed to Heroku remote: remote: Verifying deploy. done. To https://git.heroku.com/shrouded-anchorage-35377.git * [new branch] main -> main Ensure that at least one instance of the app is running.
$ heroku ps:scale web=1 Visit the app at the URL generated by its app name. As a shortcut, you can open the website.
$ heroku open View Logs
Heroku treats logs as streams of time-ordered events aggregated from the output streams of all your app and Heroku components, providing a single channel for all of the events.
View information about your running app using one of the logging commands, heroku logs —tail :
$ heroku logs --tail 2023-03-02T19:56:09.671017+00:00 heroku[web.1]: Starting process with command `npm start` 2023-03-02T19:56:12.617099+00:00 app[web.1]: 2023-03-02T19:56:12.617126+00:00 app[web.1]: > node-js-getting-started@0.3.0 start 2023-03-02T19:56:12.617127+00:00 app[web.1]: > node index.js 2023-03-02T19:56:12.617127+00:00 app[web.1]: 2023-03-02T19:56:12.738203+00:00 app[web.1]: Listening on 16832 2023-03-02T19:56:13.217147+00:00 heroku[web.1]: State changed from starting to up Visit your application in the browser again, and you see another log message generated.
To stop streaming the logs, press Control+C .
Define a Procfile
Use a Procfile, which is a text file in the root directory of your application, to explicitly declare what command executes to start your app.
The Procfile in the example app you deployed looks like:
web: npm start The name web is important because it declares that this single process type attaches to Heroku’s HTTP routing stack and receives web traffic when deployed. This command uses the start script specified in the package.json .
Procfiles can contain additional process types. For example, you can declare one for a background worker process that processes items off of a queue.
Scale the App
Right now, your app runs on a single web dyno. Think of a dyno as a lightweight container that runs the command specified in the Procfile.
You can check how many dynos are running using the ps command.
$ heroku ps === web (Eco): npm start (1) web.1: up 2023/03/02 15:56:13 -0400 (~ 6m ago) By default, your app deploys on an Eco dyno. If they don’t receive any traffic, Eco dynos sleep after 30 minutes of inactivity. Upon waking, expect a delay of a few seconds for the first request. Subsequent requests perform normally. Eco dynos also consume from a monthly, account-level quota of Eco dyno hours. As long as the quota isn’t exhausted, all Eco apps can continue to run.
To avoid dyno sleeping, you can upgrade to a Basic or Professional dyno type as described in the Dyno Types article. For example, if you migrate your app to a professional dyno, you can scale it by running a command that tells Heroku to execute a specific number of dynos, each running your web process type.
Scaling an application on Heroku is equivalent to changing the number of dynos running. Scale the number of web dynos to zero.
$ heroku ps:scale web=0 Access the app again by hitting refresh on the web tab, or heroku open to open it in a web tab. You get an error message because you no longer have any web dynos available to serve requests.
Scale it up again.
$ heroku ps:scale web=1 Declare App Dependencies
Heroku recognizes an app as Node.js from a package.json file in the root directory. For your own apps, you can create one by running npm init —yes .
The demo app that you deployed already has a package.json that looks like:
< "name": "node-js-getting-started", "version": "0.3.0", . "engines": < "node": "20.x" >, "dependencies": < "ejs": "^3.1.5", "express": "^4.15.2" >, . > The package.json file determines the version of Node.js to run your application on Heroku and the dependencies to install with your application.
Run this command in your local directory to install the dependencies, preparing your system to run the app locally.
$ npm install added 160 packages in 6s After installation, a package-lock.json file is generated when npm install is run. Make sure to check this into Git. When subsequent dependencies are added, npm makes changes to this file, so make sure to add those changes to Git too.
When an app is deployed, Heroku reads the package.json to install the appropriate node version and the package-lock.json to install the dependencies.
Run the App Locally
Start your application locally using the heroku local command, which installed as part of the Heroku CLI.
$ heroku local web --port 5001 [OKAY] Loaded ENV .env File as KEY=VALUE Format 4:09:49 p.m. web.1 | > node-js-getting-started@0.3.0 start 4:09:49 p.m. web.1 | > node index.js 4:09:49 p.m. web.1 | Listening on 5001 Just like Heroku, heroku local examines the Procfile to determine what to run.
Open http://localhost:5001 with your web browser to see your app running locally.
To stop the app from running locally, in the CLI, press Ctrl + C to exit.
Push Local Changes
In this step, you learn how to propagate a local change to the application through to Heroku. As an example, you modify the application to add an additional dependency and the code to use it.
Begin by adding a dependency for cool-ascii-faces in package.json . Run this command.
$ npm install cool-ascii-faces added 11 packages in 2s Modify index.js so that it requires this module at the start. Also add a new route ( /cool ) that uses it. You want the final code to look like:
const cool = require('cool-ascii-faces') const express = require('express') const path = require('path') const PORT = process.env.PORT || 5001 express() .use(express.static(path.join(__dirname, 'public'))) .set('views', path.join(__dirname, 'views')) .set('view engine', 'ejs') .get('/', (req, res) => res.render('pages/index')) .get('/cool', (req, res) => res.send(cool())) .listen(PORT, () => console.log(`Listening on $< PORT >`)) $ npm install $ heroku local --port 5001 When you visit your application at http://localhost:5001/cool, the sample application shows you cute faces on each refresh: ( ⚆ _ ⚆ ) .
Deploy. Almost every deploy to Heroku follows this same pattern. First, add the modified files to the local Git repository.
$ git add . Commit the changes to the repository.
$ git commit -m "Add cool face API" Deploy, just as you did previously.
$ git push heroku main Check that everything works.
$ heroku open cool If everything is in working order, you see another face.
Provision Add-Ons
Add-ons are third-party cloud services that provide out-of-the-box additional services for your application, from persistence through logging to monitoring and more.
By default, Heroku stores 1,500 lines of logs from your application. However, it makes the full log stream available as a service. Several add-on providers have logging services that provide things such as log persistence, search, and email and SMS alerts.
In this step, you provision one of these logging add-ons, Papertrail.
Provision the papertrail logging add-on.
$ heroku addons:create papertrail Creating papertrail on ⬢ shrouded-anchorage-35377. free Welcome to Papertrail. Questions and ideas are welcome (technicalsupport@solarwinds.com). Happy logging! Created papertrail-fluffy-46630 as PAPERTRAIL_API_TOKEN Use heroku addons:docs papertrail to view documentation The add-on is now deployed and configured for your application. You can list add-ons for your app.
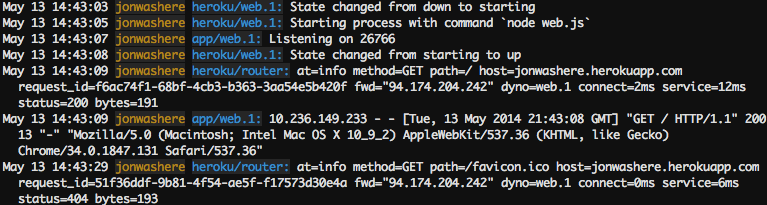
$ heroku addons To see this particular add-on in action, visit your application’s Heroku URL a few times. Each visit generates more log messages, which route to the papertrail add-on. Visit the papertrail console to see the log messages.
$ heroku addons:open papertrail Your browser opens a Papertrail web console showing the latest log events. You can search and set up alerts.
Start a Console
To get a feel for how dynos work, you can create another one-off dyno and run the bash command, which opens a shell on that dyno. You can then execute commands there. Each dyno has its own ephemeral filespace, populated with your app and its dependencies. When the command completes, in this case bash , the dyno is removed.
$ heroku run bash Running bash on ⬢ shrouded-anchorage-35377. up, run.1662 (Eco) ~ $ ls Procfile README.md app.json index.js node_modules package-lock.json package.json public test.js views ~ $ exit exit If you receive Error connecting to process , try configuring your firewall.
To exit the shell and terminate the dyno, type exit .
Define Config Vars
With Heroku, you can externalize configuration, storing data such as encryption keys or external resource addresses in config vars.
At runtime, config vars are exposed as environment variables to the application. For example, modify index.js so that it introduces a new route, /times , that repeats an action depending on the value of the TIMES environment variable. Under the existing get() call, add another.
.get('/times', (req, res) => res.send(showTimes())) At the end of the file, add this definition for the new function, showTimes() .
function showTimes() < const times = process.env.TIMES || 5 let result = '' for (i = 0; i < times; i++) < result += i + ' ' >return result > heroku local automatically sets up the environment based on the contents of the .env file in your local directory. In the top-level directory of your project, an .env file has these contents.
TIMES=2 If you run the app with heroku local —port 5001 and then open http://localhost:5001/times, you see two numbers generated every time.
To set the config var on Heroku, execute this command.
$ heroku config:set TIMES=2 View the config vars that are set using heroku config .
$ heroku config === shrouded-anchorage-35377 Config Vars PAPERTRAIL_API_TOKEN: w9EnziexBT2mzMDtS4M TIMES: 2 Deploy your changed application to Heroku, and then visit it by running heroku open times .
Provision a Database
Adding a database to complete this tutorial counts towards your usage. To control costs, delete your database as soon as you’re done. Learn about our low-cost plans. Eligible students can apply for platform credits through our Heroku for GitHub Students program.
The add-on marketplace has a large number of data stores, from Redis and MongoDB providers to Postgres and MySQL. In this step, you add a Heroku Mini Postgres Starter Tier dev database to your app.
Add the database.
$ heroku addons:create heroku-postgresql:mini Creating heroku-postgresql:mini on ⬢ shrouded-anchorage-35377. $5/month Database has been created and is available ! This database is empty. If upgrading, you can transfer ! data from another database with pg:copy Created postgresql-asymmetrical-00466 as DATABASE_URL Use heroku addons:docs heroku-postgresql to view documentation This action creates a database and sets a DATABASE_URL environment variable that you can check by running heroku config .
Use npm to add node-postgres to your dependencies.
$ npm install pg added 14 packages in 2s "dependencies": < "cool-ascii-faces": "^1.3.4", "ejs": "^3.1.5", "express": "^4.15.2", "pg": "^8.11.3" >,
Edit your index.js file to use this module to connect to the database specified in your DATABASE_URL environment variable. Add this code near the top.
const < Pool >= require('pg') const pool = new Pool( < connectionString: process.env.DATABASE_URL, ssl: < rejectUnauthorized: false >>) Add another route, /db , by adding this code just after the existing .get(‘/’, . ) .
.get('/db', async (req, res) => < try < const client = await pool.connect(); const result = await client.query('SELECT * FROM test_table'); const results = < 'results': (result) ? result.rows : null>; res.render('pages/db', results ); client.release(); > catch (err) < console.error(err); res.send("Error " + err); >>) This action ensures that when you access your app using the /db route, it returns all rows in the test_table table.
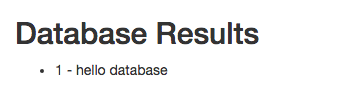
Deploy your code to Heroku. If you access /db , you receive an error because there’s no table in the database. Assuming that you have Postgres installed locally, use the heroku pg:psql command to connect to the remote database, create a table, and insert a row.
$ heroku pg:psql --> Connecting to postgresql-asymmetrical-00466 psql (14.7 (Homebrew)) SSL connection (protocol: TLSv1.3, cipher: TLS_AES_256_GCM_SHA384, bits: 256, compression: off) Type "help" for help. shrouded-anchorage-35377::DATABASE=> create table test_table (id integer, name text); CREATE TABLE shrouded-anchorage-35377::DATABASE=> insert into test_table values (1, 'hello database'); INSERT 0 1 shrouded-anchorage-35377::DATABASE=> \q Now when you access your app’s /db route with heroku open db , you see something like:
You can use a similar technique to install MongoDB or Redis add-ons.
Next Steps
Now you know how to deploy an app, change its configuration, view logs, scale, and attach add-ons. For more information, here’s some recommended reading.
- For a technical overview of the concepts that you encounter while writing, configuring, deploying, and running applications, read How Heroku Works.
- To learn more about developing and deploying Node.js applications, visit the Node.js category.
- To understand how to take an existing Node.js app and deploy it to Heroku, read Deploying Node.js Apps on Heroku.
Deploy a Node.js service to Cloud Run
Learn how to create a simple Hello World application, package it into a container image, upload the container image to Artifact Registry, and then deploy the container image to Cloud Run. You can use other languages in addition to the ones shown.
To follow step-by-step guidance for this task directly in the Cloud Shell Editor, click Guide me:
Before you begin
- Sign in to your Google Cloud account. If you’re new to Google Cloud, create an account to evaluate how our products perform in real-world scenarios. New customers also get $300 in free credits to run, test, and deploy workloads.
- In the Google Cloud console, on the project selector page, select or create a Google Cloud project. Note: If you don’t plan to keep the resources that you create in this procedure, create a project instead of selecting an existing project. After you finish these steps, you can delete the project, removing all resources associated with the project. Go to project selector
- Make sure that billing is enabled for your Google Cloud project.
- Install the Google Cloud CLI.
- To initialize the gcloud CLI, run the following command:
gcloud init
gcloud init
gcloud config set project PROJECT_ID
Write the sample application
To write an application in Node.js:
-
Create a new directory named helloworld and change directory into it:
mkdir helloworld cd helloworld < "name": "helloworld", "description": "Simple hello world sample in Node", "version": "1.0.0", "private": true, "main": "index.js", "scripts": < "start": "node index.js" >, "engines": < "node": ">=16.0.0" >, "author": "Google LLC", "license": "Apache-2.0", "dependencies": < "express": "^4.17.1" >> const express = require('express'); const app = express(); app.get('/', (req, res) => < const name = process.env.NAME || 'World'; res.send(`Hello $!`); >); const port = parseInt(process.env.PORT) || 8080; app.listen(port, () => < console.log(`helloworld: listening on port $`); >);Your app is finished and ready to be deployed.
Deploy to Cloud Run from source
Important: This quickstart assumes that you have owner or editor roles in the project you are using for the quickstart. Otherwise, refer to Cloud Run deployment permissions, Cloud Build permissions, and Artifact Registry permissions for the permissions required.
Deploy from source automatically builds a container image from source code and deploys it.
To deploy from source:
-
In your source code directory, deploy from source using the following command:
gcloud run deploy
- When you are prompted for the source code location, press Enter to deploy the current folder.
- When you are prompted for the service name, press Enter to accept the default name, for example helloworld .
- If you are prompted to enable the Artifact Registry API or to allow creation of Artifact Registry repository, respond by pressing y .
- When you are prompted for region: select the region of your choice, for example us-central1 .
- You will be prompted to allow unauthenticated invocations: respond y .
Then wait a few moments until the deployment is complete. On success, the command line displays the service URL.
Cloud Run locations
Cloud Run is regional, which means the infrastructure that runs your Cloud Run services is located in a specific region and is managed by Google to be redundantly available across all the zones within that region.
Meeting your latency, availability, or durability requirements are primary factors for selecting the region where your Cloud Run services are run. You can generally select the region nearest to your users but you should consider the location of the other Google Cloud products that are used by your Cloud Run service. Using Google Cloud products together across multiple locations can affect your service’s latency as well as cost.
Cloud Run is available in the following regions:
Subject to Tier 1 pricing
- asia-east1 (Taiwan)
- asia-northeast1 (Tokyo)
- asia-northeast2 (Osaka)
- europe-north1 (Finland) Low CO2
- europe-southwest1 (Madrid)
- europe-west1 (Belgium) Low CO2
- europe-west4 (Netherlands)
- europe-west8 (Milan)
- europe-west9 (Paris) Low CO2
- me-west1 (Tel Aviv)
- us-central1 (Iowa) Low CO2
- us-east1 (South Carolina)
- us-east4 (Northern Virginia)
- us-east5 (Columbus)
- us-south1 (Dallas)
- us-west1 (Oregon) Low CO2
Subject to Tier 2 pricing
- asia-east2 (Hong Kong)
- asia-northeast3 (Seoul, South Korea)
- asia-southeast1 (Singapore)
- asia-southeast2 (Jakarta)
- asia-south1 (Mumbai, India)
- asia-south2 (Delhi, India)
- australia-southeast1 (Sydney)
- australia-southeast2 (Melbourne)
- europe-central2 (Warsaw, Poland)
- europe-west10 (Berlin)
- europe-west12 (Turin)
- europe-west2 (London, UK) Low CO2
- europe-west3 (Frankfurt, Germany) Low CO2
- europe-west6 (Zurich, Switzerland) Low CO2
- me-central1 (Doha)
- me-central2 (Dammam)
- northamerica-northeast1 (Montreal) Low CO2
- northamerica-northeast2 (Toronto) Low CO2
- southamerica-east1 (Sao Paulo, Brazil) Low CO2
- southamerica-west1 (Santiago, Chile) Low CO2
- us-west2 (Los Angeles)
- us-west3 (Salt Lake City)
- us-west4 (Las Vegas)
If you already created a Cloud Run service, you can view the region in the Cloud Run dashboard in the Google Cloud console.
Congratulations! You have just deployed a container image from source code to Cloud Run. Cloud Run automatically and horizontally scales out your container image to handle the received requests, then scales in when demand decreases. You only pay for the CPU, memory, and networking consumed during request handling.
Clean up
Remove your test project
While Cloud Run does not charge when the service is not in use, you might still be charged for storing the container image in Artifact Registry. You can delete your container image or delete your Google Cloud project to avoid incurring charges. Deleting your Google Cloud project stops billing for all the resources used within that project.
-
Caution: Deleting a project has the following effects:
- Everything in the project is deleted. If you used an existing project for the tasks in this document, when you delete it, you also delete any other work you’ve done in the project.
- Custom project IDs are lost. When you created this project, you might have created a custom project ID that you want to use in the future. To preserve the URLs that use the project ID, such as an appspot.com URL, delete selected resources inside the project instead of deleting the whole project.
- In the Google Cloud console, go to the Manage resources page. Go to Manage resources
- In the project list, select the project that you want to delete, and then click Delete.
- In the dialog, type the project ID, and then click Shut down to delete the project.
What’s next
For more information on building a container from code source and pushing to a repository, see:
- Developing Cloud Run services
- Building Containers
- Deploying from source code
Send feedback
Except as otherwise noted, the content of this page is licensed under the Creative Commons Attribution 4.0 License, and code samples are licensed under the Apache 2.0 License. For details, see the Google Developers Site Policies. Java is a registered trademark of Oracle and/or its affiliates.
Last updated 2023-11-16 UTC.