
Как программировать arduino pro mini
Начало работы с Arduino Pro Mini
Arduino Pro Mini — это функционально гибкое, миниатюрное и недорогое устройство, ориентированное, прежде всего, на продвинутых пользователей. В нем содержится минимум компонентов (нет встроенного USB и штыревых разъемов), что позволило максимально снизить стоимость устройства. Благодаря этому, плата может встраиваться в различные проекты и устройства. Обратите внимание, что существует две версии Arduino Pro: одна работает от 5В (как большинство плат Ардуино), другая — от 3.3В. Перед началом работы, перепроверьте, чтобы источник питания и подключаемые к плате устройства соответствовали рабочему напряжению вашего Ардуино.
Прошивка программ
В устройстве не предусмотрена схема для взаимодействия с USB, поэтому для прошивки программ необходим USB-TTL преобразователь. Для 5В-версии Arduino Pro Mini подойдет кабель FTDI TTL-232R USB — TTL Level Serial Converter, а для 3.3В-версии — кабель FTDI TTL-232R-3V3 USB — TTL Level Serial Converter или переходник FTDI. Самый быстрый способ подсоединить эти устройства к Ардуино — это подключить 6-контактный штыревой разъем одним концом к кабелю FTDI (или отладочной плате), а другой конец вставить в контактные отверстия Arduino Mini, предусмотренные для впаивания 6-пинового разъема для программирования. Если же вы планируете часто прошивать свой Arduino, то удобнее будет впаять в эти отверстия штыревой разъем.
Для корректной работы FTDI-кабеля под Windows, необходимо изменить в системе одну настройку, отвечающую за автоматический сброс Ардуино. Для этого подключите устройство к компьютеру, откройте Диспетчер устройств (Панель управления > Система > Оборудование), отыщите строку USB Serial Port в списке портов Ports. Щелкните по ней правой кнопкой и откройте свойства, затем перейдите на вкладку Port Settings (Настройки порта) и нажмите кнопку Advanced (Дополнительно). В появившемся окне установите галочку Set RTS on Close в разделе Miscellaneous Options.
Для прошивки 3.3В-версий Arduino Pro, из меню Tools > Board необходимо выбрать пункт Arduino Pro or Pro Mini (3.3V, 8 MHz) w/ATmega328 или Arduino Pro or Pro Mini (3.3V, 8 MHz) w/ ATmega168 (в зависимости от модели микроконтроллера, используемого в вашем Ардуино). Для прошивки 5В-версий Arduino Pro необходимо выбрать Arduino Duemilanove or Nano w/ ATmega328 или Arduino Diecimila, Duemilanove, or Nano w/ATmega168.
Arduino Pro Mini, подключенный к (и запитанный от) кабеля FTDI TTL-232R-3V3 USB — TTL Level Serial Converter. Зеленый и черный провода подсоединены к контактным отверстиям, обозначенным на плате метками «GRN» и «BLK» соответственно.
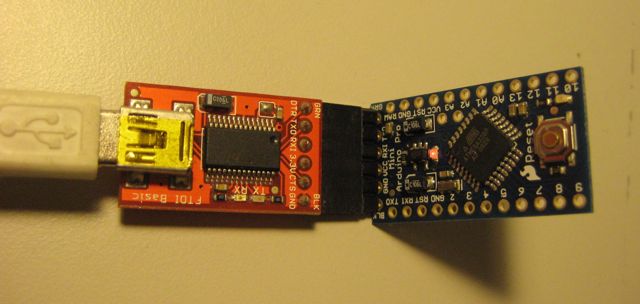
Arduino Pro Mini, подключенный к (и запитанный от) переходнику FTDI, соединенной с кабелем USB Mini-B. Обратите внимание, что на старых версиях Pro Mini контакты 6-пинового разъема перевернуты, поэтому еще раз перепроверьте соответствие меток GRN и BLK.
Питание
Устройство можно запитать от USB (через 6-контактный разъем для программирования), от стабилизированного напряжения 5В или 3.3В (в зависимости от модели Ардуино), подключенного к выводу VCC, либо от источника нестабилизированного напряжения, подключенного к выводу RAW.
Разъемы
К контактным площадкам Arduino Pro Mini можно припаять любой разъем с расстоянием между контактами в 2.54 мм. Чтобы задействовать все выводы Ардуино, потребуется 6-контактный разъем и два 8-контактных разъема. К контактным отверстиям можно также подпаивать предварительно зачищенные провода. Обратите внимание, что расположение разъемов на плате выбрано таким, чтобы она была совместима с платами расширениями Arduino.
- Последние новости
- подписаться на новости
- Последние темы с форума
Program Arduino Pro Mini Using Arduino Uno

Introduction: Program Arduino Pro Mini Using Arduino Uno

By vigneshraja vignesh raja Follow


Hello everyone. Today I am going to show how to program arduino pro mini using arduino uno.
If you already had a arduino uno and you newly buy arduino pro mini then you don’t need to buy the USB to serial converter to program the arduino pro mini because you can program pro mini using your arduino uno board. We can make pro mini to act as a central ic for arduino uno board. First of all you have to know which arduino pro mini you are using either it is 5v 16mhz or 3.3v 8mhz. Use only 5 Volt and 16MHZ pro mini with the arduino uno. we can’t program 3.3v 8mhz pro mini with arduino uno. Here i am using 5v 16mhz pro mini.Let us see the circuit connection.
Add Tip Ask Question Comment Download
Step 1: Video
Instead of reading you can watch video for full description
Add Tip Ask Question Comment Download
Step 2: Connect Pro Mini With Arduino Uno
Follow the simple steps bellow: the circuit connection
clearly shown in the video
Remove the ic in arduino uno board.
- Connect arduino uno board 5V pin to pro mini’s VCC pin.
- Connect arduino uno board GND pin to pro mini’s GND pin.
- Connect arduino uno board TX pin to pro mini’s TX0 pin.
- Connect arduino uno board RX pin to pro mini’s RXI pin
- Connect arduino uno board RESET pin to pro mini’s RST pin.
Add Tip Ask Question Comment Download
Step 3: Open Arduino Software for Program the Pro Mini
Connect the all circuit connection now open the arduino software and select tools->Board ->Ardunio Pro or Pro Mini(5V, 16MHZ) vv/ ATmega328. if you select the arduino pro you can see the selected board in the bottom of the software as shown in above image.
And open the coding you want to program and click the upload button. Now you can see that program uploading into pro mini. you can see the tx and rx led in arduino uno board blinking while program uploading . after uploading of the code. now remove the all connection and give power supply to the pro mini. your code works perfectly on arduino mini. enjoy projects with pro mini. watch the video for to clearly see how to do all steps.
Thank you for reading.
Add Tip Ask Question Comment Download

6 People Made This Project!


See 2 More
Did you make this project? Share it with us!
Recommendations

Fear Booth — Raspberry Pi Powered Photo Booth With a Spooky Twist by Görkem in Raspberry Pi

Penny’s Computer Book (from Inspector Gadget) by bekathwia in Arduino

Animatronic Skull With Arduino by patymaker in Arduino

The Ultimate Camera RIG With Portable Display by Arnov Sharma in Cameras
Robotics Contest

Jewelry Contest

CNC Student Design Challenge

20 Comments

Question 3 years ago
Answer Upvote
Hi i want the code please

Question 4 years ago
Answer Upvote
I’m loosing it here, help. What programmer are you using to up load the sketch. I’m not sure my FIDI board is working so I’m programming the Mini Arduino Pro with an Uno. This setup works because I loaded and ran the Blink program with no issues.
Tip 4 years ago
Reply Upvote
Thanks, Vignesh, for figuring this out and saving me a trip to the store. I’ve made a simple circuit that enables me to program both 5V and 3.3V Pro Mini’s and eliminates the need to push the reset button. Connect V+ to the right voltage for the Pro Mini. The base-emitter junction of the first transistor (Q2) holds the UNO Reset low against the internal 10K resistor. The base current turns the first transistor (Q2) on. When the computer sends a reset, it pulls the UNO reset even lower, turns Q2 off, this turns Q3 on, and resets the Pro Mini. The collector resistors are 3K. A 150 ohm base resistor protects Q2 from anyone inadvertently applying 5V to the reset. The LED and 1.5K resistor are optional. The components aren’t critical but if the base resistor is too large, the circuit won’t pull the UNO reset low enough.