
How to Configure MAC Authentication Function on TP-LINK CAP/AC Serial Products
Updated 06-28-2022 02:39:16 AM 39496
This Article Applies to:
AC500( V1 ) , AC50( V1 ) , CAP300-Outdoor( V1 ) , CAP1750( V1 ) , CAP1200( V1 ) , CAP300( V1 )
The «This Article Applies to» section is not updated in a timely manner, to determine if your model supports a specific feature, please refer to the Specifications page of the corresponding product on the TP-Link website.
Why do we use MAC authentication? Since the openness of wireless network, any wireless terminal in the coverage area of the CAPs can get access to the network, which is a great threaten if unexpected devices come up and connect to the wireless network. To improve the security level and allow or deny some certain clients (MAC address ID) can use WIFI, we can set up MAC authentication function by using White List or Black List. This document will introduce how to configure MAC Authentication function on TP-Link CAP/AC Serial product like AC500.
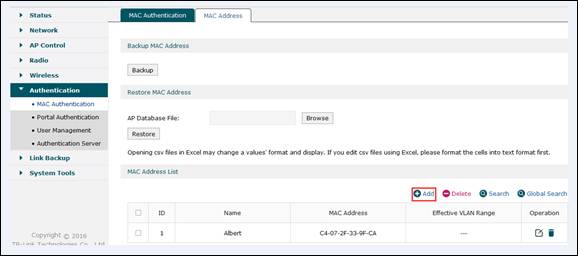
Step 1. Add the MAC address into the MAC Address List (In this instance, we add Albert’s mobile phone’s Mac address in the list).

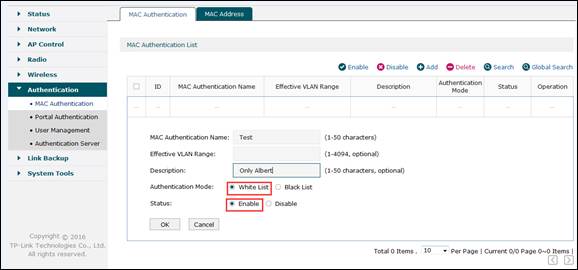
Step 2. Add the MAC Authentication entry and enable “White List” to make MAC authentication effective.

Note:
- White List: When you choose White List, devices whose MAC addresses are in the MAC Address table are allowed but all the other devices are denied.
- Black List: When you choose Black List, devices whose MAC addresses are in the MAC Address table are denied while all the other devices are allowed.
- Effective VLAN Range: when you fill this option with some certain VLAN IDs, please make sure the corresponding SSIDs are bound to the these VLANs as well; If you leave the option blank, this MAC authentication will take effect to only the SSIDs that are not bound with any VLANs.
Step 3. Create wireless SSID and bound it to CAP.

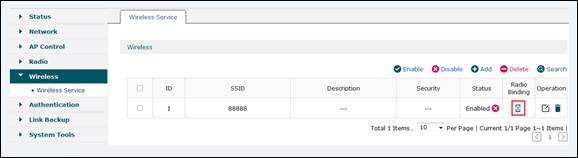
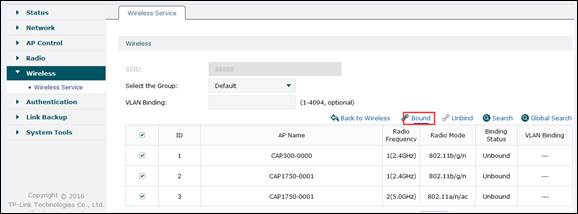

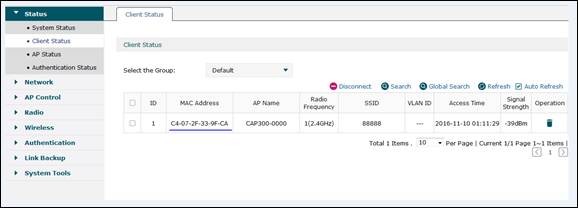
Step 4. Now we use Albert’s mobile phone to connect to Wi-Fi “88888” and we can see the wireless connection can be established successfully. But if we use other clients whose MAC address is not in the white list, wireless connection will be refused.

Is this faq useful?
Your feedback helps improve this site.
What’s your concern with this article?
- Dissatisfied with product
- Too Complicated
- Confusing Title
- Does not apply to me
- Too Vague
- Other
We’d love to get your feedback, please let us know how we can improve this content.
Thank you
We appreciate your feedback.
Click here to contact TP-Link technical support.

Still need help? Search for answers, ask questions, and get help from TP-Link experts and other users around the world.
Subscribe TP-Link takes your privacy seriously. For further details on TP-Link’s privacy practices, see TP-Link’s Privacy Policy.
Be The First To Get Exclusive Deals & News
CAPsMAN AAA
Settings to configure CAPsMAN AAA functionality are found in the /caps-man aaa menu:
| Property | Description |
|---|---|
| mac-format (string; Default: XX:XX:XX:XX:XX:XX) | Controls how the MAC address of the client is encoded by Access Point in the User-Name attribute of the MAC authentication and MAC accounting RADIUS requests. |
| mac-mode (as-username | as-username-and-password; Default: as username) | By default Access Point uses an empty password, when sending Access-Request during MAC authentication. When this property is set to as-username-and-password, Access Point will use the same value for the User-Password attribute as for the User-Name attribute. |
| mac-caching (disabled | time-interval; Default: disabled) | If this value is set to a time interval, the Access Point will cache RADIUS MAC authentication responses for a specified time, and will not contact the RADIUS server if matching cache entry already exists. The value disabled will disable the cache, Access Point will always contact the RADIUS server. |
| interim-update (disabled | time-interval; Default: disabled) | When RADIUS accounting is used, Access Point periodically sends accounting information updates to the RADIUS server. This property specifies the default update interval that can be overridden by the RADIUS server using the Acct-Interim-Interval attribute. |
| called-format (mac | mac:ssid | ssid; Default: mac:ssid) | Format of how the «called-id» identifier will be passed to RADIUS. When configuring radius server clients, you can specify «called-id» in order to separate multiple entires. |
rates.ht-basic-mcsExample
Assuming that rest of the settings are already configured and only the «Security» part has been left.
Radius authentication with one server
1. Create CAPsMAN security configuration
2. Configure Radius server client
3. Assign the configuration to your master profile (or directly to CAP itself)
/caps-man security add authentication-types=wpa2-eap eap-methods=passthrough encryption=aes-ccm group-encryption=aes-ccm name=radius /radius add address=x.x.x.x secret=SecretUserPass service=wireless /caps-man configuration set security=radius
Radius authentication with different radius servers for each SSID
1. Create CAPsMAN security configuration
2. Configure AAA settings
3. Configure Radius server clients
4. Assign the configuration to your master profile (or directly to CAP itself)
/caps-man security add authentication-types=wpa2-eap eap-methods=passthrough encryption=aes-ccm group-encryption=aes-ccm name=radius /caps-man aaa set called-format=ssid /radius add address=x.x.x.x secret=SecretUserPass service=wireless called-id=SSID1 /radius add address=y.y.y.y secret=SecretUserPass service=wireless called-id=SSID2 /caps-man configuration set security=radius
Now everyone connecting to CAP’s with ssid=SSID1 will have their radius authentication requests sent to x.x.x.x and everyone connecting to CAP’s with ssid=SSID2 will have their radius authentication requests sent to y.y.y.y
CAPsMAN Access-list
Access list on CAPsMAN is an ordered list of rules that is used to allow/deny clients to connect to any CAP under CAPsMAN control. When a client attempts to connect to a CAP that is controlled by CAPsMAN, CAP forwards that request to CAPsMAN. As a part of the registration process, CAPsMAN consults an access list to determine if a client should be allowed to connect. The default behavior of the access list is to allow a connection.
Access list rules are processed one by one until a matching rule is found. Then the action in the matching rule is executed. If action specifies that the client should be accepted, the client is accepted, potentially overriding its default connection parameters with ones specified in access-list rule.
An access list is configured in the /caps-man access-list menu. There are the following parameters for access-list rules:
- client matching parameters:
- address — MAC address of the client
- mask — MAC address mask to apply when comparing client address
- interface — optional interface to compare with an interface to which client actually connects to
- time — a time of day and days when rule matches
- signal-range — range in which client signal must fit for a rule to match
- allow-signal-out-of-range — an option that permits the client’s signal to be out of the range always or for some time interval
- accept — accept client
- reject — reject client
- query-radius — query RADIUS server if a particular client is allowed to connect
- ap-tx-limit — tx speed limit in direction to client
- client-tx-limit — tx speed limit in direction to AP (applies to RouterOS clients only)
- client-to-client-forwarding — specifies whether to allow forwarding data received from this client to other clients connected to the same interface
- private-passphrase — PSK passphrase to use for this client if some PSK authentication algorithm is used
- radius-accounting — specifies if RADIUS traffic accounting should be used if RADIUS authentication gets done for this client
- vlan-mode — VLAN tagging mode specifies if traffic coming from a client should get tagged (and untagged when going to a client).
- vlan-id — VLAN ID to use if doing VLAN tagging.
CAPsMAN channel
Channel group settings allow for the configuration of lists of radio channel related settings, such as radio band, frequency, Tx Power extension channel, and width.
Channel group settings are configured in the Channels profile menu /caps-man channels
Property Description band (2ghz-b | 2ghz-b/g | 2ghz-b/g/n | 2ghz-onlyg | 2ghz-onlyn | 5ghz-a | 5ghz-a/n | 5ghz-onlyn; Default: ) Define operational radio frequency band and mode taken from hardware capability of wireless card comment (string; Default: ) Short description of the Channel Group profile extension-channel (Ce | Ceee | eC | eCee | eeCe | eeeC | disabled; Default: ) Extension channel configuration. (E.g. Ce = extension channel is above Control channel, eC = extension channel is below Control channel) frequency (integer [0..4294967295]; Default: ) Channel frequency value in MHz on which AP will operate. name (string; Default: ) A descriptive name for the Channel Group Profile tx-power (integer [-30..40]; Default: ) TX Power for CAP interface (for the whole interface not for individual chains) in dBm. It is not possible to set higher than allowed by country regulations or interface. By default max allowed by country or interface is used. width (; Default: ) Sets Channel Width in MHz. (E.g. 20, 40) save-selected (; Default: yes) Saves selected channel for the CAP Radio — will select this channel after the CAP reconnects to CAPsMAN and use it till the channel Re-optimize is done for this CAP. CAPsMAN configuration
Configuration profiles permit pre-defined ‘top-level’ master settings to be applied to CAP radios being provisioned.
Configuration Profiles are configured in /caps-man configuration menu:
- yes — AP does not include SSID in the beacon frames and does not reply to probe requests that have broadcast SSID.
- no — AP includes SSID in the beacon frames and replies to probe requests that have broadcast SSID.
- disabled — disables the helper and sends multicast packets with multicast destination MAC addresses
- full — all multicast packet mac address are changed to unicast mac addresses prior sending them out
- default — default choice that currently is set to disabled. Value can be changed in future releases.
You can set MCS interval for each of Spatial Stream
- none — will not use selected Spatial Stream
- MCS 0-7 — client must support MCS-0 to MCS-7
- MCS 0-8 — client must support MCS-0 to MCS-8
- MCS 0-9 — client must support MCS-0 to MCS-9
You can set MCS interval for each of Spatial Stream
- none — will not use selected Spatial Stream
- MCS 0-7 — devices will advertise as supported MCS-0 to MCS-7
- MCS 0-8 — devices will advertise as supported MCS-0 to MCS-8
- MCS 0-9 — devices will advertise as supported MCS-0 to MCS-9
- eap-tls — Use built-in EAP TLS authentication.
- passthrough — Access point will relay authentication process to the RADIUS server.
- tkip — Temporal Key Integrity Protocol — encryption protocol, compatible with legacy WEP equipment, but enhanced to correct some of the WEP flaws.
- aes-ccm — more secure WPA encryption protocol, based on the reliable AES (Advanced Encryption Standard). Networks free of WEP legacy should use only this cipher.
- verify-certificate — Require remote device to have valid certificate. Check that it is signed by known certificate authority. No additional identity verification is done. Certificate may include information about time period during which it is valid. If router has incorrect time and date, it may reject valid certificate because router’s clock is outside that period. See also the Certificates configuration.
- dont-verify-certificate — Do not check certificate of the remote device. Access Point will not require client to provide certificate.
- no-certificates — Do not use certificates. TLS session is established using 2048 bit anonymous Diffie-Hellman key exchange.
- verify-certificate-with-crl — Same as verify-certificate but also checks if the certificate is valid by checking the Certificate Revocation List.
CAPsMAN datapath
Datapath settings control data forwarding related aspects. On CAPsMAN datapath settings are configured in the datapath profile menu /caps-man datapath or directly in a configuration profile or interface menu as settings with datapath. prefix.
There are 2 major forwarding modes:
- local forwarding mode, where CAP is locally forwarding data to and from wireless interface
- manager forwarding mode, where CAP sends to CAPsMAN all data received over wireless and only sends out the wireless data received from CAPsMAN. In this mode, even client-to-client forwarding is controlled and performed by CAPsMAN.
Forwarding mode is configured on a per-interface basis — so if one CAP provides 2 radio interfaces, one can be configured to operate in local forwarding mode and the other in manager forwarding mode. The same applies to Virtual-AP interfaces — each can have different forwarding mode from master interface or other Virtual-AP interfaces.
Most of the datapath settings are used only when in manager forwarding mode, because in local forwarding mode CAPsMAN does not have control over data forwarding.
There are the following datapath settings:
- bridge — bridge interface to add interface to, as a bridge port, when enabled
- bridge-cost — bridge port cost to use when adding as bridge port
- bridge-horizon — bridge horizon to use when adding as bridge port
- client-to-client-forwarding — controls if client-to-client forwarding between wireless clients connected to interface should be allowed, in local forwarding mode this function is performed by CAP, otherwise it is performed by CAPsMAN.
- local-forwarding — controls forwarding mode
- openflow-switch — OpenFlow switch to add interface to, as port when enabled
- vlan-id — VLAN ID to assign to interface if vlan-mode enables use of VLAN tagging
- vlan-mode — VLAN tagging mode specifies if VLAN tag should be assigned to interface (causes all received data to get tagged with VLAN tag and allows interface to only send out data tagged with given tag)
CAPsMAN interface
CAPsMAN interfaces are managed in /caps-man interface menu:
[admin@CM] > /caps-man interface print Flags: M - master, D - dynamic, B - bound, X - disabled, I - inactive, R - running # NAME RADIO-MAC MASTER-INTERFACE 0 M BR cap2 00:0C:42:1B:4E:F5 none 1 B cap3 00:00:00:00:00:00 cap2
CAPsMAN manager
- none — do not perform upgrade
- require-same-version — CAPsMAN suggest to upgrade the CAP RouterOS version and if it fails it will not provision the CAP. (Manual provision is still possible)
- suggest-same-version — CAPsMAN suggests to upgrade the CAP RouterOS version and if it fails it will still be provisioned
CAPsMAN provisioning
CAPsMAN distinguishes between CAPs based on a common-name identifier. The identifier is generated based on the following rules:
- if CAP provided a certificate, the identifier is set to the Common Name field in the certificate
- otherwise, an identifier is based on Base-MAC provided by CAP in the form: ‘[XX:XX:XX:XX:XX:XX]’.
When the DTLS connection with CAP is successfully established (which means that CAP identifier is known and valid), CAPsMAN makes sure there is no stale connection with CAP using the same identifier. Currently connected CAPs are listed in /caps-man remote-cap menu:
[admin@CM] /caps-man> remote-cap print # ADDRESS IDENT STATE RADIOS 0 00:0C:42:00:C0:32/27044 MT-000C4200C032 Run 1
CAPsMAN distinguishes between actual wireless interfaces (radios) based on their built-in MAC address (radio-mac). This implies that it is impossible to manage two radios with the same MAC address on one CAPsMAN. Radios currently managed by CAPsMAN (provided by connected CAPs) are listed in /caps-man radio menu:
[admin@CM] /caps-man> radio print Flags: L - local, P - provisioned # RADIO-MAC INTERFACE REMOTE-AP-IDENT 0 P 00:03:7F:48:CC:07 cap1 MT-000C4200C032
When CAP connects, CAPsMAN at first tries to bind each CAP radio to CAPsMAN master interface based on radio-mac. If an appropriate interface is found, radio gets set up using master interface configuration and configuration of slave interfaces that refer to a particular master interface. At this moment interfaces (both master and slaves) are considered bound to radio and radio is considered provisioned.
If no matching master interface for radio is found, CAPsMAN executes ‘provisioning rules’. Provisioning rules is an ordered list of rules that contain settings that specify which radio to match and settings that specify what action to take if a radio matches.
Provisioning rules for matching radios are configured in /caps-man provisioning menu:
- create-disabled — create disabled static interfaces for radio. I.e., the interfaces will be bound to the radio, but the radio will not be operational until the interface is manually enabled;
- create-enabled — create enabled static interfaces. I.e., the interfaces will be bound to the radio and the radio will be operational;
- create-dynamic-enabled — create enabled dynamic interfaces. I.e., the interfaces will be bound to the radio, and the radio will be operational;
- none — do nothing, leaves radio in the non-provisioned state;
- cap — default name
- identity — CAP boards system identity name
- prefix — name from the name-prefix value
- prefix-identity — name from the name-prefix value and the CAP boards system identity name
If no rule matches radio, then implicit default rule with action create-enabled and no configurations set is executed.
To get the active provisioning matchers:
[admin@CM] /caps-man provisioning> print Flags: X - disabled 0 radio-mac=00:00:00:00:00:00 action=create-enabled master-configuration=main-cfg slave-configurations=virtual-ap-cfg name-prefix=""
For the user’s convenience there are commands that allow the re-execution of the provisioning process for some radio or all radios provided by some AP:
[admin@CM] > caps-man radio provision 0
[admin@CM] > caps-man remote-cap provision 0
CAPsMAN radio
see / caps-man provisioning
CAPsMAN rates
see / caps-man configuration
CAPsMAN registration-table
Registration table contains a list of clients that are connected to radios controlled by CAPsMAN and is available in /caps-man registration-table menu:
[admin@CM] /caps-man> registration-table print # INTERFACE MAC-ADDRESS UPTIME RX-SIGNAL 0 cap1 00:03:7F:48:CC:0B 1h38m9s210ms -36
CAPsMAN remote-cap
see / caps-man provisioning
CAPsMAN security
Example
Assuming that rest of the settings are already configured and only the «Security» part has been left.
Radius authentication with one server
1. Create CAPsMAN security configuration
2. Configure Radius server client
3. Assign the configuration to your master profile (or directly to CAP itself)
/caps-man security add authentication-types=wpa2-eap eap-methods=passthrough encryption=aes-ccm group-encryption=aes-ccm name=radius /radius add address=x.x.x.x secret=SecretUserPass service=wireless /caps-man configuration set security=radius
Radius authentication with different radius servers for each SSID
1. Create CAPsMAN security configuration
2. Configure AAA settings
3. Configure Radius server clients
4. Assign the configuration to your master profile (or directly to CAP itself)
/caps-man security add authentication-types=wpa2-eap eap-methods=passthrough encryption=aes-ccm group-encryption=aes-ccm name=radius /caps-man aaa set called-format=ssid /radius add address=x.x.x.x secret=SecretUserPass service=wireless called-id=SSID1 /radius add address=y.y.y.y secret=SecretUserPass service=wireless called-id=SSID2 /caps-man configuration set security=radius
Now everyone connecting to CAP’s with ssid=SSID1 will have their radius authentication requests sent to x.x.x.x and everyone connecting to CAP’s with ssid=SSID2 will have their radius authentication requests sent to y.y.y.y
- Нет меток
MAC RADIUS Authentication
You can control access to your network through a switch by using several different authentication methods. Junos OS switches support 802.1X, MAC RADIUS, and captive portal as an authentication methods to devices requiring to connect to a network.
You can configure MAC RADIUS authentication on the switch interfaces to which the hosts are connected to provide LAN access. For more information, read this topic.
Configuring MAC RADIUS Authentication (CLI Procedure)
You can permit devices that are not 802.1X-enabled LAN access by configuring MAC RADIUS authentication on the switch interfaces to which the hosts are connected.
You can also allow non-802.1X-enabled devices to access the LAN by configuring their MAC address for static MAC bypass of authentication.
You can configure MAC RADIUS authentication on an interface that also allows 802.1X authentication, or you can configure either authentication method alone.
If both MAC RADIUS and 802.1X authentication are enabled on the interface, the switch first sends the host three EAPoL requests to the host. If there is no response from the host, the switch sends the host’s MAC address to the RADIUS server to check whether it is a permitted MAC address. If the MAC address is configured as permitted on the RADIUS server, the RADIUS server sends a message to the switch that the MAC address is a permitted address, and the switch opens LAN access to the nonresponsive host on the interface to which it is connected.
If MAC RADIUS authentication is configured on the interface but 802.1X authentication is not (by using the mac-radius restrict option), the switch attempts to authenticate the MAC address with the RADIUS server without delaying by attempting 802.1X authentication first.
Before you configure MAC RADIUS authentication, be sure you have:
- Configured basic access between the switch and the RADIUS server. See Example: Connecting a RADIUS Server for 802.1X to an EX Series Switch.
To configure MAC RADIUS authentication by using the CLI:
-
On the switch, configure the interfaces to which the nonresponsive hosts are attached for MAC RADIUS authentication, and add the restrict qualifier for interface ge-0/0/20 to have it use only MAC RADIUS authentication:
[edit] user@switch# set protocols dot1x authenticator interface ge-0/0/19 mac-radius user@switch# set protocols dot1x authenticator interface ge-0/0/20 mac-radius restrict
[root@freeradius]# edit /etc/raddb vi users 00040ffdacfe Auth-type:=Local, User-Password = "00040ffdacfe" 0004aecd235f Auth-type:=Local, User-Password = "0004aecd235f"
[edit]# user@switch# edit protocols dot1x authenticator mac-radius password $9$H.fQ/CuEclFnclKMN-HqmPfQFn/AuOzF
See Also
Example: Configuring MAC RADIUS Authentication on an EX Series Switch
To permit hosts that are not 802.1X-enabled to access a LAN, you can configure MAC RADIUS authentication on the switch interfaces to which the non-802.1X-enabled hosts are connected. When MAC RADIUS authentication is configured, the switch will attempt to authenticate the host with the RADIUS server by using the host’s MAC address.
This example describes how to configure MAC RADIUS authentication for two non-802.1X-enabled hosts:
- Requirements
- Overview and Topology
- Configuration
- Verification
Requirements
This example uses the following software and hardware components:
This example also applies to QFX5100 switches.
- Junos OS Release 9.3 or later for EX Series switches.
- An EX Series switch acting as an authenticator port access entity (PAE). The ports on the authenticator PAE form a control gate that blocks all traffic to and from supplicants until they are authenticated.
- A RADIUS authentication server. The authentication server acts as the backend database and contains credential information for hosts (supplicants) that have permission to connect to the network.
Before you configure MAC RADIUS authentication, be sure you have:
- Configured basic access between the EX Series switch and the RADIUS server. See Example: Connecting a RADIUS Server for 802.1X to an EX Series Switch.
- Performed basic bridging and VLAN configuration on the switch. See the documentation that describes setting up basic bridging and a VLAN for your switch. If you are using a switch that supports the Enhanced Layer 2 Software (ELS) configuration style, see Example: Setting Up Basic Bridging and a VLAN for an EX Series Switch with ELS Support or Example: Setting Up Basic Bridging and a VLAN on Switches. For all other switches, see Example: Setting Up Basic Bridging and a VLAN for an EX Series Switch.
Note: For more about ELS, see: Using the Enhanced Layer 2 Software CLI
Overview and Topology
IEEE 802.1X port-based network access control (PNAC) authenticates and permits devices access to a LAN if the devices can communicate with the switch by using the 802.1X protocol (that is, the devices are 802.1X-enabled). To permit non-802.1X-enabled end devices to access the LAN, you can configure MAC RADIUS authentication on the interfaces to which the end devices are connected. When the MAC address of the end device appears on the interface, the switch consults the RADIUS server to check whether it is a permitted MAC address. If the MAC address of the end device is configured as permitted on the RADIUS server, the switch opens LAN access to the end device.
You can configure both MAC RADIUS authentication and 802.1X authentication methods on an interface configured for multiple supplicants. Additionally, if an interface is connected only to a non-802.1X-enabled host, you can enable MAC RADIUS and not enable 802.1X authentication by using the mac-radius restrict option, and thus avoid the delay that occurs while the switch determines that the device is does not respond to EAP messages.
Figure 1 shows the two printers connected to the switch.
This figure also applies to QFX5100 switches.
Figure 1: Topology for MAC RADIUS Authentication Configuration
Table 1 shows the components in the example for MAC RADIUS authentication.
EX4200 ports (ge-0/0/0 through ge-0/0/23)
Connections to printers (no PoE required)
ge-0/0/19, MAC address 00040ffdacfe
ge-0/0/20, MAC address 0004aecd235f
Connected to the switch on interface ge-0/0/10
The printer with the MAC address 00040ffdacfe is connected to access interface ge-0/0/19. A second printer with the MAC address 0004aecd235f is connected to access interface ge-0/0/20. In this example, both interfaces are configured for MAC RADIUS authentication on the switch, and the MAC addresses (without colons) of both printers are configured on the RADIUS server. Interface ge-0/0/20 is configured to eliminate the normal delay while the switch attempts 802.1X authentication; MAC RADIUS authentication is enabled and 802.1X authentication is disabled using the mac radius restrict option.
Topology
Configuration
Procedure
- CLI Quick Configuration
- Step-by-Step Procedure
- Results
CLI Quick Configuration
To quickly configure MAC RADIUS authentication, copy the following commands and paste them into the switch terminal window:
[edit] set protocols dot1x authenticator interface ge-0/0/19 mac-radius set protocols dot1x authenticator interface ge-0/0/20 mac-radius restrict
You must also configure the two MAC addresses as usernames and passwords on the RADIUS server, as is done in step 2 of the Step-by-Step Procedure.
Step-by-Step Procedure
Configure MAC RADIUS authentication on the switch and on the RADIUS server:
-
On the switch, configure the interfaces to which the printers are attached for MAC RADIUS authentication, and configure the restrict option on interface ge-0/0/20, so that only MAC RADIUS authentication is used:
[edit] user@switch# set protocols dot1x authenticator interface ge-0/0/19 mac-radius user@switch# set protocols dot1x authenticator interface ge-0/0/20 mac-radius restrict
[root@freeradius]# edit /etc/raddb vi users 00040ffdacfe Auth-type:=EAP, User-Password = "00040ffdacfe" 0004aecd235f Auth-type:=EAP, User-Password = "0004aecd235f"
Results
Display the results of the configuration on the switch:
user@switch> show configuration protocols < dot1x < authenticator < authentication-profile-name profile52; interface < ge-0/0/19.0 < mac-radius; >ge-0/0/20.0 < mac-radius < restrict; >> > > > >
Verification
Verify that the supplicants are authenticated:
Verifying That the Supplicants Are Authenticated
Purpose
After supplicants are configured for MAC RADIUS authentication on the switch and on the RADIUS server, verify that they are authenticated and display the method of authentication.
Action
Display information about the 802.1X-configured interfaces ge-0/0/19 and ge-0/0/20:
user@switch> show dot1x interface ge-0/0/19.0 detail ge-0/0/19.0 Role: Authenticator Administrative state: Auto Supplicant mode: Single Number of retries: 3 Quiet period: 60 seconds Transmit period: 30 seconds Mac Radius: Enabled Mac Radius Restrict: Disabled Reauthentication: Enabled Configured Reauthentication interval: 3600 seconds Supplicant timeout: 30 seconds Server timeout: 30 seconds Maximum EAPOL requests: 2 Guest VLAN member: Number of connected supplicants: 1 Supplicant: user101, 00:04:0f:fd:ac:fe Operational state: Authenticated Authentication method: Radius Authenticated VLAN: vo11 Dynamic Filter: match source-dot1q-tag 10 action deny Session Reauth interval: 60 seconds Reauthentication due in 50 seconds user@switch> show dot1x interface ge-0/0/20.0 detail ge-0/0/20.0 Role: Authenticator Administrative state: Auto Supplicant mode: Single Number of retries: 3 Quiet period: 60 seconds Transmit period: 30 seconds Mac Radius: Enabled Mac Radius Restrict: Enabled Reauthentication: Enabled Configured Reauthentication interval: 3600 seconds Supplicant timeout: 30 seconds Server timeout: 30 seconds Maximum EAPOL requests: 2 Guest VLAN member: Number of connected supplicants: 1 Supplicant: user102, 00:04:ae:cd:23:5f Operational state: Authenticated Authentcation method: Radius Authenticated VLAN: vo11 Dynamic Filter: match source-dot1q-tag 10 action deny Session Reauth interval: 60 seconds Reauthentication due in 50 seconds
Meaning
The sample output from the show dot1x interface detail command displays the MAC address of the connected end device in the Supplicant field. On interface ge-0/0/19, the MAC address is 00:04:0f:fd:ac:fe , which is the MAC address of the first printer configured for MAC RADIUS authentication. The Authentication method field displays the authentication method as Radius . On interface ge-0/0/20 , the MAC address is 00:04:ae:cd:23:5f , which is the MAC address of the second printer configured for MAC RADIUS authentication. The Authentication method field displays the authentication method as Radius .
Overview
The ‘WiFi’ configuration menu, introduced in RouterOS 7.13, is a RouterOS menu for managing Wi-Fi 5 wave2 and newer WiFi interfaces.
Devices with compatible radios also require either the ‘wifi-qcom-ac’ driver package (for 802.11ac chipsets) or the ‘wifi-qcom’ driver package for 802.11ax and newer chipsets.
The configuration menu used to be called ‘wifiwave2’ in RouterOS versions before 7.13, where it was a part of the ‘wifiwave2’ software package.
WiFi Terminology
Before we move on let’s familiarize ourselves with terms important for understanding the operation of the menu. These terms will be used throughout the article.
- Profile — refers to the configuration preset created under one of this WiFi sub-menus: aaa, channel, security, datapath, or interworking.
- Configurationprofile — configuration preset defined under /interface/wifi/configuration, it can reference various profiles.
- Station — wireless client.
Basic Configuration:
Basic password-protected AP
/interface/wifi set wifi1 disabled=no configuration.country=Latvia configuration.ssid=MikroTik security.authentication-types=wpa2-psk,wpa3-psk security.passphrase=8-63_characters
Open AP with OWE transition mode
Opportunistic wireless encryption (OWE) allows the creation of wireless networks that do not require the knowledge of a password to connect, but still offer the benefits of traffic encryption and management frame protection. It is an improvement on regular open access points.
However, since a network cannot be simultaneously encrypted and unencrypted, 2 separate interface configurations are required to offer connectivity to older devices that do not support OWE and offer the benefits of OWE to devices that do.
This configuration is referred to as OWE transition mode.
/interface/wifi add master-interface=wifi1 name=wifi1_owe configuration.ssid=MikroTik_OWE security.authentication-types=owe security.owe-transition-interface=wifi1 configuration.hide-ssid=yes set wifi1 configuration.country=Latvia configuration.ssid=MikroTik security.authentication-types="" security.owe-transition-interface=wifi1_owe enable wifi1,wifi1_owe
Client devices that support OWE will prefer the OWE interface. If you don’t see any devices in your registration table that are associating with the regular open AP, you may want to move on from running a transition mode setup to a single OWE-encrypted interface.
Resetting configuration
WiFi interface configurations can be reset by using the ‘reset’ command.
/interface/wifi reset wifi1
Configuration profiles
One of the new WiFi additions is configuration profiles, you can create various presets, that can be assigned to interfaces as needed. Configuration settings for WiFi are grouped in profiles according to the parameter sections found at end of this page — aaa, channel, configuration, datapath, interworking, and security, and can then be assigned to interfaces. Configuration profiles can include other profiles as well as separate parameters from other categories.
This optional flexibility is meant to allow each user to arrange their configuration in a way that makes the most sense for them, but it also means that each parameter may have different values assigned to it in different sections of the configuration.
The following priority determines, which value is used:
- Value in interface settings
- Value in a profile assigned to interface
- Value in configuration profile assigned to interface
- Value in a profile assigned to configuration profile (which in turn is assigned to interface).
If you are at any point unsure of which parameter value will be used for an interface, consult the actual-configuration menu. For an example of configuration profile usage, see the following example.
Example for dual-band home AP
# Creating a security profile, which will be common for both interfaces /interface wifi security add name=common-auth authentication-types=wpa2-psk,wpa3-psk passphrase="diceware makes good passwords" wps=disable # Creating a common configuration profile and linking the security profile to it /interface wifi configuration add name=common-conf ssid=MikroTik country=Latvia security=common-auth # Creating separate channel configurations for each band /interface wifi channel add name=ch-2ghz frequency=2412,2432,2472 width=20mhz add name=ch-5ghz frequency=5180,5260,5500 width=20/40/80mhz # Assigning to each interface the common profile as well as band-specific channel profile /interface wifi set wifi1 channel=ch-2ghz configuration=common-conf disabled=no set wifi2 channel=ch-5ghz configuration=common-conf disabled=no /interface/wifi/actual-configuration print 0 name="wifi1" mac-address=74:4D:28:94:22:9A arp-timeout=auto radio-mac=74:4D:28:94:22:9A configuration.ssid="MikroTik" .country=Latvia security.authentication-types=wpa2-psk,wpa3-psk .passphrase="diceware makes good passwords" .wps=disable channel.frequency=2412,2432,2472 .width=20mhz 1 name="wifi2" mac-address=74:4D:28:94:22:9B arp-timeout=auto radio-mac=74:4D:28:94:22:9B configuration.ssid="MikroTik" .country=Latvia security.authentication-types=wpa2-psk,wpa3-psk .passphrase="diceware makes good passwords" .wps=disable channel.frequency=5180,5260,5500 .width=20/40/80mhz
Access List
The access list provides multiple ways of filtering and managing wireless connections.
RouterOS will check each new connection to see if its parameters match the parameters specified in any access list rule.
The rules are checked in the order they appear in the list. Only management actions specified in the first matching rule are applied to each connection.
Connections, which have been accepted by an access list rule, will be periodically checked, to see if they remain within the permitted time and signal-range. If they do not, they will be terminated.
Take care when writing access list rules which reject clients. After being repeatedly rejected by an AP, a client device may start avoiding it.
The access list has two kinds of parameters — filtering, and action. Filtering properties are only used for matching clients, to whom the access list rule should be applied to. Action parameters can change connection parameters for that specific client and potentially overriding its default connection parameters with ones specified in the access list rule.
MAC address authentication
Implemented through the query-radius action, MAC address authentication is a way to implement a centralized whitelist of client MAC addresses using a RADIUS server.
When a client device tries to associate with an AP, which is configured to perform MAC address authentication, the AP will send an access-request message to a RADIUS server with the device’s MAC address as the user name and an empty password. If the RADIUS server answers with access-accept to such a request, the AP proceeds with whatever regular authentication procedure (passphrase or EAP authentication) is configured for the interface.
Access rule examples
Only accept connections to guest network from nearby devices during business hours
/interface/wifi/access-list/print detail Flags: X - disabled 0 signal-range=-60..0 allow-signal-out-of-range=5m ssid-regexp="MikroTik Guest" time=7h-19h,mon,tue,wed,thu,fri action=accept 1 ssid-regexp="MikroTik Guest" action=reject
Reject connections from locally-administered (‘anonymous’/’randomized’) MAC addresses
/interface/wifi/access-list/print detail Flags: X - disabled 0 mac-address=02:00:00:00:00:00 mac-address-mask=02:00:00:00:00:00 action=reject
Assigning a different passphrase for a specific client can be useful, if you need to provide wireless access to a client, but don’t want to share your wireless password, or don’t want to create a separate SSID. When the matching client will connect to this network, instead of using the password defined in the interface configuration, the access list will make that client use a different password. Just make that the specific client doesn’t get matched by a more generic access list rule first.
/interface wifi access-list add action=accept disabled=no mac-address=22:F9:70:E5:D2:8E interface=wifi1 passphrase=StrongPassword
Frequency scan
The ‘/interface/wifi/frequency-scan wifi1’ command provides information about RF conditions on available channels that can be obtained by running the frequency-scan command. Used to approximate the spectrum usage, it can be useful to find less crowded frequencies.
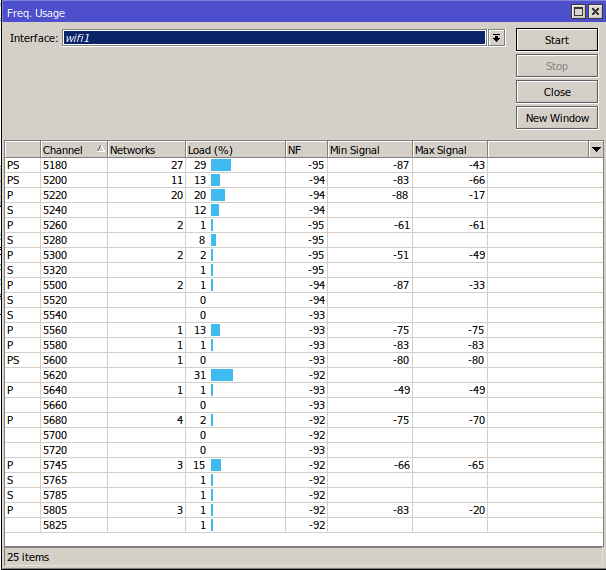
Running a frequency scan will disconnect all connected clients, or if the interface is in station mode, it will disconnect from AP.
Scan command
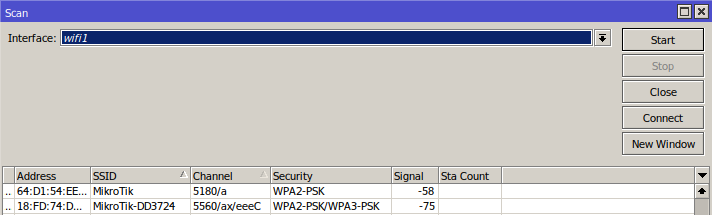
The ‘/interface wifi scan’ command will scan for access points and print out information about any APs it detects. It doesn’t show the frequency usage, per channel, but it will reveal all access points that are transmitting. You can use the «connect» button, to initiate a connection to a specific AP.
The scan command takes all the same parameters as the frequency-scan command.
Sniffer
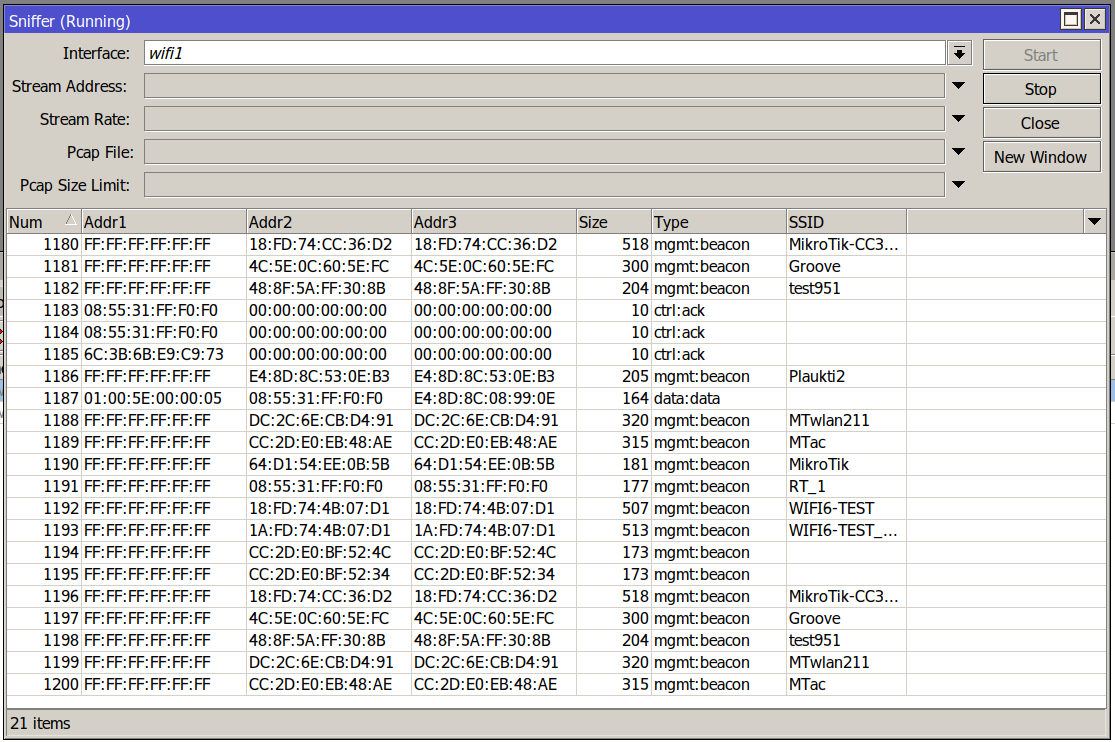
The sniffer command enables monitor mode on a wireless interface. This turns the interface into a passive receiver for all WiFi transmissions.
The command continuously prints out information on received packets and can save them locally to a pcap file or stream them using the TZSP protocol.The sniffer will operate on whichever channel is configured for the chosen interface.
WPS client
The wps-client command enables obtaining authentication information from a WPS-enabled AP.
/interface/wifi/wps-client wifi1
WPS server
An AP can be made to accept WPS authentication by a client device for 2 minutes by running the following command.
/interface/wifi wps-push-button wifi1
Radios
Information about the capabilities of each radio can be gained by running the `/interface/wifi/radio print detail` command. It can be useful to see what bands are supported by the interface and what channels can be selected. The country profile that is applied to the interface will influence the results.
interface/wifi/radio/print detail Flags: L - local 0 L radio-mac=48:A9:8A:0B:F7:4A phy-id=0 tx-chains=0,1 rx-chains=0,1 bands=5ghz-a:20mhz,5ghz-n:20mhz,20/40mhz,5ghz-ac:20mhz,20/40mhz,20/40/80mhz,5ghz-ax:20mhz, 20/40mhz,20/40/80mhz ciphers=tkip,ccmp,gcmp,ccmp-256,gcmp-256,cmac,gmac,cmac-256,gmac-256 countries=all 5g-channels=5180,5200,5220,5240,5260,5280,5300,5320,5500,5520,5540,5560,5580,5600,5620,5640,5660, 5680,5700,5720,5745,5765,5785,5805,5825 max-vlans=128 max-interfaces=16 max-station-interfaces=3 max-peers=120 hw-type="QCA6018" hw-caps=sniffer interface=wifi1 current-country=Latvia current-channels=5180/a,5180/n,5180/n/Ce,5180/ac,5180/ac/Ce,5180/ac/Ceee,5180/ax,5180/ax/Ce, 5180/ax/Ceee,5200/a,5200/n,5200/n/eC,5200/ac,5200/ac/eC,5200/ac/eCee,5200/ax. . 5680/n/eC,5680/ac,5680/ac/eC,5680/ax,5680/ax/eC,5700/a,5700/n,5700/ac,5700/ax current-gopclasses=115,116,128,117,118,119,120,121,122,123 current-max-reg-power=30
While Radio information gives us information about supported channel width, it is also possible to deduce this information from the product page, to do so you need to check the following parameters: number of chains, max data rate. Once you know these parameters, you need to check the modulation and coding scheme (MCS) table, for example, here: https://mcsindex.com/.
If we take hAP ax 2 , as an example, we can see that number of chains is 2, and the max data rate is 1200 — 1201 in the MCS table. In the MCS table we need to find entry for 2 spatial streams — chains, and the respective data rate, which in this case shows us that 80MHz is the maximum supported channel width.
Registration table
‘/interface/wifi/registration-table/’ displays a list of connected wireless clients and detailed information about them.

De-authentication
Wireless peers can be manually de-authenticated (forcing re-association) by removing them from the registration table.
/interface/wifi/registration-table remove [find where mac-address=02:01:02:03:04:05]
WiFi CAPsMAN
WiFi CAPsMAN allows applying wireless settings to multiple MikroTik WiFi AP devices from a central configuration interface.
More specifically, the Controlled Access Point system Manager (CAPsMAN) allows the centralization of wireless network management. When using the CAPsMAN feature, the network will consist of a number of ‘Controlled Access Points’ (CAP) that provide wireless connectivity and a ‘system Manager’ (CAPsMAN) that manages the configuration of the APs, it also takes care of client authentication.
WiFi CAPsMAN only passes wireless configuration to the CAP, all forwarding decisions are left to the CAP itself — there is no CAPsMAN forwarding mode.
- Any RouterOS device, that supports the WiFi package, can be a controlled wireless access point (CAP) as long as it has at least a Level 4 RouterOS license.
- WiFi CAPsMAN server can be installed on any RouterOS device that supports the WiFi package, even if the device itself does not have a wireless interface
- Unlimited CAPs (access points) supported by CAPsMAN
WiFi CAPsMAN can only control WiFi interfaces, and WiFi CAPs can join only WiFi CAPsMAN, similarly, regular CAPsMAN only supports non-WiFi caps.
CAPsMAN — CAP simple configuration example:
CAPsMAN in WiFi uses the same menu as a regular WiFi interface, meaning when you pass configuration to CAPs, you have to use the same configuration, security, channel configuration, etc. as you would for regular WiFi interfaces.
You can configure sub configuration menus, directly under «/interface/wifi/configuration» or reference previously created profiles in the main configuration profile
#create a security profile /interface wifi security add authentication-types=wpa3-psk name=sec1 passphrase=HaveAg00dDay #create configuraiton profiles to use for provisioning /interface wifi configuration add country=Latvia name=5ghz security=sec1 ssid=CAPsMAN_5 add name=2ghz security=sec1 ssid=CAPsMAN2 add country=Latvia name=5ghz_v security=sec1 ssid=CAPsMAN5_v #configure provisioning rules, configure band matching as needed /interface wifi provisioning add action=create-dynamic-enabled master-configuration=5ghz slave-configurations=5ghz_v supported-bands=\ 5ghz-n add action=create-enabled master-configuration=2ghz supported-bands=2ghz-n #enable CAPsMAN service /interface wifi capsman set ca-certificate=auto enabled=yes
#enable CAP service, in this case CAPsMAN is on same LAN, but you can also specify "caps-man-addresses=x.x.x.x" here /interface/wifi/cap set enabled=yes #set configuration.manager= on the WiFi interface that should act as CAP /interface/wifi/set wifi1,wifi2 configuration.manager=capsman-or-local
If the CAP is hAP ax 2 or hAP ax 3 , it is strongly recommended to enable RSTP in the bridge configuration, on the CAP
configuration.manager should only be set on the CAP device itself, don’t pass it to the CAP vai configuration profile that you provision.
The interface that should act as CAP needs additional configuration under «interface/wifi/set wifiX configuration.manager=»
CAPsMAN — CAP VLAN configuration example:
In this example, we will assign VLAN20 to our main SSID, and will add VLAN30 for the guest network, ether5 from CAPsMAN is connected to CAP.
/interface bridge add name=br vlan-filtering=yes /interface vlan add interface=br name=VLAN20 vlan-id=20 add interface=br name=VLAN30 vlan-id=30 #definfing channel is optional /interface wifi channel add frequency=5180,2412 name=CH /interface wifi datapath add bridge=br name=VLAN20 vlan-id=20 add bridge=br name=VLAN30 vlan-id=30 /interface wifi security add authentication-types=wpa2-psk,wpa3-psk name=security #make sure to change the country to one where you reside in /interface wifi configuration add channel=CH country=Latvia datapath=VLAN20 name=2Ghz_main security=security ssid=2G_MAIN add channel=CH country=Latvia datapath=VLAN30 name=2Ghz_guest security=security ssid=2G_Guest add channel=CH country=Latvia datapath=VLAN20 name=5Ghz_main security=security ssid=5G_MAIN add channel=CH country=Latvia datapath=VLAN30 name=5Ghz_guest security=security ssid=5G_Guest /ip pool add name=dhcp_pool0 ranges=192.168.1.2-192.168.1.254 add name=dhcp_pool1 ranges=192.168.20.2-192.168.20.254 add name=dhcp_pool2 ranges=192.168.30.2-192.168.30.254 /ip dhcp-server add address-pool=dhcp_pool0 interface=br name=dhcp1 add address-pool=dhcp_pool1 interface=VLAN20 name=dhcp2 add address-pool=dhcp_pool2 interface=VLAN30 name=dhcp3 /interface bridge port add bridge=br interface=ether5 /interface bridge vlan add bridge=br tagged=ether5,br vlan-ids=20 add bridge=br tagged=ether5,br vlan-ids=30 /interface wifi capsman set enabled=yes interfaces=br /interface wifi provisioning add action=create-dynamic-enabled master-configuration=2Ghz_main name-format=2G-%I slave-configurations=2Ghz_guest supported-bands=2ghz-ax add action=create-dynamic-enabled master-configuration=5Ghz_main name-format=5G-%I slave-configurations=5Ghz_guest supported-bands=5ghz-ax /ip address add address=192.168.1.1/24 interface=br network=192.168.1.0 add address=192.168.20.1/24 interface=VLAN20 network=192.168.20.0 add address=192.168.30.1/24 interface=VLAN30 network=192.168.30.0 /ip dhcp-client add interface=ether1 disabled=no /ip dhcp-server network add address=192.168.1.0/24 gateway=192.168.1.1 add address=192.168.20.0/24 gateway=192.168.20.1 add address=192.168.30.0/24 gateway=192.168.30.1
/interface bridge add name=bridgeLocal /interface wifi datapath add bridge=bridgeLocal comment=defconf disabled=no name=capdp /interface wifi set [ find default-name=wifi1 ] configuration.manager=capsman datapath=capdp disabled=no set [ find default-name=wifi2 ] configuration.manager=capsman datapath=capdp disabled=no /interface bridge port add bridge=bridgeLocal comment=defconf interface=ether1 add bridge=bridgeLocal comment=defconf interface=ether2 add bridge=bridgeLocal comment=defconf interface=ether3 add bridge=bridgeLocal comment=defconf interface=ether4 add bridge=bridgeLocal comment=defconf interface=ether5 /interface wifi cap set discovery-interfaces=bridgeLocal enabled=yes slaves-datapath=capdp /ip dhcp-client add interface=bridgeLocal disabled=no
Advanced examples
Replacing ‘wireless’ package
Some MikroTik Wi-Fi 5 APs, which ship with their interfaces managed by the ‘wireless’ menu, can install the additional ‘wifi-qcom-ac’ package to make their interfaces compatible with the ‘wifi’ menu instead.
To do this, it is necessary to uninstall the ‘wireless’ package, then install ‘wifi-qcom-ac’.
Compatibility
The wifi-qcom-ac package includes alternative drivers for IPQ4018/4019 and QCA9984 radios that make them compatible with the WiFi configuration menu.
As a rule of thumb, the package is compatible with 802.11ac producs, which have an ARM CPU. It is NOT copmatible with any of our 802.11ac products which have a MIPS CPU.
Compatibility Devices Compatible Audience, Audience LTE kit, Chateau (all variants of D53), hAP ac ^2 , hAP ac^3, cAP ac, cAP XL ac, LDF 5 ac , LHG XL 5 ac , LHG XL 52 ac , NetMetal ac^2, mANTBox 52 15s, wAP ac (RBwAPG-5HacD2HnD), SXTsq 5 ac Incompatbile RB4011iGS+5HacQ2HnD-IN (no support for the 2.4GHz interface), Cube 60Pro ac (no support for 60GHz interface), wAP ac (RBwAPG-5HacT2HnD) and all other devices with a MIPSBE CPU Benefits
- WPA3 authentication and OWE (opportunistic wireless encryption)
- 802.11w standard management frame protection
- 802.11r/k/v
- MU-MIMO and beamforming
- 400Mb/s maximum data rate in the 2.4GHz band for IPQ4019 interfaces
Lost features
The following notable features are lost when running 802.11ac products with drivers that are compatible with the ‘wifi’ management interface
- Nstreme and Nv2 wireless protocols
- VLAN configuration in the wireless settings (Per-interface VLANs can be configured in bridge settings)
- Compatibility with station-bridging as implemented in the ‘wireless’ package
Property Reference
AAA properties
Properties in this category configure an access point’s interaction with AAA (RADIUS) servers.
Certain parameters in the table below take format-string as their value. In a format-string, certain characters are interpreted in the following way:
Character Interpretation a Hexadecimal character making up the MAC address of the client device in lower case A Hexadecimal character making up the MAC address of the client device in upper case i Hexadecimal character making up the MAC address of the AP’s interface in lower case I (capital ‘i’) Hexadecimal character making up the MAC address of the AP’s interface in upper case N The entire name of the AP’s interface (e.g. ‘wifi1’) S The entire SSID All other characters are used without interpreting them in any way. For examples, see default values.
Format for the value of the Called-Station-Id RADIUS attribute, in AP’s messages to RADIUS servers. Default: II-II-II-II-II-II:S
Length of time to cache RADIUS server replies, when MAC address authentication is enabled.
This resolves issues with client device authentication timing out due to (comparatively high latency of RADIUS server replies.Default value: disabled.
Format for value to use in calculating the value of the User-Password attribute in AP’s messages to RADIUS servers when performing MAC address authentication.
Default value: «» (an empty string).
Format for the value of the User-Name attribute in APs messages to RADIUS servers when performing MAC address authentication.
Default value : AA:AA:AA:AA:AA:AA
Channel properties
Properties in this category specify the desired radio channel.
Supported frequency band and wireless standard. Defaults to newest supported standard.
Note that band support is limited by radio capabilities.For an interface in AP mode, specifies frequencies (in MHz) to consider when picking control channel center frequency.
For an interface in station mode, specifies frequencies on which to scan for APs.
Leave unset (default) to consider all frequencies supported by the radio and permitted by the applicable regulatory profille.
The parameter can contain 1 or more comma-separated values of integers or, optionally, ranges of integers denoted using the syntax RangeBeginning-RangeEnd:RangeStep
Examples of valid channel.frequency values:
- 2412
- 2412,2432,2472
- 5180-5240:20,5500-5580:20
Frequency (in MHz) to use for the center of the secondary part of a split 80+80MHz channel.
Only official 80MHz channels (5210, 5290, 5530, 5610, 5690, 5775) are supported.
Leave unset (default) for automatic selection of secondary channel frequency.
Whether to avoid using channels, on which channel availability check (listening for presence of radar signals) is required.
- 10min-cac — interface will avoid using channels, on which 10 minute long CAC is required
- all — interface will avoid using all channels, on which CAC is required
- disabled (default) — interface may select any supported channel, regardless of CAC requirements
Width of radio channel. Defaults to widest channel supported by the radio hardware.
Configuration properties
This section includes properties relating to the operation of the interface and the associated radio.
antenna-gain (integer 0..30)
Overrides the default antenna gain. The master interface of each radio sets the antenna gain for every interface which uses the same radio.
This setting cannot override the antenna gain to be lower than the minimum antenna gain of a radio.
No default value.beacon-interval (time interval 100ms..1s)
Interval between beacon frames of an AP. Default: 100ms.
The 802.11 standard defines beacon interval in terms of time units (1 TU = 1.024 ms). The actual interval between beacons will be 1 TU for every 1 ms configured.
Every AP running on the same radio (i.e. a master AP and all its ‘virtual’/’slave’ APs) must use the same beacon interval.
chains (list of integer 0..7 )
Radio chains to use for receiving signals. Defaults to all chains available to the corresponding radio hardware.
country (name of a country)
Determines, which regulatory domain restrictions are applied to an interface. Defaults to «United States».
It is important to set this value correctly to comply with local regulations and ensure interoperability with other devices.
dtim-period (integer 1..255)
Period at which to transmit multicast traffic, when there are client devices in power save mode connected to the AP. Expressed as a multiple of the beacon interval.
Higher values enable client devices to save more energy, but increase network latency.
hide-ssid (no | yes)
- yes — AP does not include its SSID in beacon frames, and does not reply to probe requests that have broadcast SSID.
- no — AP includes its SSID in the beacon frames, and replies to probe requests that have broadcast SSID.
manager (capsman | capsman-or-local | local)
capsman — the interface will act as CAP only, this option should not be passed via provisioning rules to the CAP
capsman-or-local — the interface will get configuration via CAPsMAN or use its own, if /interface/wifi/cap is not enabled.
local — interface won’t contact CAPsMAN in order to get configuration.
Interface operation mode
- ap (default) — interface operates as an access point
- station — interface acts as a client device, scanning for access points advertising the configured SSID
- station-bridge — interface acts as a client device and enables support for a 4-address frame format, so that the interface can be used as a bridge port
The station-bridge mode, as implemented for ‘wifi’ intefaces, is incompatible with APs running the older ‘wireless’ package and vice versa.
With the multicast-enhance feature enabled, an AP will convert every multicast-addressed IP or IPv6 packet into multiple unicast-addressed frames for each connected station.
This may improve link throughput and reliability since, unlike multicast frames, unicasts are acknowledged by stations and transmitted using a higher data rate.- dscp-high-3-bits — interface will transmit data packets using a WMM priority equal to the value of the 3 most significant bits of the IP DSCP field
- priority — interface will transmit data packets using a WMM priority equal to that set by IP firewall or bridge filter
802.11ac wireless chipsets do not support the dscp-high-3-bits classifier mode.
Datapath properties
Parameters relating to forwarding packets to and from wireless client devices.
Default VLAN ID to assign to client devices connecting to this interface (only relevant to interfaces in AP mode).
When a client is assigned a VLAN ID, traffic coming from the client is automatically tagged with the ID and only packets tagged with with this ID are forwarded to the client.
Default: none802.11ac chipsets do not support this type of VLAN tagging , but they can be configured as VLAN access ports in bridge settings.
Security Properties
Parameters relating to authentication.
authentication-types (list of wpa-psk, wpa2-psk, wpa-eap, wpa2-eap, wpa3-psk, owe, wpa3-eap, wpa3-eap-192)
Authentication types to enable on the interface.
The default value is an empty list (no authenticaion, an open network).
Configuring a passphrase, adds to the default list the wpa2-psk authentication method (if the interface is an AP) or both wpa-psk and wpa2-psk (if the interface is a station).
Configuring an eap-username and an eap-password adds to the default list wpa-eap and wpa2-eap authentication methods.
APs within the same connect group do not allow more than 1 client device with the same MAC address. This is to prevent malicious authorized users from intercepting traffic intended to other users (‘MacStealer’ attack) or performing a denial of service attack by spoofing the MAC address of a victim.
Handling of new connections with duplicate MAC addresses depends on the connect-priority of AP interfaces involved.
By default, all APs are assigned the same connect-group.
Theese parameters determine, how a connection is handled if the MAC address of the client device is the same as that of another active connection to another AP.
If (accept-priority of AP2) < (hold-priority of AP1), a connection to AP2 wil cause the client to be dropped from AP1.
If (accept-priority of AP2) = (hold-priority of AP1), a connection to AP2 will be allowed only if the MAC address can no longer be reached via AP1.
If (accept-priority of AP2) > (hold-priority of AP1), a connection to AP2 will not be accepted.If omitted, hold-priority is the same as accept-priority.
By default, APs, which perform user authentication, have higher priority (lower integer value), than open APs.Identifiers of elliptic curve cryptography groups to use in SAE (WPA3) authentication.
- yes — Do not include PMKID in EAPOL frames.
- no (default) — include PMKID in EAPOL frames.
Properties related to EAP, are only relevant to interfaces in station mode. APs delegate EAP authentication to the RADIUS server.
Policy for handling the TLS certificate of the RADIUS server.
- verify-certificate — require server to have a valid certificate. Check that it is signed by a trusted certificate authority.
- dont-verify-certificate (default) — Do not perform any checks on the certificate.
- no-certificates — Attempt to establish the TLS tunnel by performing anonymous Diffie-Hellman key exchange. To be used if the RADIUS server has no certificate at all.
- verify-certificate-with-crl — Same as verify-certificate, but also checks if the certificate is valid by checking the Certificate Revocation List.
Take care when configuring encryption ciphers.
All client devices MUST support the group encryption cipher used by the AP to connect, and some client devices (notably, Intel® 8260) will also fail to connect if the list of unicast ciphers includes any they don’t support.
A list of ciphers to support for encrypting unicast traffic.
Defaults to ccmp.
Properties related to 802.11r fast BSS transition only apply to interfaces in AP mode. WiFi interfaces in station mode do not support 802.11r.
For a client device to successfully roam between 2 APs, the APs need to be managed by the same instance of RouterOS. For information on how to centrally manage multiple APs, see CAPsMAN
Whether to enable 802.11r fast BSS transitions ( roaming). Default: no.
The fast BSS transition mobility domain ID. Default: 44484 (0xADC4).
Fast BSS transition PMK-R0 key holder identifier. Default: MAC address of the interface.
Whether to enable fast BSS transitions over DS (distributed system). Default: no.
- no — when a client connects to this AP via 802.11r fast BSS transition, it is assigned a VLAN ID according to the access and/or interface settings
- yes (default) — when a client connects to this AP via 802.11r fast BSS transition, it retains the VLAN ID, which it was assigned during initial authentication
The default behavior is essential when relying on a RADIUS server to assign VLAN IDs to users, since a RADIUS server is only used for initial authentication.
Lifetime of the fast BSS transition PMK-R0 encryption key. Default: 600000s (~7 days)
Fast BSS transition reassociation deadline. Default: 20s.
Cipher to use for encrypting multicast traffic.
Defaults to ccmp.
Interval at which the group temporal key (key for encrypting broadcast traffic) is renewed. Defaults to 24 hours.
Cipher to use for encrypting protected management frames. Defaults to cmac.
management-protection (allowed | disabled | required)
Whether to use 802.11w management frame protection. Incompatible with management frame protection in standard wireless package.
Default value depends on value of selected authentication type. WPA2 allows use of management protection, WPA3 requires it.
owe-transition-interface (interface)
Name or internal id of an interface whose MAC address and SSID to advertise as the matching AP when running in OWE transition mode.
Required for setting up open APs that offer OWE, but also work with older devices that don’t support the standard. See configuration example below.
Passphrase to use for PSK authentication types. Defaults to an empty string — «».
WPA-PSK and WPA2-PSK authentication requires a minimum of 8 chars, while WPA3-PSK does not have minimum passphrase length.
Due to SAE (WPA3) associations being CPU resource intensive, overwhelming an AP with bogus authentication requests makes for a feasible denial-of-service attack.
This parameter provides a way to mitigate such attacks by specifying a threshold of in-progress SAE authentications, at which the AP will start requesting that client devices include a cookie bound to their MAC address in their authentication requests. It will then only process authentication requests which contain valid cookies.
- push-button (default) — AP will accept WPS authentication for 2 minutes after ‘wps-push-button’ command is called. Physical WPS button functionality not yet implemented.
- disabled — AP will not accept WPS authentication
Steering properties
Properties in this category govern mechanisms for advertising potential roaming candidates to client devices.
When sending neighbor reports and BSS transition management requests, an AP will list all other APs within its neighbor group as potential roaming candidates.
By default, a dynamic neighbor group is created for each set of APs with the same SSID and authentication settings.
APs operating in the 5GHz band are indicated to be preferable to ones operating in the 2.4GHz band.Miscellaneous properties
- disabled — the interface will not use ARP
- enabled — the interface will use ARP (default)
- local-proxy-arp — the router performs proxy ARP on the interface and sends replies to the same interface
- proxy-arp — the router performs proxy ARP on the interface and sends replies to other interfaces
- reply-only — the interface will only reply to requests originated from matching IP address/MAC address combinations which are entered as static entries in the ARP table. No dynamic entries will be automatically stored in the ARP table. Therefore for communications to be successful, a valid static entry must already exist.
- yes — interface’s running property will be true whenever the interface is not disabled
- no (default) — interface’s running property will only be true when it has established a link to another device
disabled (no | yes) (X)
Hardware interfaces are disabled by default. Virtual interfaces are not.
mac-address (MAC)
MAC address (BSSID) to use for an interface.
Hardware interfaces default to the MAC address of the associated radio interface.
Default MAC addresses for virtual interfaces are generated by
- Taking the MAC address of the associated master interface
- Setting the second-least-significant bit of the first octet to 1, resulting in a locally administered MAC address
- If needed, incrementing the last octet of the address to ensure it doesn’t overlap with the address of another interface on the device
mtu (integer [32..2290] ; Default: 1500)
Layer3 Maximum transmission unit.
l2mtu (integer [32..2290] ; Default: 229 0)
Layer2 Maximum transmission unit.
master-interface (interface)
Multiple interface configurations can be run simultaneously on every wireless radio.
Only one of them determines the radio’s state (whether it is enabled, what frequency it’s using, etc). This ‘master’ interface, is bound to a radio with the corresponding radio-mac.
To create additional (‘virtual’) interface configurations on a radio, they need to be bound to the corresponding master interface.
No default value.
name (string)
A name for the interface. Defaults to wifiN, where N is the lowest integer that has not yet been used for naming an interface.
Read-only properties
True for master interfaces that are currently available for WiFi manager.
True for a virtual interface (configurations linked to a master interface) when both the interface itself and its master interface are not disabled and the master interface has a bound flag.
False for interfaces in AP mode when they’ve selected a channel for operation (i.e. configuration has been successfully applied).
False for interfaces in station mode when they’ve connected to an AP (i.e. configuration has been successfully applied, an with AP with matching settings has been found).
True for physical interfaces on router itself or detected CAP if running as CAPsMAN.
False for virtual interfaces.
True, when an interface has established a link to another device.
If disable-running-check is set to ‘yes’, true whenever the interface is not disabled.
Access List
Modifies the mac-address parameter to match if it is equal to the result of performing bit-wise AND operation on the client MAC address and the given address mask.
Default: FF:FF:FF:FF:FF:FF (i.e. client’s MAC address must match value of mac-address exactly)
The length of time which a connected peer’s signal strength is allowed to be outside the range required by the signal-range parameter, before it is disconnected.
If the value is set to ‘always’, peer signal strength is only checked during association.
Whether to authorize a connection
- accept — connection is allowed
- reject — connection is not allowed
- query-radius — connection is allowed if MAC address authentication of the client’s MAC address succeeds
Whether to isolate the client from others connected to the same AP. No default value.
Frequency scan
Information about RF conditions on available channels can be obtained by running the frequency-scan command.
Command parameters Parameter Description duration (time interval) Length of time to perform the scan for before exiting. Useful for non-interactive use. Not set by default. freeze-frame-interval (time interval) Time interval at which to update command output. Default: 1s. frequency (list of frequencies/ranges) Frequencies to perform the scan on. See channel.frequency parameter syntax above for more detail. Defaults to all supported frequencies. numbers (string) Either the name or internal id of the interface to perform the scan with. Required. Not set by default. rounds (integer) Number of times to go through list of scannable frequencies before exiting. Useful for non-interactive use. Not set by default. save-file (string) Name of file to save output to. Not set by default. Number of access points detected on the channel.
Scan command
The ‘/interface wifi scan’ command will scan for access points and print out information about any APs it detects.
The scan command takes all the same parameters as the frequency-scan command.
security (string)
Authentication methods supported by the AP.
Sniffer
A string that specifies a filter to apply to captured frames. Only frames matched by the filter expression will be displayed, saved or streamed.
This works similarly to filter strings in libpcap, for example.
The filter can match
- Address fields (addr1, addr2, addr3)
- Wireless frame type and subtype, including shortcuts such as ‘beacon’ (type == 0 && subtype == 8)
- Flags (to-ds, from-ds, retry, power, protected)
A string can include the following operators:
- == (exact match)
- != (does not equal)
- && (logical AND)
- || (logical OR)
- () (for grouping filter expressions)
number (interface)
WPS
Command parameters Parameter Description duration (time interval) Length of time after which the command will time out if no AP is found. Unlimited by default. interval (time interval) Time interval at which to update command output. Default: 1s. mac-address (MAC) Only attempt connecting to AP with the specified MAC (BSSID). Not set by default. numbers (string) Name or internal id of the interface with which to attempt connection. Not set by default. ssid (string) Only attempt to connect to APs with the specified SSID. Not set by default. Radios
Information about the capabilities of each radio can be gained by running the `/interface/wifi/radio print detail` command.
A unique identifier.
Registration table
The registration table contains read-only information about associated wireless devices.
Strength of signal received from the peer (in dBm).
CAPsMAN Global Configuration
Disable or enable CAPsMAN functionality
package-path ( string | ; Default: )
require-peer-certificate ( yes | no ; Default: no )
Require all connecting CAPs to have a valid certificate
upgrade-policy (none | require-same-version | suggest-same-upgrade ; Default: none )
Upgrade policy options
- none — do not perform upgrade
- require-same-version — CAPsMAN suggest to upgrade the CAP RouterOS version and, if it fails it will not provision the CAP. (Manual provision is still possible)
- suggest-same-version — CAPsMAN suggests to upgrade the CAP RouterOS version and if it fails it will still be provisioned
CAPsMAN Provisioning
Provisioning rules for matching radios are configured in /interface/wifi/provisioning/ menu:
- create-disabled — create disabled static interfaces for radio. I.e., the interfaces will be bound to the radio, but the radio will not be operational until the interface is manually enabled;
- create-enabled — create enabled static interfaces. I.e., the interfaces will be bound to the radio and the radio will be operational;
- create-dynamic-enabled — create enabled dynamic interfaces. I.e., the interfaces will be bound to the radio, and the radio will be operational;
- none — do nothing, leaves radio in the non-provisioned state;
Base string to use when constructing names of provisioned interfaces. Each new interface will be created by taking the base string and appending a number to the end of it.
If included in the string, character sequence %I will be replaced by the system identity of the cAP. %C will be replaced with the cAP’s TLS certificate’s Common Name.
If action specifies to create interfaces, then a new slave interface for each configuration profile in this list is created.
Specifies if the provision rule is disabled.
CAP configuration
lock-to-caps-man (no | yes; Default: no )
slaves-static ( )
caps-man-certificate-common-names ()