Как на телефоне Tecno поменять частоту обновления экрана включить 90Гц или 120Гц
3. Жмём на соответствующий пункт.
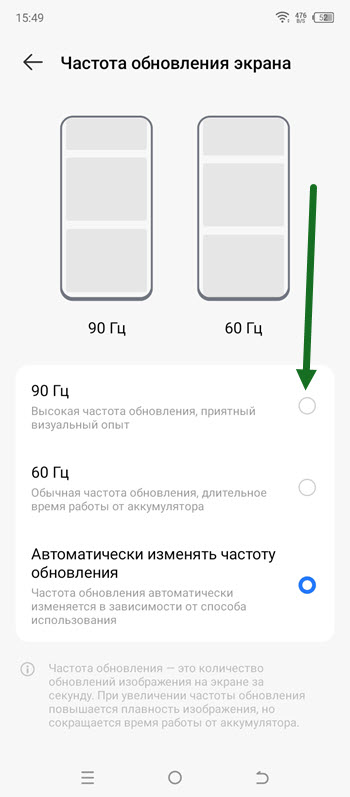
4. Выставляем нужное значение.
- ВКонтакте
- Telegram
- Одноклассники
Здравствуйте, у меня tecno camon19 и я нажал туда на «экран и яркость» Такого нету можете показать как найти?
У меня так же
Значит на вашем устройстве доступно только 60гц
Не могу найти частоту экрана
Это для техно камон 19 про а не 19
Помогите у меня только вкладка яркость экрана как зделать то? Мое устройство ТЕСНО ПОП 5 ЛИТЕ ИЛИ ТЕКНО BD4a
Поставил 120 а стоит все равно на счетчеке 60..
Перезагрузи телефон , у меня также было, я мастера вызвал надо было просто телефон перезагрузить))) в итоге за вызов и за починку телефона отдал 610 рублей)) не считая такси для него)))))))
А если телефон на 32ГБ и у тебя 60 Гц на техно Спарк 8с
В игре 60-70 почему?
Что делать, я купил телефон было сказано 120 гц, но когда посмотрел там не переключить, у меня Tecno camon 20
У меня техно Спарк 10 и в видео игре у меня 40-70 ФПС хотя я поставил 90
Я включил 90 герц и у меня на частот показано 60герц в играх также как включить
чтоб работал? Подскажите пожалуйста.
How to Force 120Hz Refresh Rate on Galaxy S23/Plus/Ultra
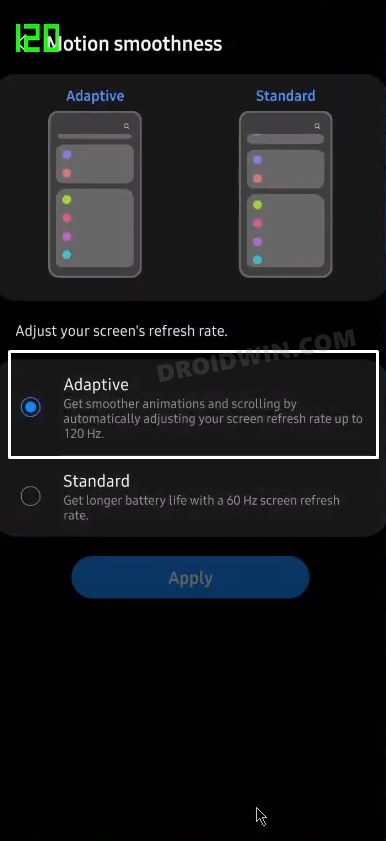
In this guide, we will show you the steps to force 120Hz refresh rate on Galaxy S23/Plus/Ultra. The newest addition to the Samsung family, the S23 series has managed to grab the attention of the masses [well, the writing was already on the cards]. If we shoft our attention towards the display, then it houses a 6.8 inch HDR10+ screen with a 120Hz refresh rate. Talking about which, there are two Motion Smoothness settings that you could opt for- Adaptive and Standard.
As is evident from their names, the Adaptive refresh rate osciallates the value up to 120hz and adjust it according to the task that you are currently carrying. On the other hand, the Standard keeps it fixed at 60 hz. While these settings might be sufficient enough for many, but some users want to get the most fluid usage experience out of their device and hence want the refresh rate fixed at 120Hz all the time, irrespective of the app they are interacting with.
While it would lead to additional battery drainage, but are ready for this trade-off if it gives out the smoothest work environment. If you also echo these thought and want to force 120Hz refresh rate on Galaxy S23/Plus/Ultra, then this guide will help you out. Follow along for the instructions.
Table of Contents
How to Force 120Hz Refresh Rate on Galaxy S23/Plus/Ultra
- To begin with, download and install the Set Edit app from Play Store.
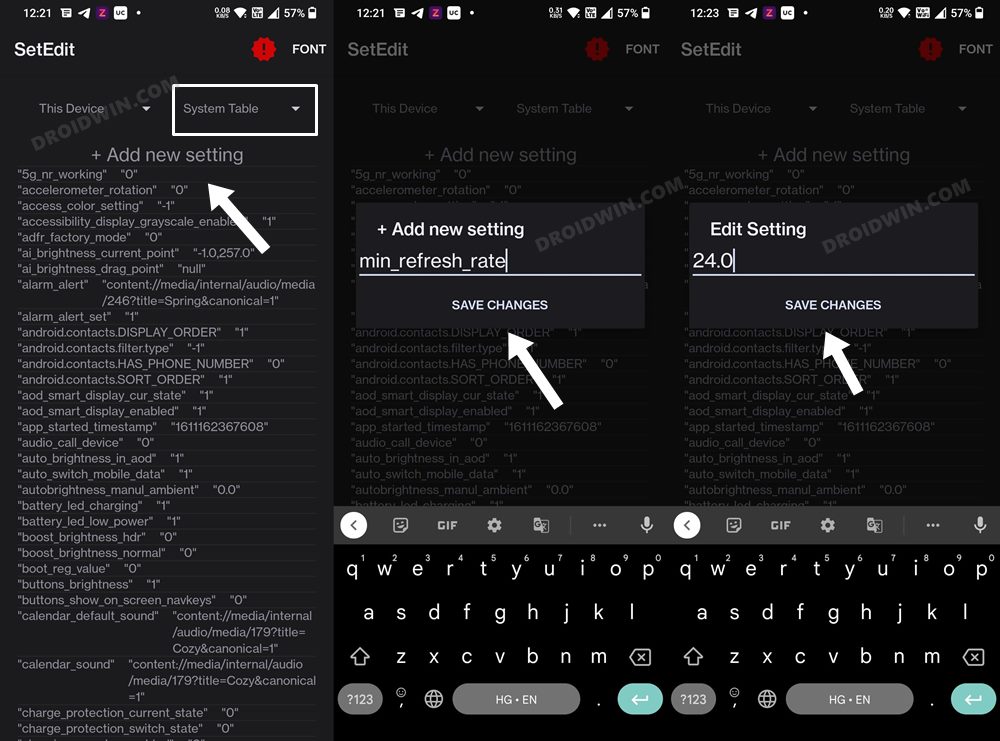
- Then launch it and select System Table from the top right.
- Now tap on Add New Setting, name it min_refresh_rate, and hit Save Changes.
- It will now ask you to enter the value, type in 24.0, and hit Save Changes.
- Again, tap on Add New Setting. This time name it peak_refresh_rate and hit Save Changes.
- Assign it the same 24.0 value as well and tap on the Save Changes button.
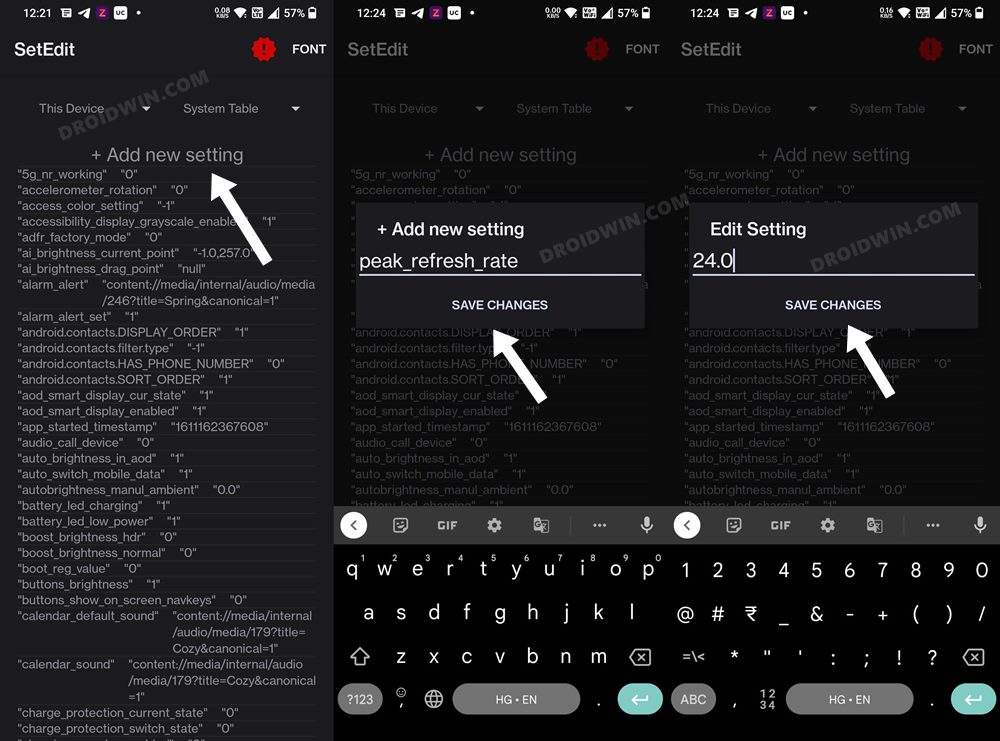
- The Galaxy S23/Plus/Ultra will now stick to 120hz refresh rate.
Why did we choose 24.0? Well, by assigning it a random and unsupported value, we are [kind of] breaking the refresh rate. As a result of which, the OS won’t be able to adjust this rate, and hence stick with the maximum available rate. Moreover, there does exist a third-party app named AutoHZ that also does this job, but it is paid, doesn’t have many positive reviews, and most importantly doesn’t work with Android 13. So the aforementioned tweak is your best bet.
How to Revert the Change
If at any point in time, you wish to revert the change [due to additional battery drain or any other specific reason], then just delete both these parameters. To do so, long press on min_refresh_rate and select Delete Row. Likewise, do the same for peak_refresh_rate.
So with that, we round off the guide on how you could force 120Hz refresh rate in Galaxy S23/Plus/Ultra. If you have any queries concerning the aforementioned steps, do let us know in the comments. We will get back to you with a solution at the earliest.
- How to Unlock Bootloader on Galaxy S23/Plus/Ultra
- How to Root Samsung Galaxy S23 Ultra via Magisk [New Method]
- How to Pass SafetyNet on Rooted Galaxy S23/Plus/Ultra
- Install LSPosed Xposed Framework on Galaxy S23/Plus/Ultra
About Chief Editor
Sadique Hassan
A technical geek by birth, he always has a keen interest in the Android platform right since the birth of the HTC Dream. The open-source environment always seems to intrigue him with the plethora of options available at his fingertips. “MBA by profession, blogger by choice!”
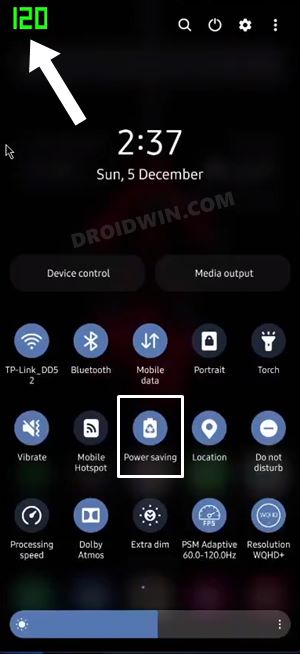
Enable 120Hz Refresh Rate in Power Saving Mode in One UI 4/5
In this guide, we will show you the steps to enable 120Hz Refresh Rate in Power Saving Mode in Samsung One UI 4/5. In the last couple of years, the number of times your screen refreshes per second has become a major talking point. In this regard, most of the devices now offer 90Hz, and the one that takes it up to 120Hz counts it as their USP. Moreover, the ability of the device to automatically adjust to the required refresh rate based on the work that you are currently doing is also a pretty nifty feature.
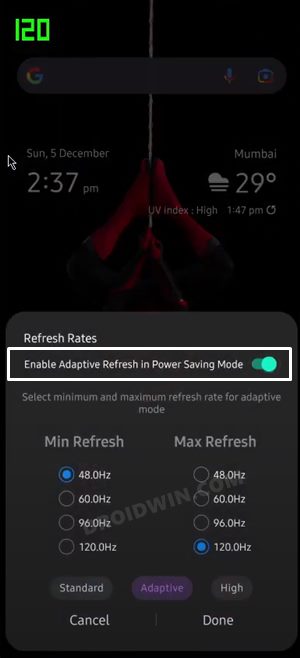
For example, if you are chatting with someone, then the rate would drop down to 48hz and while playing a graphics-intensive game, it might shoot all the way up to 120hz. This adaptive mode is quite handy as it negates the need for manually switching to low/high rates and this in turn also ends up saving some battery juice. Talking about which, you might have to bid adieu to most of these functionalities if the Battery Saving Mode is enabled on your device.
Be it opting for the highest refresh rate or selecting the Adaptive mode, both of them might not work until the battery restrictive limitations have been lifted. Well, turns out there does exist a nifty method through which you could easily enable the 120Hz Refresh rate even in the Power Saving Mode on Samsung One UI 4/5 devices. And in this guide, we will show you how to do just that. So without further ado, let’s check it out.
Table of Contents
Enable 120Hz Refresh Rate in Power Saving Mode in Samsung One UI 4/5
There exist two different methods to get this job done. The first one is the lengthier and requires the use of a PC but you don’t have to shell out any bucks. On the other hand, the second approach is extremely easier to execute and is a shorter process but requires a paid app. Anyways, we have listed both these methods below, you may try out the one which is in sync with your requirement.
Method 1: Via Quick Settings Tool and ADB Command
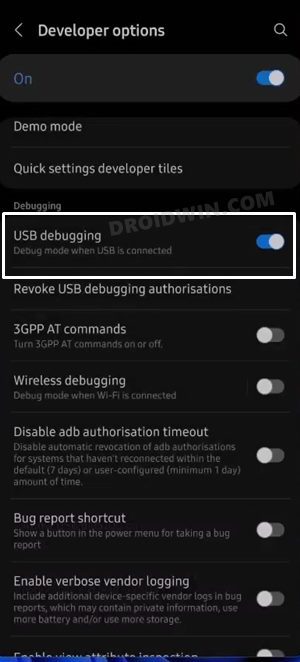
- To begin with, enable USB Debugging on your device. For that, go to Settings > About Phone > Software information > Tap on Build Number 7 Times > Then go back to Settings > Developer Options > Enable USB Debugging.
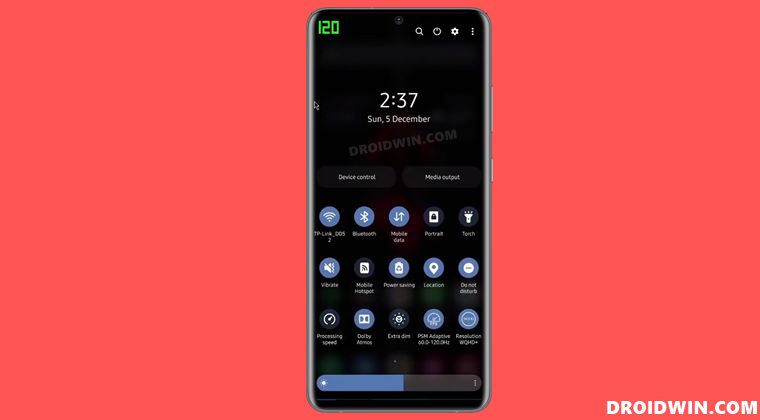
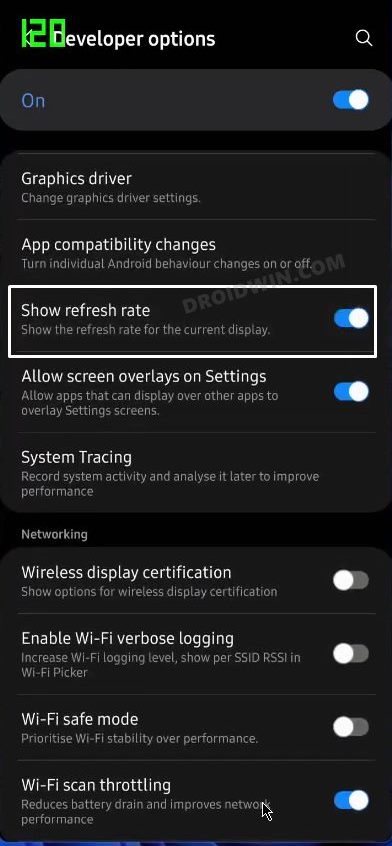
- After that, scroll to Show Refresh Rate (under Developer Options itself) and enable the toggle next to it. It will help us keep a track of the current refresh rate.
- Then go to Settings > Display > Motion Smoothness > Select Standard and then switch back to Adaptive.
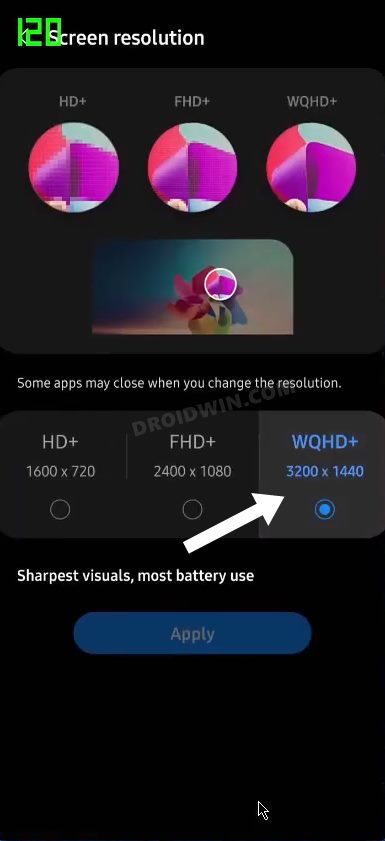
- After that, go to Screen Resolution and reselect WQHD+. This will refresh its settings.
- Now download and install the Quick Settings Tool app from GitHub. [Credits: XDA SeniorMember nishidh].
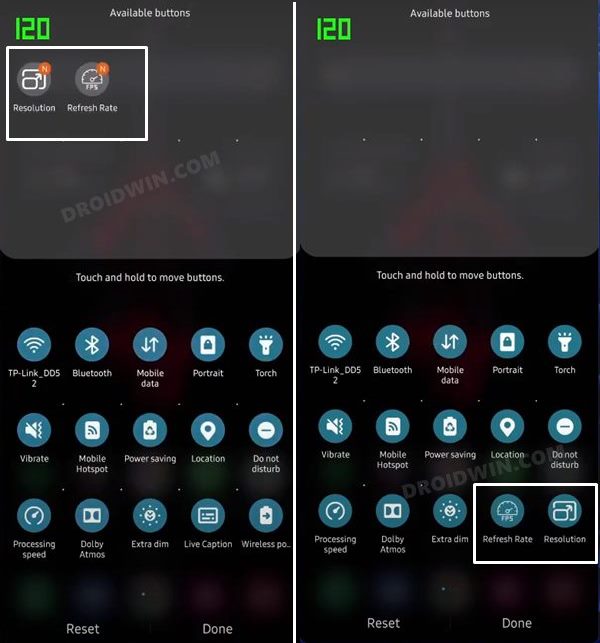
- Once installed, you wouldn’t see it in the app drawer. Rather it will straightaway go to Quick Settings.
- So pull down the notification shade and tap on the Edit icon situated at the top right. You will see two toggles named Resolution and Quick Settings. Drag them down to the Quick Settings panel.
- You will now have to grant the app the necessary permissions. So download Android SDK Platform Tools and extract it onto your PC.

- After that, connect your device to the PC via USB cable. Make sure USB Debugging is enabled.
- Then head over to the platform-tools folder, type in CMD in the address bar, and hit Enter. This will launch the Command Prompt.

- Now type in the following command in the CMD window to grant the app the required permission
adb shell pm grant com.nss.ssettings android.permission.WRITE_SECURE_SETTINGS
Method 2: Via Galaxy MaxHZ App [Paid]
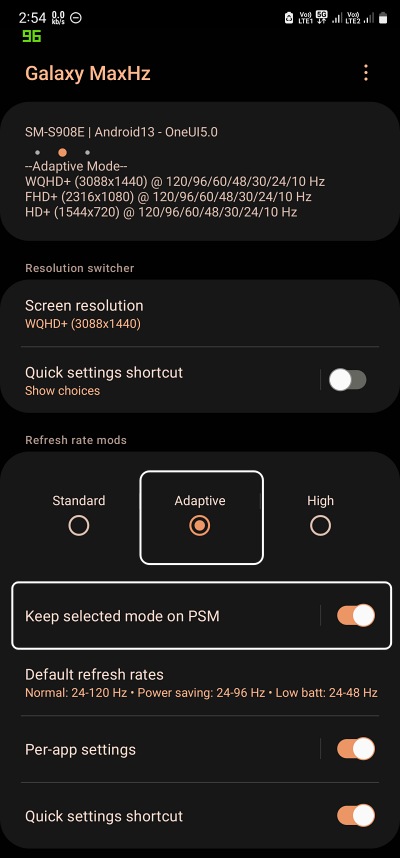
- To begin with, download and install the Galaxy MaxHz app from GitHub.
- Then launch it and select Adaptive or High under Refresh Rate Mods.
- After that, enable the toggle next to Keep selected mode on PSM.
- Now carry out any “one” of these tweaks to implement this tweak:
- Do a dummy (fake) video call to any number using the native video call app OR
- Connect and disconnect to a WiFi display receiver (e.g. Smart TV, Chromecast) using the Smart View function OR
- Connect and disconnect to Samsung Dex on TV using an HDMI cable or Samsung Dex on PC using a USB data cable. Connect the phone and confirm the “Start now” prompt and disconnect once Samsung Dex has started.
That’s it. These were the two different methods to enable 120Hz Refresh Rate in Power Saving Mode in Samsung One UI 4/5. And as you might have noticed, you will also be able to use the Adaptive Refresh Rate in this Power Saving Mode. On that note, we conclude the tutorial. If you have any queries concerning the aforementioned steps, do let us know in the comments. We will get back to you with a solution at the earliest.
Как на телефоне Samsung поменять частоту обновления экрана включить 90Гц или 120Гц
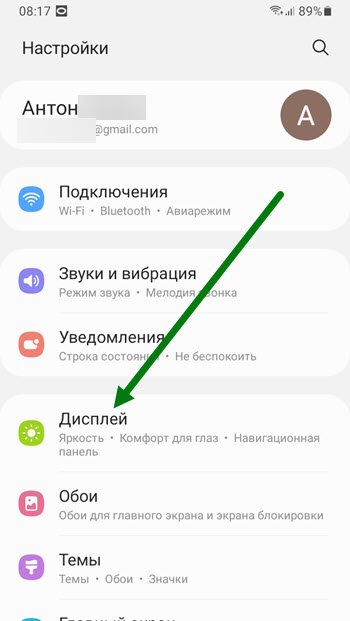
2. Переходим в раздел «Дисплей».
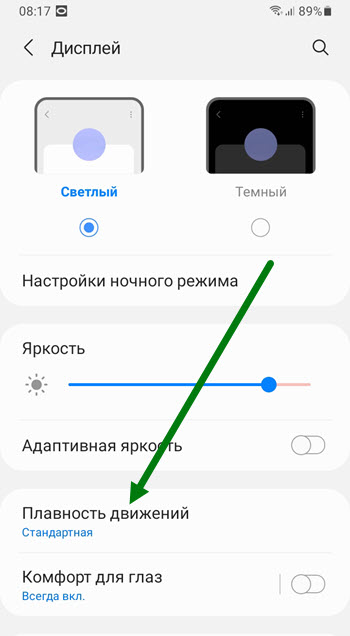
3. Находим подраздел «Плавность движения» и открываем его.
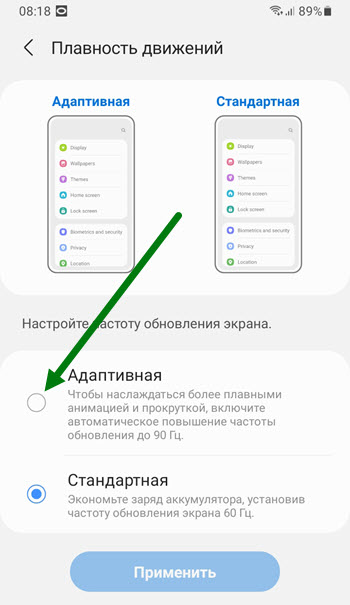
4. Выставляем нужное значение, на моём Samsung Galaxy M12 максимальное значение это 90Гц.
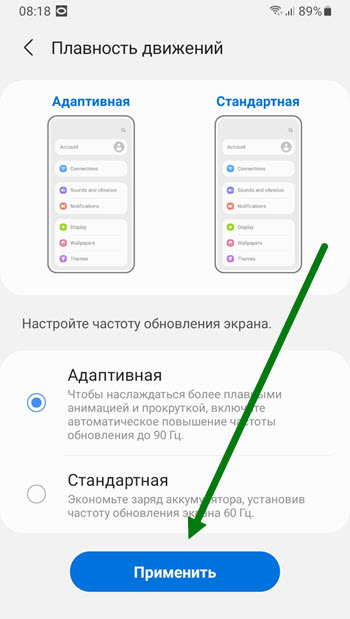
5. Сохраняем выбранные значения, нажав на кнопку «Применить».
- ВКонтакте
- Telegram
- Одноклассники