
[Asus Armoury Crate] Часто задаваемые вопросы Armoury Crate
1. [Armoury Crate] Установка/Удаление
1-1. Как установить Armoury Crate
1-1-1. Проверьте, какая версия Windows установлена
1-1-2. ROG и TUF Игровые ноутбуки или настольные ПК
1-1-3. Материнские платы ROG, ROG Strix, TUF Gaming или Prime.
1-1-4. Использование Armory Crate для настройки периферийных устройств на несовместимых устройствах
1-3-1.Установка прервана
1-3-2.Удаление прервано
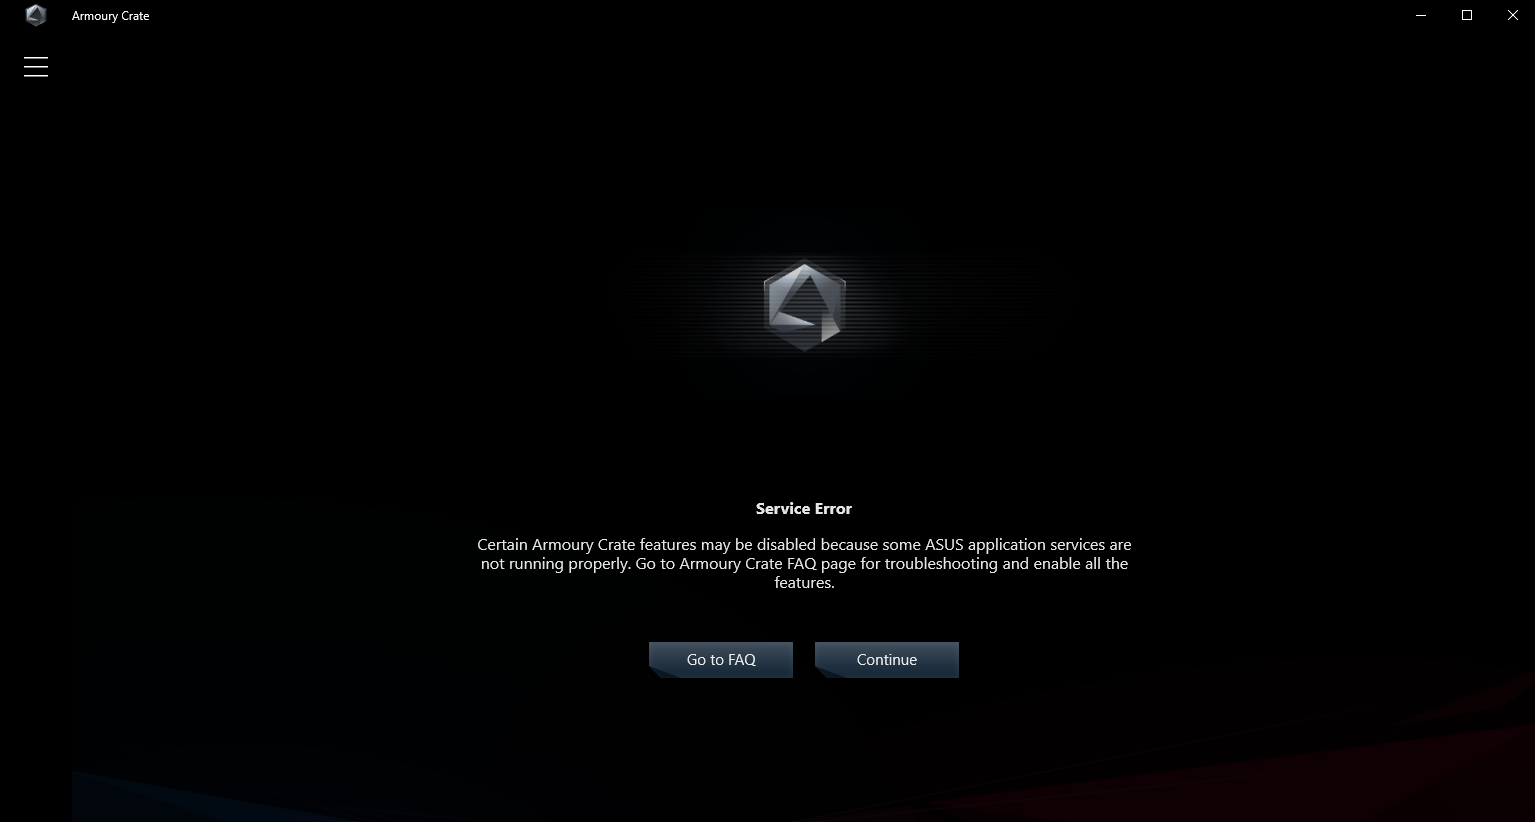
1-3-3.Ошибка сервиса
1-1-1. Проверьте, какая версия Windows установлена
Проверьте версию сборки Windows, установленной на компьютер (или ноутбук) и убедитесь, что она совместима с Armoury Crate. Требуется Windows 10 (Creators Update/1903 или более поздняя сборка) или Windows 11.
1-1-2. ROG и TUF — игровые ноутбуки или настольные ПК
Для новых пользователей игровых ноутбуков и настольных ПК серии ROG или TUF приложениеArmoury Crate редустановлено. Armoury Crate открывается через нажатие кнопки «Пуск» в окружении системы.
1-1-3. Материнские платы ROG, ROG Strix, TUF Gaming или Prime.
Автоматическая установка с первым включением
Для новых пользователей материнских плат серий ROG, ROG Strix, TUF Gaming или Prime, использующих Windows 10 (Creators Update/ 1903 или более позднюю версию) или Windows 11 может загрузиться всплывающее pop-up — приглашение к установке Armoury Crate во время первой загрузки Вашего ПК. Для запуска установки, просто нажмите ‘OK’, программное обеспечение автоматически загрузится и установится.
Параметры установки Armoury Crate после её отмены или удаления
Если не желаете устанавливать Armoury Crate с первым включением нового ПК , можно будет сделать это позже, скачав вручную установщик Armoury Crate и Aura Creator Installer c сайта поддержки ASUS для вашей модели.
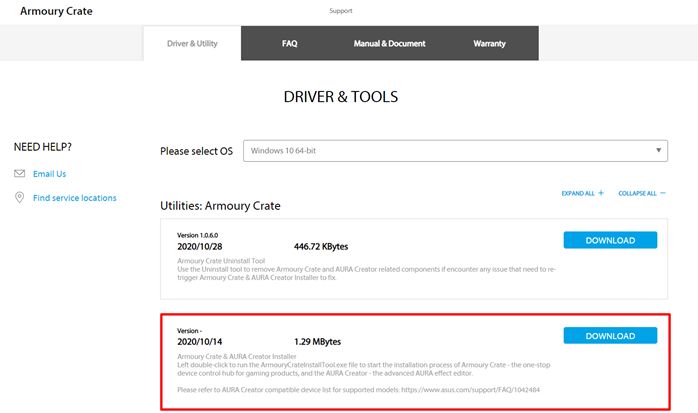
Порядок действий:
1. Загрузите “ArmouryCrateInstallTool.zip”.
2. Распакуйте архив “ArmouryCrateInstallTool.zip” и двойным нажатием на “ArmouryCrateInstaller.exe” запустите установку.
3. Выберите одно из приложений(Armoury Crate или Aura Creator), или сразу оба. Кнопкой “Start” запустите установку.
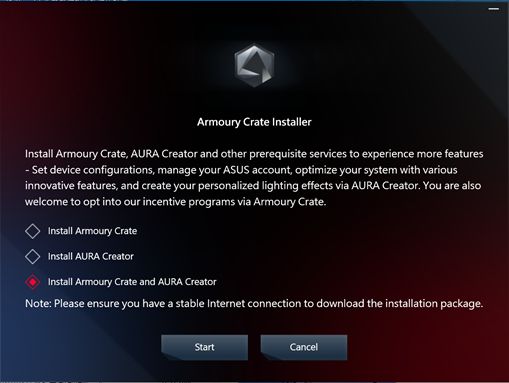
1-1-4. Использование Armory Crate для настройки периферийных устройств на несовместимых устройствах
Если используете периферийные устройства ROG или TUF Gaming на ПК или ноутбуке, несовместимых с Armoury Crate, всё равно можно установить Armoury Crate и попробовать использовать для настройки своих периферийных устройств.
1. Загрузите архив ArmouryCrateInstallTool.zip с сайта поддержки ASUS для своей модели.

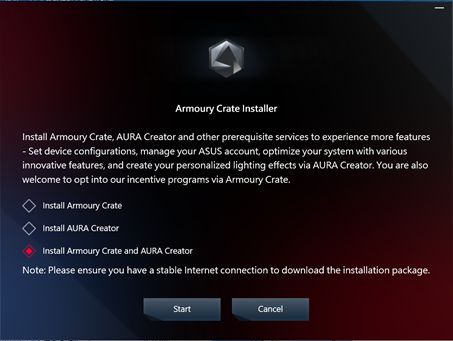
2. Распакуйте архив“ArmouryCrateInstallTool.zip” и двойным нажатием на “ArmouryCrateInstaller.exe” запустите установку.
3. Выберите одно из приложений (Armoury Crate или Aura Creator), или сразу оба. Кнопкой “Start” запустите установку.
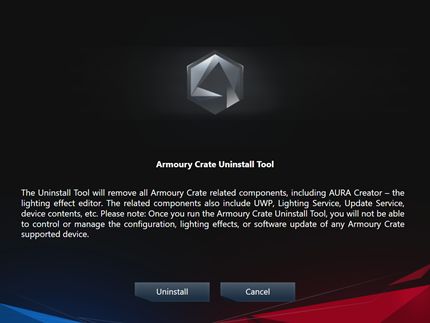
Для удаления всех приложений и сервисов Armoury Crate следуйте шагам:
1. Перейдите по ссылке с сайта поддержки Armoury Crate
2. Откройте раздел “Драйверы и Утилиты” и выберите ОС “Windows 10 64-bit” для загрузки утилиты “Armoury Crate Uninstall Tool”
3. Распакуйте архив “Armoury_Crate_Uninstall_Tool.zip” и двойным нажатием на “Armoury Crate Uninstall Tool.exe” запустите удаление.
4. По окончании удаления перезагрузите систему.
1-3. Устранение неполадок
Если столкнулись с ошибками в работе Armoury Crate, используйте рекомендации по устранению неполадок:
1-3-1. Установка прервана
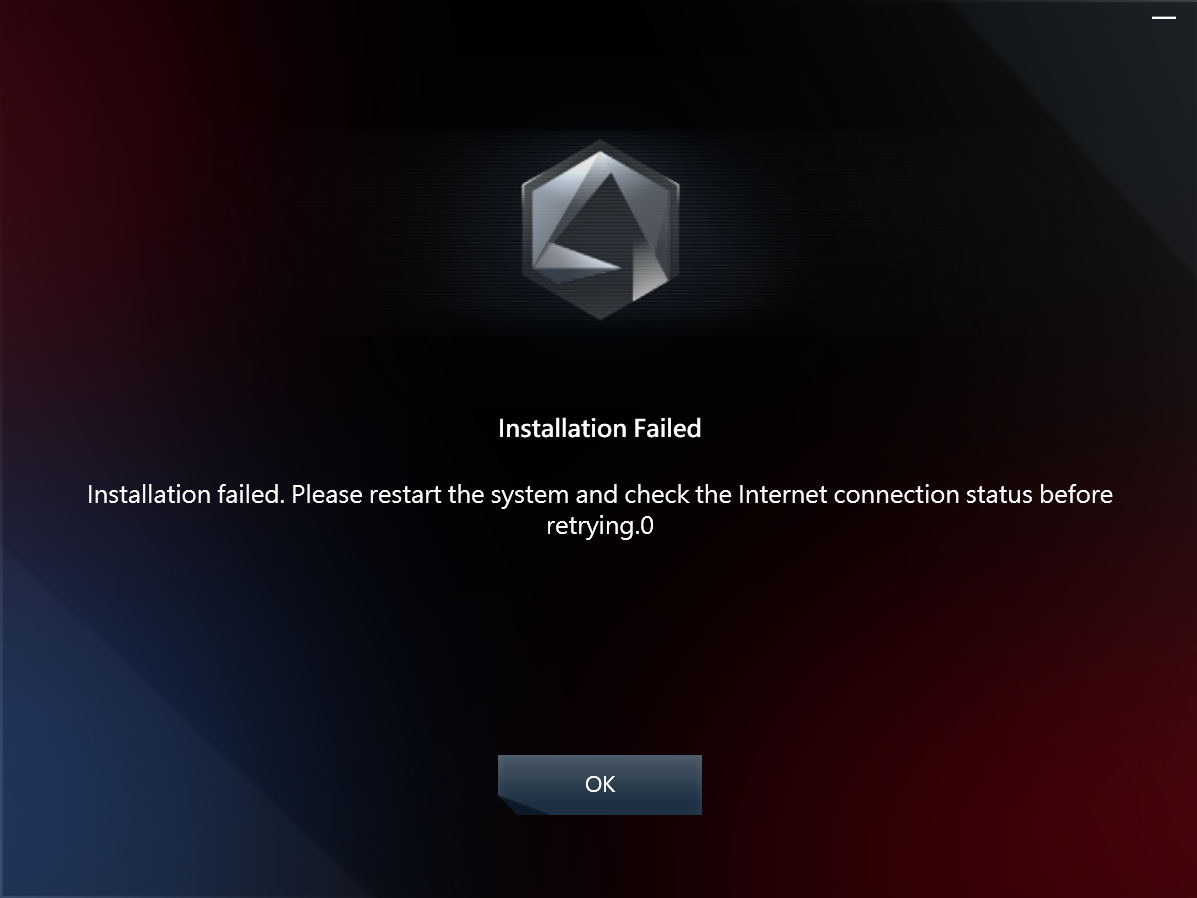
На момент установки должны соблюдаться следующие условия:
1. Соединение с сетью internet должно быть стабильно, не используйте VPN.
2. Убедитесь что антивирус или оптимизатор программного обеспечения не блокируют процессы Armoury Crate.
3. Если до этого момента приложение Armoury Crate уже было установлено, на всякий случай воспользуйтесь утилитой Armoury Crate Uninstall Tool , чтобы выполнить полное удаление и перезагрузку системы перед новой установкой.
4. Не используйте виртуальную платформу (например эмулятор Android) во время установки Armoury Crate.
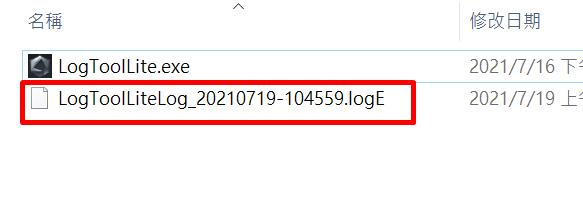
Если останутся проблемы при установке, загрузите инструмент сбора логов: Armoury Crate Lite Log Tool и следуйте шагам по сбору логов, чтобы передать их в службу поддержки ASUS:
1.Распакуйте архив Armoury Crate Lite Log Tool.zip, Двойным нажатием запустите LogToolLite.exe.
2.Поставьте галочку “Enable Log”.
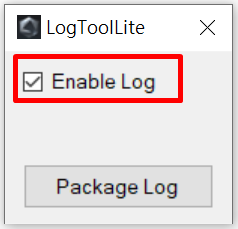
3.Запустите установщик Armoury Crate для воспроизведения ситуации с установкой.
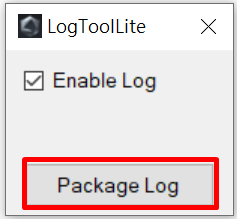
4.Нажмите на кнопку “Package Log”.
5.Ожидайте появления уведомления “Done”.
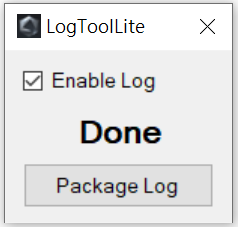
6. Вернитесь в папку с Armoury Crate Lite Log Tool, там будет файл LogToolLiteLog_xxxxxxx(date and time).logE . Предоставьте его службе поддержки ASUS.
1-3-2. Удаление прервано
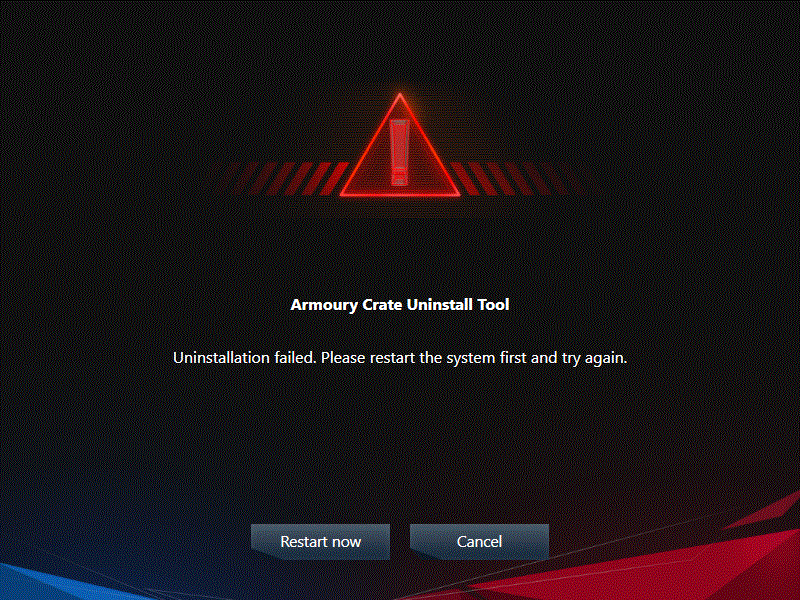
Если удаление прервётся, следуйте подсказкам в диалоговом окне, чтобы перезагрузить компьютер и снова запустить инструмент удаления. Повторное удаление должно будет завершиться успешно.
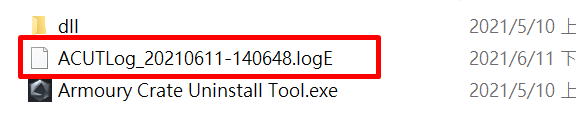
Если ситуация повторится, найдите файл ACUTLog_xxxxxxxx(date and time).logE в папке с Armoury Crate Uninstall Tool. Предоставьте его службе поддержки ASUS.
1-3-3. Ошибка сервиса
Перезапустите ваш компьютер(или ноутбук) и, если проблема повторится, загрузите установщик Armoury Crate и переустановите Armoury Crate повторно. Загрузить установщик Armoury Crate можно с сайта поддержки ASUS .
Чтобы выключить автоматическое обновление Armoury Crate UWP и Aura Creator UWP, выполните следующие действия:
*Примечание: Если автоматическое обновление будет отключено, то этот параметр применится ко всем установленным приложениям из Microsoft Store (не только к Armoury Crate и Aura Creator).
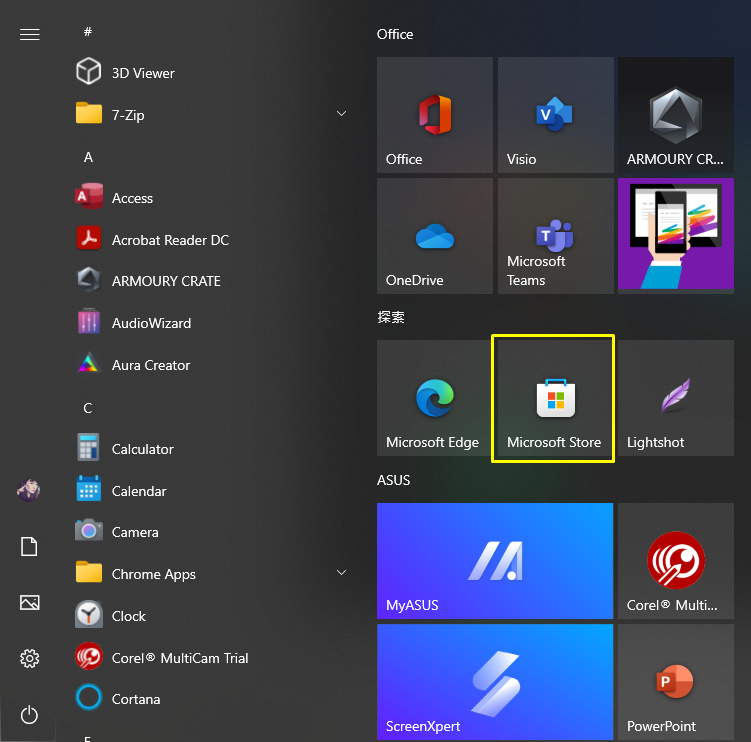
1. Откройте Microsoft Store
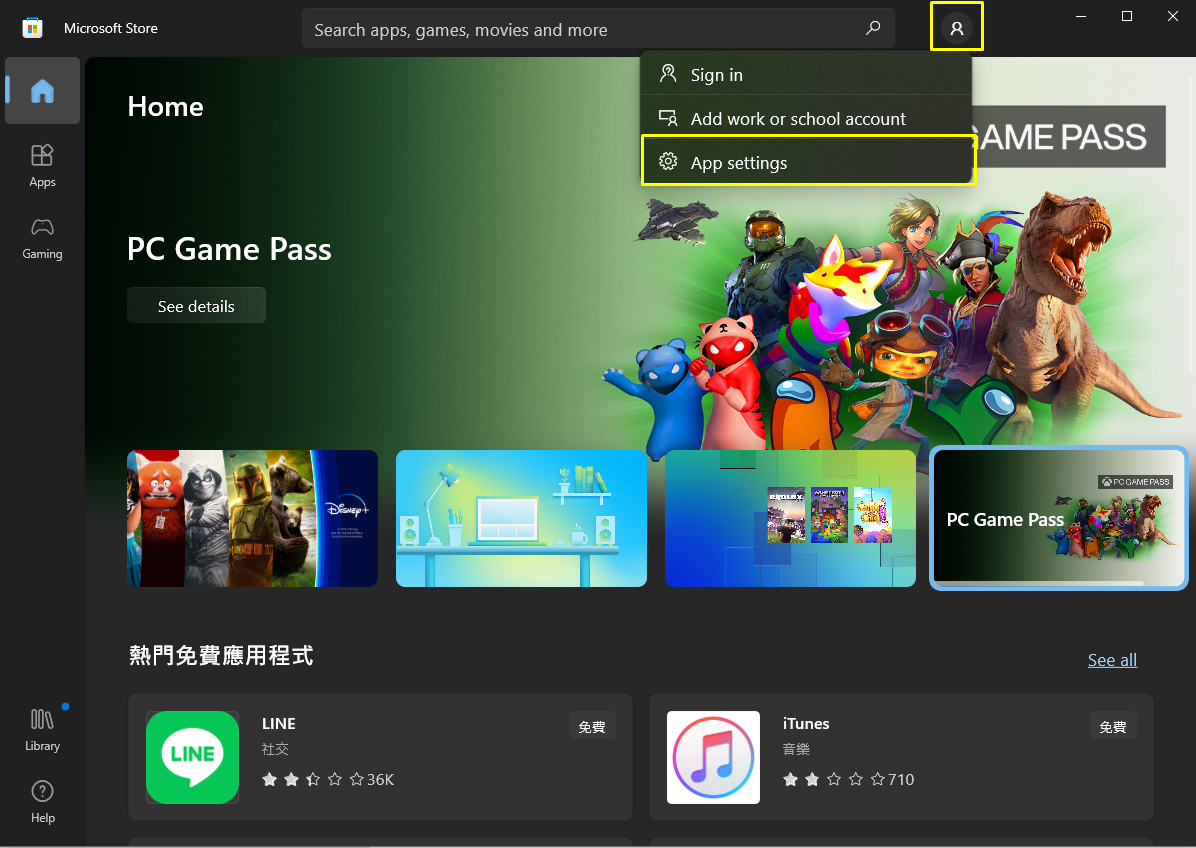
2. Нажмите на значок “Sign in”(войти) на панели справа, откройте раздел “App settings”(настройки приложений).
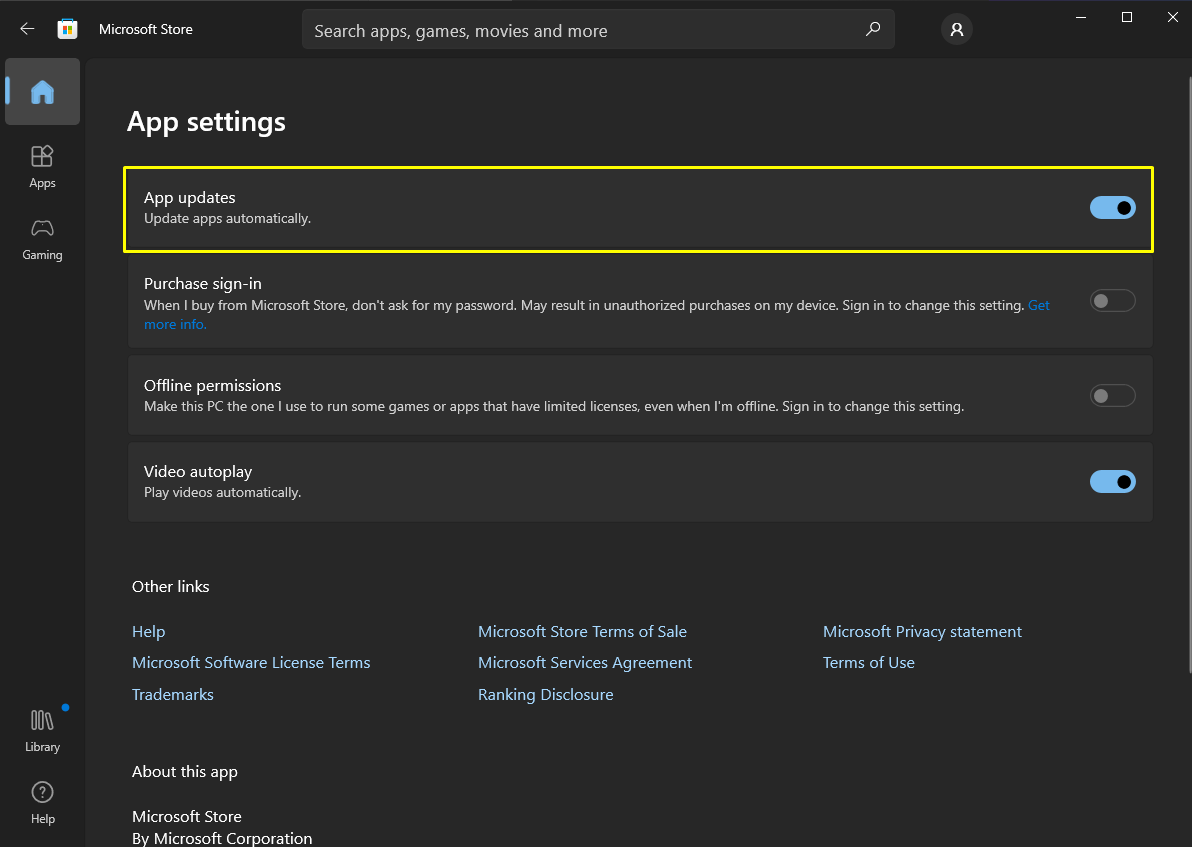
3. Отключите “App updates” (автообновление приложений), используя переключатель.
*Примечание: Если автоматическое обновление будет отключено, то этот параметр применится ко всем установленным приложениям из Microsoft Store (не только к Armoury Crate и Aura Creator).
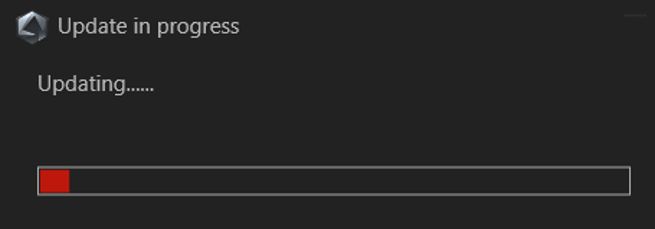
1-5. Как обновиться с версии v1.4.1 или v2.1.9 на v2.3.X или более позднюю
Если уже была установлена версия Armoury Crate v1.4.1 или было обновление на v2.1.9, воспользуйтесь инструкциями для обновления приложения.
1. Удаление Armoury Crate v1.4.1 или v2.1.9.
2. Загрузите установщик Armoury Crate Installer.zip с сайта поддержки ASUS для своей модели.
3. Двойным нажатием запустите файл ‘SetupROGLSLService.exe file’ , установщик загрузит приложения Armoury Crate и ROG Live Service, установка запустится автоматически.
1-6. Удаление Armoury Crate v1.4.1 или v2.1.9.
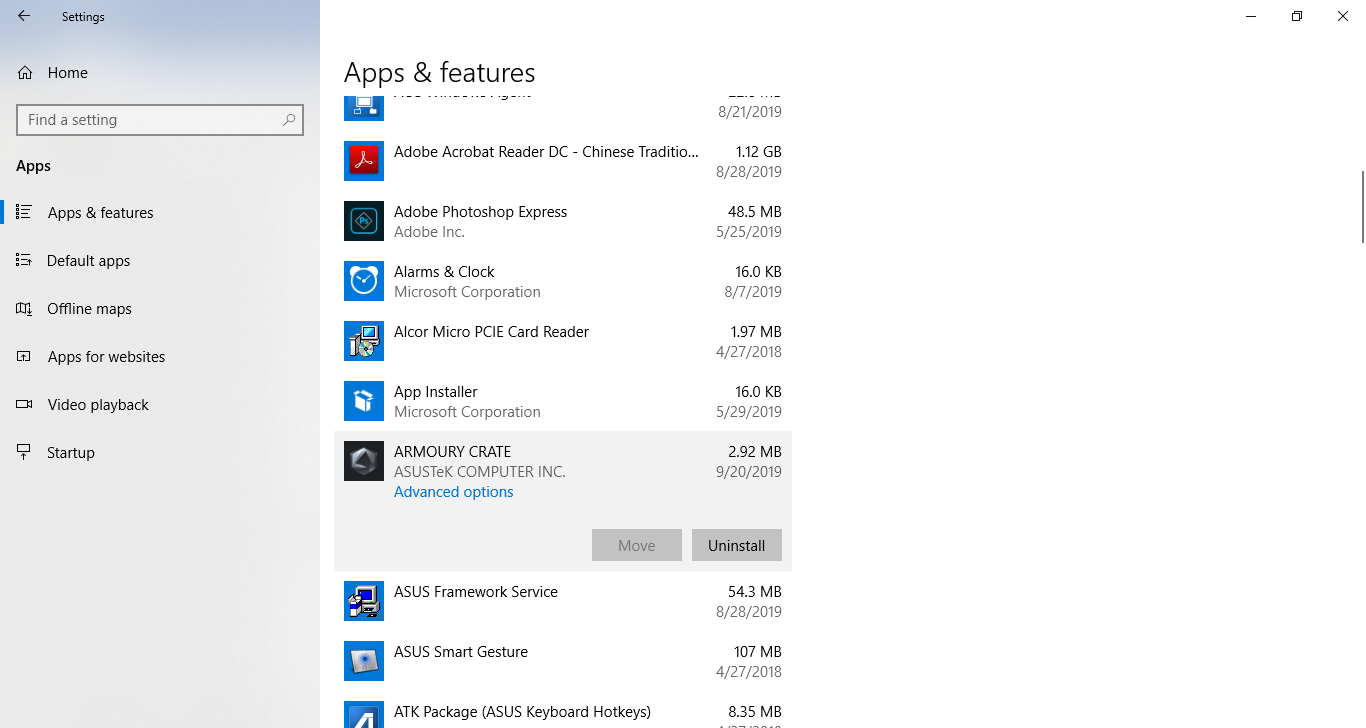
1. Нажмите на «Пуск», затем на шестерёнку «Настройки», а затем «Приложения» и «Приложения и функции».
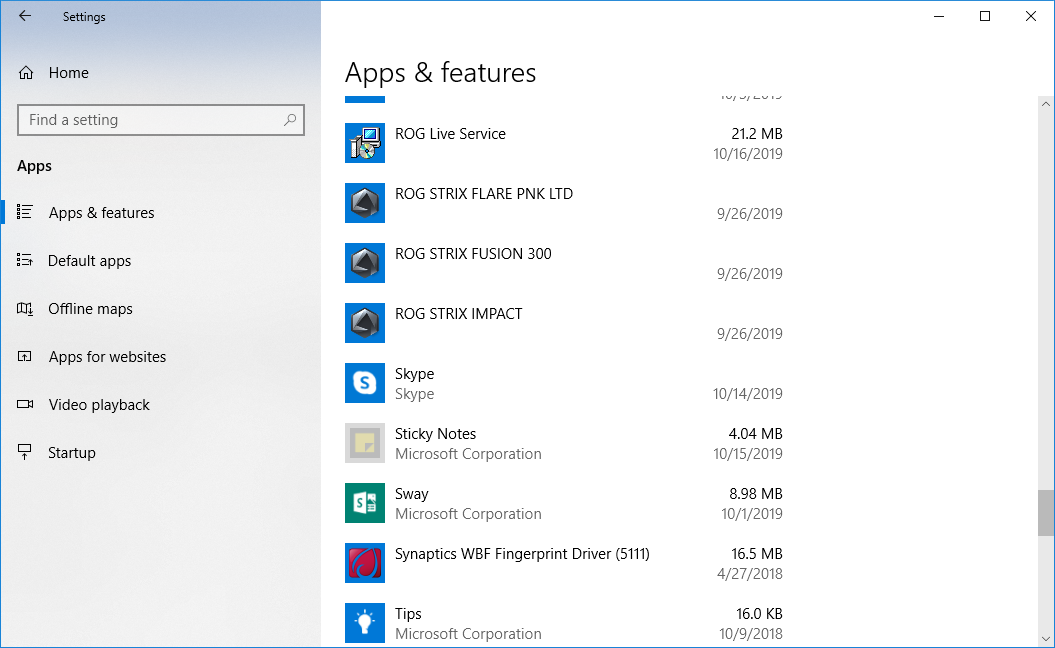
2. Выберите каждый элемент по очереди, затем «Удалить», и нажмите «Удалить» для подтверждения:
A. ARMOURY CRATE, Вариант 1
B. ARMOURY CRATE Service (для ноутбуков и настольных ПК серии ROG ) или ARMOURY CRATE Lite Service (для материнских плат и других поддерживемых устройств)
C. ASUS Framework Service
D. Aura Service (если хотите оставить Aura Sync или Aura Creator, не удаляйте Aura Service)
E. ROG Live Service (если хотите оставить Aura Sync или Aura Creator, не удаляйте ROG Live Service)
F. Для всех остальных составляющих, связанных с подключенными устройствами ASUS или ROG — следуйте Варианту 2
2.[Armoury Crate] Aura Sync – Введение
2-1. Aura Sync: поддерживаемые устройства
Существует более 180 устройств, поддерживающих Aura Sync. Подробнее — по ссылке: сайт Aura.
1. Материнские платы
2. Видеокарты и аксессуары
3. Мониторы
4. Ноутбуки
5. Настольные ПК
6. Клавиатуры
7. Мышки
8. Коврики для мышек
9. Гарнитуры и микрофоны
10. AIO-системы охлаждения
11. Корпуса для настольных ПК
12. Источники питания
13. Аксессуары
14. Хранилища
Параметры во вкладке «Aura Sync» позволяют управлять всеми подключенными устройствами, совместимыми с Aura Sync. Можно менять эффекты Aura Sync и синхронизировать устройства через вкладку «Aura Sync», а также применять расширенные световые эффекты, созданные через Aura Creator.
Параметры на вкладке «Подсветка» на вкладке «Устройство» позволяют независимо управлять освещением каждого устройства, когда оно не синхронизировано с Aura Sync.
Примечание: Эти настройки НЕ синхронизируют другие световые эффекты.
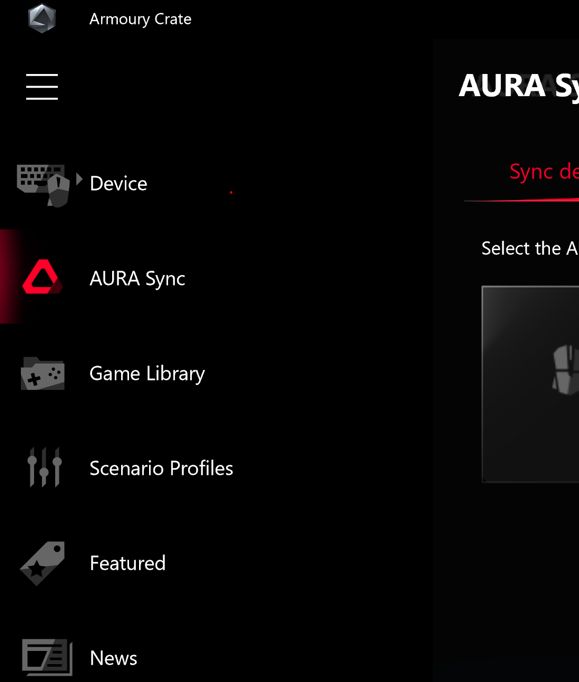
Во вкладке «Устройство» параметры отображают конфигурации всех подключенных устройств, поддерживаемых Armoury Crate. Например, можно изменить подсветку устройства (когда устройство не синхронизировано через Aura Sync) или изменить параметры производительности, включая скорость вращения вентилятора материнской платы, DPI мыши, настройки кулера AIO, макроклавиши или настройки дисплея.
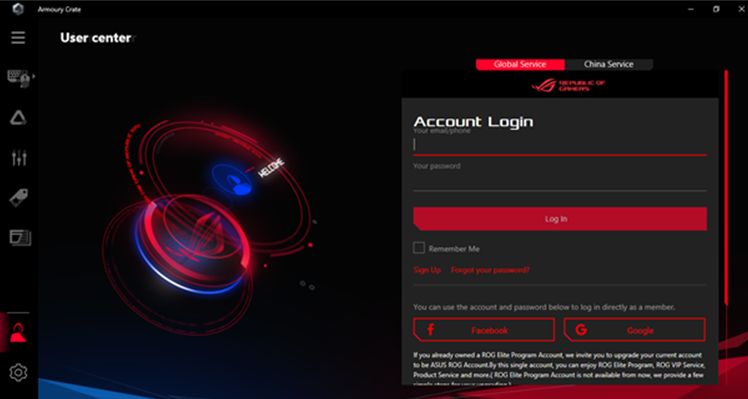
1. Если у Вас есть аккаунт ASUS ::
A. Нажмите на значок пользователячтобы открыть ‘Центр пользователя’.
B. Введите имя пользователя и пароль от аккаунта ASUS.
2. Если ещё не завели аккаунт ASUS :
A. Нажмите на значок пользователя чтобы открыть ‘Центр пользователя’.
B. Нажмите на ссылку ‘Зарегистрироваться’ чтобы завести аккаунт ASUS, или авторизуйтесь через учётную запись Facebook или Google.
1. Войдите в учётную запись ASUS
2. Откройте ‘Центр пользователя’ и выберите раздел ‘Мои продукты’
3. Выберите ‘Зарегистрировать новый продукт’
4. Введите серийный номер устройства
Fix Asus Aura Sync Not Working [Causes & Solutions 2023]
Well, it thwarts all the excitement and ruins the day. But you are not alone. This is a widespread issue for ASUS’s motherboards and GPU owners.
Calm yourself down though, as in this article, I’ll help you fix all the issues of the Aura Sync software.
So buckle up for the ride, shall we?
Quick Navigation show
- Why is ASUS Aura Sync Not Working?
- Possible Issues with the ASUS Aura Sync Software
- 1. Restart Aura Sync App
- 2. Check Motherboard Compatibility
- 3. Update the Aura Sync
- 4. Reinstall Aura Sync
- 5. Uninstall Other RGB Syncing Apps
- 6. Disable Fast Startup
- 7. Reconnect the RGB Headers
- 8. Reset LED from BIOS
Why is ASUS Aura Sync Not Working?
ASUS Aura Sync is not working due to damaged installation files, conflict with other RGB software, Windows Fast Startup, or RGB headers not being connected properly. Besides, an incompatible motherboard is not detected by Aura Sync at all. Not to mention, outdated Aura Sync app create issues too.
Before going furthermore, I think you need to know the main causes that create problems between Aura sync and your PC. This will surely help you to fix your specific problem very easily.
Here are some of the main reasons why ASUS Aura Sync is not working:
Corrupted Installation Files
This is a common problem that most people come across. With the new download link of the ASUS Aura Sync, you won’t face any problems related to corrupted files.
Conflicting With other RGB Software
Aura Sync doesn’t work properly when there is other RGB-controlling software installed on your PC. Sometimes free antivirus like Avast causes difficulty and restricts the Aura Sync app.
Recently, ASUS combined all the different apps and put them under the Armoury Crate app. If you have both the ASUS Aura Sync and Armoury Crate installed on your PC, most likely, you’ll face issues.
Custom Installation Path
Aura Sync doesn’t seem to open and work correctly when it’s installed in any custom installation path. So, I will recommend you install it in the default directory.
Fast Startup of Windows
The Fast Startup feature of the Windows operating system lets the PC boot very fast, but it has some side effects too. You might face problems with Aura Sync when this feature is on.
To make sure that this reason is causing the problem, you will sometimes see that only the I/O shield of the motherboard is blinking with red light.
RGB Headers Connected Incorrectly
If the RGB/ARGB headers aren’t connected in the right order, they will be unable to sync with the app. This will not let users control the RGB lighting as they wish.
Outdated Aura Sync App
The older versions of the Asus Aura Sync app have lots of bugs. So I will recommend you download and use the latest version of this app to get rid of ASUS Aura not working.
Possible Issues with the ASUS Aura Sync Software
Aura Sync is an excellent app for LED lighting control. But people face different problems with it.
I know this is crazy when your expensive RGB lighting components are not giving lighting effects according to your wish for a simple app like this.
Here are the Aura Sync issues:
Asus Aura Is Not Opening
Sometimes you may find that you are double-clicking on the Asus Aura Sync app shortcut icon, but it isn’t opening.
You also might have tried running the app as an administrator or opening it from the search box but without any success.
This sometimes happens due to inappropriate installation and corrupted installation files. You need a proper and stable setup file to fix this issue. Also, the files should be placed in the default installation path.
ASUS AURA Has Stopped Working
ASUS Aura Sync usually stops working when it fails to sync with different RGB components. ASUS Aura has stopped working error also happens sometimes while opening the app. It outright crashes.
Buttons Inside Aura Sync App Not Responding
Unresponsive buttons are those which you will find a bit dark in color in the app as if they’re disabled. When Aura Sync can’t find any of the components to sync with, it shows unlickable buttons there.
Aura Sync Unable To Sync With All RGB Components
Yes, that’s the most common problem with this software. ASUS Aura Sync can’t adjust with all the RGB components unless they are compatible with the software.
So, you may find some of the components are lit differently, or they aren’t glowing at all.
Aura Sync Not Detecting Motherboard
The most annoying problem with the Aura Sync software is that it can’t detect your motherboard.
As a result, none of the compatible components can sync with Aura Sync. Which ultimately leads your PC to look like a sad non-RGB PC.
How to Fix Asus Aura Sync Not Working Error
To fix Aura Sync not working, reinstall the app. After uninstalling ASUS Aura, install the standalone version of Aura Sync Utility. Remove the previously installed Armoury Crate app, reset the LED from the BIOS, and reconnect all the RGB cables.
You might be tired of the Aura Sync issues after buying expensive RGB peripherals. Now let’s get to the main point.
Warning: Before going to the fixes, you need to know if your components are Aura Sync compatible or not. If your motherboard isn’t compatible with Aura Sync, none of my solutions will work.
Now, let’s get into the solutions.
Here are the methods to fix Aura Sync not working:
1. Restart Aura Sync App
Temporary bugs and glitches are one of the rudimentary reasons why Aura Sync suddenly stops working on a computer. In such instances, the first thing to do is restart the aura sync application.
First, quit the RGB program from the background process. To do that, simply press Ctrl + Shift + Esc and fire up the task manager. Look for aura sync and right-click on it. End the process, and it’s not disabled.
Open the Aura sync app again and check if it’s working properly. Negative?
Restart your PC and launch the Aura Sync program, and it should be working properly.
2. Check Motherboard Compatibility
Aura Sync not detecting motherboards is a common and widespread issue. And this also explains why Aura Sync does not work on some computers.
So, first, it’s important to check the compatibility of the main board. FYI, not all ASUS motherboard is compatible with Aura Sync software.
Here’s how you can check motherboard compatibility for aura sync:
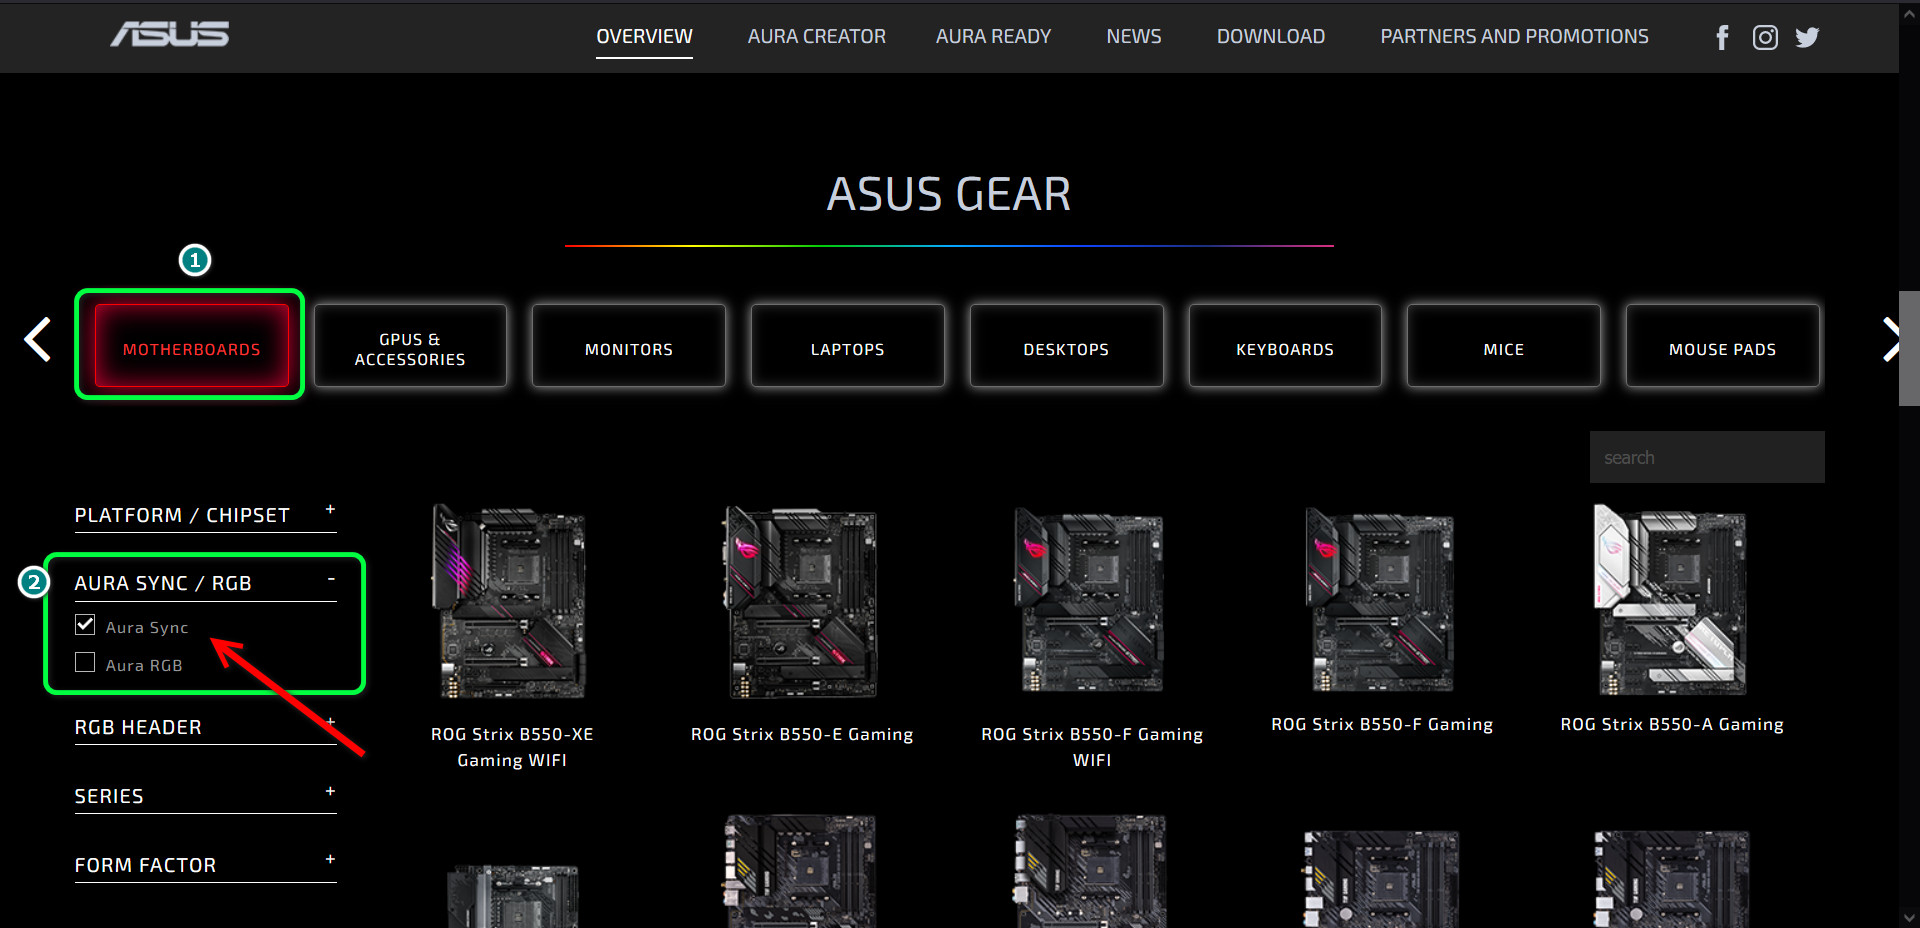
- Go to ASUS’s official global site.
- Scroll down to ASUS Gear.
- Expand AURA SYNC /RGB from the left pane.
- Check the Aura Sync box.
Within a few moments, all the supported boards will pop up. Check whether your board makes it into the list. If you don’t find your board, it explains why Aura Sync is not working with your motherboard.
3. Update the Aura Sync
As newer motherboards constantly get released, the Aura Sync app often doesn’t have the exact product number embedded in the software. However, with an update, this compatibility issue can be resolved.
It’s basic troubleshooting for numerous Aura Sync issues, such as compatibility and not working.
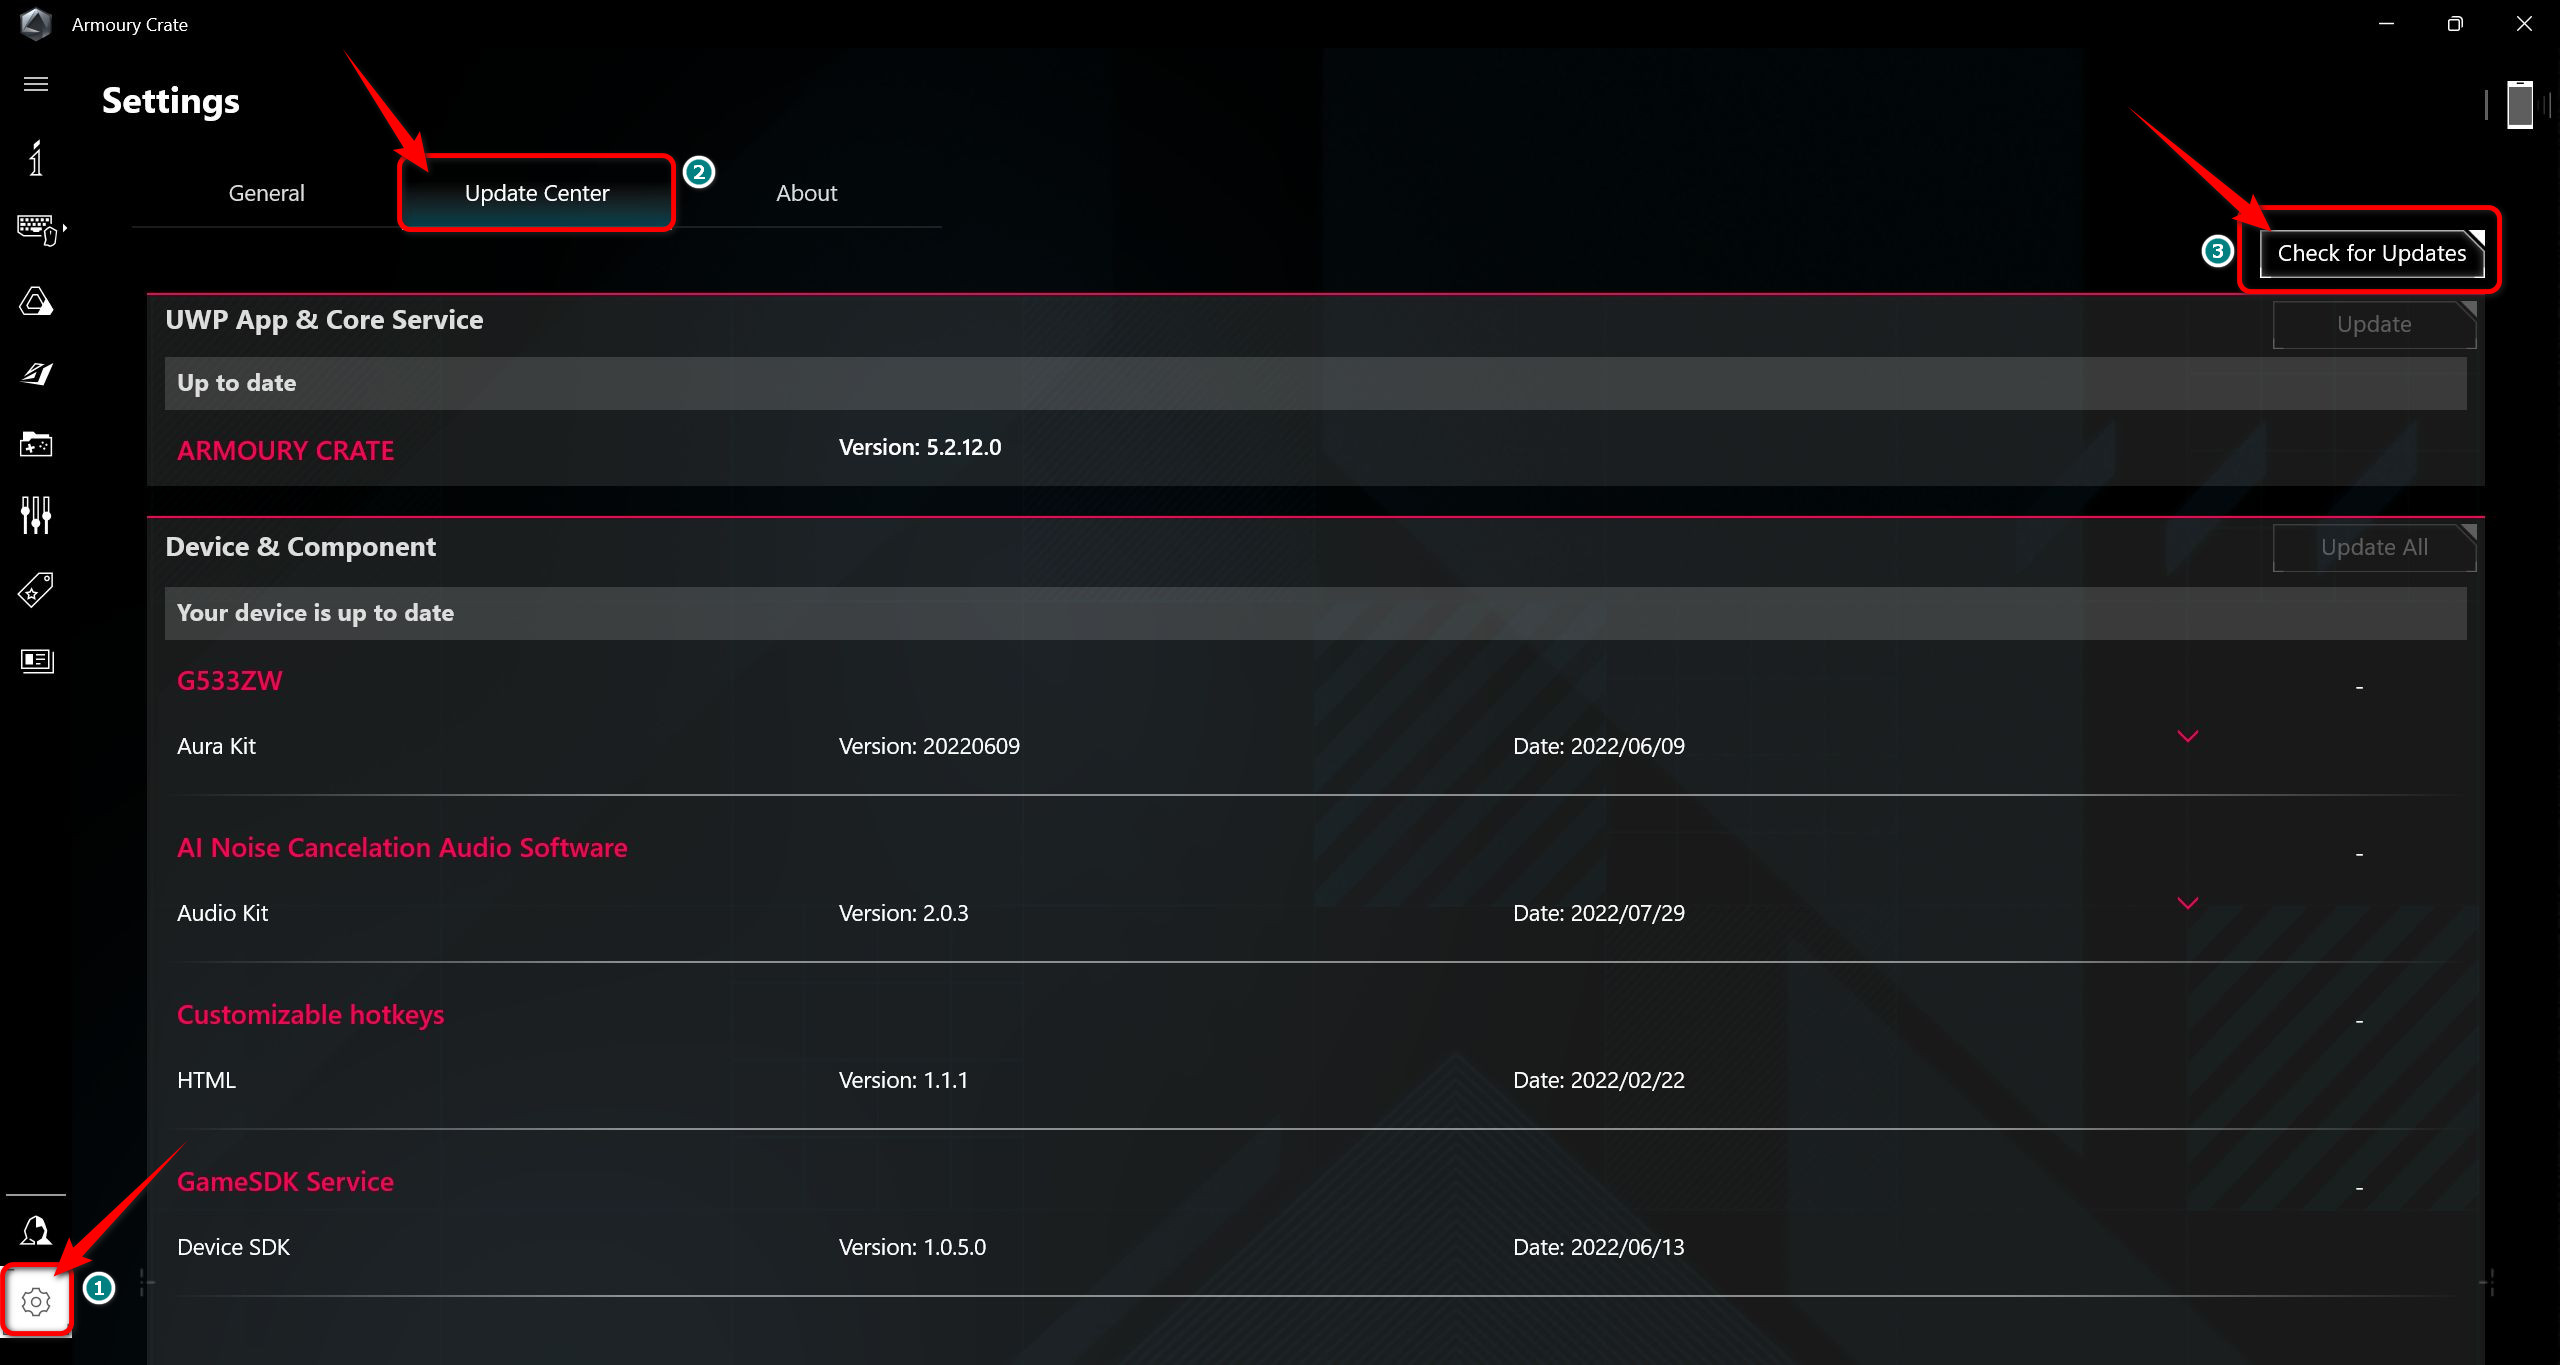
To update Aura Sync, fire up Armoury Crate software on your machine. Go to Settings and click on Check for Updates.
All the list of programs that needs an update will appear. Click on Update All, and it should be good to go. Now restart your computer and check whether Aura Sync issues are fixed.
4. Reinstall Aura Sync
In most cases, the Aura Sync issue arises due to incorrect installation or corrupted installation files.
Either way, the solution is to completely remove Aura Sync manually from the system and then install the latest standalone version of the app from the official website (ignore any third-party link). Try reinstalling the software using this method, as the fix worked in most cases.
Follow the steps below to reinstall Aura Sync:
- Press Win+I to open Windows Settings.
- Go to Apps.
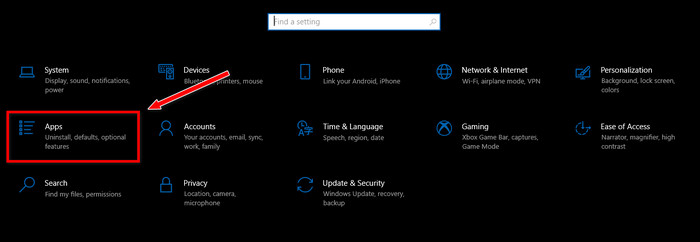
- Uninstall AURA and AURA Service.
- Open File Explorer and go to C drive > Program Files (x86) folder.
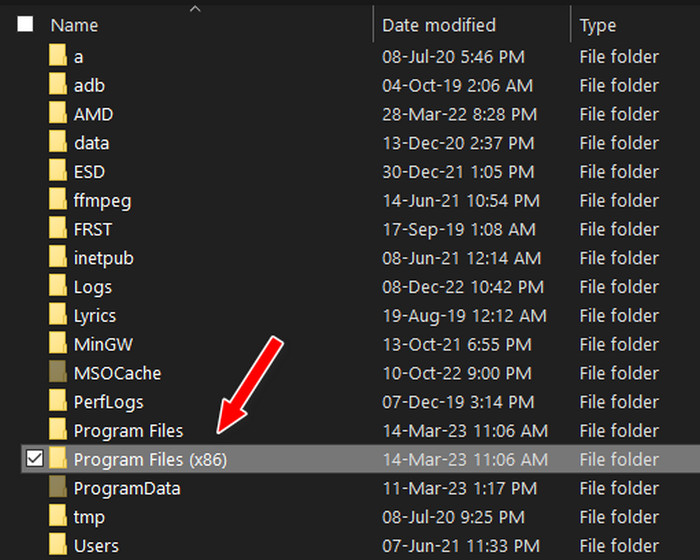
- Delete the LightingService folder.
- Press Win+R to open the Run window.
- Type temp and press Enter. It will open the temp files directory.
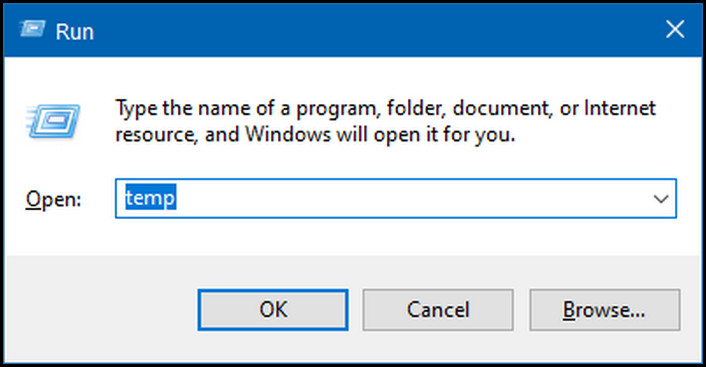
- Press Ctrl+A to select all files, then press Delete to delete all temp files.
- Restart the PC.
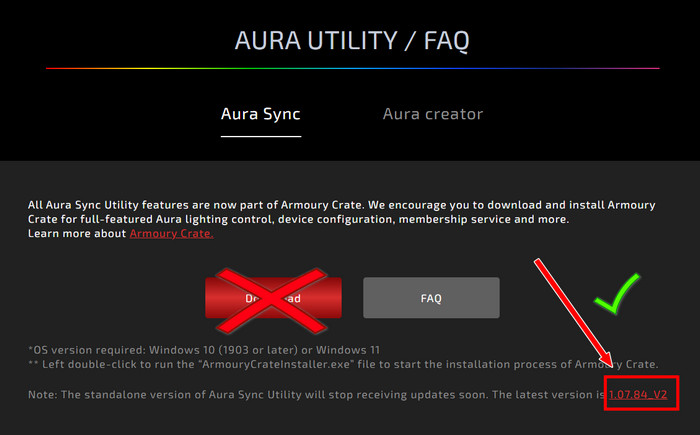
- Download the latest standalone version of the ASUS Aura Sync Utility from thislink. Note that instead of clicking on the big Download button, you need to use the link in the lower-right corner. See the screenshot for more details.
- Unzip the file and run the “Setup.exe” file to install the Aura Sync application.
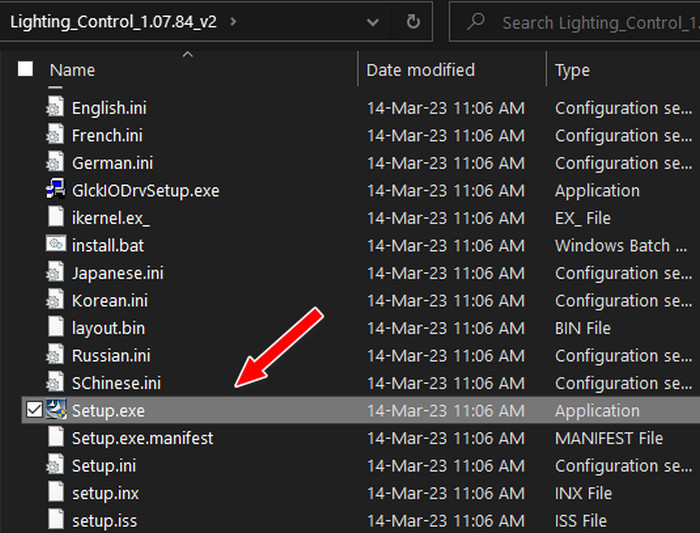
Once the ASUS Aura is installed, restart the PC again, and it should work now.
5. Uninstall Other RGB Syncing Apps
If reinstalling the software doesn’t work, try this method.
To make sure that Asus Aura software works properly, you will have to uninstall other RGB lighting software. This includes apps from other manufacturers like ASRock Polychrome Sync, Razer Chrome, RGB Fusion, Corsair iCUE, Cooler Master MasterPlus+, etc.
Moreover, you should not install the ASUS Armoury Crate alongside the AURA Sync. Many users faced problems after installing the app, as both apps would clash with each other.
ASUS included all the features of the AURA Sync inside the Armoury Crate. AURA Sync will be discontinued in the future, and only Armoury Crate will get updates.
So, the first option is to only install Armoury Crate using the ASUS ROG Armoury Crate download link and get rid of the Aura Sync.
If you face issues using the Armoury Crate, we have a guide to fix Armoury Crate not working.
The second option is to use AURA Sync only. For either option, you have to remove any other RGB apps.
Here are the steps to uninstall other RGB syncing apps:
- Press Win+I to go to Settings.
- Go to Apps.
- Click on the RGB software name.
- Select Uninstall.
- Go through the process of uninstallation.
- Repeat the process for all the other RGB apps installed on your PC.
Once you’re done, reboot the PC and check if the solution worked.
6. Disable Fast Startup
Fast Startup is a Windows 10 and 11 feature that caches the running processes in storage when you shut down the PC and then reloads them when you start the PC again. It shortens the boot time, and hence you’re able to boot faster.
However, RGB apps like Aura Sync can face problems with it. If there’s an error during the runtime of the app, the error remains even if you restart the PC, as the app never refreshes, and it continues from the previous session.
Users reported that this method works in many scenarios. Therefore, you need to disable the feature.
Here are the steps to disable the fast startup of Windows:
- Go to Control Panel.
- Select Large icons from the top-right corner.
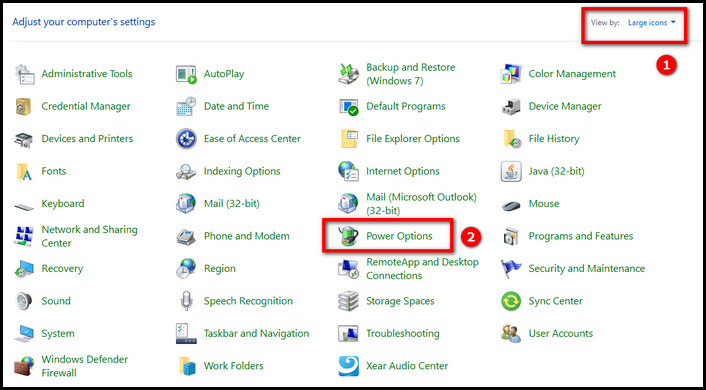
- Go to Power Options > Choose what the power buttons do.
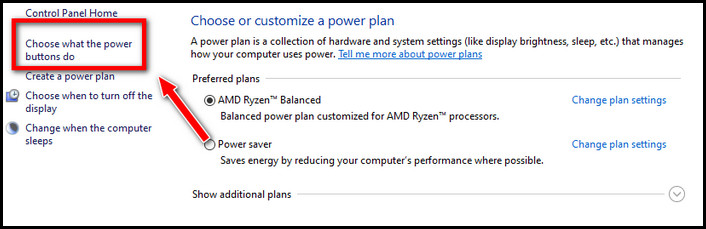
- Click Change Settings that are currently unavailable.
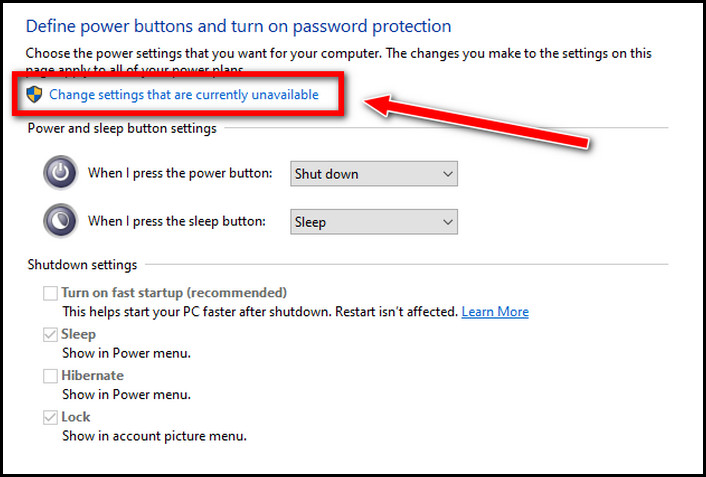
- Uncheck the box that says Turn on fast startup.
- Save changes.
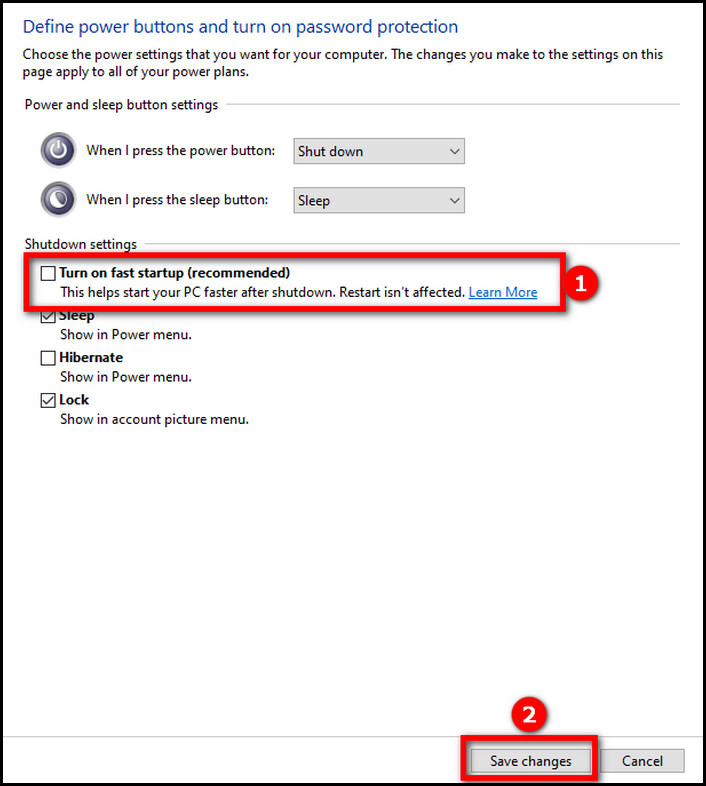
- Restart the PC.
Now Aura Sync should load fresh from a new start instead of continuing where it left off in the previous session and remove any errors.
7. Reconnect the RGB Headers
Connecting the RGB/ ARGB headers to the motherboard is a very necessary task for lighting up your computer. Incorrectly or Poorly connected RGB headers won’t work at all.
Some people mess up while making connections. So, make sure to connect the RGB headers perfectly to your motherboard.
3-pin headers are to be connected for ARGB devices, and 4-pin headers are made for RGB devices. Check if all the connections are made correctly. You can reconnect the cables to ensure they’re fitted correctly.
If you’re still facing issues with the Aura Sync, then you have to use ASUS Aura Sync alternatives.
8. Reset LED from BIOS
Resetting the LED from BIOS is an effective way to fix the glitchy Aura Sync program that suddenly stopped working. The lights on your computer might get stuck to a single color light or effect.
In such instances, just turn the RGB light off and on from the BIOS, and it should fix the issue.
To reset LED from BIOS:
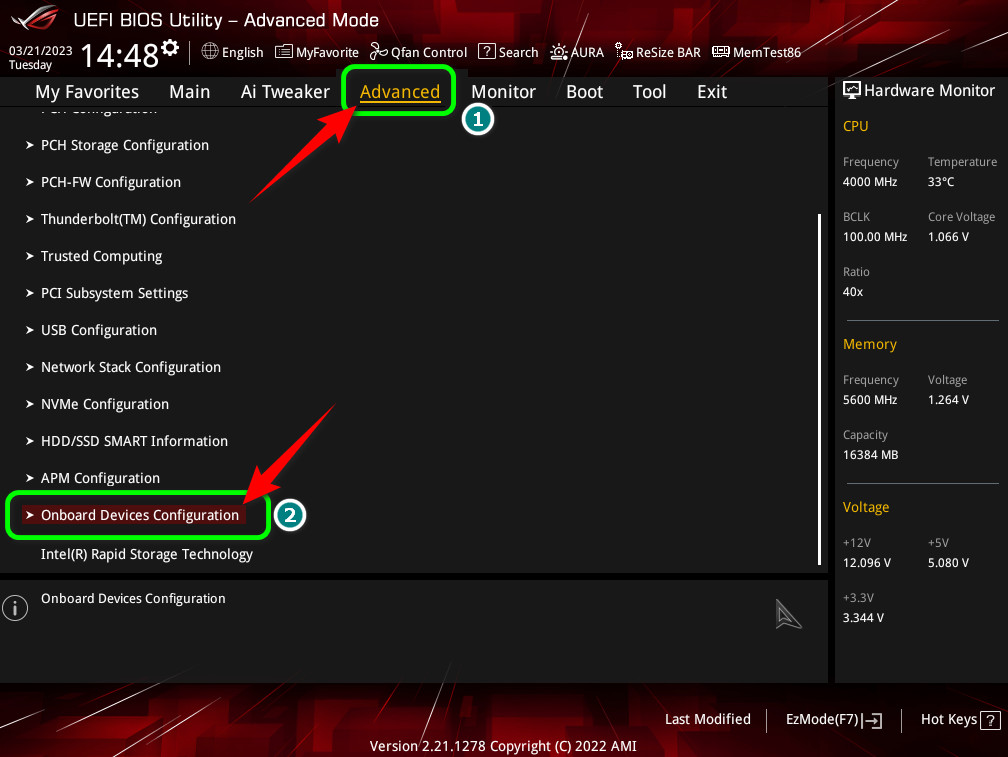
- At PC startup, access BIOS by continuously pressing the F2 or Delete button on your ASUS motherboard.
- Switch to the Advanced tab.
- Get to Onboard Device Configuration.
- Find RGB LED Lighting and choose Off.
- Scroll down and Select APM Configuration.
- Choose Enable(S4+S5) for ErP Ready.
- Press the F10 key to save the changes. This will restart your computer.
- Get into the BIOS once again and turn on RGB LED lighting under the Advanced tab.
Save and restart your computer, and this should sync all your RGB with the Aura Sync software.
Frequently Asked Questions
Does Aura Sync Work On Any Graphics Card?
No, Aura Sync only works on ASUS GPUs. Graphics cards from other manufacturers won’t be get detected by Aura Sync. Even all ASUS products don’t support Aura Sync. Only some specific models, such as ROG Strix, Tuf, or Dual series cards, work with Aura Sync.
How Can I Sync My Whole Setup With Aura Sync?
To sync your whole setup with Aura Sync, you can use all the Aura Sync-compatible products or modify things by adding supported RGB or ARGB LED strips. Also, ensure to connect RGB/ARGB cable to the correct headers.
Why is Aura Sync Not Detecting RGB?
Aura Sync is not detecting RGB mainly due to incorrect connection of RGB or ARGB headers. If the connection is loose, this problem can arise. Besides, using Armoury Crate alongside Aura Sync can also cause issues.
What happened to Aura Sync?
All the different software and utilities of ASUS are brought under one app, the Armoury Crate. The features of the Aura Sync app is also merged into the Armoury Crate. Moreover, the standalone Aura Sync app will be discontinued.
Final Words
Problems with Aura Sync can cause a major issue with your RGB computer, as it’s responsible for all the RGB controls of your setup.
That said, newer versions of the app or the new Armoury Crate app will be hopefully more convenient to use with ASUS RGB products.
If you have more question on your mind, reach us by making a comment.
About The Author


Steven Arends
Steven Arends is a computer science graduate and tech enthusiast with over 10 years of experience in the field. He has a vast collection of computer hardware and loves exploring the latest advancements. As a contributing author to 10Scopes, Steven shares his expertise to make the world of technology more accessible and easier to understand for all readers.
Related Posts


5 Comments..
My pc motherboard is being detected but I can’t control the lighting on that or on my aio from cooler master because it says when I go to asus aura sync not comparable devices or no devices detected Reply
after updating 2.1.2.2 xpg rams stopped being detected by armoury. (XPG D60G) Reply
Steven Arends
rollback to the previous version. ReplyASUS TUF Dash F15 FX516PE_FX516PE is my laptop, i am having trouble connecting my laptop to aura sync / creator so i can’t change the color… Reply
Hi, thanks for this post, it’s helpful. I ran into an issue earlier this week, I am trying to sync my corsair RAM and I know it it doable with the plugin for iCue, but I accidentally hit the checkbox to unsync my GPU (Asus ROG Strix 3090) on the main panel in Aura Sync. Now no matter how many times I resync it or try to uninstall / re-install the software it will not work with aura even though it did perfectly fine prior to hitting the sync checkbox. Would possibly removing iCue from my pc and just running Aura sync do the trick? Reply
Question Aura Sync Not Showing motherboard
You are using an out of date browser. It may not display this or other websites correctly.
You should upgrade or use an alternative browser.heavyarms003
Commendable
Oct 21, 2018 14 0 1,510
Using Asus Rog Strix B450 F Gaming motherboard. I can’t get the motherboard to show up in the Aura Sync software. My Trident Z ram shows up and I can control it but not the motherboard RGB. I can turn the motherboard RGB off in the bios or turn it on and thats it. But I cant actually set the color or pattern. Any thoughts?
helpstar
Titan
Dec 25, 2012 12,613 652 83,840
FAQ:
«My Aura Sync compatible device do not appear in Aura UI. 1. Make sure that the device is correctly connected to your system. Unplug and replug it if necessary. 2. Hit the refresh button on the right top part of the UI and wait a few seconds for UI to refresh. 3. If the step above does not work, close and reopen Aura software. 4. If the step above does not work, restart your system and reopen Aura software. »
https://www.asus.com/campaign/aura/upload/download/20180420013758_m1.pdfheavyarms003
Commendable
Oct 21, 2018 14 0 1,510
FAQ:
«My Aura Sync compatible device do not appear in Aura UI. 1. Make sure that the device is correctly connected to your system. Unplug and replug it if necessary. 2. Hit the refresh button on the right top part of the UI and wait a few seconds for UI to refresh. 3. If the step above does not work, close and reopen Aura software. 4. If the step above does not work, restart your system and reopen Aura software. »
https://www.asus.com/campaign/aura/upload/download/20180420013758_m1.pdfI’m currently running the lastest bios and version of aura. I’ve even tried older verions. And its not a a device I can unplug. Its the ROG logo on the motherboard it self that lights up
Los Angeles Magazine
Los Angeles magazine is a regional magazine of national stature. Our combination of award-winning feature writing, investigative reporting, service journalism, and design covers the people, lifestyle, culture, entertainment, fashion, art and architecture, and news that define Southern California. Started in the spring of 1961, Los Angeles magazine has been addressing the needs and interests of our region for 48 years. The magazine continues to be the definitive resource for an affluent population that is intensely interested in a lifestyle that is uniquely Southern Californian.