
[Solved] No python interpreter configured for the project
No python interpreter configured for the project is a common error message you may encounter in PyCharm. PyCharm is a very useful editor having nice features like debugging, testing, refactoring and code completion. However, it needs an external interpreter (Python.exe) to run Python code.
This message tells you that project configuration should be updated to use a valid Python installation. To open the related configuration, you can click on Configure Python interpreter link as shown below. Or alternatively, you can select File -> Settings from the menu and open Project -> Python Interpreter setting.
Python Interpreter setting shows that is selected for the project. To select (or create) a Python.exe interpreter click on Gear icon and select Show All… option.

In the Python Interpreters window that opens, the list is empty. To add a new Python Interpreter click on Plus (+) icon.

In Add Python Interpreter window, you can create a new virtual Python environment. My project is under C:\abcstudyguide\python directory, so I have created a folder venv under this directory to create a new virtual environment for my project.
You must then choose a Base interpreter. Base interpreter is the python.exe file installed on your system. When you create a virtual environment, it will be based on Python version specified here. If you need a specific version of Python (like 3.8, 3.7), you need show path of this Python version in Base interpreter filed.
If you don’t have Python installed on your system yet, you can download it from https://www.python.org/downloads/. Note that I installed Python in C:\Python\Python39 directory on my computer. However, default installation path is C:\Users\\AppData\Local\Programs\Python .

Virtual Environments in Python
Instead of creating a new virtual environment, you can also use the System Interpreter, but this method is not recommended.
You can work on many different Python projects. Virtual environments are useful for creating an isolated environment for each Python project. Consider you are working on two different projects (ProjectA and ProjectB). Both projects are using the same library (LibraryX) but they require different versions of LibraryX. ProjectA needs version 1.0 of LibraryX, ProjectB needs version 2.0.
To avoid version conflicts between third party libraries, each project should create and use its own virtual environment instead of using System Interpreter ( C:\Python\Python39\python.exe ).

When you create a new Python virtual environment and select it as Python Interpreter in your project settings, No python interpreter configured for the project message will be gone.
Configure a Python interpreter
To work with your Python code in PyCharm, you need to configure at least one Python interpreter. You can use a system interpreter that is available with your Python installation. You can also create a Virtualenv, pipenv, Poetry, or conda virtual environment . A virtual environment consists of a base interpreter and the installed packages.
With PyCharm Professional , you can also configure interpreters to execute your Python code on remote environments by using SSH, Vagrant, Docker, Docker Compose, or WSL (only for Windows).
When you configure a Python interpreter , you need to specify the path to the Python executable in your system. So, before configuring a Python interpreter, you need to ensure that you’ve downloaded Python and installed it in your system and you’re aware of a path to it.
You can create several Python interpreters based on the same Python executable. This is helpful when you need to create different virtual environments for developing different types of applications. For example, you can create one virtual environment based on Python 3.6 to develop Django applications and another virtual environment based on the same Python 3.6 to work with scientific libraries.
Python interpreters can be configured for a new project or for the current project (you can create a new interpreter or use one of the existing interpreters).
Configuring an existing Python interpreter
At any time, you can switch the Python interpreter either by using the Python Interpreter selector or in Settings .
Switch the Python interpreter using the Python Interpreter selector
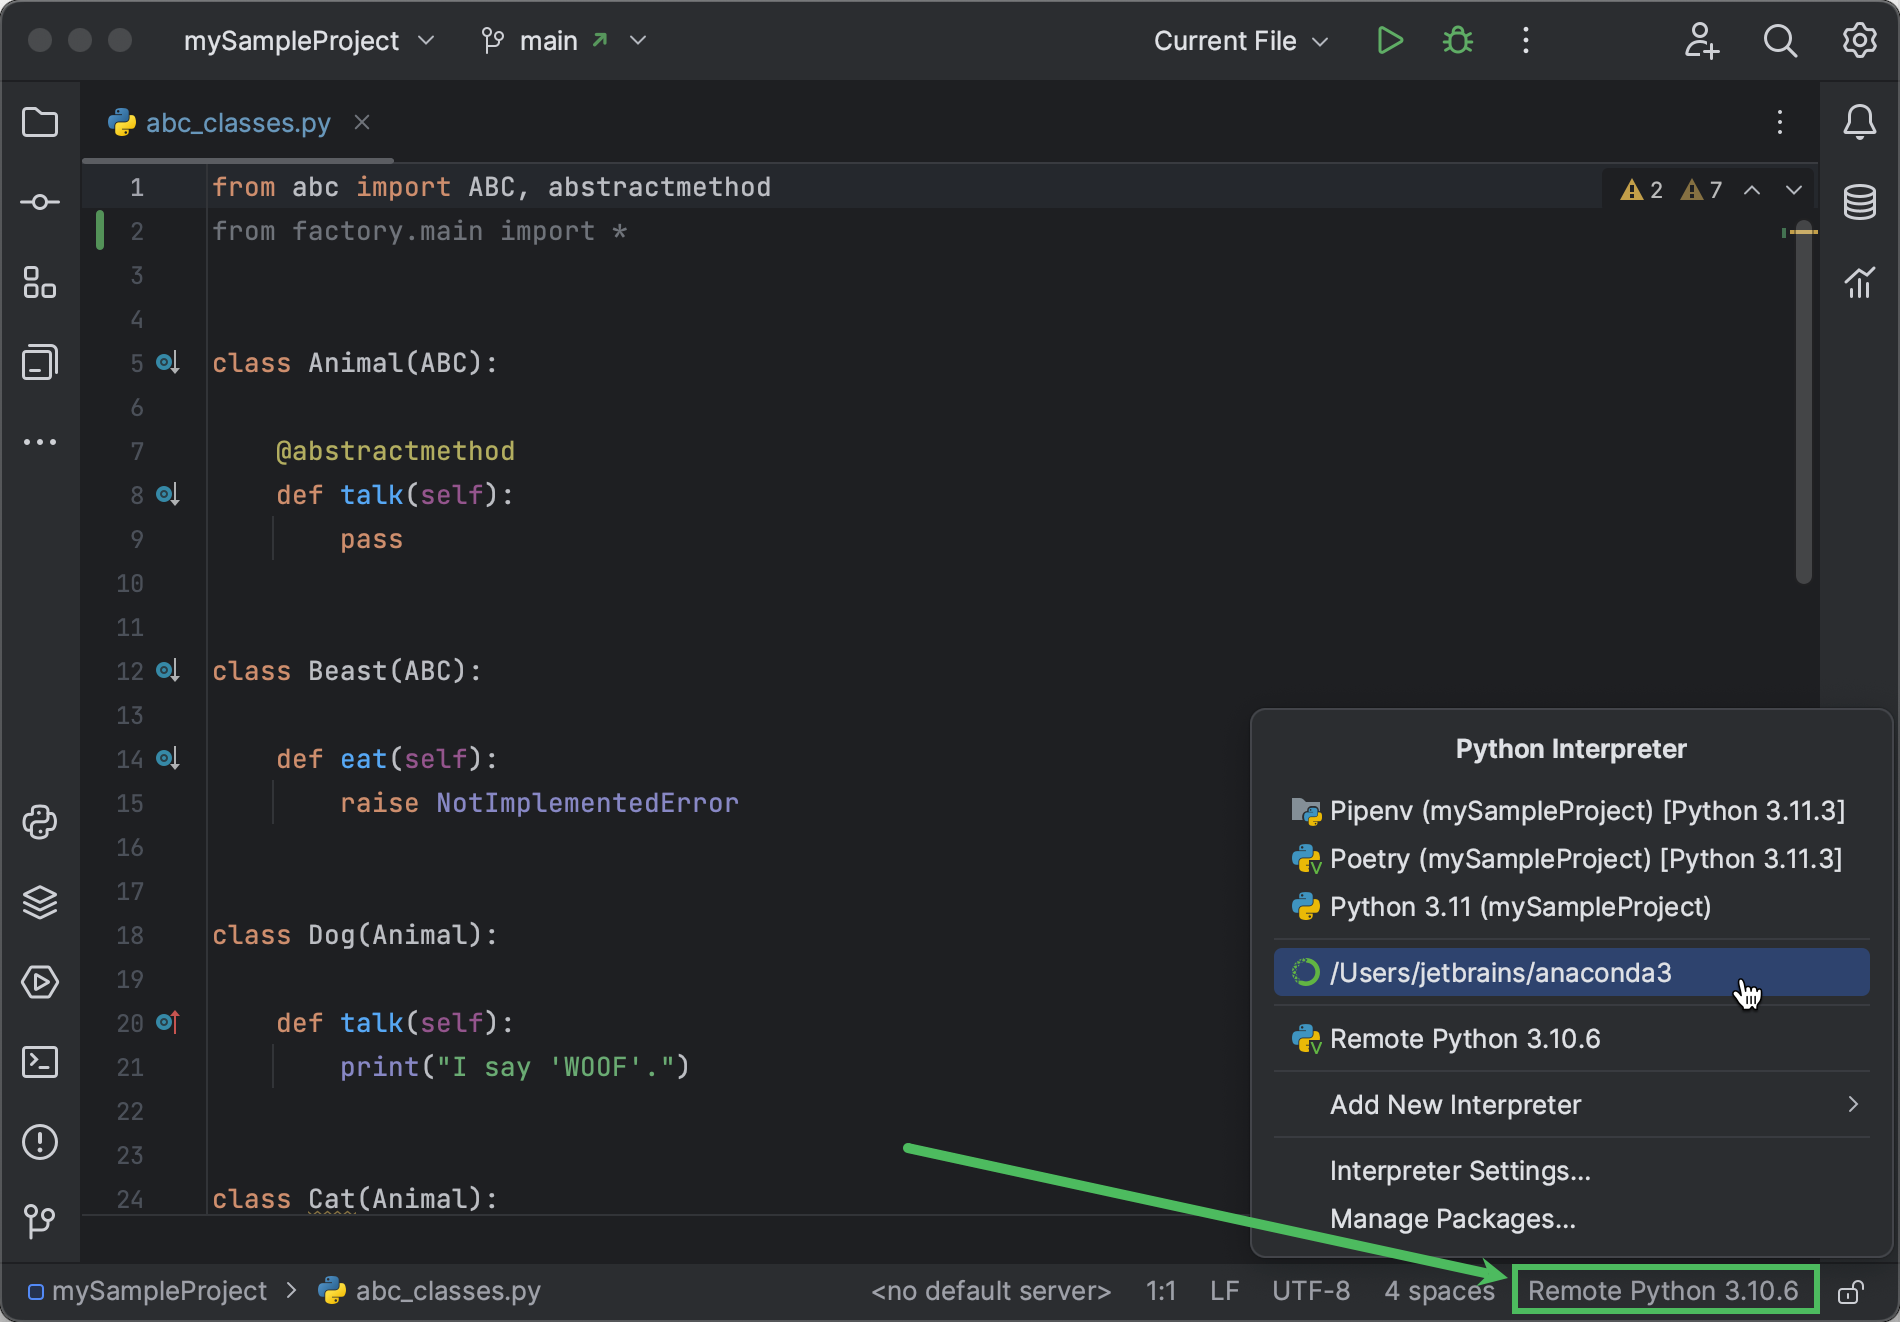
- The Python Interpreter selector is located on the status bar. It is the most convenient and quickest way to switch the Python interpreter. Just click it and select the target interpreter:
Switch the Python interpreter in the IDE settings
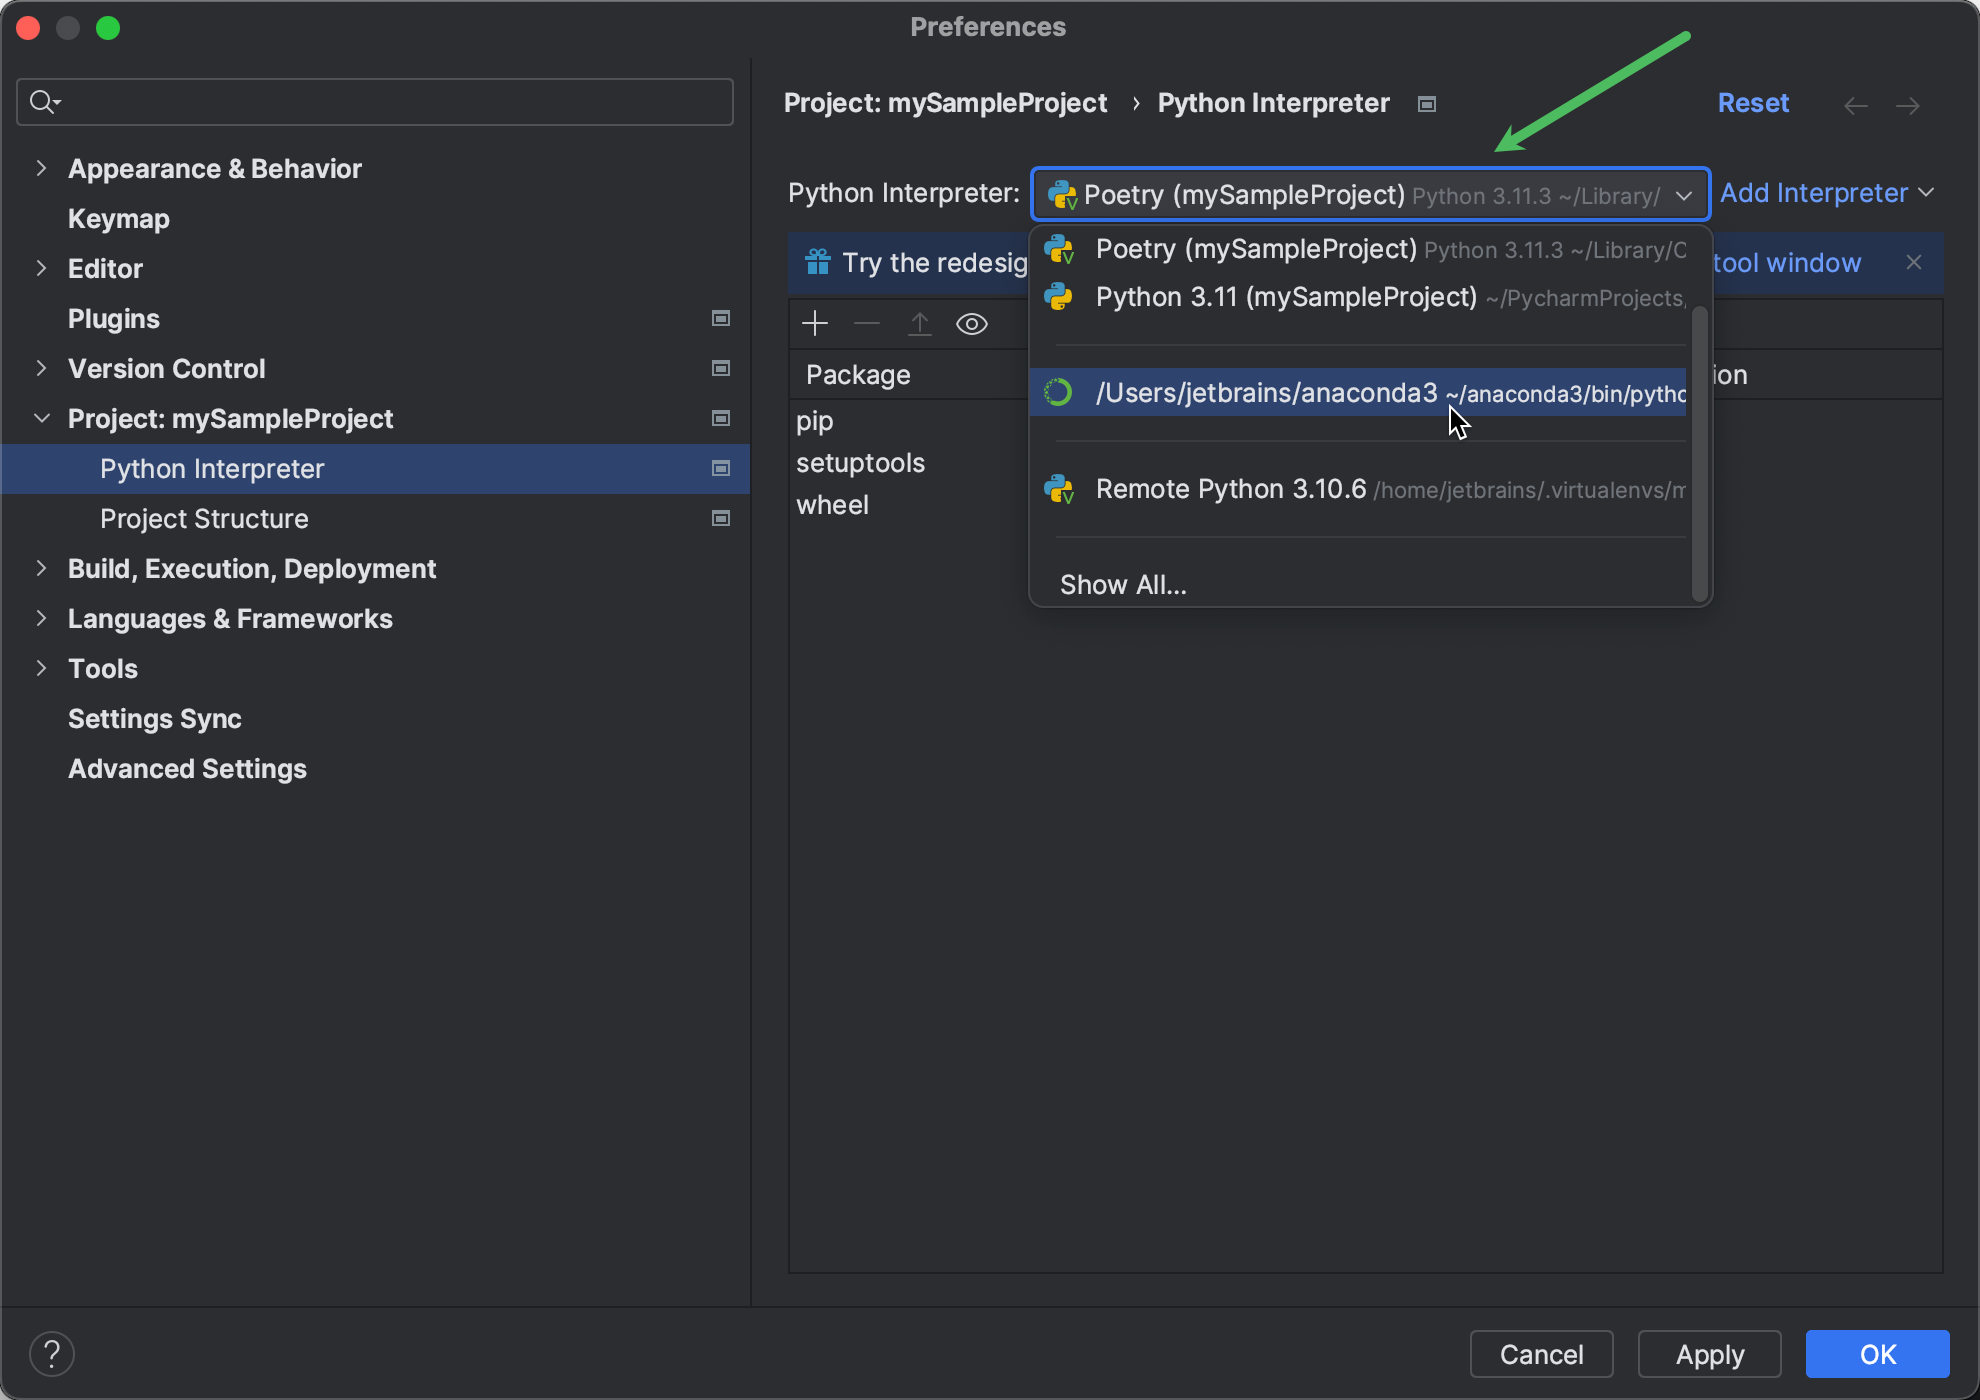
- Press Control+Alt+S to open the IDE settings and then select Project | Python Interpreter .
- Click the drop-down and select the desired Python interpreter:
- If it’s not on the list, click Show All . Then select the desired interpreter in the left pane and click OK . When PyCharm stops supporting any of the outdated Python versions, the corresponding Python interpreter is marked as unsupported.
When you change the project interpreter and select an SSH interpreter, you might need to synchronize the local content with the target server. Mind a notification balloon in the lower-right corner:
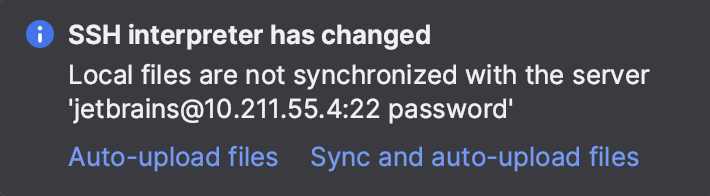
You can choose to enable the automatic uploading of files to the server:
- Click Auto-upload files to start uploading on the next save.
- Click Sync and auto-upload files to immediately sync the files and upload them on every save in future.
Modify a Python interpreter
- Press Control+Alt+S to open the IDE settings and then select Project | Python Interpreter .
- Expand the list of the available interpreters and click Show All .
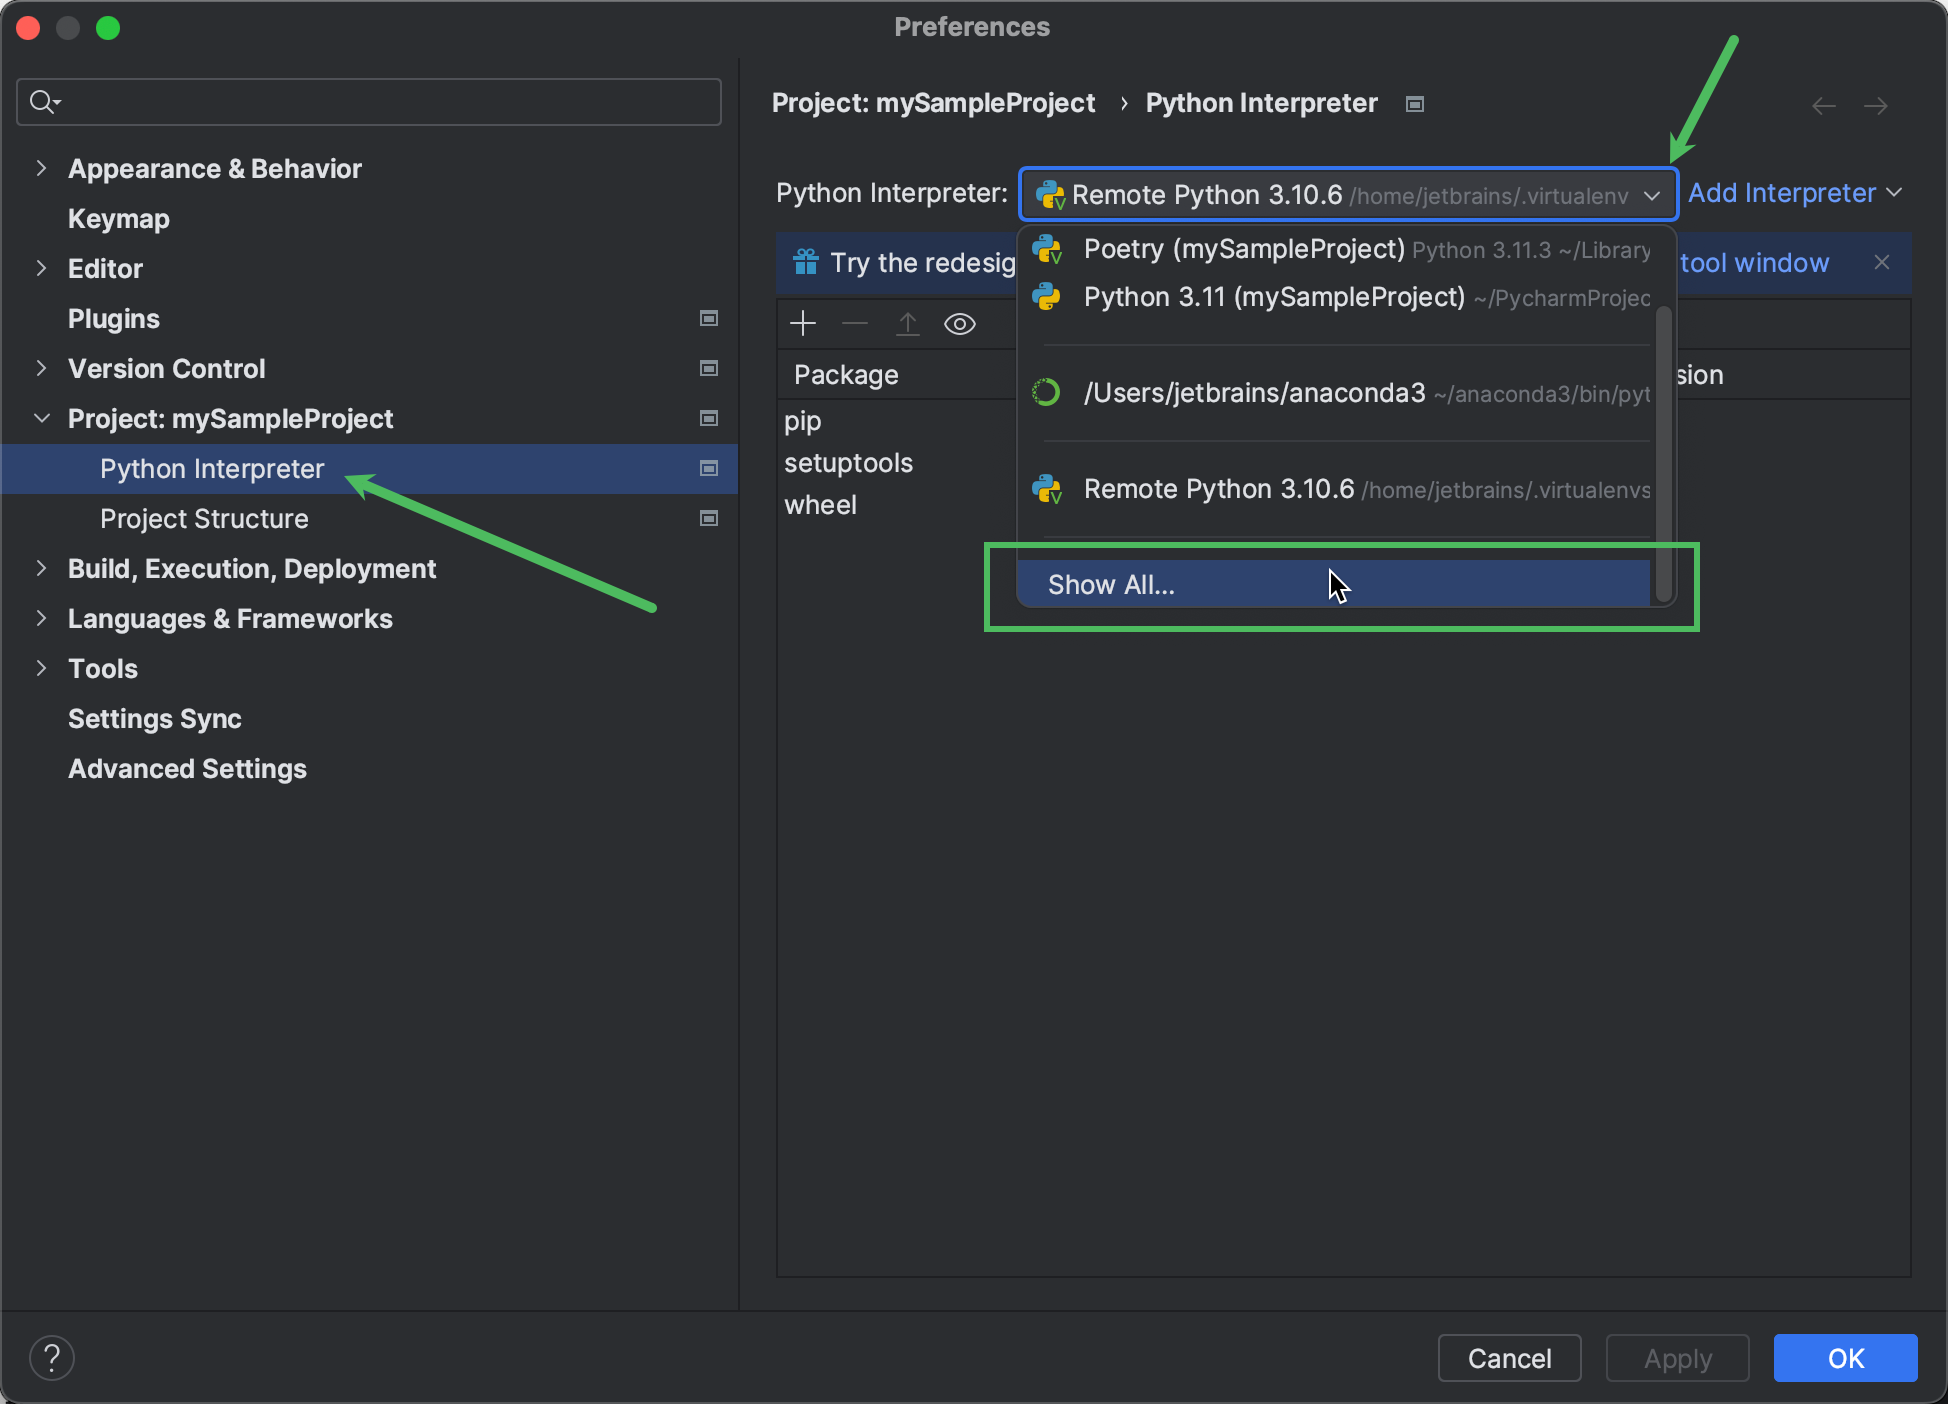
- You can modify the path to the Python executable in the Interpreter path field. When the Associate this virtual environment with the current project checkbox is enabled, the interpeter is available only in the current PyCharm project. To change the interpreter name, select the target interpreter and click .
 The Python interpreter name specified in the Name field, becomes visible in the list of available interpreters. Click OK to apply the changes.
Remove a Python interpreter
If you no longer need a Python interpreter for a project, you can remove it from the project settings.
- Do one of the following:
- Press Control+Alt+S to open the IDE settings and then select Project | Python Interpreter .
- Click the Python Interpreter selector and choose Interpreter Settings .
- Expand the list of the available interpreters and click Show All .
- Choose the interpreter that you want to remove and click .
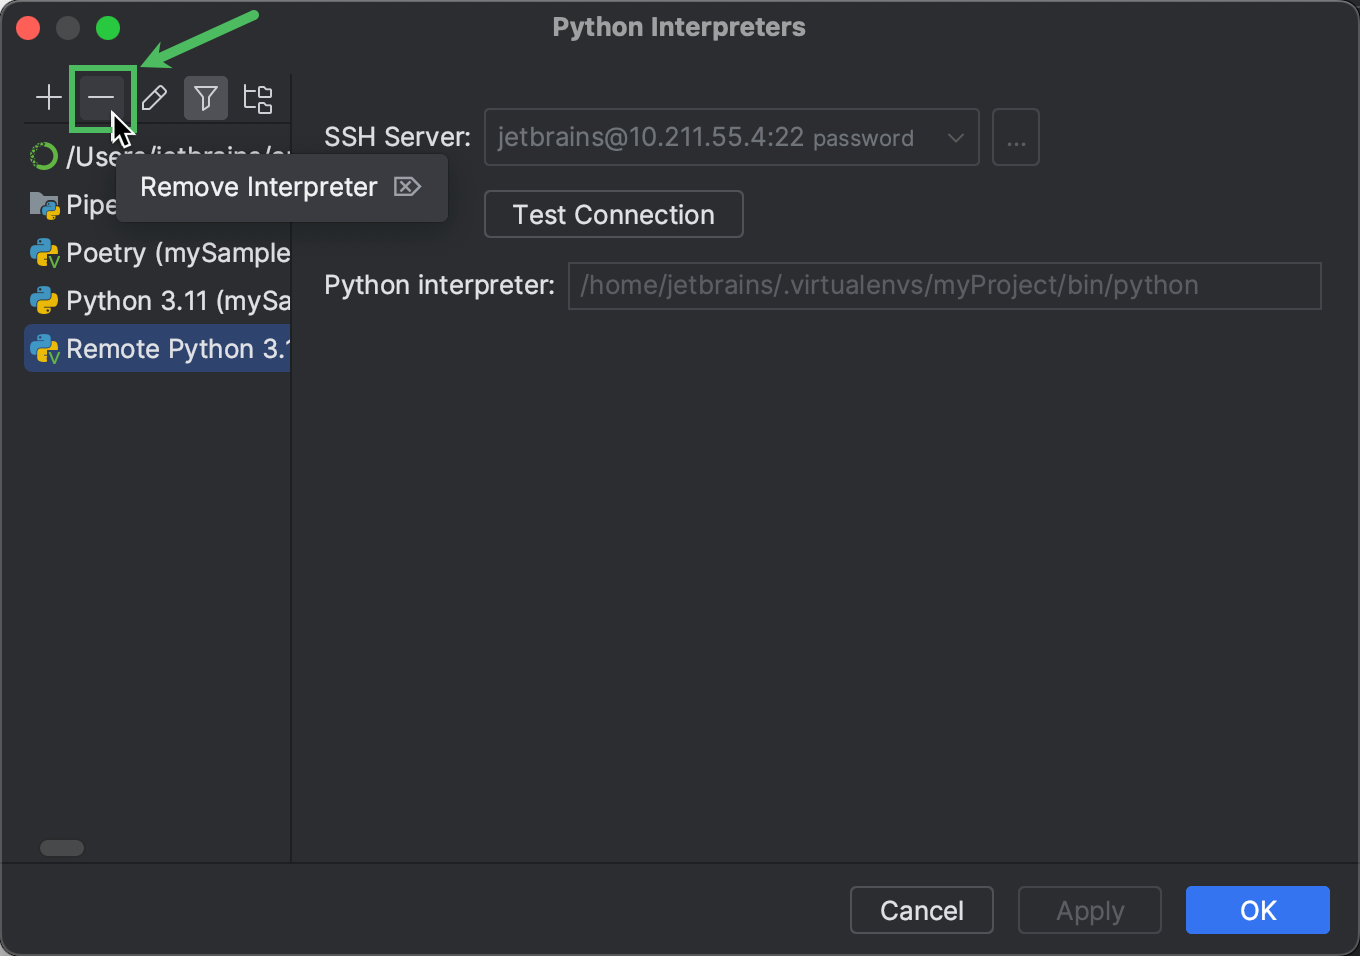
Creating a new Python interpreter
Configuring local Python interpreters
To configure a local Python interpreter for the current project, follow one of the procedures below:
Configure a system interpreter
- Ensure that you have downloaded and installed Python on your computer. Installing Python on Windows from Microsoft Store If you are on Windows, you can download Python from the Microsoft Store and install it as a Python interpreter. Once the Python application is downloaded from the Microsoft Store, it becomes available in the list of the Python executables. Note that interpreters added from the Microsoft Store installations come with some limitations. Because of restrictions on Microsoft Store apps, Python scripts may not have full write access to shared locations such as TEMP and the registry.
- Do one of the following:
- Click the Python Interpreter selector and choose Add New Interpreter .
- Press Control+Alt+S to open Settings and go to Project: | Python Interpreter . Click the Add Interpreter link next to the list of the available interpreters.
- Click the Python Interpreter selector and choose Interpreter Settings . Click the Add Interpreter link next to the list of the available interpreters.
- Select Add Local Interpreter .
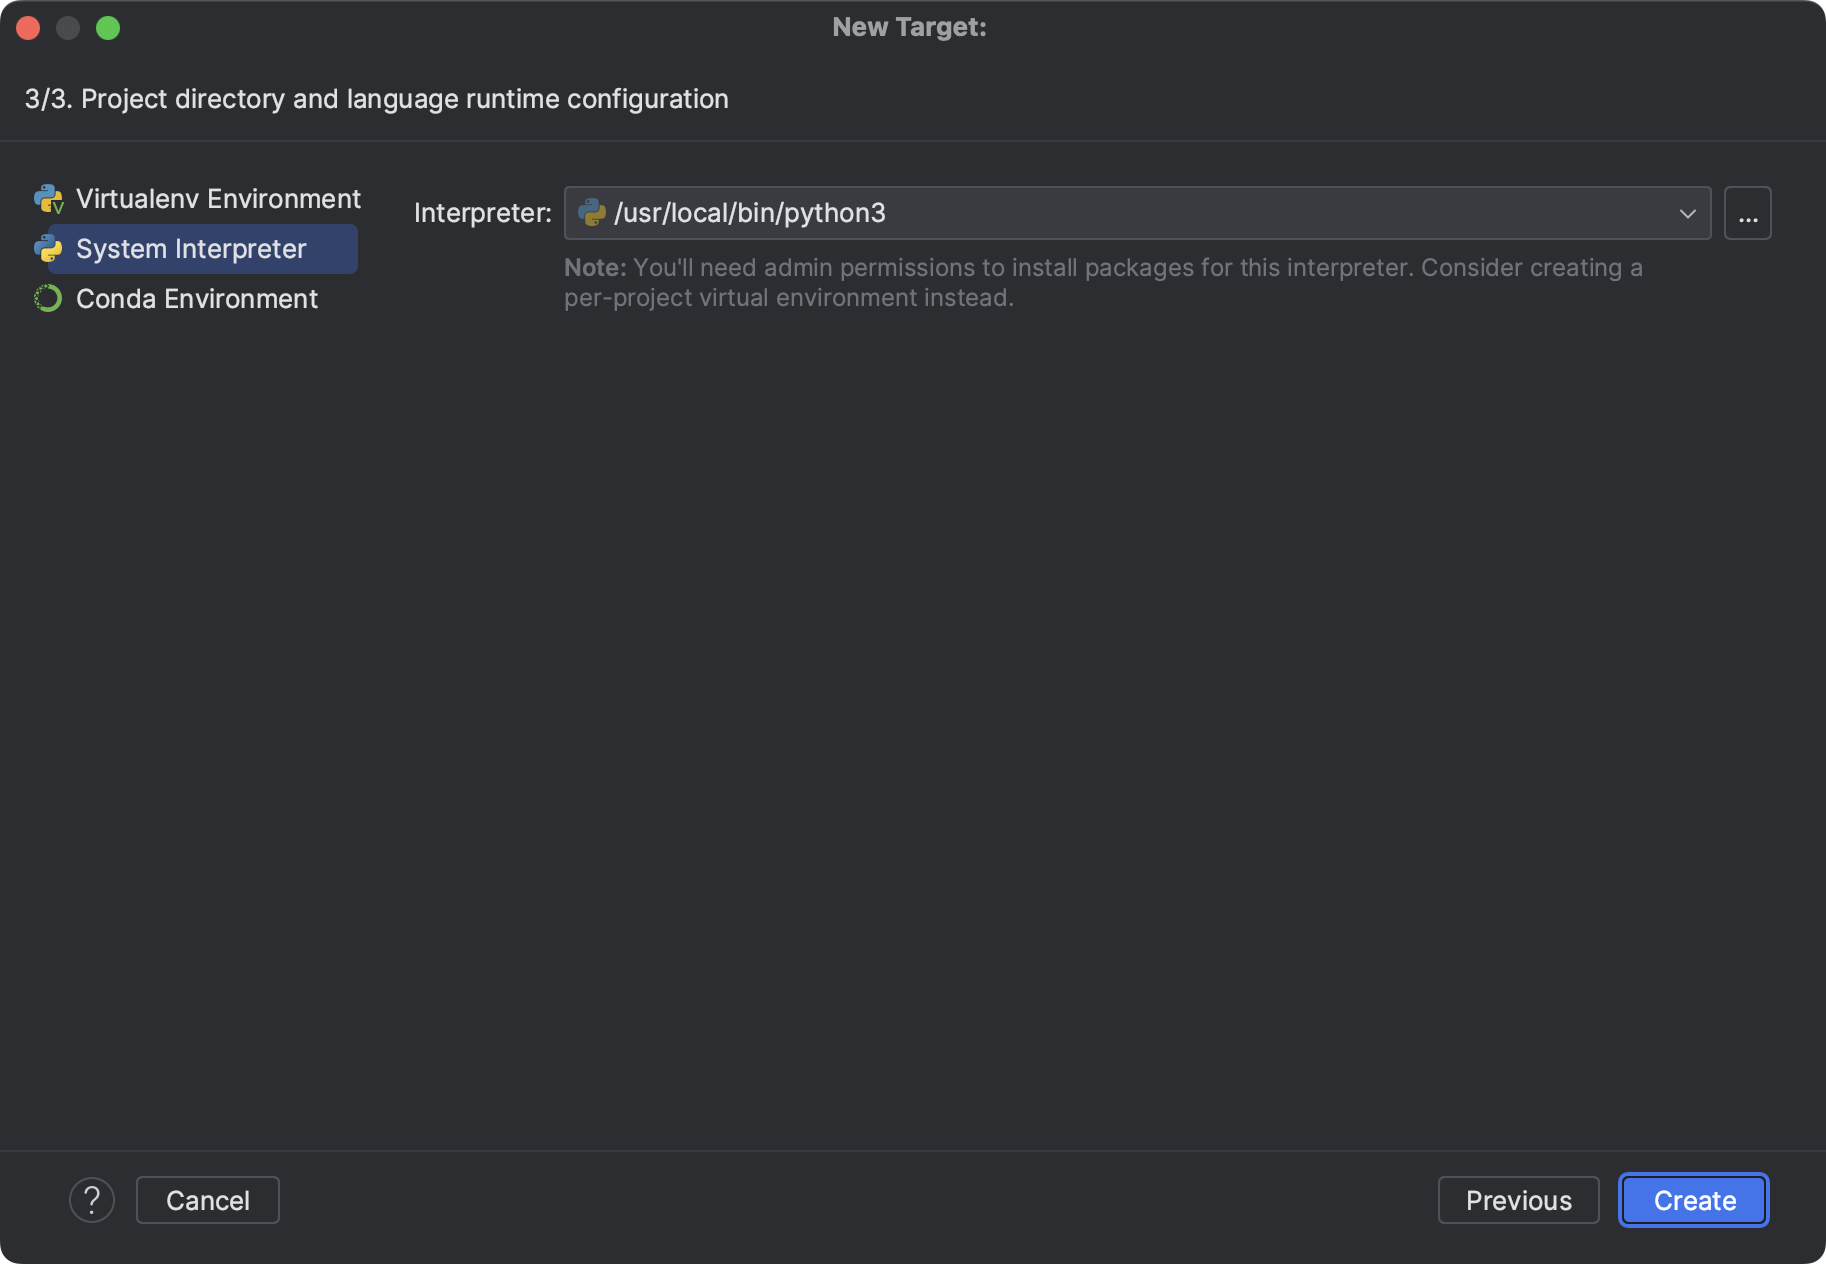
- In the left-hand pane of the Add Python Interpreter dialog, select System Interpreter .
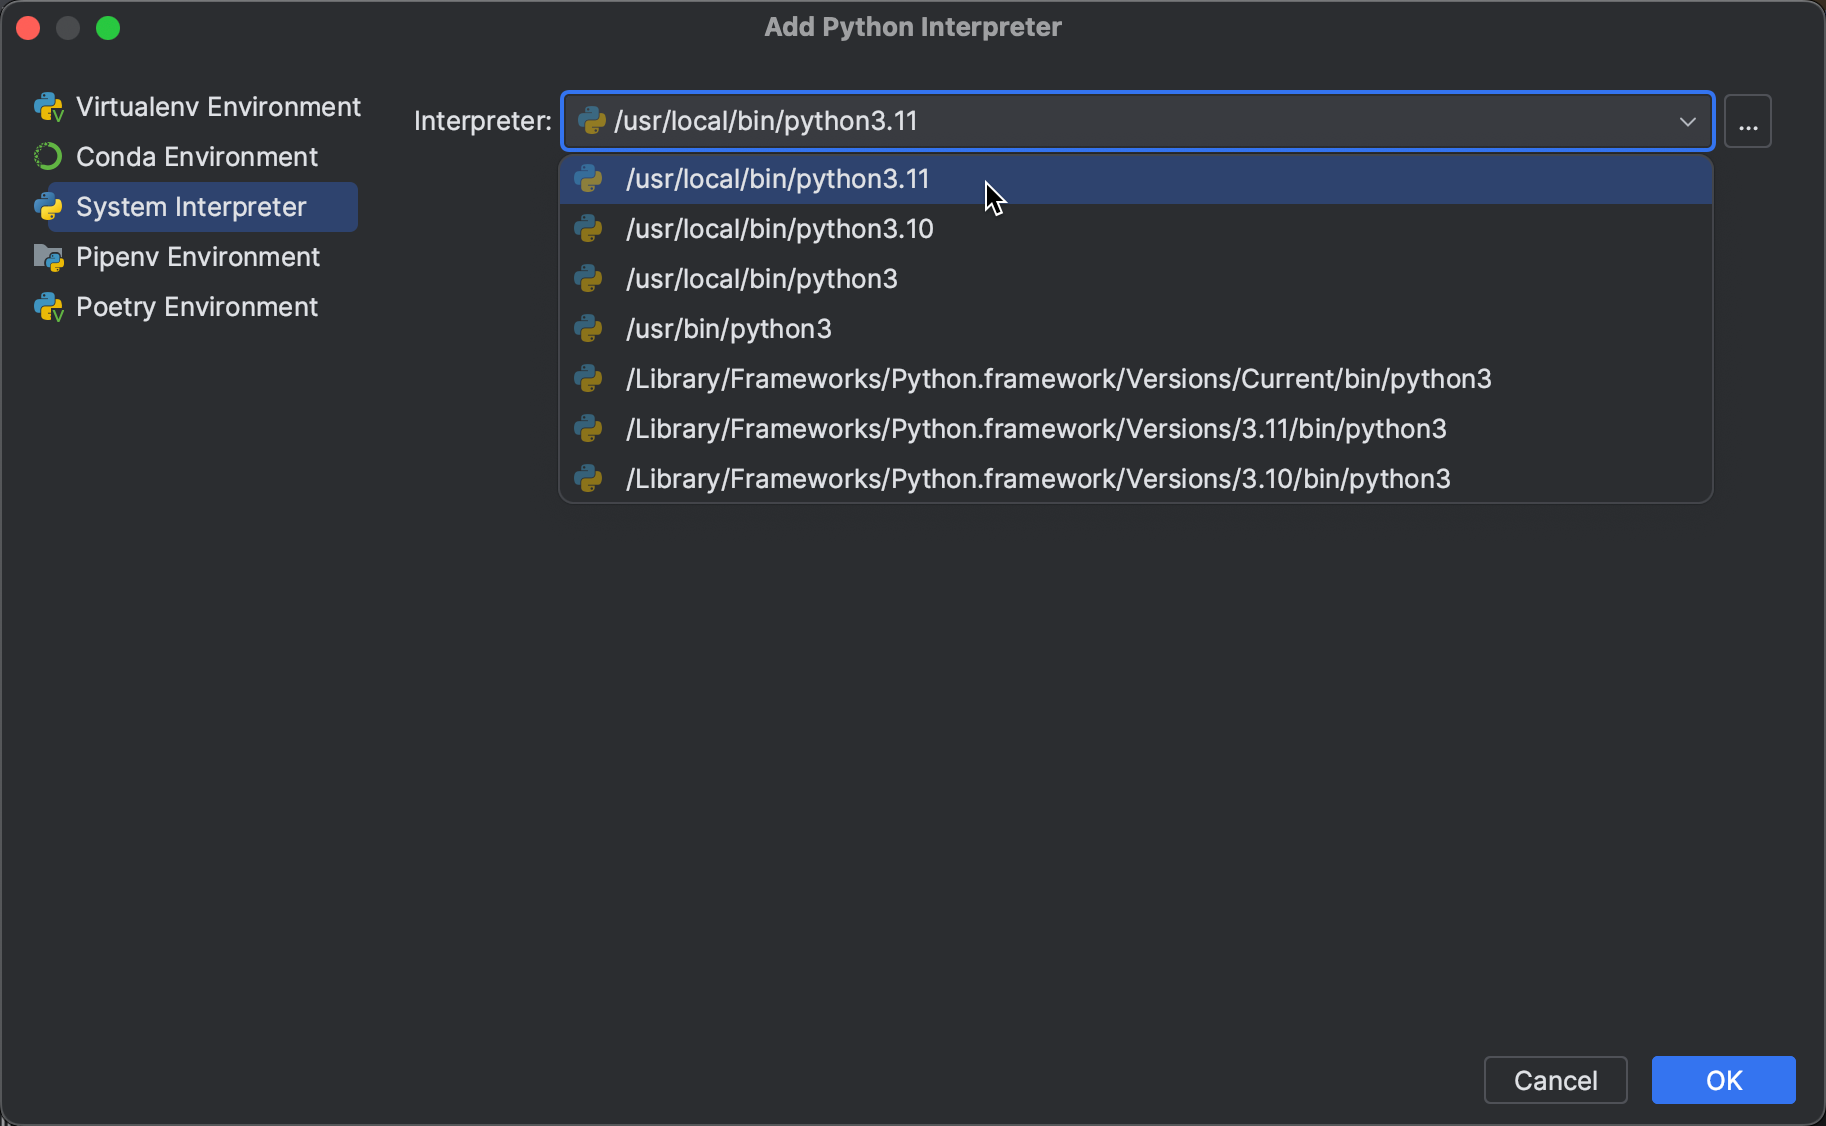
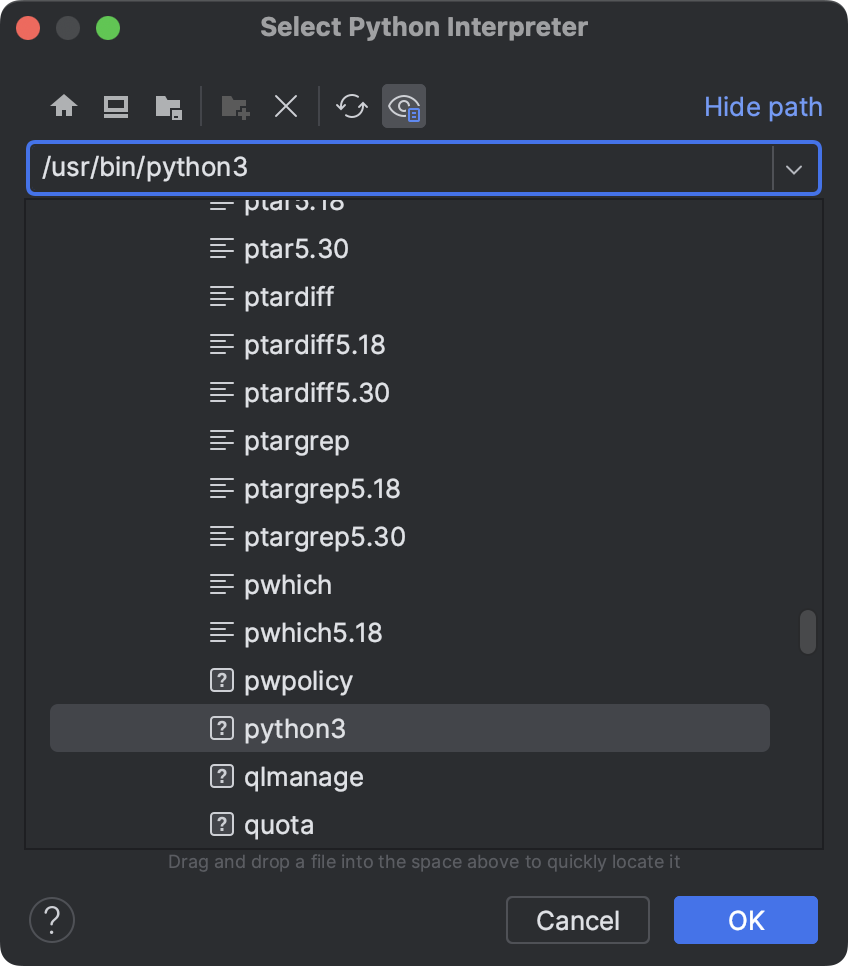
- In the Interpreter drop-down, select one of the Python interpreters that have been installed in your system, or click and in the Select Python Interpreter dialog that opens, choose the desired Python executable.
 You will need admin privileges to install, remove, and upgrade packages for the system interpreter. When attempting to install an interpreter package through an intention action, you might receive the following error message:
 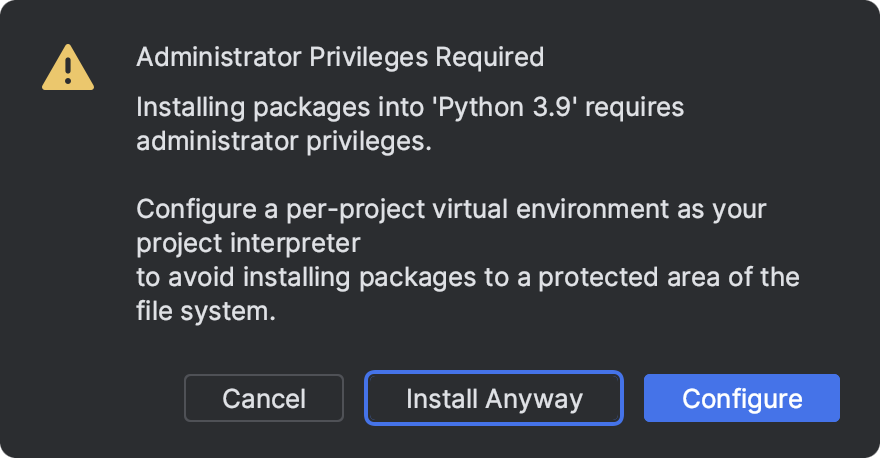 As prompted, consider using a virtual environment for your project.
 - Click OK to complete the task.
Create a virtualenv environment
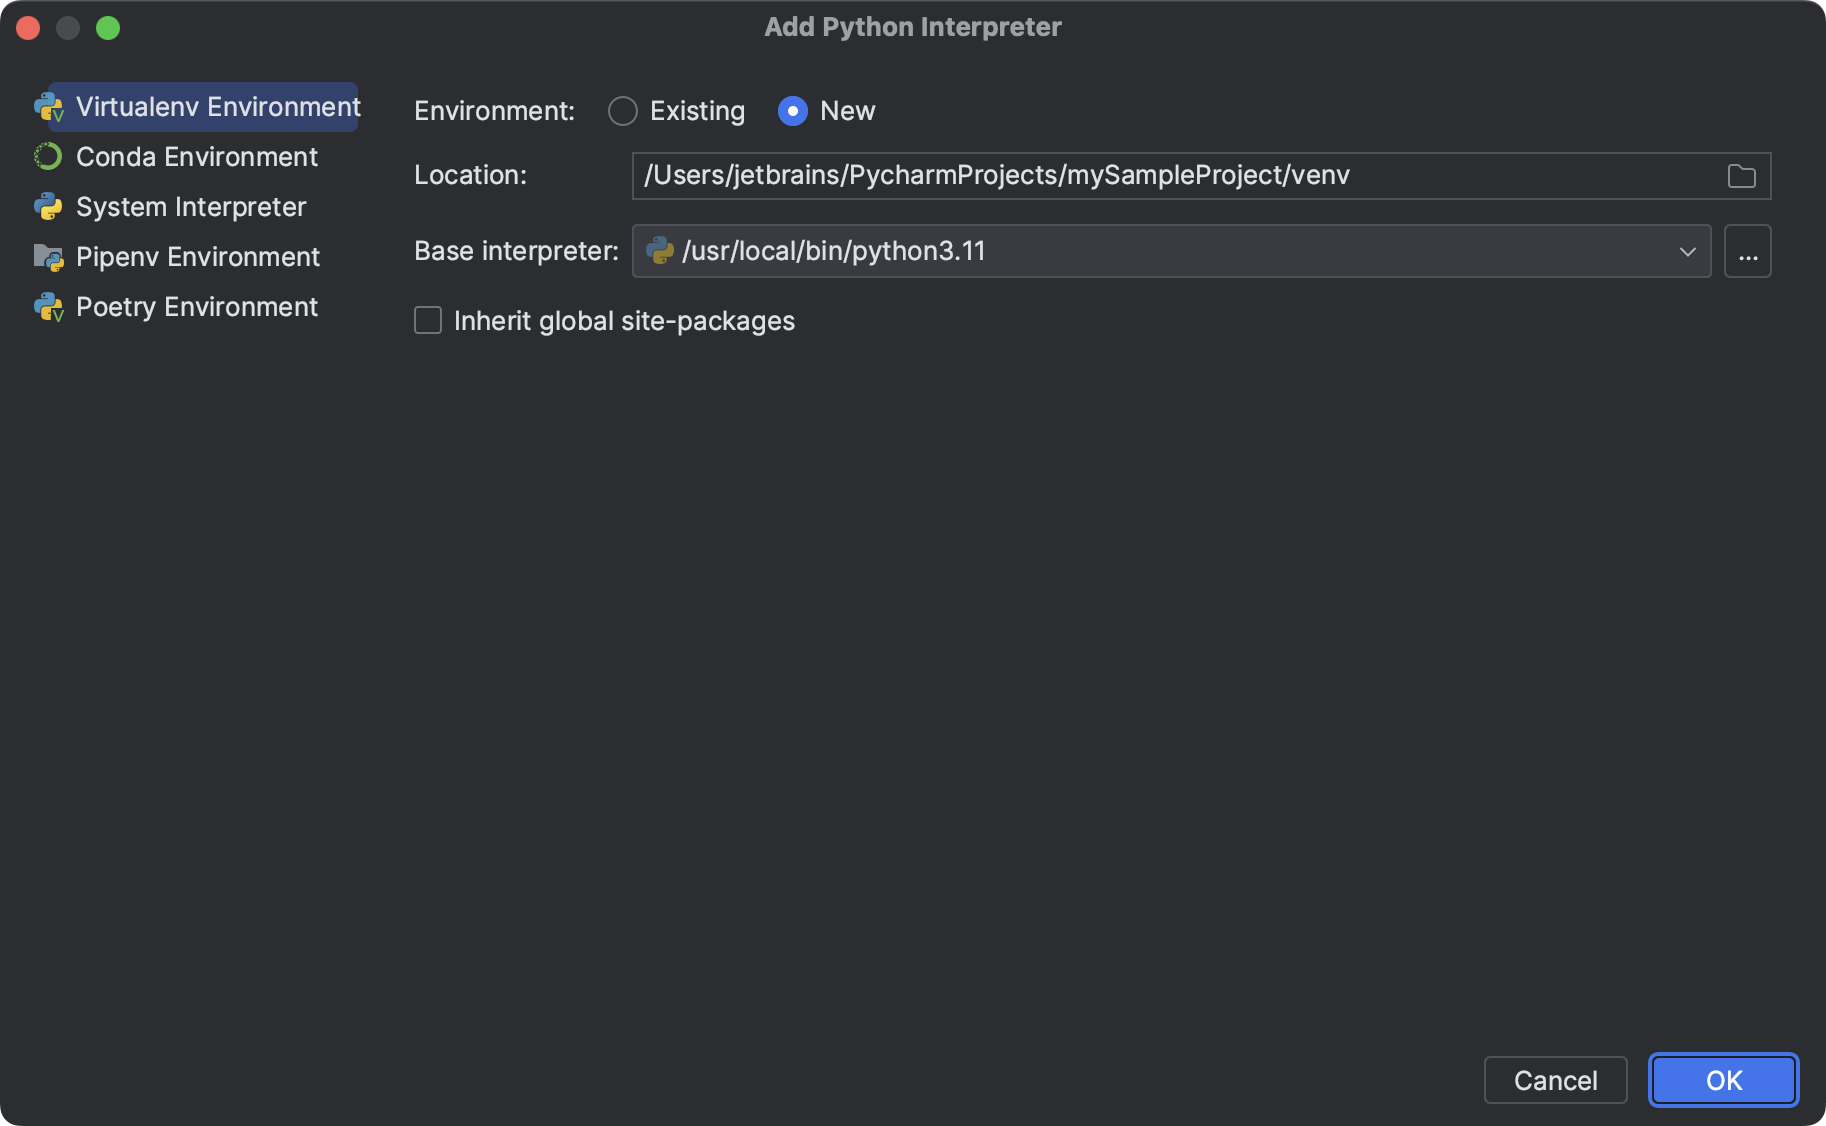
- Do one of the following:
- Click the Python Interpreter selector and choose Add New Interpreter .
- Press Control+Alt+S to open Settings and go to Project: | Python Interpreter . Click the Add Interpreter link next to the list of the available interpreters.
- Click the Python Interpreter selector and choose Interpreter Settings . Click the Add Interpreter link next to the list of the available interpreters.
- Select Add Local Interpreter .
- In the left-hand pane of the Add Python Interpreter dialog, select Virtualenv Environment .
- The following actions depend on whether you want to create a new virtual environment or to use an existing one. New virtual environment
- Specify the location of the new virtual environment in the Location field, or click and browse for the desired location in your file system. The directory for the new virtual environment should be empty.
- Choose the base interpreter from the list, or click and find the desired Python executable in your file system.
- Select the Inherit global site-packages checkbox if you want all packages installed in the global Python on your machine to be added to the virtual environment you’re going to create. This checkbox corresponds to the —system-site-packages option of the virtualenv tool.
Existing virtual environment
- Choose the desired interpreter from the list.
- If the desired interpreter is not on the list, click , and then browse for the desired Python executable (for example, venv/bin/python on macOS or venv\Scripts\python.exe on Windows).
The selected virtual environment will be reused for the current project.
If PyCharm displays the Invalid environment warning, it means that the specified Python binary cannot be found in the file system, or the Python version is not supported. Check the Python path and install a new version, if needed.
Create a conda environment
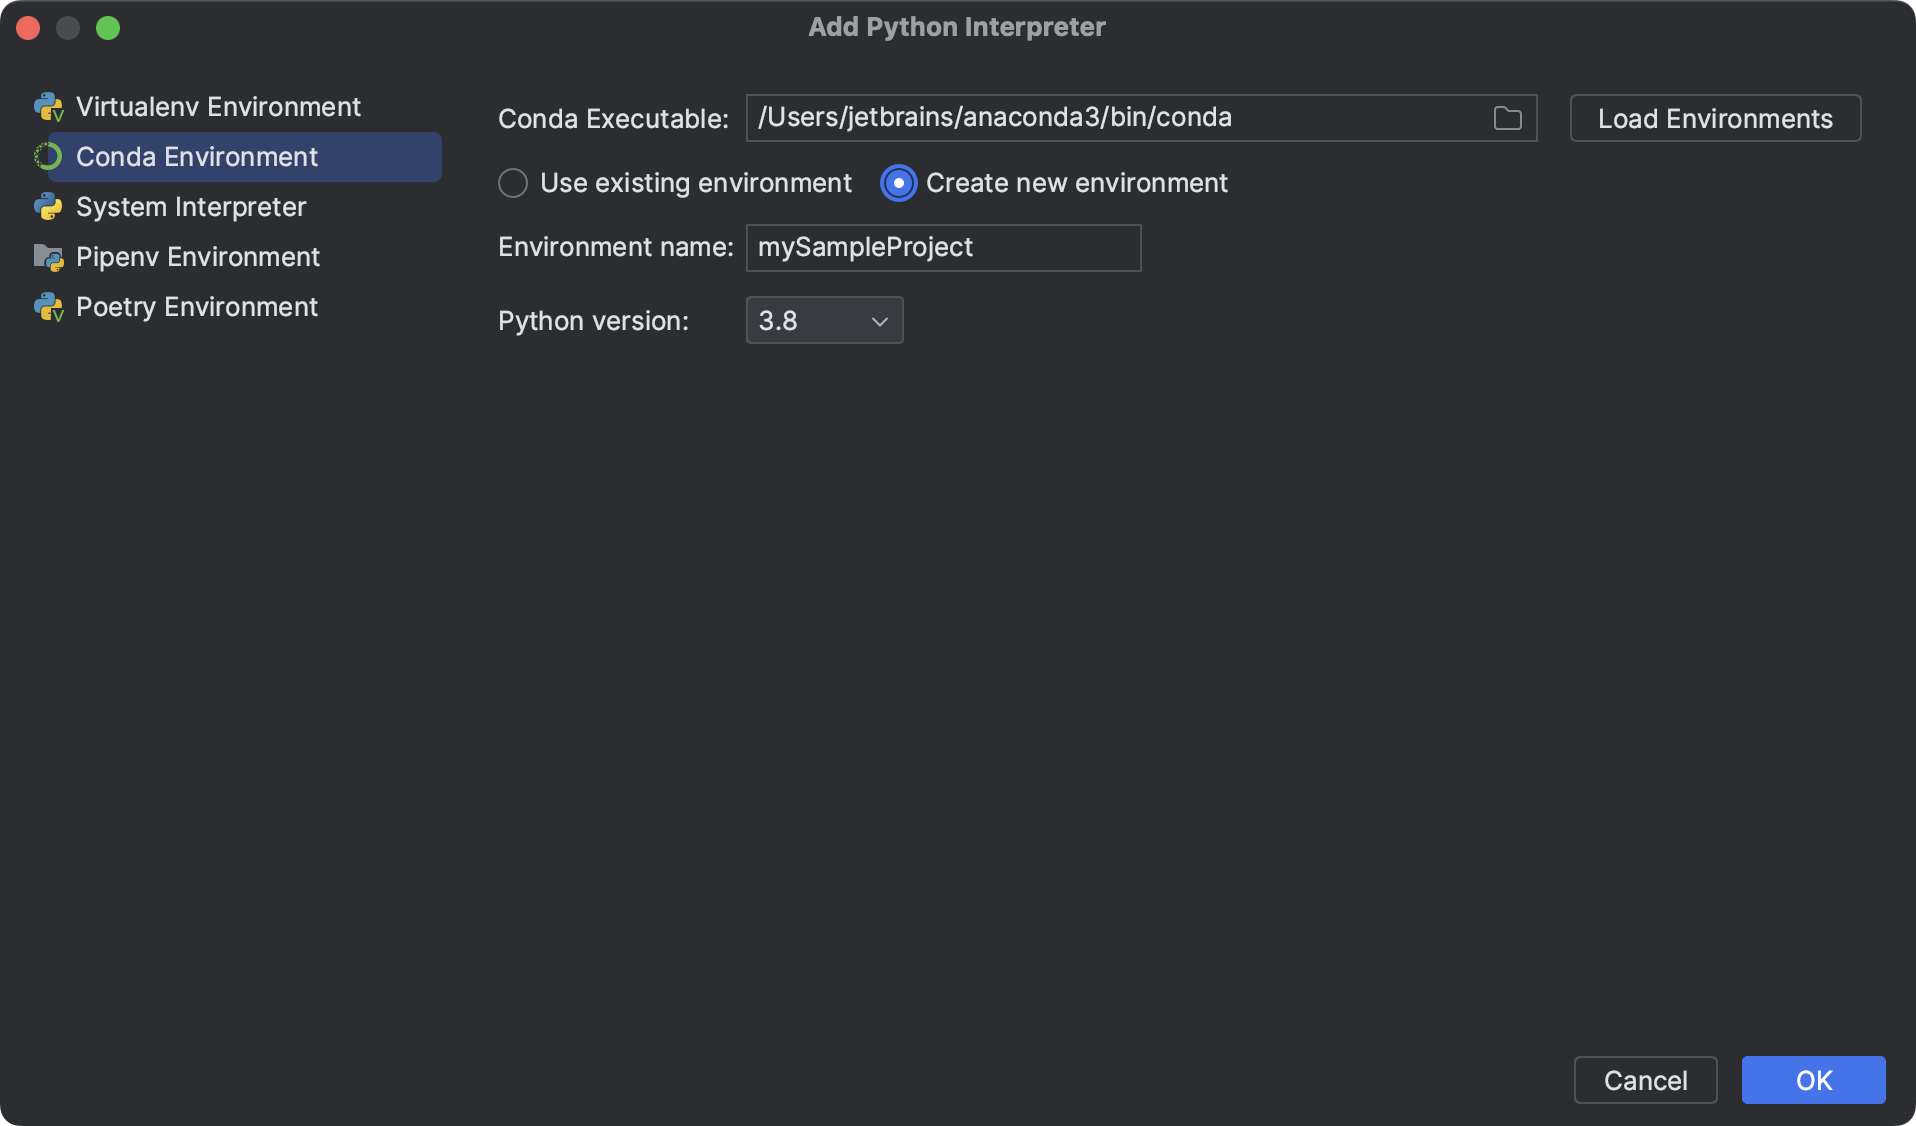
- Ensure that Anaconda or Miniconda is downloaded and installed on your computer, and you’re aware of a path to its executable file. For more information, refer to the installation instructions.
- Do one of the following:
- Click the Python Interpreter selector and choose Add New Interpreter .
- Press Control+Alt+S to open Settings and go to Project: | Python Interpreter . Click the Add Interpreter link next to the list of the available interpreters.
- Click the Python Interpreter selector and choose Interpreter Settings . Click the Add Interpreter link next to the list of the available interpreters.
- Select Add Local Interpreter .
- In the left-hand pane of the Add Python Interpreter dialog, select Conda Environment .
- The following actions depend on whether you want to create a new conda environment or to use an existing one. New conda environment
- Select the Python version from the list.
- Normally, PyCharm will detect conda installation. Otherwise, specify the location of the conda executable, or click to browse for it.
- Specify the environment name.
Existing conda environment
- Choose the desired environment from the list.
The selected conda environment will be reused for the current project.
Create a pipenv environment
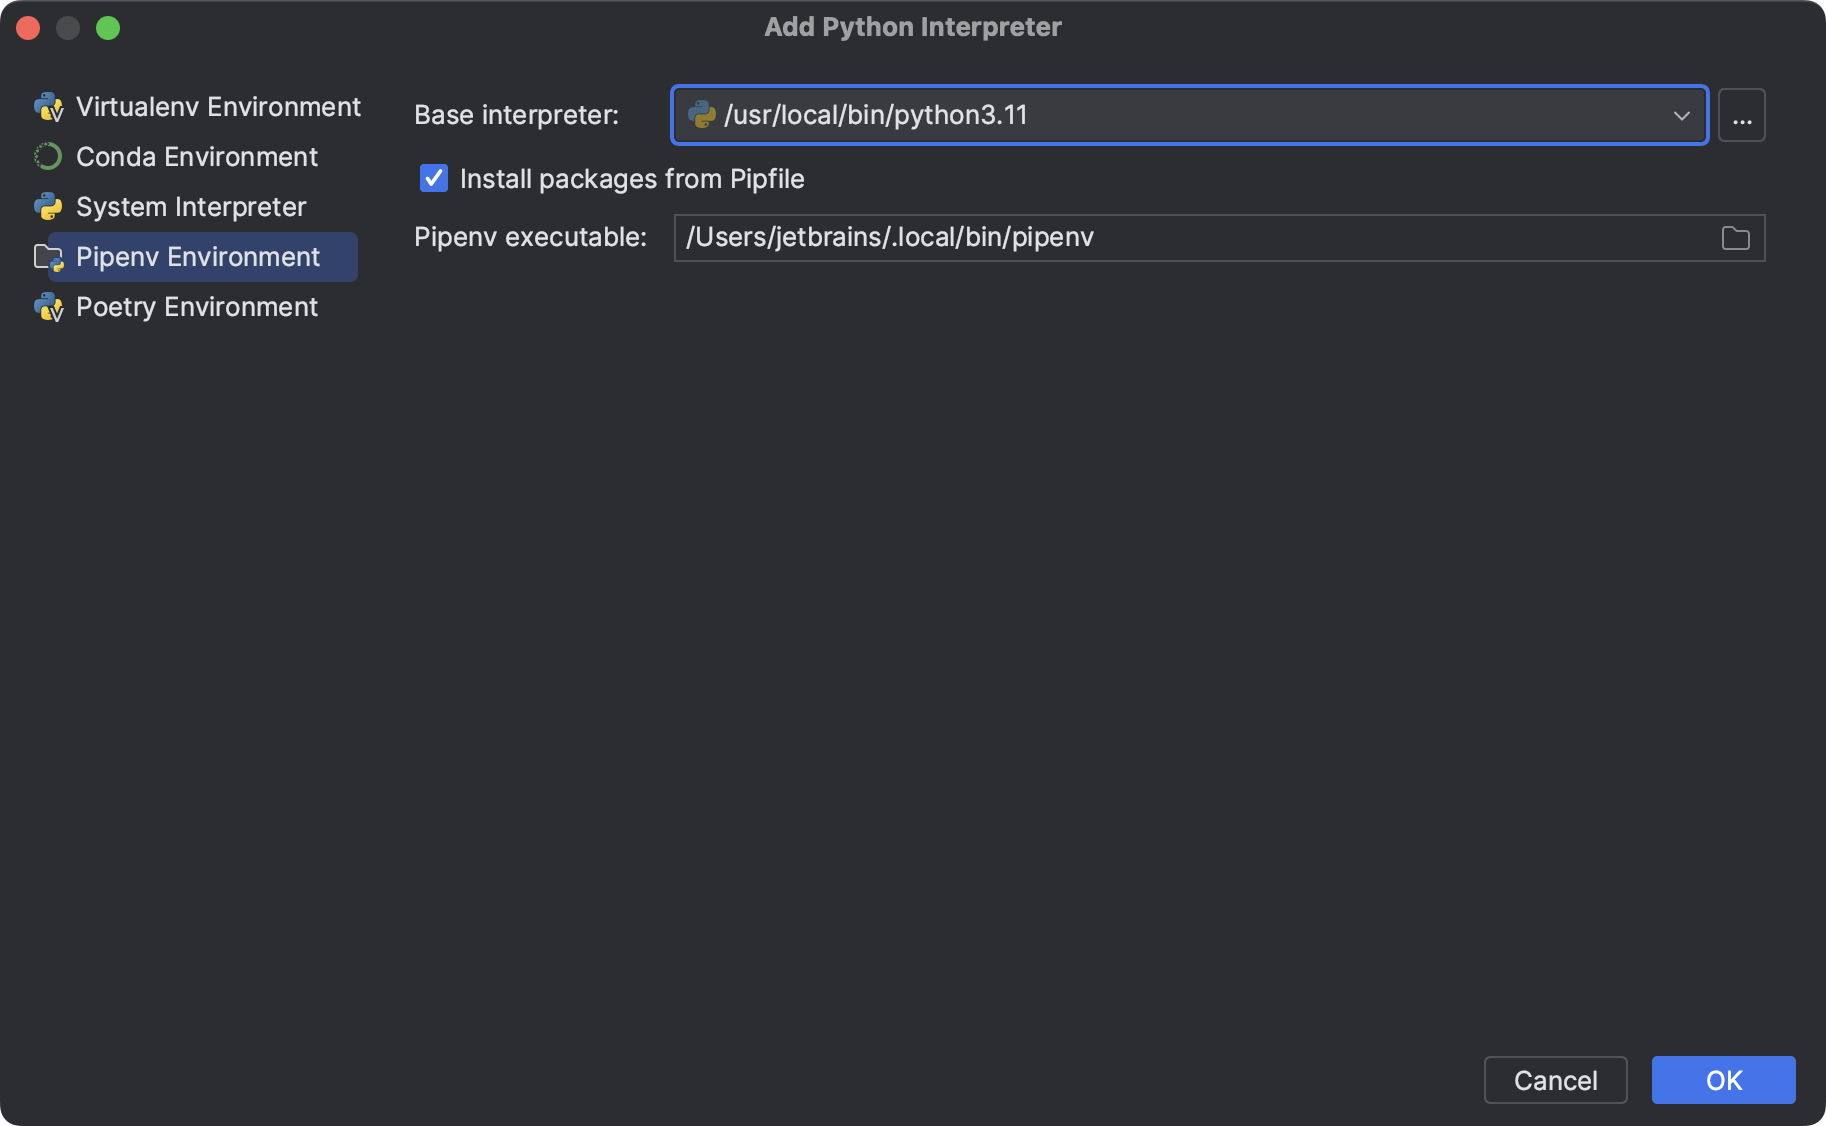
- Do one of the following:
- Click the Python Interpreter selector and choose Add New Interpreter .
- Press Control+Alt+S to open Settings and go to Project: | Python Interpreter . Click the Add Interpreter link next to the list of the available interpreters.
- Click the Python Interpreter selector and choose Interpreter Settings . Click the Add Interpreter link next to the list of the available interpreters.
- Select Add Local Interpreter .
- In the left-hand pane of the Add Python Interpreter dialog, select Pipenv Environment .
- Choose the base interpreter from the list, or click and find the desired Python executable in your file system.
- If your project contains Pipfile , you can choose whether you want to install the packages listed in it by enabling or disabling the Install packages from Pipfile checkbox. By default, the checkbox is enabled.
- If you have added the base binary directory to your PATH environmental variable, you don’t need to set any additional options: the path to the pipenv executable will be autodetected. If the pipenv executable is not found, follow the pipenv installation procedure to discover the executable path, and then paste it in the Pipenv executable field.
- Click OK to complete the task.
When you have set the pipenv virtual environment as a Python interpreter, all available packages are added from the source defined in Pipfile . The packages are installed, removed, and updated in the list of the packages through pipenv rather than through pip.
Create a Poetry environment
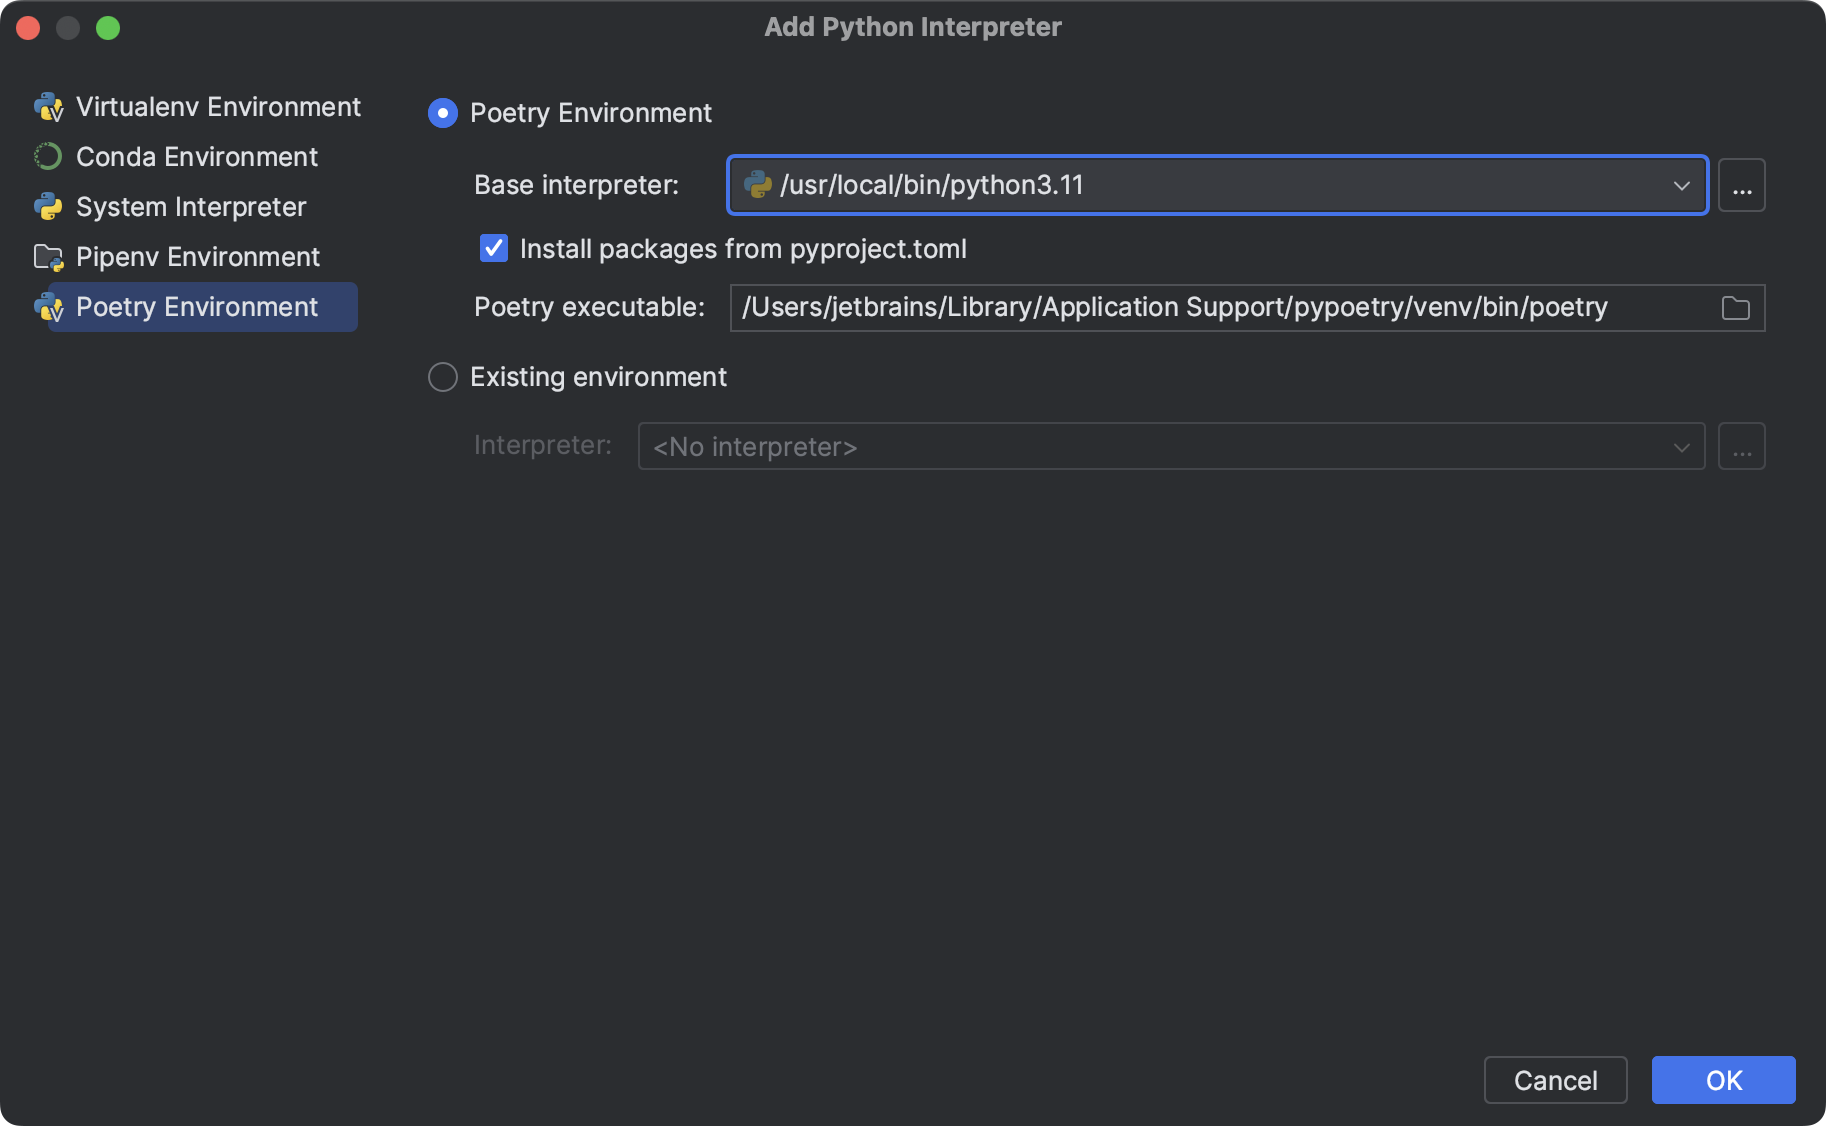
- Do one of the following:
- Click the Python Interpreter selector and choose Add New Interpreter .
- Press Control+Alt+S to open Settings and go to Project: | Python Interpreter . Click the Add Interpreter link next to the list of the available interpreters.
- Click the Python Interpreter selector and choose Interpreter Settings . Click the Add Interpreter link next to the list of the available interpreters.
- Select Add Local Interpreter .
- In the left-hand pane of the Add Python Interpreter dialog, select Poetry Environment .
- The following actions depend on whether you want to create a new Poetry environment or to use an existing one. New Poetry environment
- Select Poetry Environment .
- Choose the base interpreter from the list, or click and find the desired Python executable in your file system.
- If your project contains pyproject.toml , you can choose whether you want to install the packages listed in it by enabling or disabling the Install packages from pyproject.toml checkbox. By default, the checkbox is enabled.
- If PyCharm doesn’t detect the poetry executable, specify the following path in the Poetry executable field, replacing jetbrains with your username:
/Users/jetbrains/Library/Application Support/pypoetry/venv/bin/poetry
C:\Users\jetbrains\AppData\Roaming\pypoetry\venv\Scripts\poetry.exe
/home/jetbrains/.local/bin/poetry
- Make sure that the project directory contains a pyproject.toml file.
- Select Existing environment . Then expand the Interpreter list and choose the desired interpreter.
- If the desired interpreter is not on the list, click, and then browse for the Python executable within the previously configured Poetry environment.
The selected Poetry environment will be reused for the current project.
Configuring remote Python interpreters
When a remote Python interpreter is added, at first the PyCharm helpers are copied to the remote host. PyCharm helpers are needed to run remotely the packaging tasks, debugger, tests and other PyCharm features.
Next, the skeletons for binary libraries are generated and copied locally. Also, all the Python library sources are collected from the Python paths on a remote host and copied locally along with the generated skeletons. Storing skeletons and all Python library sources locally is required for resolve and completion to work correctly.
PyCharm checks the remote helpers version on every remote run, so if you update your PyCharm version, the new helpers will be uploaded automatically, and you don’t need to recreate remote interpreter.
Configure a WSL interpreter
- Do one of the following:
- Click the Python Interpreter selector and choose Add New Interpreter .
- Press Control+Alt+S to open Settings and go to Project: | Python Interpreter . Click the Add Interpreter link next to the list of the available interpreters.
- Click the Python Interpreter selector and choose Interpreter Settings . Click the Add Interpreter link next to the list of the available interpreters.
- Select On WSL .
- Wait until PyCharm detects Linux on your machine and completes introspection. Press Next to proceed:

- In the left-hand pane of the dialog, select the type of the WSL interpreter you want to create: Virtual Environment , Conda Environment , or System Interpreter .
 For a system interpreter, just provide the path to the Python executable in the selected Linux distribution. For virtual and conda environments, you can provide a path to a Python executable of an existing environment in the selected Linux distribution or create a new environment based on the specified Python.
Once done, the new interpreter will be added to your project, and the default mnt mappings will be set.
Configure an interpreter using Vagrant
- Ensure that the following prerequisites are met (outside of PyCharm):
- One of supported Vagrant providers is installed on your computer.
- Vagrant is installed on your computer, and all the necessary infrastructure is created.
- The parent folders of the following executable files have been added to the system PATH variable:
- vagrant.bat or vagrant from your Vagrant installation. This should be done automatically by the installer.
- VBoxManage.exe or VBoxManage from your Oracle’s VirtualBox installation.
- The required virtual boxes are created.
- Make sure that the Vagrant plugin is enabled.
- Ensure that you have properly initiated and started Vagrant. Basically, you need to open the Terminal window and execute the following commands:
$ vagrant init ubuntu/trusty64
$ vagrant up
For more information, refer to Vagrant documentation.
- Click the Python Interpreter selector and choose Add New Interpreter .
- Press Control+Alt+S to open Settings and go to Project: | Python Interpreter . Click the Add Interpreter link next to the list of the available interpreters.
- Click the Python Interpreter selector and choose Interpreter Settings . Click the Add Interpreter link next to the list of the available interpreters.
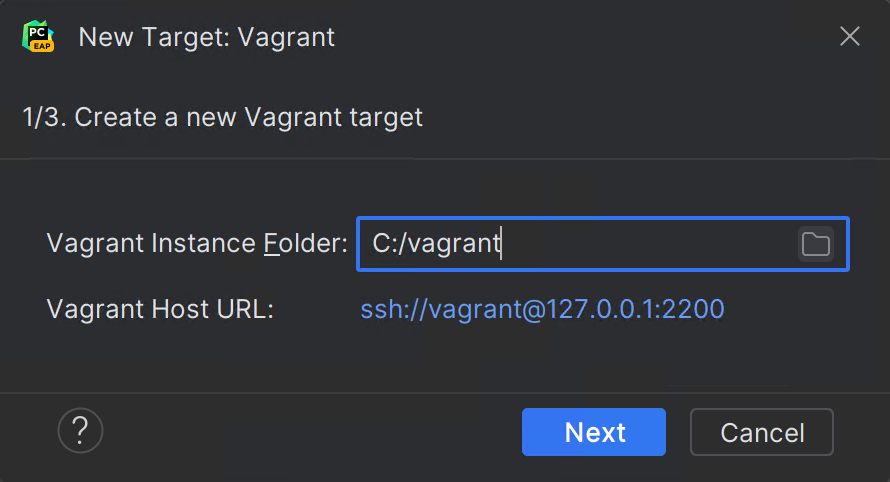
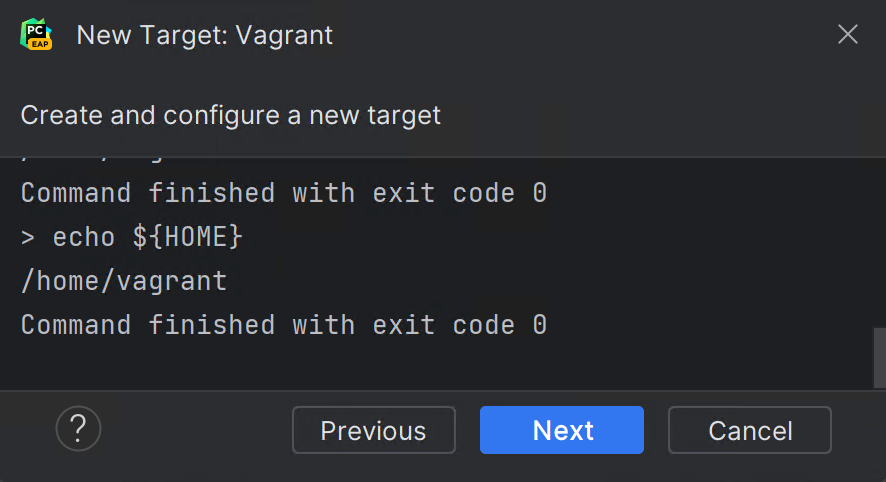
 Clik Create to complete the task.
Configure an interpreter using SSH
- Ensure that there is an SSH server running on a remote host, since PyCharm runs remote interpreters via ssh-sessions.
- Do one of the following:
- Click the Python Interpreter selector and choose Add New Interpreter .
- Press Control+Alt+S to open Settings and go to Project: | Python Interpreter . Click the Add Interpreter link next to the list of the available interpreters.
- Click the Python Interpreter selector and choose Interpreter Settings . Click the Add Interpreter link next to the list of the available interpreters.
- Select On SSH .
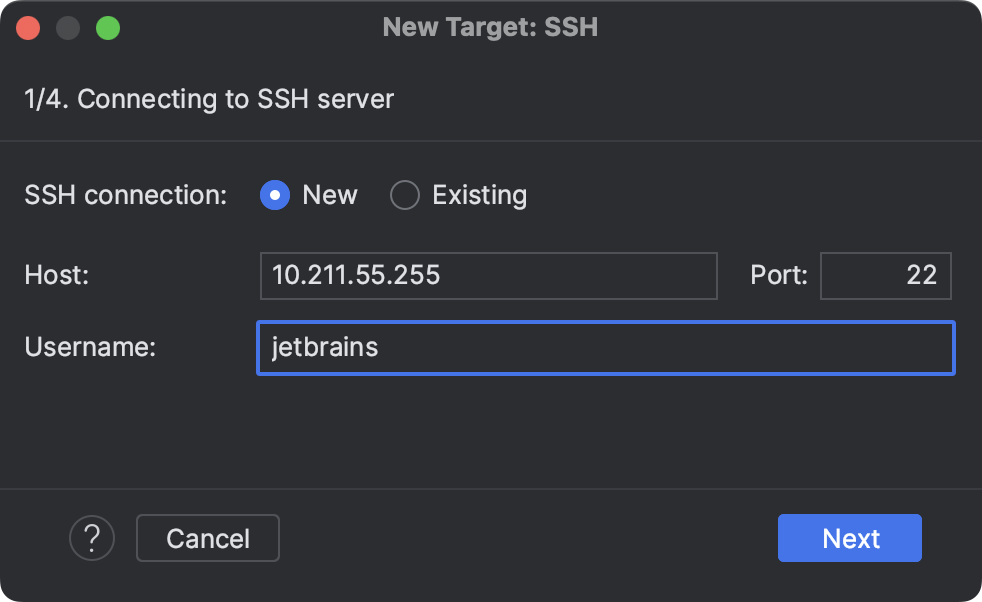
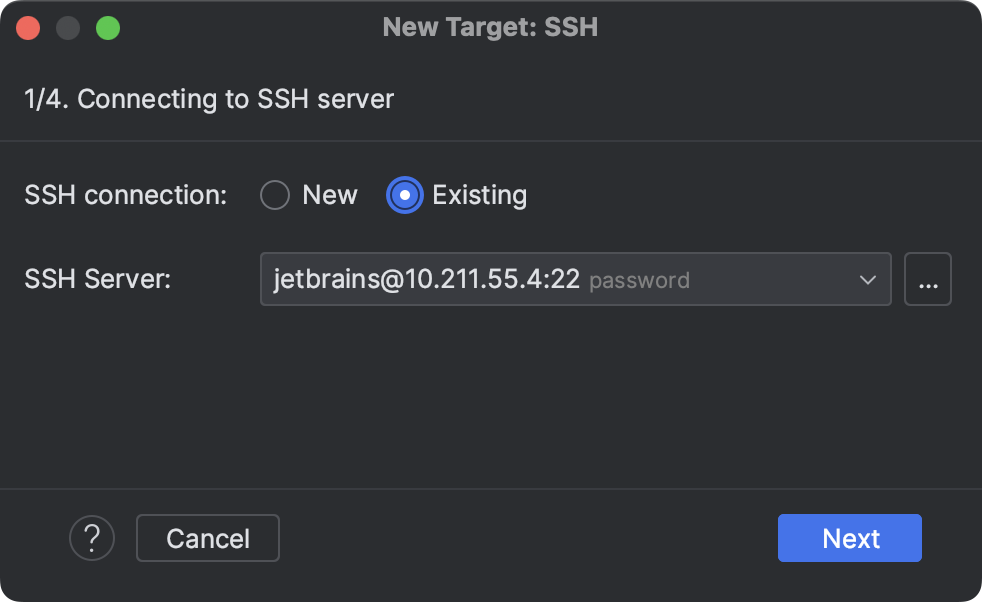
- Select an option to create a new SSH connection, then specify server information (host, port, and username).
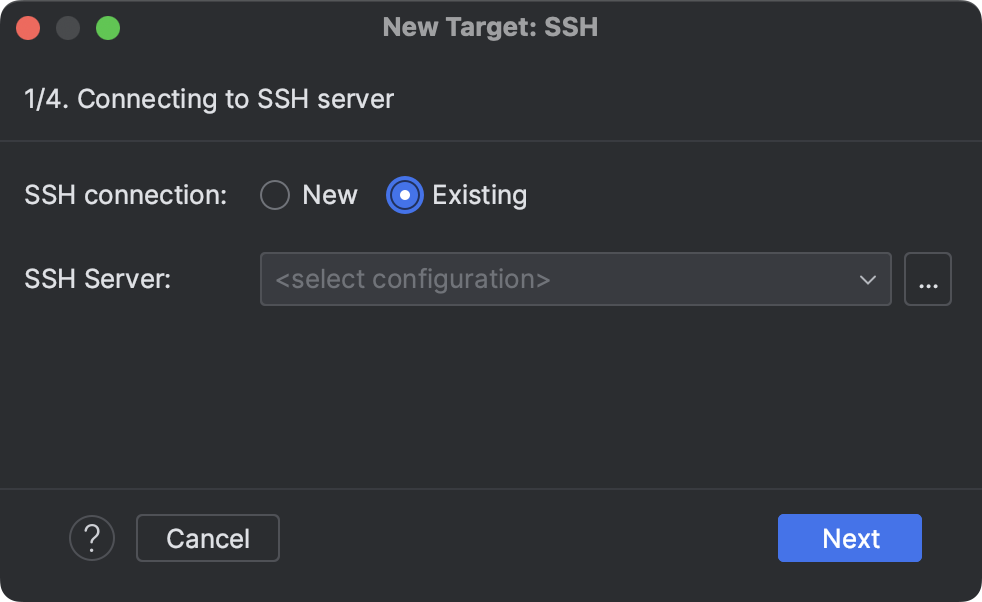
 Alternatively, you can select Existing and choose any available SSH configuration from the list. To create a new SSH configuration, follow the steps below: Creating an SSH configuration
- Click next to the list of configurations:
- Click, disable the Visible only for this project checkbox, and fill in the required fields:
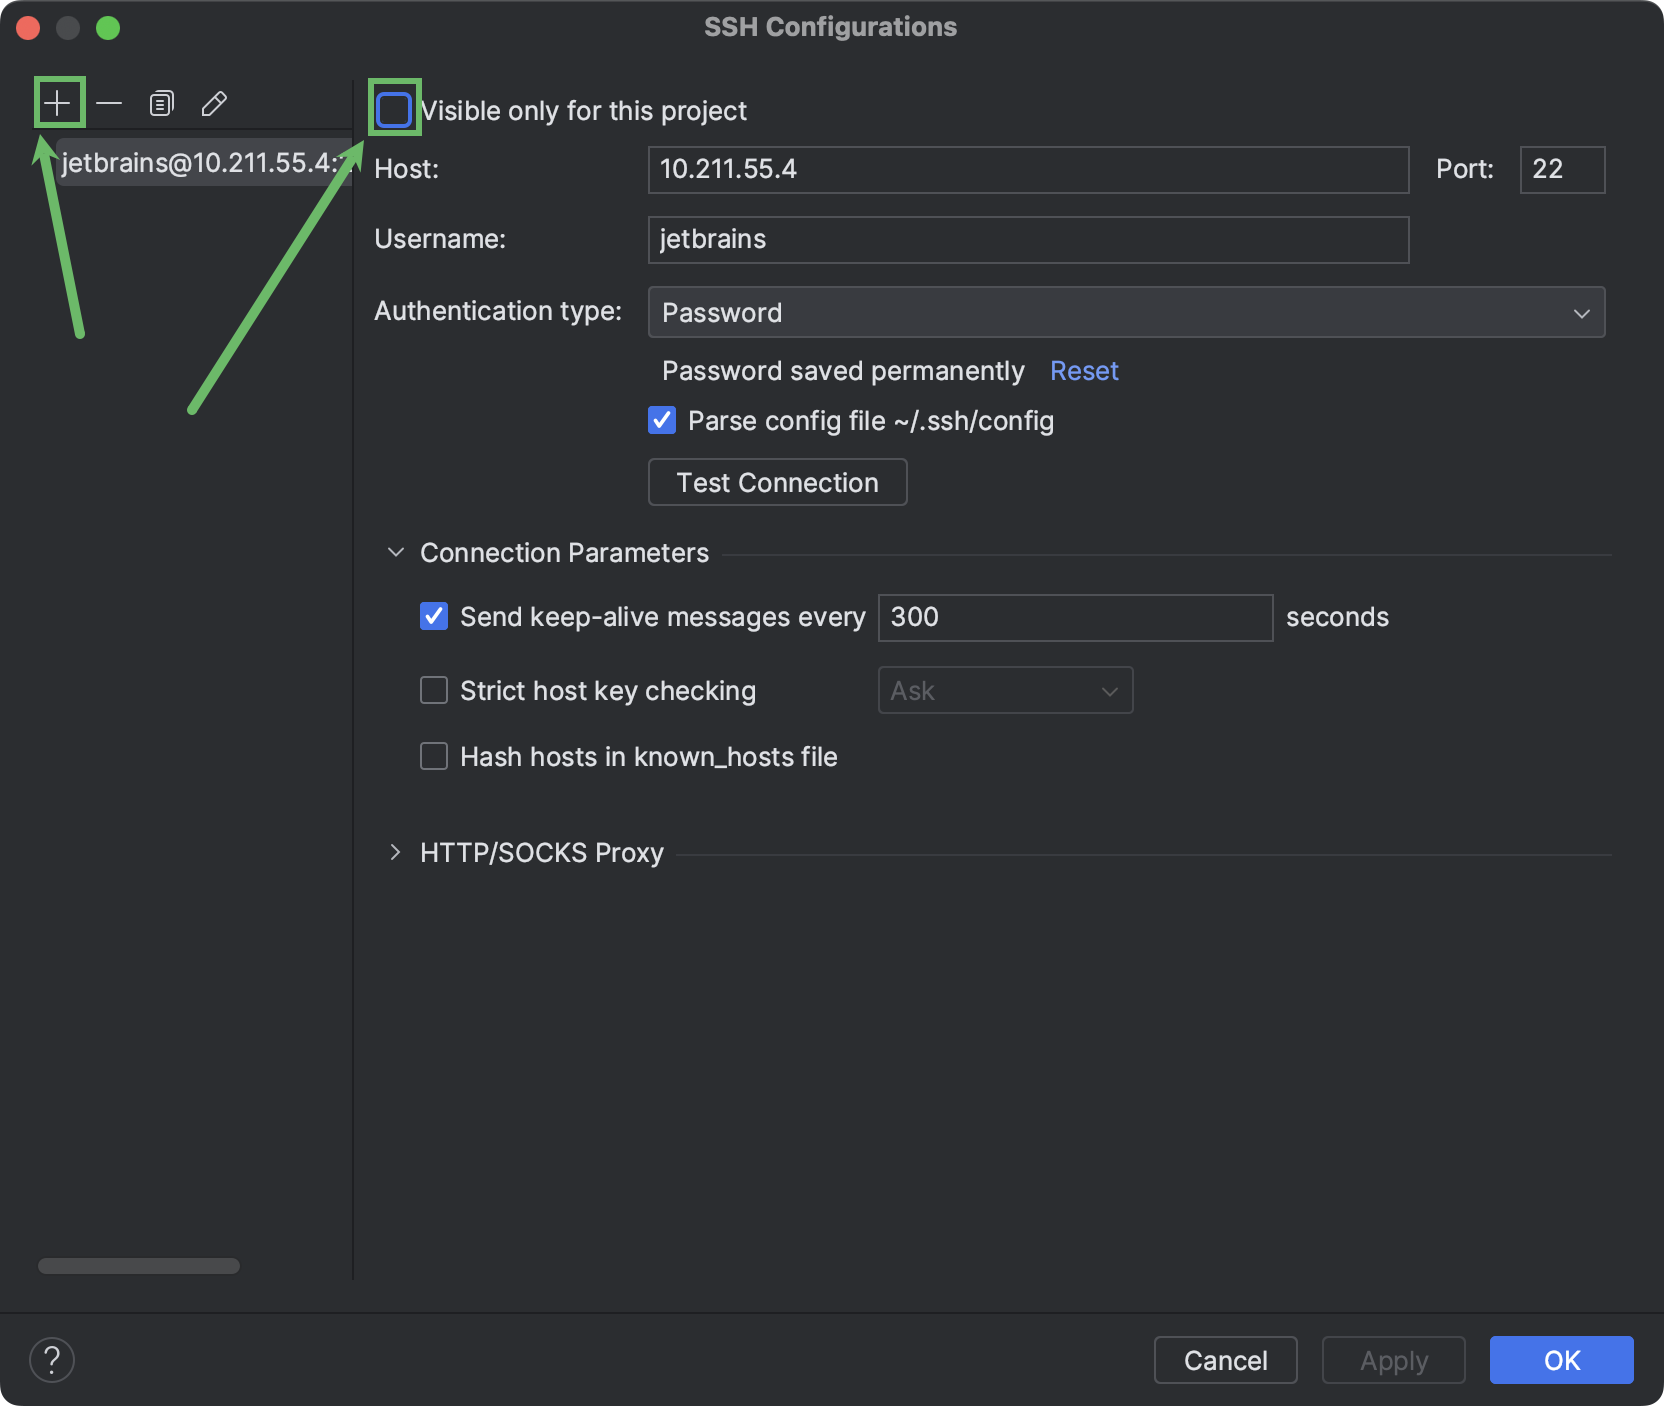
- Once done, the newly created SSH configuration will appear in the list of available configurations. It will also become available in the SSH Deployment Configurations settings. Click Next to proceed:
- Click next to the list of configurations:
- In the next dialog window, provide the authentication details to connect to the target server.
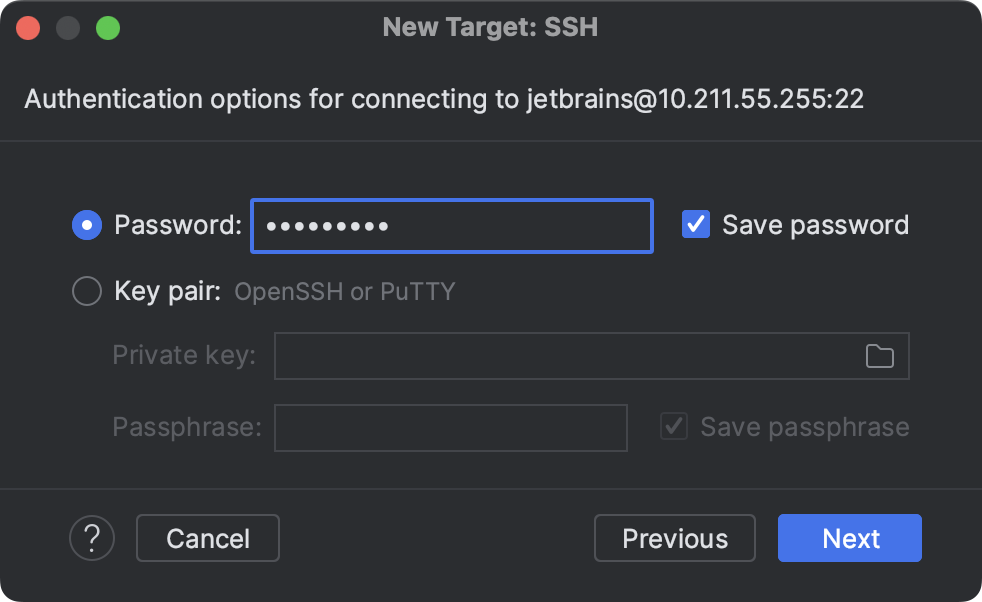 Select Password or Key pair (OpenSSH or PuTTY) and enter your password or passphrase. If Key pair (OpenSSH or PuTTY) is selected, specify:
- Private key : location of the file with a private key
- Passphrase : similar to a password, it serves to encrypt the private key.
Click Next to proceed.
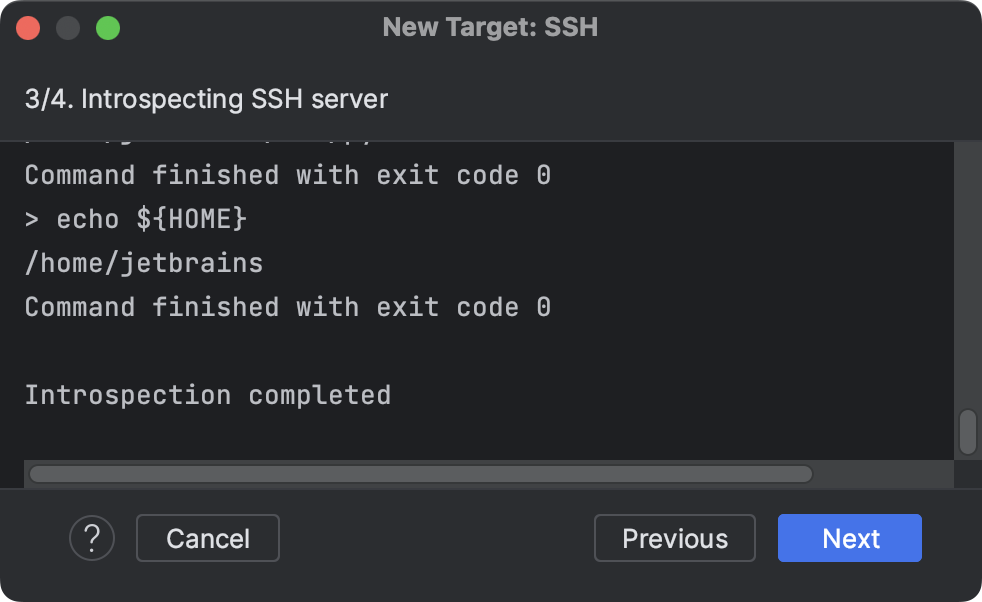
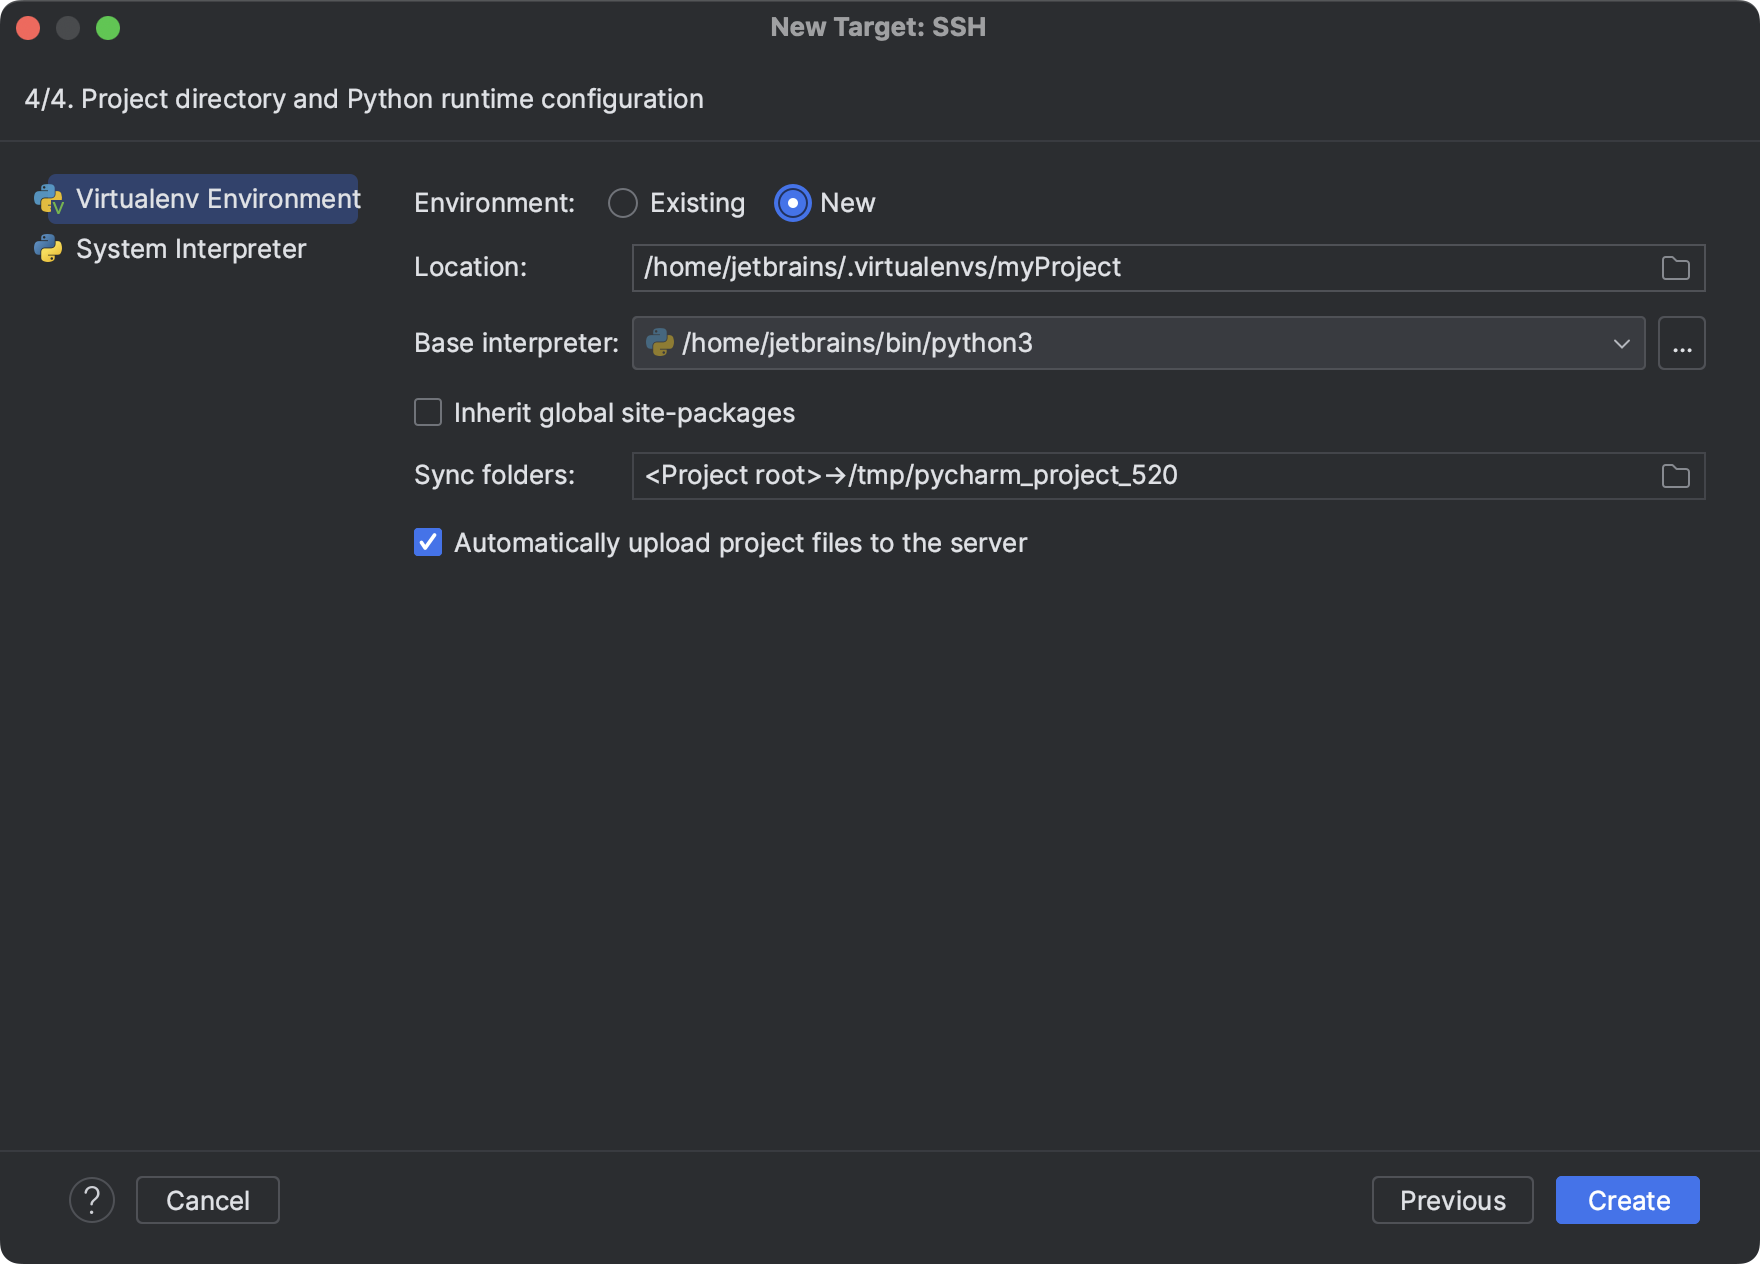 You can create a new virtual environment, select an existing one, or use a system interpreter.
- Select the Inherit global site-packages checkbox if you want all packages installed in the global Python on your machine to be added to the virtual environment you’re going to create. This checkbox corresponds to the —system-site-packages option of the virtualenv tool.
- You can configure the path mappings between your local project and the server. To do that, click the Browse icon in the Sync folders field and enter the path to the local project folder and the path to the folder on the remote server.
Click Create to complete adding the interpreter.
Configure an interpreter using Docker
- Do one of the following:
- Click the Python Interpreter selector and choose Add New Interpreter .
- Press Control+Alt+S to open Settings and go to Project: | Python Interpreter . Click the Add Interpreter link next to the list of the available interpreters.
- Click the Python Interpreter selector and choose Interpreter Settings . Click the Add Interpreter link next to the list of the available interpreters.
- Select On Docker .
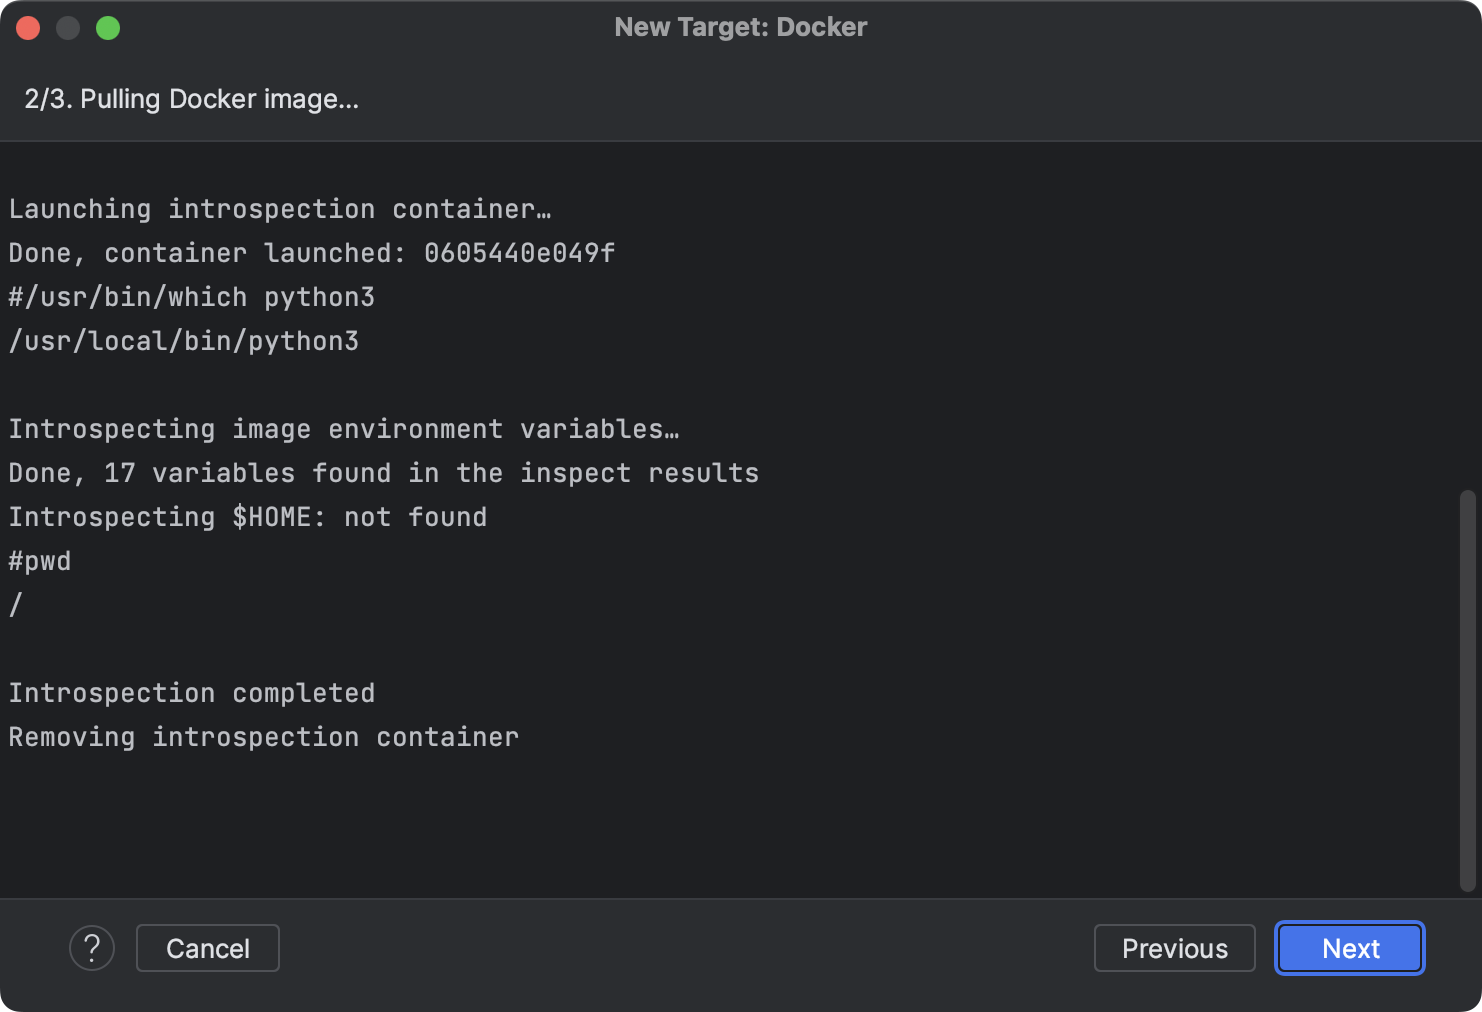
- Select an existing Docker configuration in the Docker server dropdown. Alternatively, click and perform the following steps to create a new Docker configuration: Create a Docker configuration Click to add a Docker configuration and specify how to connect to the Docker daemon. The connection settings depend on your Docker version and operating system. For more information, refer to Docker connection settings. The Connection successful message should appear at the bottom of the dialog.
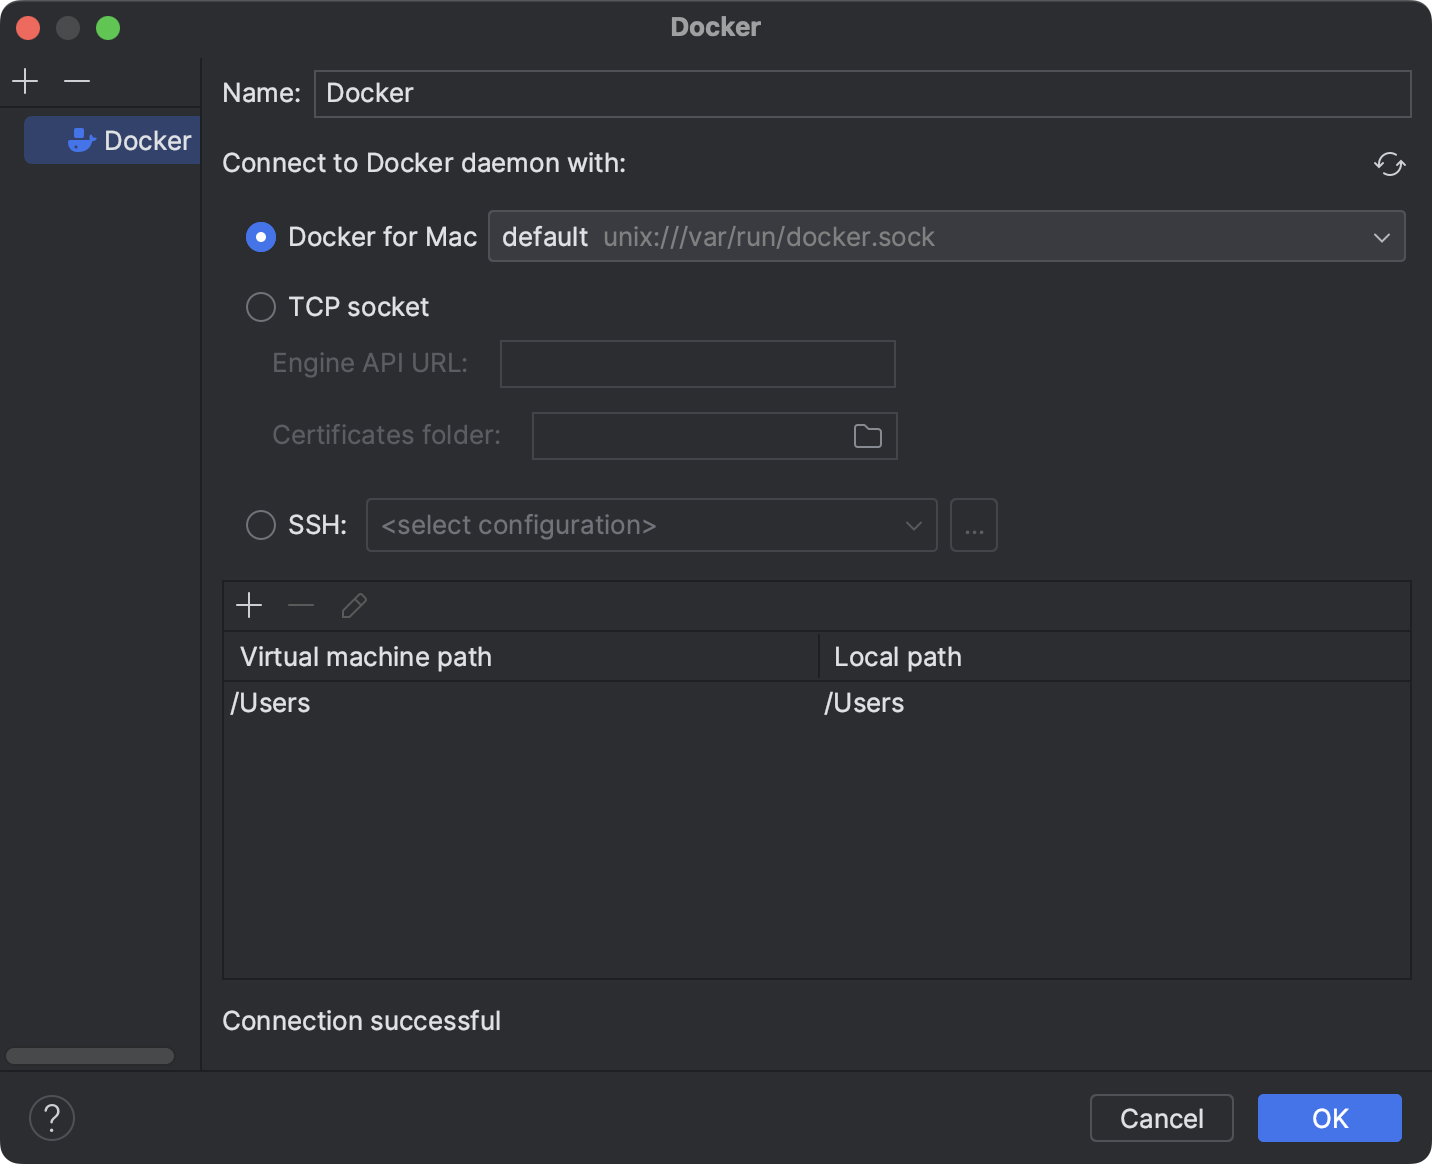 For more information about mapping local paths to the virtual machine running the Docker daemon when using Docker on Windows or macOS, refer to Virtual machine path mappings for Windows and macOS hosts. You will not be able to use volumes and bind mounts for directories outside of the mapped local path. This table is not available on a Linux host, where Docker runs natively and you can mount any directory to the container.
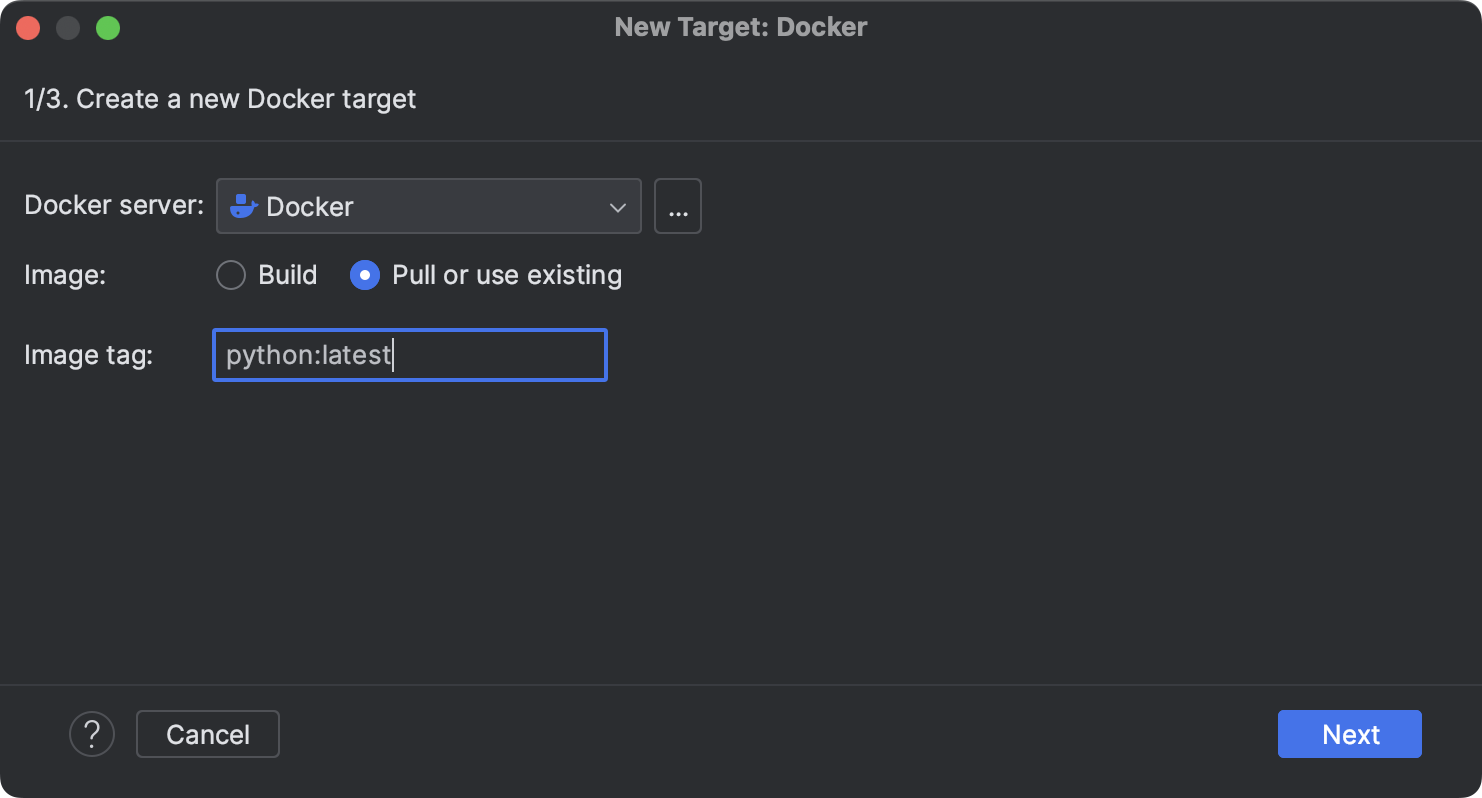
 - The following actions depend on whether you want to pull a pre-built image from a Docker registry or to build an image locally from a Dockerfile. Pull a Docker image Select Pull or use existing and specify the tag of the desired image in the Image tag field.
 Build a Docker image Select Build and change the default values in the Dockerfile and Context folder fields if necessary.
 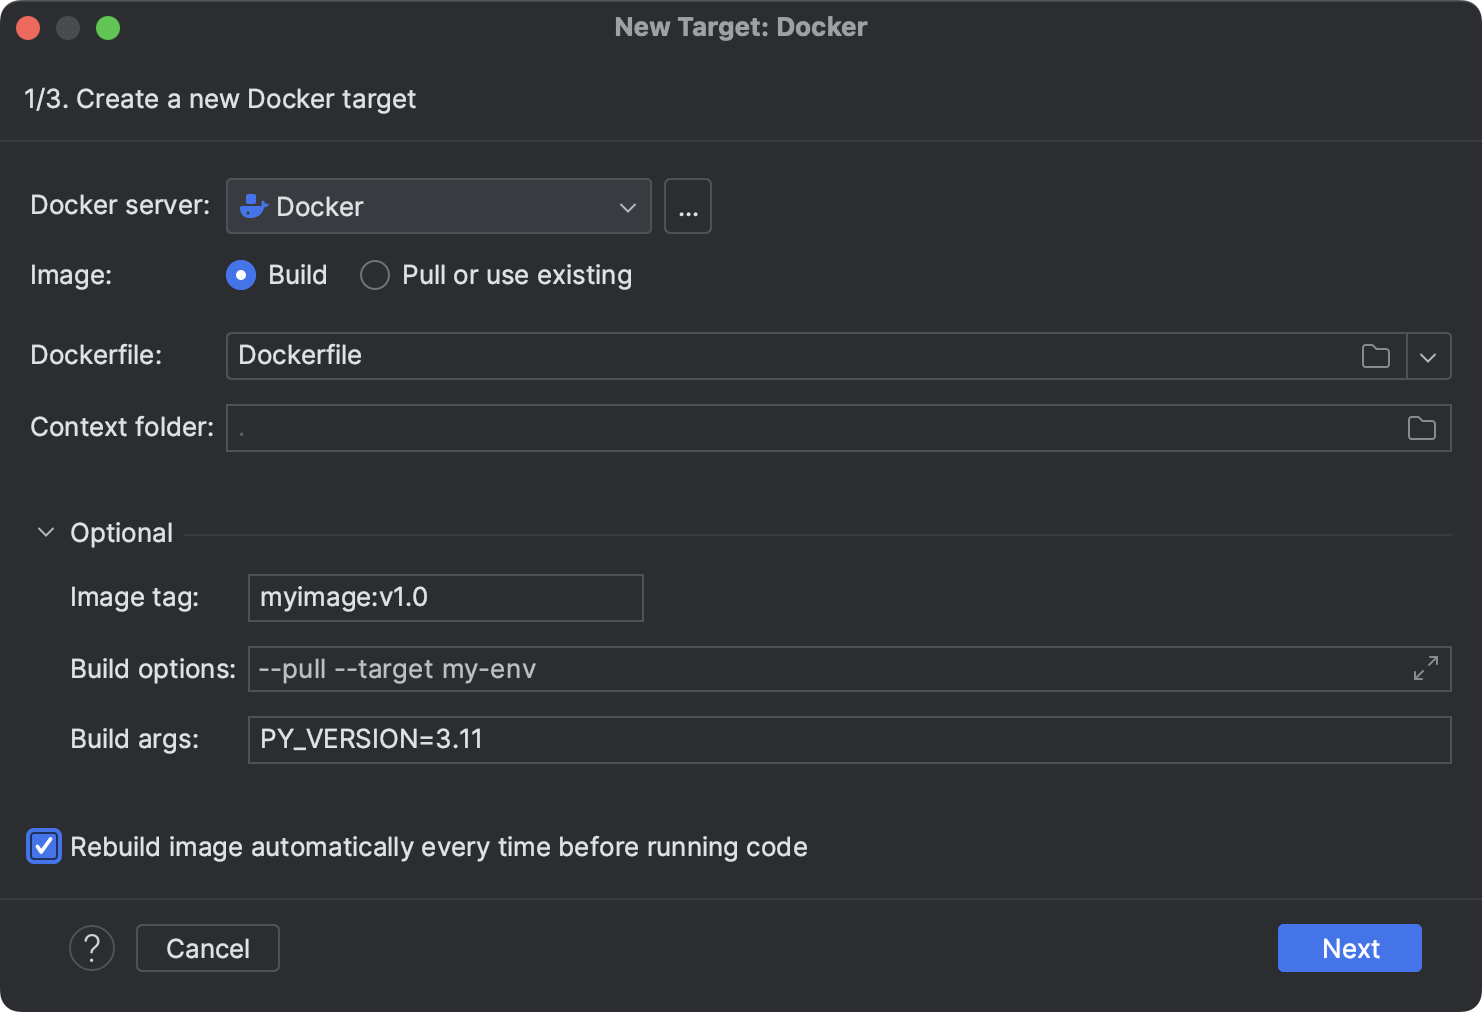 If required, expand the Optional section and specify the following:
| Image tag | Specify an optional name and tag for the built image. This can be helpful for referring to the image in the future. If you leave the field blank, the image will have only a random unique identifier. |
| Build options | Set supported docker build options. For example, you can specify metadata for the built image with the —label option. |
| Build args | Specify the values for build-time variables that can be accessed like regular environment variables during the build process but do not persist in the intermediate or final images. This is similar to using the —build-args option with the docker build command. These variables must be defined in the Dockerfile with the ARG instruction. For example, you can define a variable for the version of the base image that you are going to use: |
ARG PY_VERSION=latest FROM python:$PY_VERSION
The PY_VERSION variable in this case will default to latest and the Dockerfile will produce an image with the latest available version of Python, unless you redefine it as a build-time argument. If you set, PY_VERSION=3.10 , Docker will pull python:3.10 instead, which will run a container with Python version 3.10. Redefining the PY_VERSION argument is similar to setting the following command-line option:
—build-arg PY_VERSION=3.10
Configure an interpreter using Docker Compose
- Do one of the following:
- Click the Python Interpreter selector and choose Add New Interpreter .
- Press Control+Alt+S to open Settings and go to Project: | Python Interpreter . Click the Add Interpreter link next to the list of the available interpreters.
- Click the Python Interpreter selector and choose Interpreter Settings . Click the Add Interpreter link next to the list of the available interpreters.
- Select On Docker Compose .
- Select an existing Docker configuration in the Server dropdown. Alternatively, select Create new and perform the following steps to create a new Docker configuration: Create a Docker configuration Click to add a Docker configuration and specify how to connect to the Docker daemon. The connection settings depend on your Docker version and operating system. For more information, refer to Docker connection settings. The Connection successful message should appear at the bottom of the dialog. For more information about mapping local paths to the virtual machine running the Docker daemon when using Docker on Windows or macOS, refer to Virtual machine path mappings for Windows and macOS hosts. You will not be able to use volumes and bind mounts for directories outside of the mapped local path. This table is not available on a Linux host, where Docker runs natively and you can mount any directory to the container.
- In Configuration files , specify the docker-compose.yml file. Also select the service.
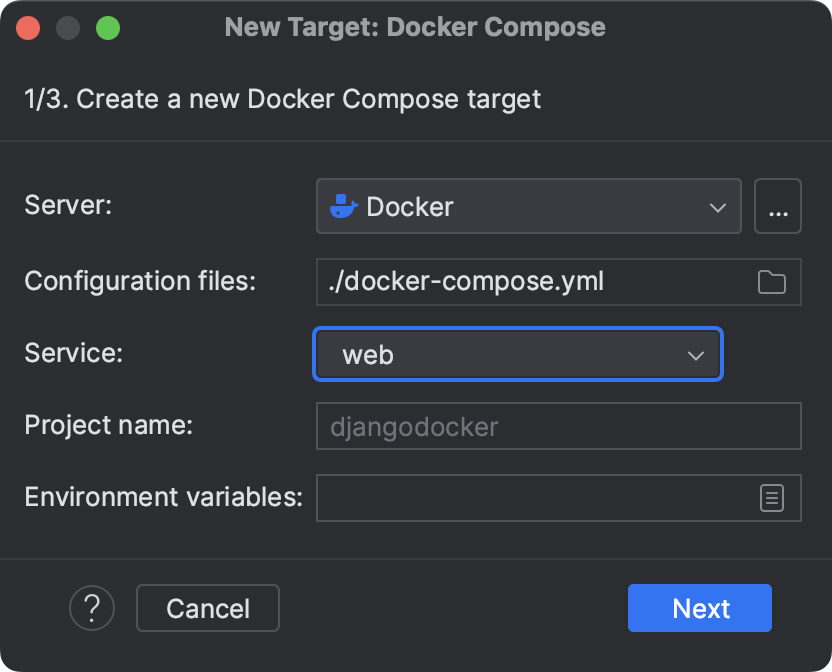 Optionally, specify environment variables and edit the Compose project name in Project name .
 - Wait until PyCharm creates and configures a new target:
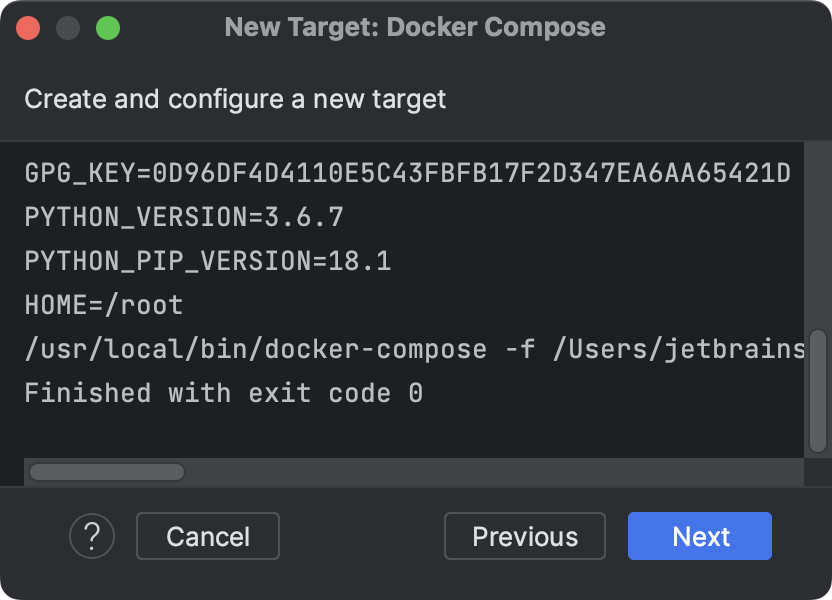
- Next, select an interpreter to use in the container. You can choose any virtualenv or conda environment that is already configured in the container, or select a system interpreter.
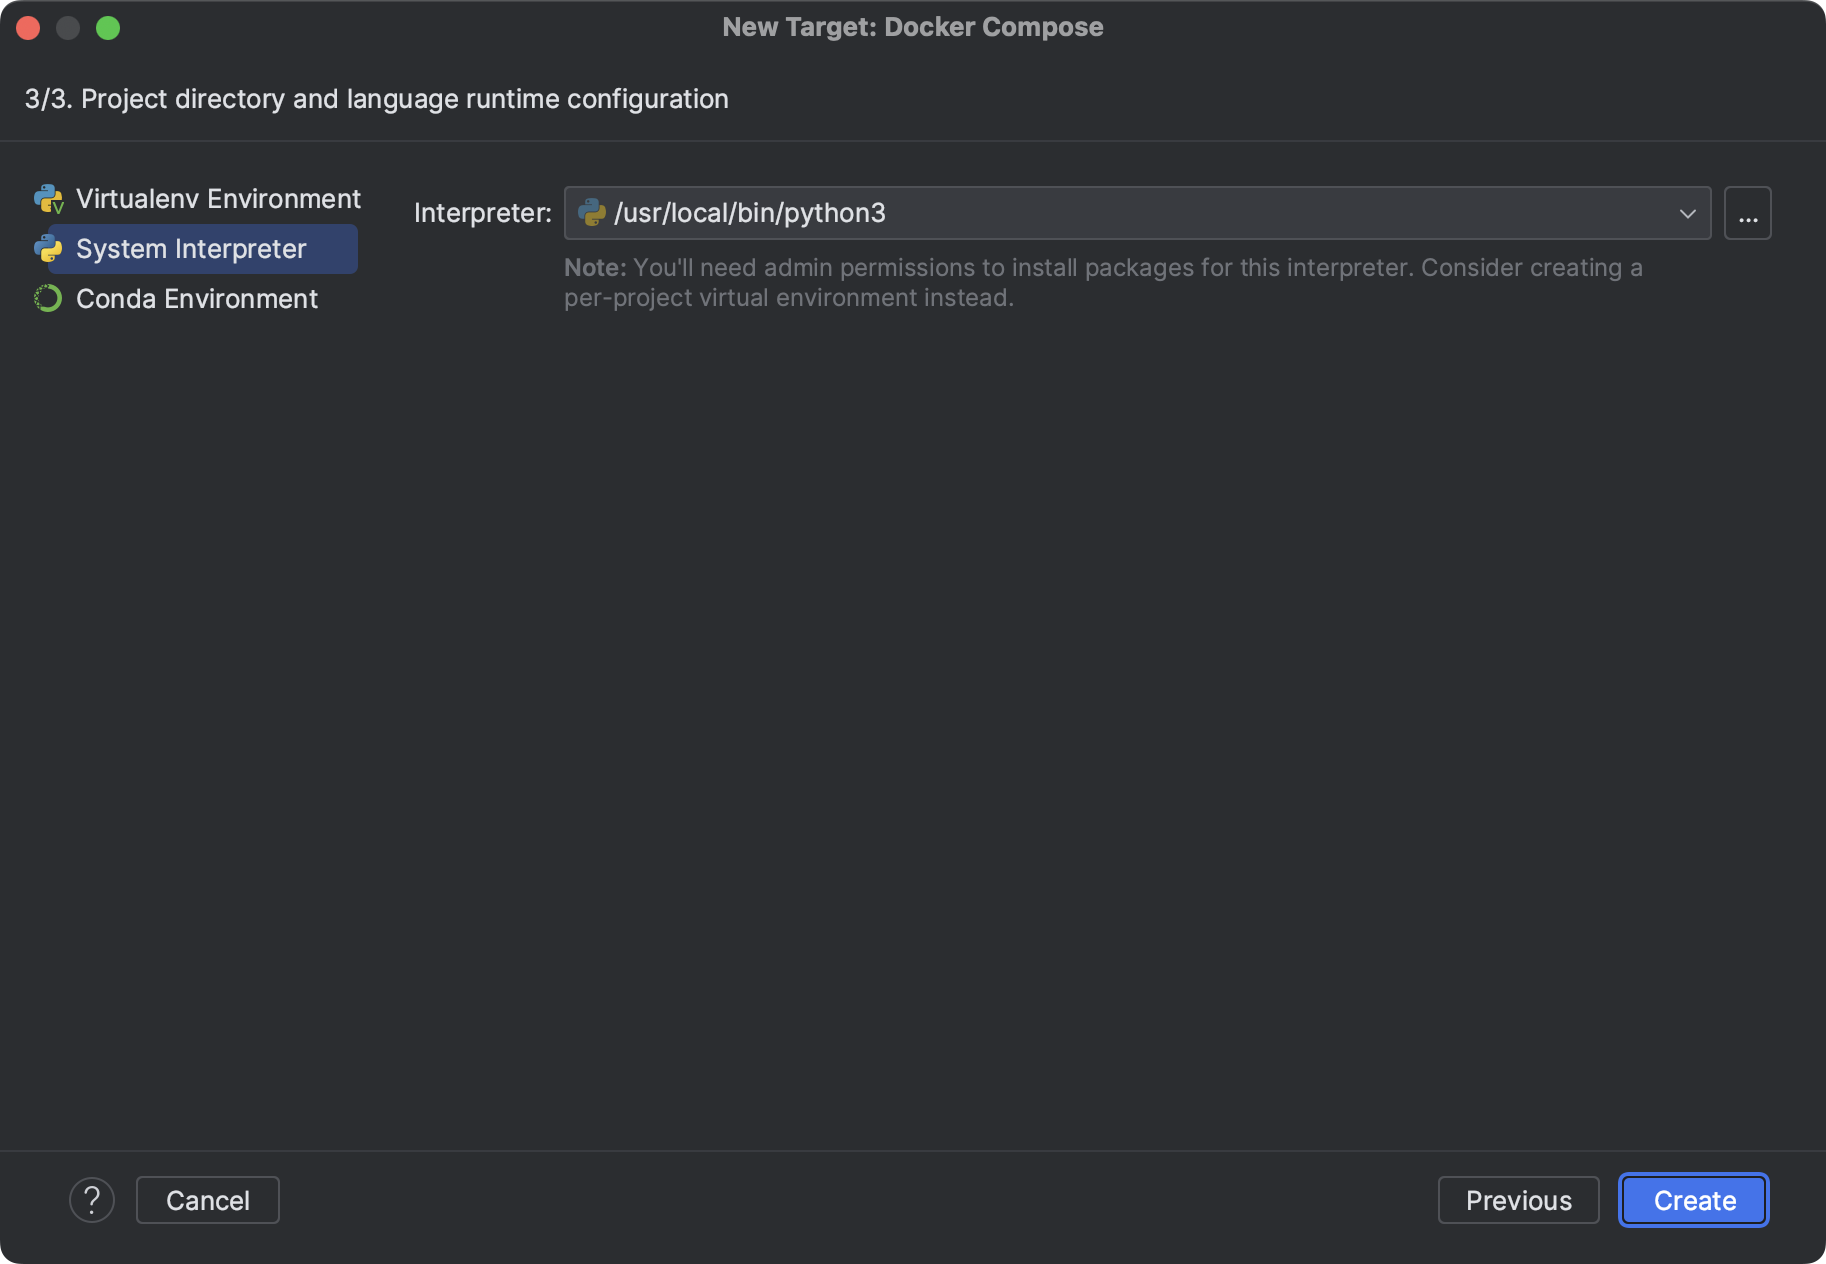
- Click OK . The configured remote interpreter is added to the list.
Setting the default interpreter
In PyCharm, you can specify an interpreter that will be automatically set for all newly created projects.
- Go to File | New Projects Setup | Settings for New Projects (on Window and Linux) or File | New Projects Setup | Preferences for New Projects (on macOS).
- Select Python Interpreter settings. Then either choose an existing interpreter from the Python interpreter list of click to add a new interpreter. Click OK to save the changes. The change will become effective for all newly created projects in PyCharm.
Managing interpreter packages
For each interpreter, you can install, upgrade, and delete Python packages. By default, PyCharm uses pip to manage project packages. For conda environments you can use the conda package manager.
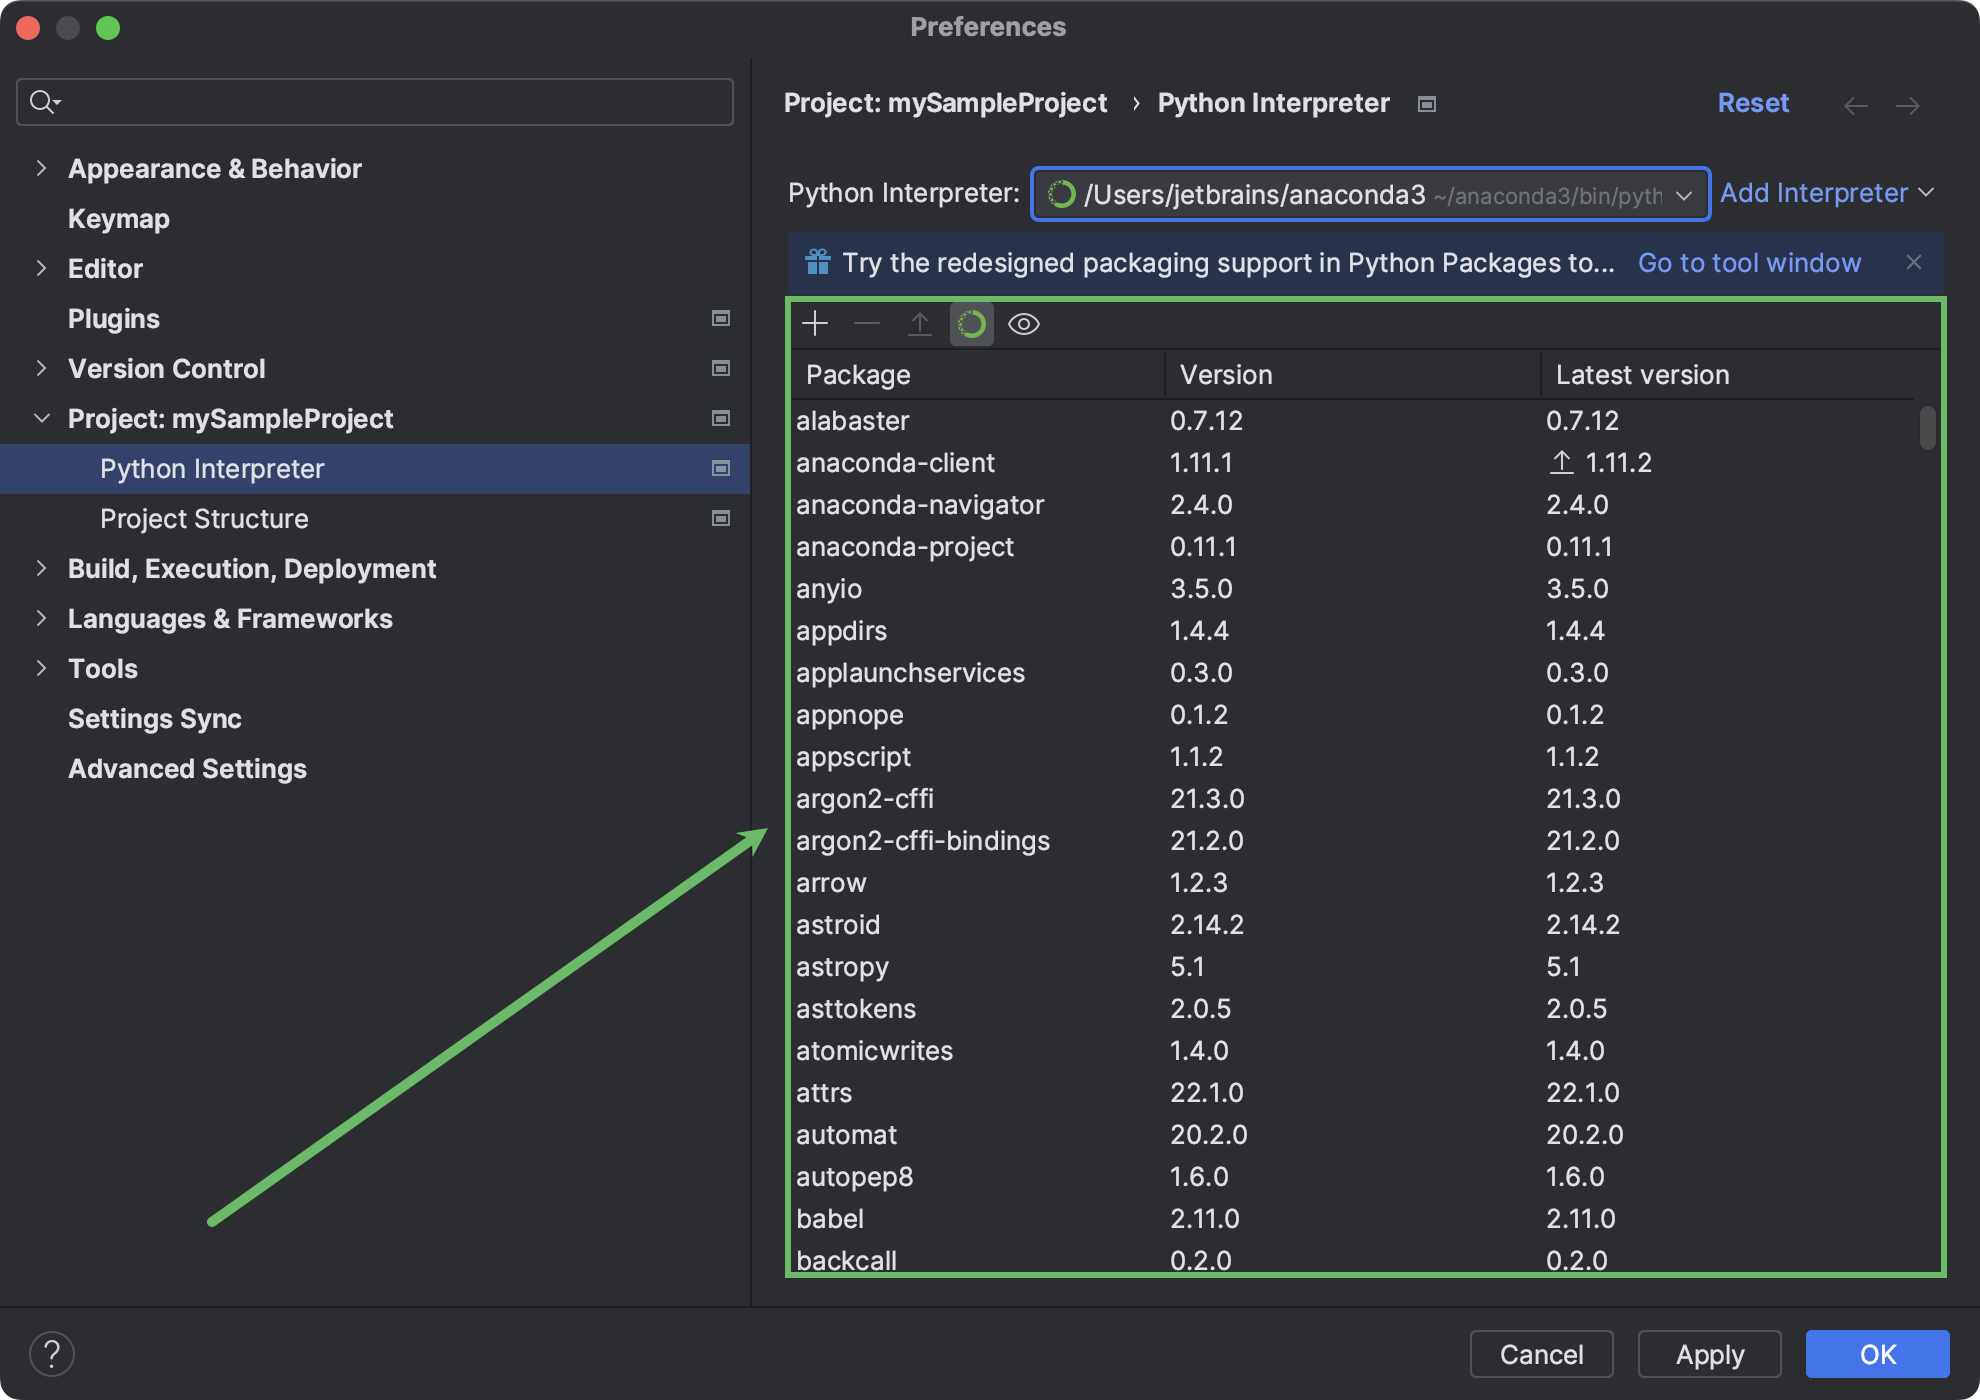
PyCharm smartly tracks the status of packages and recognizes outdated versions by showing the number of the currently installed package version (column Version ), and the latest available version (column Latest version ). When a newer version of a package is detected, PyCharm marks it with the arrow sign and suggests to upgrade it.
By default, the Latest version column shows only stable versions of the packages. If you want to extend the scope of the latest available versions to any pre-release versions (such as beta or release candidate ), click Show early releases .
You can upgrade several packages at once. Hold Cmd (macOS) or Ctrl on (Unix or Windows), left-click to select several items in the list of packages, and then click Upgrade .
See the detailed instructions:
- How to install a package
- How to upgrade the package
- How to uninstall the package
If you are looking for a more convenient way to search for Python packages, preview the documentation, and manage Python package repositories, try the Python Packages tool window. For more information, refer to Manage packages in the Python Packages tool window.
PyCharm
PyCharm — это среда программирования для языка Python, или IDE. Средами называют программы, в которых можно писать, запускать и отлаживать код, устанавливать новые расширения и дополнительные модули. Это мощный многофункциональный инструмент для разработчиков.
Освойте профессию
«Fullstack-разработчик на Python»
Название среды читается как «пайчарм». Ее разработала компания JetBrains, которая также сделала известную IDE для языка Java под названием IntelliJ IDEA. PyCharm пользуется более 50% разработчиков на Python: она удобная, понятная и многофункциональная.
PyCharm существует для нескольких операционных систем: Windows, Linux и macOS. Она поддерживает разные версии Python: и 2.x, и 3.x. Ее широкие возможности делают разработку на Python быстрее и эффективнее.
Для чего нужен PyCharm
Языки программирования устроены так, что писать код на них можно где угодно, даже в «Блокноте». Главное — сохранить файл в нужном расширении, а потом запустить с помощью установленного интерпретатора или компилятора. Но большинство разработчиков все равно пользуются IDE. И вот почему.
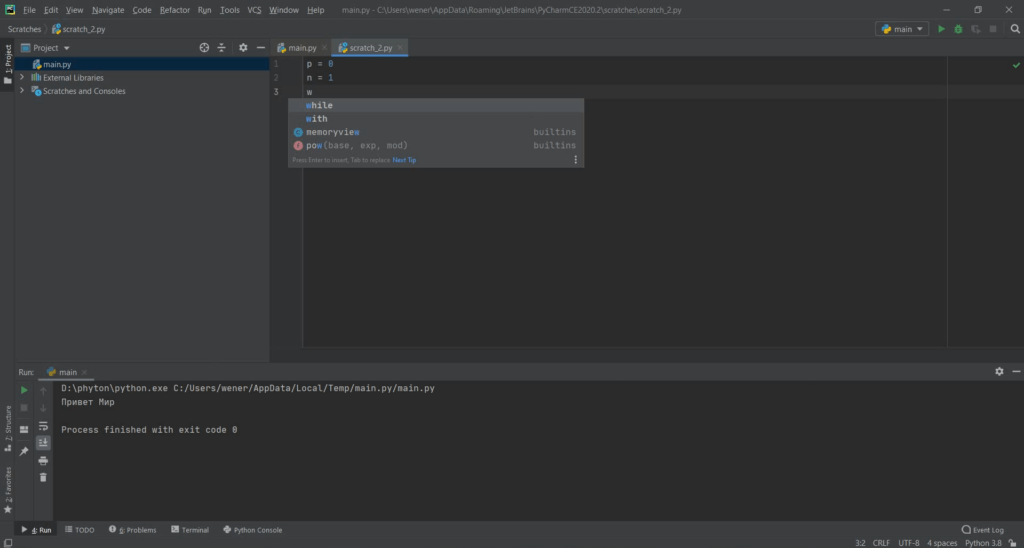
Код писать удобнее. В средах, в том числе PyCharm, есть подсветка синтаксиса: разные ключевые слова и конструкции выделяются цветами, так что нужное место в коде проще найти.
Возможности среды шире. В IDE можно не только написать код, но и запустить его и сразу посмотреть на результат работы программы. Там есть инструменты для отладки, контроля версий, например с помощью Git; можно в несколько кликов устанавливать сторонние библиотеки и фреймворки.
Командная работа проще. Профессиональная версия среды дает возможность синхронизироваться с другими разработчиками и делать командную работу эффективнее.
Для Python существует несколько популярных сред. PyCharm выбирает большинство: его легко настраивать, в нем удобный и функциональный интерфейс, а возможностей много. Он подходит для широкого спектра задач: от автоматического тестирования до машинного обучения. Другие среды для языка обычно или менее удобные, или более узкие в применении.
Профессия / 12 месяцев
Fullstack-разработчик на Python
Создавайте веб-проекты самостоятельно
Что позволяет делать PyCharm
IDE — это не просто редактор для кода. У него намного больше возможностей, облегчающих жизнь разработчику. PyCharm можно представить как комбайн, где есть большинство функций, важных для программиста. Вот лишь некоторые вещи, которые в нем можно делать.
Создавать проекты. Проект на языке программирования — это не просто создание файла. Когда разработчик создает проект в PyCharm, среда выделяет под него отдельную папку, где хранит все связанное с этим проектом. Так нужные файлы и компоненты находятся под рукой. Структуру проекта PyCharm показывает в левой части интерфейса и дает возможность в любой момент переключиться на интересующий файл внутри него.
Писать код на Python. Внутри проекта можно создать файл в нужном расширении и писать в нем код. Синтаксис подсвечивается автоматически, причем параметры подсветки можно настроить. К тому же PyCharm дает возможность сразу проверять правильность написания и выделять ошибочные моменты. Среда помогает писать более чистый код.
Запускать. IDE подключены к интерпретатору или компилятору нужного языка. Python — интерпретируемый язык, и PyCharm может запустить его интерпретатор. Поэтому код можно выполнить прямо внутри среды, для этого не понадобится открывать консоль или любое стороннее приложение. В интерфейсе IDE есть кнопка запуска: достаточно нажать на нее, и код запустится. Результат исполнения программа покажет сразу — выведет в специальную консоль внутри среды или откроет новое окно.
Отлаживать. В среде есть инструменты для отладки кода. Например, можно настроить режим отладки так, чтобы показывать значения разных переменных в любой момент времени. Или остановить выполнение на конкретной строчке и смотреть, нормально ли код работает в этом моменте, — это помогает найти место, в котором происходит ошибка. Есть и пошаговое выполнение: программа выполняет одну строчку кода и останавливается, чтобы разработчик мог проверить, правильно ли она работает на этом участке.
Станьте Fullstack-разработчик на Python и найдите стабильную работу
на удаленке
Тестировать. Автоматическое тестирование — одна из распространенных сфер применения Python. И делать это в PyCharm удобно. В среде есть инструменты для автоматической генерации кода, и к ней легко подключить модули для тестирования.
Корректировать. Чтобы код был чистым и красивым и его было легко читать, нужно следовать правилам «хорошего тона» для разработчиков. PyCharm может следить за выполнением этих правил. Он также может автоматически расставлять переносы строк и отступы и дополнять написанное: человек вводит только часть команды, а PyCharm уже предлагает подсказки для ее окончания.
Устанавливать библиотеки и фреймворки. Некоторые версии PyCharm «из коробки» поддерживают ряд популярных фреймворков для языка, другие дают возможность быстро их скачать и установить. Одна из возможностей среды – быстро найти нужный фреймворк в сети, загрузить и подключить к проекту. Это удобно: для установки и развертывания окружения не приходится пользоваться множеством дополнительных инструментов.
Устанавливать дополнения и плагины. Для самой среды тоже есть модули, расширяющие ее функциональность. Их можно установить изнутри IDE. Примеры таких модулей – проверка читаемости кода, подсказки с помощью искусственного интеллекта, расстановка недостающих скобок и многое другое. Некоторые плагины меняют интерфейс, если разработчику не нравится стандартный. Другие расширяют возможности самой среды. После установки дополнением можно пользоваться как частью IDE.
Писать на других языках. PyCharm предназначена для Python, но в ней есть поддержка и других языков. Например, Python часто используется в веб-разработке, поэтому IDE также поддерживает JavaScript для браузера и SQL для баз данных. Кроме JavaScript, поддерживаются основанные на нем TypeScript и CoffeeScript, популярные JS-фреймворки, а также языки HTML и CSS для верстки. В среде можно пользоваться шаблонизаторами – специальными инструментами, которые помогают создавать шаблоны для веб-страниц. Языки шаблонизаторов PyCharm тоже понимает.
Полезные особенности PyCharm
Использование шаблонов. Можно пользоваться шаблонами кода, чтобы быстрее решать типовые задачи.
Автогенерация кода. Среда может сгенерировать код по заданным вами критериям – обычно это используют для шаблонных действий, например, для подключения библиотек или оформления функций.
Умный редактор. Автодополнение кода, обнаружение ошибок и возможности для автоматического исправления предохраняют разработчика от части неприятных сбоев.
Рефакторинг. Так называют исправление и изменение кода, и для него в PyCharm много функций: быстрая вставка или переименование сущности по всему проекту, структурирование кода и другие. Все делается быстро, и многое автоматизировано.
Умный поиск. Благодаря интеллектуальному поиску что угодно можно найти буквально в несколько кликов – и в коде, и внутри самой среды.
Встроенные инструменты. В PyCharm можно работать с системами контроля версий, такими как Git, а также с СУБД и удаленными устройствами. Среда поддерживает и другие технологии.
Community и Pro: в чем разница
У PyCharm две основных версии: бесплатная Community и платная Pro. Про-версия предназначена для профессиональных разработчиков, которым нужна более широкая функциональность. В комьюнити-версии можно учиться, писать код для себя или для небольших проектов. Для большинства задач ее достаточно.
- Community не поддерживает JavaScript, CSS и другие веб-технологии. В ней можно работать только с «чистым» Python и его вариациями, а также с HTML, XML, JSON и некоторыми другими форматами.
- То же самое касается поддержки популярных фреймворков. PyCharm Community Edition поддерживает только фреймворки для «питона», а Pro-версия – еще и React, Angular и другие инструменты веб-разработки, ориентированные на JavaScript.
- В Community-версии нет встроенных инструментов для работы с базами данных, а в Pro они есть.
- Инструменты для развертывания и контроля версий в Community устанавливаются отдельно как плагины, а в Pro предустановлены.
- Возможности совместной разработки в бесплатной версии ограничены: не более трех человек и сессии не больше 30 минут.
Что выбрать: Community или Pro
Доступ к про-версии платный, поэтому новичкам мы рекомендуем пользоваться комьюнити-версией. Для обучения и начальных проектов ее вполне достаточно. Некоторые инструменты, которые могут понадобиться в процессе, можно скачать как плагины. А совместная разработка в большой команде и подключение JavaScript – вещи, которые могут понадобиться в первую очередь в профессиональном проекте. А в таких проектах Pro-версию может оплатить и работодатель.
JetBrains также предлагает Edu-версию, которая рассчитана исключительно на обучение программированию. Работать с ней может быть проще, но ею можно пользоваться только в рамках обучения в JetBrains Academy. Кроме того, скорее всего при переходе к практическим проектам вам все равно придется пользоваться Community.
Как начать работать с PyCharm
Вам понадобится скачать и установить интерпретатор для Python, а также саму среду. Онлайн-платформы PyCharm для ознакомления не предлагается.
Системные требования. IDE запускается на большинстве современных компьютеров, поэтому проблем с системными требованиями возникнуть не должно. Стоит учесть только несколько моментов: желательно, чтобы на компьютере был установлен SSD-диск, а оперативной памяти было не меньше 8 Гб. Так среда будет работать быстрее и продуктивнее.
Также понадобится не менее 2.5 Гб места на диске и еще 1 Гб для кэша. В идеале среде стоит выделить до 5 Гб.
PyCharm существует для всех трех популярных семейств операционных систем: Windows, Linux и macOS. Проблемы могут возникнуть только с редкими дистрибутивами Linux, которые среда может не поддерживать. Так что советуем сразу поискать версию для своего дистрибутива.
Современные версии PyCharm работают на системах начиная с Windows 8, macOS 10.14, Linux с поддержкой Gnome, Unity DE или KDE. Если у вас более старая система – можете поискать предыдущие версии среды, они обычно есть в открытом доступе.
Установка. Вам понадобится установить интерпретатор для Python с официального сайта языка, а потом скачать и установить сам PyCharm. Это происходит стандартно для операционной системы, в которой вы находитесь: через exe-файлы для Windows, через dmg-файлы для macOS и архивом .tar.gz для Linux.
Мы советуем использовать свежую версию Python – 3.x, ту, которая актуальна сегодня. Вторая версия языка сейчас применяется в основном для специфических задач, которые вряд ли встретятся новичку.
Можно воспользоваться официальной утилитой Toolbox, которая поможет установить и автоматически обновлять PyCharm, а также управлять плагинами. Применять ее или нет – зависит только от ваших пожеланий, это необязательно.
Настройка. Когда PyCharm установится, вам понадобится его настроить. Меню интуитивно понятное, а информация о горячих клавишах и основных настройках есть в документации. Возможно, вам придется по вкусу стандартный интерфейс, и поначалу каких-то специфических изменений не понадобится.
В PyCharm есть специальные настройки для людей с ограниченными возможностями здоровья, есть много инструментов для удобства – так что, если вы хотите настроить среду по своему вкусу, это можно сделать «из коробки».
Подключение интерпретатора. Подробнее обсудим, как подключить интерпретатор. По умолчанию он не входит в пакет PyCharm, поэтому его и нужно скачивать отдельно. При создании проекта среда покажет окно, где можно будет настроить его окружение – в частности выбрать интерпретатор. Достаточно указать там, где находится скачанный вами интерпретатор – обычно PyCharm видит его.
Если PyCharm не видит интерпретатор, понадобится зайти в его настройки. В меню «Файл – Настройка – Проект» нужно выбрать вкладку «Интерпретатор». В английской версии она называется Project Interpreter.
В этой вкладке в выпадающем меню нужно выбрать интерпретатор, который вы скачали. Если PyCharm его не видит – нажмите на «Показать все» (Show All), потом на «Добавить» (Add) и вручную укажите путь к месту, где хранится ваш интерпретатор.
Указывать нужно путь к исполняемому файлу с именем python – в Windows он называется python.exe. Это и есть программа-интерпретатор. Обычно она хранится в папке Python36, Python37 – или с другими цифрами в зависимости от того, какая у вас версия языка.
Как писать код в PyCharm
Сначала понадобится создать проект и указать для него настройки и интерпретатор. Потом – создать внутри проекта файл с расширением .py. Все это можно сделать через меню «Файл» в несколько кликов. Только убедитесь, что система ассоциирует расширение .py с PyCharm – иначе IDE не будет подсвечивать синтаксис, а возможностей будет меньше.
В файле можно писать код, а написанный – сохранять и запускать специальной кнопкой. Подсветка применяется автоматически, хотя вы можете настроить ее цветовую схему и особенности.
Мы советуем сразу выучить горячие клавиши и основные возможности умного редактора: так вам будет легче писать и редактировать код.
Если нужно, можете скачать интересующие модули для правок, проверки, отладки и многого другого. А если вы интересуетесь конкретным направлением – в PyCharm есть возможность установить фреймворки для чего угодно начиная от автоматического тестирования и заканчивая Data Science.
Узнать больше о современных инструментах для программирования помогут наши курсы. Получите новую профессию в IT и станьте востребованным специалистом.
Fullstack-разработчик на Python
Fullstack-разработчики могут в одиночку сделать IT-проект от архитектуры до интерфейса. Их навыки востребованы у работодателей, особенно в стартапах. Научитесь программировать на Python и JavaScript и создавайте сервисы с нуля.
Статьи по теме:
- SciPy
- Выбираем IDE: средства для программирования на Python
Рассказываем про интегрированные среды разработки и редакторы кода, помогаем выбрать подходящий инструмент
«Error: Please select a valid Python interpreter» in Pycharm
I have been asked to use Python in Pycharm and, after downloading it, I have found a problem which doesn’t allow me to compile anything because there is an «Error: Please select a valid Python interpreter» . I know there are similar questions already solved that propose solutions to this problem but I have revised those solutions and none of them is satisfactory for me. I would appreciate help very much. I let you here also some screenshots that show the error: