
Fills
You can add colored, patterned, textured, and other fills to the inside of objects or other enclosed areas. You can customize a fill and set it as a default, so that each object you draw has the same fill.
The features documented in the Help are available in the full version of CorelDRAW Graphics Suite 2019. Some features may not be available in this version of the product.
Was this page helpful? Send feedback. (Internet connection required.)
Advanced Graphics with Mesh Fills
This tutorial has been written for CorelDRAW® Graphics Suite X5. While similar features might be available in previous releases, the tutorial will be fully applicable to CorelDRAW Graphics Suite X5 only.
The Mesh Fill tool allows you to create a fill with very subtle changes in color that will add a sense of realism to the object. The vastly improved Mesh Fill tool lets you design multicolored filled objects with more fluid color transitions. With the Smooth Mesh Color option on the property bar, you can achieve color transitions that retain color richness. We’ll take a look at how we can make the most out of this very special tool.

What you will learn
- Apply a mesh to an object
- Fill a mesh with color
- Smooth the appearance of color in a mesh fill
- Apply transparency to a mesh fill
Applying a mesh to an object
A mesh fill can be applied only to closed objects or a single path. If you want to apply a mesh fill
to a complex object, you must first create a mesh-filled object and combine it with the complex object to form a PowerClip object.
Creating our object
Let’s start with our object. We are going to draw an ellipse using the Ellipse Tool (F7) from the Toolbox. Then from the Arrange menu, we will select Convert to Curves (Ctrl+Q).
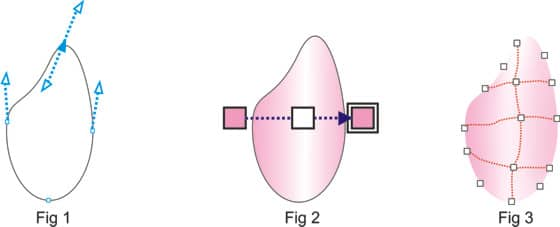
Once you have converted the ellipse to a curve, use the Shape tool (F10) and move the control handles to create the shape that you want. (Fig 1)
Next, we are going to give this shape a fill. I have used the Interactive Fill tool (G) to create a linear fountain fill and then I removed the outline on the object. (Fig 2)
Apply a Mesh to an object

- In the toolbox, click the Mesh Fill tool.
- Type the number of rows and columns in the Grid size box on the Property bar and press Enter. For this sample object, we use a value of 2 horizontally and 4 vertically. (Fig 3)
- You can then adjust the grid nodes much the same way that you would adjust the nodes of a curve with the Shape tool (F10).
 |
You can add intersecting lines by double-clicking in a space, or you can add a single line by double-clicking a line. If you double-click intersecting lines, they will be removed. |
Adding Colors to the Mesh
Now that we have created the object and applied the mesh, it is time to bring it to life and see just how powerful this tool really is. We will start by dragging colors from the color palette onto the points of the mesh.
To fill a mesh with color
- Select a mesh-filled object.
- In the toolbox, click the Mesh Fill tool.
- Drag a color from the color palette to a patch in the object.
To color an intersecting node in a mesh fill, click an intersection node, and then click a color on the color palette. If you want to add 10% of a specific color to a node, select the node and then hold the Ctrl key while clicking on a color in the color palette.
|
By holding down the left mouse button on one of the colors in the color palette, you will be given a larger choice of colors to chose from. |
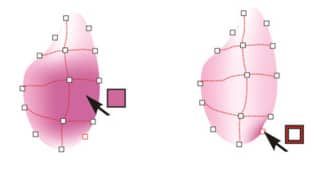
Dragging a color from the color palette and dropping it onto an area bounded by mesh lines will cause the color to completely fill the area and blend into the surrounding areas. When dropping the color on the node, the color will blend from that point outwards.
Fine Tuning the colors
If the mesh object contains color, adjusting the intersection nodes of the mesh affects how the colors blend together. This can be changed or adjusted with the shape tool.

To smooth the appearance of color in a mesh fill, select a mesh-filled object and in the toolbox, click the Mesh Fill tool, next click the Smooth Mesh Color button on the property bar.
Applying transparencies to a mesh fill
One other feature that has been added is the ability to add transparency to a mesh fill. This is great in that you can now place a texture or other object behind the mesh and with the Transparency tool, adjust the transparency of a node or group of nodes.
To apply transparency to a mesh fill
- Select a mesh-filled object.
- In the toolbox, click the Mesh fill tool.
- Click a node to select part of the mesh.
- On the property bar, move the Transparency slider to the right to increase the color transparency.
To complete our design, I have created a shape for the vase and applied a mesh fill with a grid of 7 x 2 and dropped the colors that I want.
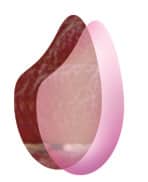

To copy this mesh to another object, select the target object – in this case, the top of the vase – and click on the Copy Mesh Fill icon.
This will copy the mesh that I have created. Next, I simply add transparency to the vase, as I did to the petals of the flowers and then I put everything together.

With a little practice, you can see how very easy it is to create realistic designs that will convey the thoughts and emotions that you have in mind.
Как пользоваться coreldraw graphics suite extras fills

- Applies to:
- CorelDRAW Standard
- Last Review: Sep 7, 2021
- Available Translations:
- Get updatesDownload


by Roger Wambolt
This tutorial has been written for CorelDRAW® Graphics Suite X7. While similar features might be available in previous releases, the tutorial will be fully applicable to CorelDRAW Graphics Suite X7 only.
The Mesh Fill tool allows you to create a fill with very subtle changes in color that will add a sense of realism to the object. It lets you design multicolored filled objects with more fluid color transitions. With the Smooth Mesh Color button on the property bar, you can achieve color transitions that retain color richness. We’ll take a look at how I used this tool to create an image of a flower vase.

Applying a mesh to an object
A mesh fill can be applied only to closed objects or a single path. If you want to apply a mesh fill to a complex object, you must first create a mesh-filled object and combine it with the complex object to form a PowerClip object.
Let’s start with an object, such as a flower petal in the image I created. We are going to draw an ellipse using the Ellipse tool (F7) from the toolbox. Then from the Object menu (Arrange menu in CorelDRAW X6 and earlier), we will select Convert to Curves (Ctrl+Q).
Next, use the Shape tool (F10) to move the control handles to create the shape that you want. (Fig 1)
Now, we are going to give the shape a fill. I‘ve used the Interactive Fill tool (G) to create a linear fountain fill. Then, I removed the outline on the object by choosing None from the Outline width list box in the Outline section of the Object Properties docker. (Fig 2)

1. In the toolbox, click the Mesh Fill tool (M).
2. Type the number of rows and columns in the Grid Size boxes on the property bar, and press Enter. I used values of 2 horizontally and 4 vertically. (Fig 3)
3. You can then adjust the grid nodes much the same way that you would adjust the nodes of a curve with the Shape tool (F10).
You can add intersecting lines by double-clicking in a space, or you can add a single line by double-clicking a line. If you double-click intersecting lines, they will be removed.
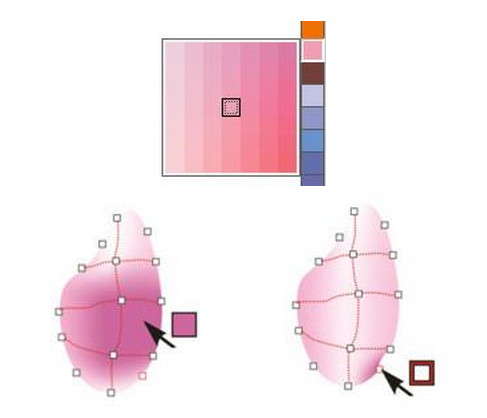
Dragging a color from the color palette and dropping it onto an area bounded by mesh lines will cause the color to completely fill the area and blend into the surrounding areas. When dropping the color on the node, the color will blend from that point outwards.
Smoothing the colors in a mesh fill
If the mesh object contains color, adjusting the intersection nodes of the mesh affects how the colors blend together. This can be changed or adjusted with the Shape tool.

To smooth the appearance of color in a mesh fill, select a mesh-filled object, select the Mesh Fill tool in the toolbox, and click the Smooth Mesh Color button on the property bar.
Applying transparencies to a mesh fill
You can also add transparency to a mesh fill. For example, you could place a texture or other object behind the mesh and adjust the transparency of a node or group of nodes with the Transparency tool.
1. Select a mesh-filled object.
2. In the toolbox, click the Mesh Fill tool.
3. Click a node to select part of the mesh.
4. On the property bar, move the Transparency slider to the right to increase the color transparency
To complete our design, I created a shape for the vase, applied a mesh fill with a grid of 7 vertical x 2 horizontal, and dropped in the colors that I wanted.
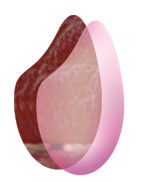

To copy this mesh to another object, select the target object — in this case, the top of the vase — and click the Copy Mesh Fill button
on the property bar.
This will copy the mesh that I have created. Next, I simply add transparency to the vase, as I did to the flower petals, and then I put everything together.
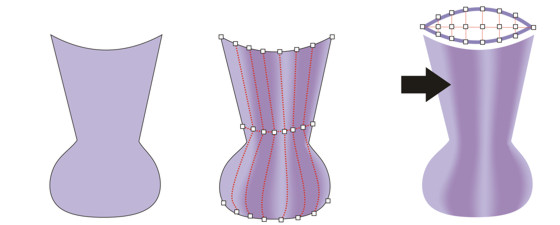
In no time, you’ll be using mesh fills to design with creativity and confidence.
Was this article helpful?
Tell us how we can improve it.
Как пользоваться coreldraw graphics suite extras fills
- Applies to:
- CorelDRAW Standard
- Last Review: Sep 7, 2021
- Available Translations:
- Get updatesDownload
You now have the option to install all Clipart, Photo’s and Objects to your hard drive as part of the Extras Installer; however, the CorelDraw Graphics Suite must be installed before these items can be installed to your hard drive.
Open Type, True Type fonts and symbol fonts are included with CorelDRAW Graphics Suite X5; however, they must first be added or installed to be used within applications. For more information on installing fonts, refer to your Windows documentation, the Help within Font Navigator or any other font management program.
Fonts are available within the Extras\Content\Fonts folder on the DVD. Symbol fonts are available in the Extras\Content\Fonts\Symbols folder on the DVD.
Extra Pattern Fill, Spraylists, Frames, Tile files, Brush Textures, Image lists, Objects and Photos are available as part of the Extras installer. See the Help for more information on how to load and use these files within CorelDRAW Graphics Suite X5 applications.
If you enter a custom path for the Extras, please note that this will apply to the Clipart & Images files only; all other extra content will be installed to the locations required by the applications
Sample files for each application are available in a Samples sub-folder for each application. (for example, ..\Program Files\Corel\CorelDRAW Graphics Suite X5\Draw\Samples ).
Was this article helpful?
Tell us how we can improve it.