
Как создать лексер на python
Создание компилятора на Python
1. Введение
1.1 Цель
При проектировании какого-либо компилятора или интерпретатора в качестве инструмента, как правило, выбирают язык C. А что если планируется создать «небольшой язык программирования» , просто так, забавы ради (или, может быть, для более серьёзного применения)? Чего беспокоиться, если вы обладаете достаточно мощным инструментом — интерпретатором Python!
1.2 Инструменты
В рабочий каталог нужно переписать модули lex.py и yacc.py. Само собой, потребуется и Python версии 2.1 или выше.
2. Первый шаг
Перед тем, как углубиться в детали реализации, пройдемся по основным терминам и понятиям.
2.1 Лексемы
Что такое лексемы? Лексемы — это символы, подобные +, -, * или /, или это слова, такие как begin, end, if или while, которые могут выступать в качестве операндов в выражениях, зарезервированных или ключевых слов и т.п. Лексемы должны быть определены как регулярные выражения.
2.2 Определение языка программирования
Поскольку пишется компилятор для нашего конкретного языка программирования, то следует начать с определения этого языка, записав для него набор грамматических правил. Например, если предполагается введение в язык конструкции ‘if-then-else-endif’, то правило достаточно просто можно записать так:
if_statement : IF LPAREN statement RPAREN multiple-statements ELSE multiple-statements ENDIF
где (1) IF, LPAREN, RPAREN, ELSE и ENDIF — лексемы для синтаксических единиц if , ( , ) , else и endif соответственно. (2) ‘statement’ и ‘multiple-statements’ — различные конструкции, для которых должны быть определены свои правила.
2.3 Грамматический разбор
Говоря простыми словами, грамматический разбор (в просторечие — парсинг, от английского to parse, не путать с пирсингом — прим. ред. 🙂 есть проверка соответствия исходного текста программы заданному набору правил. Существуют различные методы разбора, но нам нет нужды вдаваться в детали. Вам достаточно лишь знать, что, имея набор правил (см. пример выше), синтаксический анализатор производит разбор текста программы в соответствии с этим набором.
3. Реализация
Итак, приступим к созданию компилятора. Процесс компиляции делится на несколько этапов.
- Выделение лексем
- Грамматический разбор
- Выполнение действий, определяемых семантикой языка.
- Создание промежуточного кода.
- Оптимизация
- Создание результирующего кода.
3.1 Набор правил
Как уже упоминалось, сначала необходимо определить язык программирования, для которого реализуется компилятор. Определитесь, какой набор конструкций и операторов вы хотите предоставить. Такие конструкции, как ‘while’, ‘if’, ‘ assignment statements’ (операция присваивания) и пр. обычно имеются в большинстве языков программирования, так же как и арифметические операторы, такие как +, -, *, / и пр. Затем необходимо создать набор грамматических правил для вашего языка программирования. Набор правил для поддержки операции присваивания приводится ниже.
assign_statement : VAR EQUALS statement statement : statement ADDOP term | statement SUBOP term | term term : term MULOP factor | term DIVOP factor | factor factor : VAR | NUM | LPAREN statement RPAREN
Здесь и далее мы будем придерживаться следующих соглашений о написании лексем и правил. Лексемы мы будем записывать в верхнем регистре (NUM, VAR, EQUALS, ADDOP, SUBOP, MULOP, DIVOP, LPAREN, RPAREN), а правила (assign_statement, statement, term, factor) — в нижнем.
3.2 Определение лексем и их анализ
import lex # Список лексем. Обязателен. tokens = ( 'NUM', 'VAR', 'EQUALS', 'ADDOP', 'SUBOP', 'MULOP', 'DIVOP', 'LPAREN', 'RPAREN' ) # Регулярные выражения для выделения лексем. t_VAR = r'[a-zA-Z_][\w_]*' t_EQUALS = r'=' t_ADDOP = r'\+' t_SUBOP = r'-' t_MULOP = r'\*' t_DIVOP = r'/' t_LPAREN = r'\(' t_RPAREN = r'\)' # Регулярное выражение, требующее дополнительных действий. def t_NUM(t) : r'\d+' try: t.value = int(t.value) except ValueError: print "Строка %d: Число %s слишком велико!" % (t.lineno, t.value) t.value = 0 return t # Правило трассировки номеров строк. def t_newline(t): r'\n+' t.lineno += len(t.value) # Строка, содержащая игнорируемые символы (пробелы и символы табуляции). t_ignore = ' \t' # Правило обработки ошибок def t_error(t): print "Недопустимый символ '%s'" % t.value[0] t.skip(1) # Создать анализатор lex.lex() # Получить данные со стандартного ввода data = raw_input() lex.input(data) # Выделение лексем while 1 : tok = lex.token() if not tok : break print tok
Если вы хотите использовать зарезервированные слова, то, как правило, достаточно добавить соответствующее имя (идентификатор) и создать функцию, реализующую действие зарезервированного слова, как показано ниже:
reserved = < 'if' : 'IF', 'then' : 'THEN', 'else' : 'ELSE', 'while' : 'WHILE', . >def t_VAR(t): r'[a-zA-Z_][\w_]*' t.type = reserved.get(t.value,'ID') # Проверка на зарезервированное слово return t
3.3 Грамматический разбор
# Yacc example import yacc # Получить таблицу лексем от лексического анализатора, # который был создан нами ранее # Для этого. from ourlex import tokens __var_names = <> def p_assign_statement(t) : 'assign_statement : VAR EQUALS statement' __var_names[t[1]] = t[3] def p_statement_plus(t) : 'statement : statement ADDOP term' t[0] = t[1] + t[3] def p_statement_minus(t) : 'statement : statement SUBOP term' t[0] = t[1] - t[3] def p_statement_term(t) : 'statement : term' t[0] = t[1] def p_term_times(t) : 'term : term MULOP factor' t[0] = t[1] * t[3] def p_term_div(t) : 'term : term DIVOP factor' t[0] = t[1] / t[3] def p_term_factor(t) : 'term : factor' t[0] = t[1] def p_factor_num(t) : 'factor : NUM' t[0] = t[1] def p_factor_var(t) : 'factor : VAR' if __var_names.has_key(t[1]) : t[0] = __var_names[t[1]] else : print "Имя переменной", t[1], " в строке ", t.lineno(1), "не определено." def p_factor_expr(t): 'factor : LPAREN statement RPAREN' t[0] = t[2] # Обработка синтаксических ошибок def p_error(t): print "Синтаксическая ошибка!" # Создать грамматический анализатор yacc.yacc() while 1: try: s = raw_input('enter > ') except EOFError: break if not s: continue yacc.parse(s)
Здесь каждая функция принимает единственный аргумент t — массив (на самом деле удобный Python’овый не-модифицируемый «массивосписок» — tuple. прим. ред.), содержащий грамматические элементы:
def p_statement_plus(t): 'statement : statement ADDOP term' # ^ ^ ^ ^ # t[0] t[1] t[2] t[3] t[0] = t[1] + t[3]
3.4 Семантика
Семантика определяет последовательность действий, которые должен выполнить грамматический анализатор, когда ему удается свести входной поток до одного конкретного правила. В нашем примере семантика соответствует программе-интерпретатору. В случае простого компилятора, результатом работы может оказаться соответствующий правилу ассемблерный код.
Предположим, что в результате работы компилятора должен получаться код на языке ассемблера для процессора 8086. Примем за правило, что регистр ‘bx’ используется для хранения промежуточных результатов. Встретив очередной операнд, необходимо содержимое регистра ‘ax’ переписать в регистр ‘bx’, после чего в регистр ‘ax’ занести новый операнд. Таким образом, последний встреченный операнд (или результат операции) всегда будет содержаться в регистре ‘ax’.
def p_factor_num(t) : 'factor : NUM' __output_fp.write("\tmov bx,ax\n"%f) # bx
где, '__output_fp' -- дескриптор результирующего файла.
После того, как операнды подготовлены к выполнению операции (унарной или бинарной), мы можем описать семантику операции, например сложения:
def p_statement_plus(t) : 'statement : statement ADDOP term' __output_fp.write("\tadd ax,bx\n") # ax
Аналогичным образом, встретив объявление переменной, можно предусмотреть выбрать регистр процессора для ее хранения (локальные переменные предпочтительнее размещать на стеке), и запомнить выделенный регистр в словаре. Всякий раз, когда встречается ссылка на имя переменной, используя имя переменной в качестве ключа можно найти имя соответствующего регистра.
3.5 Оптимизация
Если говорить о компиляторе языка C, то ассемблерный код получается сложнее, чем описано выше. В действительности компилятор производит сначала некоторый промежуточный код, затем этот код оптимизируется и, наконец, создается окончательный вариант ассемблерного кода.
Тема оптимизации кода слишком обширна, чтобы обсуждать ее здесь, поэтому остановимся лишь на самом простом методе оптимизации - локальная оптимизация [peephole optimization]. Простейший способ выполнения локальной оптимизации -- написать участок кода на языке ассемблера вручную и сравнить его с кодом, создаваемым вашим компилятором.
Например, если в имеющемся наборе отсутствует инструкция умножения, то вы можете заставить компилятор производить код, выполняющий умножение, через последовательность сложений. В качестве оптимизации можно предложить проверять величину операндов, и если один из них равен 1, то в качестве результата можно сразу принять второй операнд, минуя цикл сложений. Далее, поскольку величина множителя (количество значимых бит прим. перев.) определяет количество итераций, в качестве множителя можно назначать меньший из операндов.
Еще один пример локальной оптимизации -- оптимизация безусловных переходов:
jmp .L1 . . . . . .L1 jmp .L2 . . . . . .L2 add ax,bx
В этом случае, число выполняемых инструкций безусловного перехода можно сократить, изменив первую команду jump :
jmp .L2 . . . . . .L1 jmp .L2 . . . . . .L2 add ax,bx
Существуют различные алгоритмы оптимизации. Методы, описанные выше, являются лишь первым маленьким шагом в направлении оптимизации по времени исполнения и размеру создаваемого кода.
4. Что дальше?
Примеры, приведенные выше, не являются полнофункциональным компилятором. Для их завершения требуется реализовать гораздо большее число привычных конструкций. Эти примеры можно рассматривать лишь как иллюстрацию написания соответствующих этим привычным конструкциям правил, регулярных выражений (для выделения лексем), функций грамматического разбора и функций реализации семантики языка.
Dinil Divakaran
Я -- студент последнего года по специальности "Информатика" [computer science] в колледже GEC Thrissur в Керале, Индия.
Copyright (C) 2002, Dinil Divakaran.
Простой интерпретатор с нуля на Python (перевод) #1

Вещь, которая привлекла меня изучать компьютерную науку была компилятором. Я думал, что это все магия, как они могут читать даже мой плохо написанный код и компилировать его. Когда я прошел курс компиляторов, я стал находить этот процесс очень простым и понятным.
Содержание
В этом цикле статей я попытаюсь захватить часть этой простоты путем написания простого интерпретатора для обычного императивного языка IMP (IMperative Language). Интерпретатор будет написан на Питоне, потому что это простой и широко известный язык. Также, питон-код похож на псевдокод, и даже если вы не знаете его [питон], у вас получится понять код. Парсинг будет выполнен с помощью простого набора комбинаторов, написанных с нуля (подробнее расскажу в следующей части). Никаких дополнительных библиотек не будет использовано, кроме sys (для I/O), re (регулярные выражения в лексере) и unittest (для проверки работоспособности нашей поделки).
Сущность языка IMP
Прежде всего, давайте обсудим, для чего мы будем писать интерпретатор. IMP есть нереально простой язык со следующими конструкциями:
Присвоения (все переменные являются глобальные и принимают только integer):
x := 1
if x = 1 then y := 2 else y := 3 end
while x < 10 do x := x + 1 end
Составные операторы (разделенные ;):
x := 1; y := 2
Это всего-лишь игрушечный язык. Но вы можете расширить его до уровня полезности как у Python или Lua. Я лишь хотел сохранить его настолько простым, насколько смогу.
А вот тут пример программы, которая вычисляет факториал:
n := 5; p := 1; while n > 0 do p := p * n; n := n - 1 end
Язык IMP не умеет читать входные данные (input), т.е. в начале программы нужно создать все нужные переменные и присвоить им значения. Также, язык не умеет выводить что-либо: интерпретатор выведет результат в конце.
Структура интерпретатора
Ядро интерпретатора является ничем иным, как промежуточным представлением (intermediate representation, IR). Оно будет представлять наши IMP-программы в памяти. Так как IMP простой как 3 рубля, IR будет напрямую соответствовать синтаксису языка; мы создадим по классу для каждой единицы синтаксиса. Конечно, в более сложном языке вы хотели бы использовать еще и семантическую представление, которое намного легче для анализа или исполнения.
- Разобрать символы исходного кода на токены.
- Собрать все токены в абстрактное синтаксическое дерево (abstract syntax tree, AST). AST и есть наша IR.
- Исполнить AST и вывести результат в конце.
Процессом разделения символов на токены называется лексинг (lexing), а занимается этим лексер (lexer). Токены являют собой короткие, удобоваримые строки, содержащие самые основные части программы, такие как числа, идентификаторы, ключевые слова и операторы. Лексер будет пропускать пробелы и комментарии, так как они игнорируются интерпретатором.
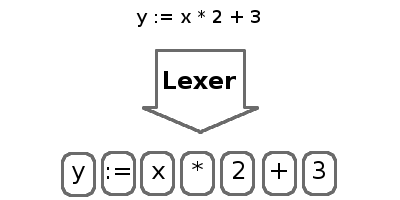
Процесс сборки токенов в AST называется парсингом. Парсер извлекает структуру нашей программы в форму, которую мы можем исполнить.
Эта статься будет сосредоточена исключительно на лексере. Сначала мы напишем общую лекс-библиотеку а затем уже лексер для IMP. Следующие части будут сфокусированы на парсере и исполнителе.
Лексер
По правде говоря, лексические операции очень просты и основываются на регулярных выражениях. Если вы с ними не знакомы, то можете прочитать официальную документацию.
Входными данными для лексера будет простой поток символов. Для простоты мы прочитаем инпут в память. А вот выходящими данными будет список токенов. Каждый токен включает в себя значение и метку (тег, для идентификации вида токена). Парсер будет использовать это для построения дерева (AST).
Итак, давайте сделаем обычнейший лексер, который будет брать список регэкспов и разбирать на теги код. Для каждого выражения он будет проверять, соответствует ли инпут текущей позиции. Если совпадение найдено, то соответствующий текст извлекается в токен, наряду с тегом регулярного выражения. Если регулярное выражение ни к чему не подходит, то текст отбрасывается. Это позволяет нам избавиться от таких вещей как комментарии и пробелы. Если вообще ничего не совпало, то мы рапортуем об ошибке и скрипт становится героем. Этот процесс повторяется, пока мы не разберем весь поток кода.
Вот код из библиотеки лексера:
import sys import re def lex(characters, token_exprs): pos = 0 tokens = [] while pos < len(characters): match = None for token_expr in token_exprs: pattern, tag = token_expr regex = re.compile(pattern) match = regex.match(characters, pos) if match: text = match.group(0) if tag: token = (text, tag) tokens.append(token) break if not match: sys.stderr.write('Illegal character: %s\n' % characters[pos]) sys.exit(1) else: pos = match.end(0) return tokens Отметим, что порядок передачи в регулярные выражения является значительным. Функция lex будет перебирать все выражения и примет только первое найденное совпадение. Это значит, что при использовании этой функции, первым делом нам следует передавать специфичные выражения (соответствующие операторам и ключевым словам), а затем уже обычные выражения (идентификаторы и числа).
Лексер IMP
С учетом кода выше, создание лексера для нашего языка становится очень простым. Для начала определим серию тегов для токенов. Для языка нужно всего лишь 3 тега. RESERVED для зарезервированных слов или операторов, INT для чисел, ID для идентификаторов.
import lexer RESERVED = 'RESERVED' INT = 'INT' ID = 'ID' Теперь мы определим выражения для токенов, которые будут использованы в лексере. Первые два выражения соответствуют пробелам и комментариям. Так как у них нету тегов, лексер их пропустит.
token_exprs = [ (r'[ \n\t]+', None), (r'#[^\n]*', None), После этого следуют все наши операторы и зарезервированные слова.
(r'\:=', RESERVED), (r'\(', RESERVED), (r'\)', RESERVED), (r';', RESERVED), (r'\+', RESERVED), (r'-', RESERVED), (r'\*', RESERVED), (r'/', RESERVED), (r'=', RESERVED), (r'>', RESERVED), (r'=', RESERVED), (r'!=', RESERVED), (r'and', RESERVED), (r'or', RESERVED), (r'not', RESERVED), (r'if', RESERVED), (r'then', RESERVED), (r'else', RESERVED), (r'while', RESERVED), (r'do', RESERVED), (r'end', RESERVED),
Наконец, нам нужны выражения для чисел и идентификаторов. Обратите внимание, что регулярным выражениям для идентификаторов будут соответствовать все зарезервированные слова выше, поэтому очень важно, чтобы эти две строчки шли последними.
(r'[0-9]+', INT), (r'[A-Za-z][A-Za-z0-9_]*', ID), ]
Когда наши регэкспы определены, мы можем создать обертку над функцией lex:
def imp_lex(characters): return lexer.lex(characters, token_exprs) Если вы дочитали до этих слов, то вам, скорее всего, будет интересно как работает наше чудо. Вот код для теста:
import sys from imp_lexer import * if __name__ == '__main__': filename = sys.argv[1] file = open(filename) characters = file.read() file.close() tokens = imp_lex(characters) for token in tokens: print token $ python imp.py hello.impСкачать полный исходный код: imp-interpreter.tar.gz
Автор оригинальной статьи — Jay Conrod.
UPD: Спасибо пользователю zeLark за исправление бага, связанного с порядком определения шаблонов.
Write your own lexer
If a lexer for your favorite language is missing in the Pygments package, you can easily write your own and extend Pygments.
All you need can be found inside the pygments.lexer module. As you can read in the API documentation , a lexer is a class that is initialized with some keyword arguments (the lexer options) and that provides a get_tokens_unprocessed() method which is given a string or unicode object with the data to lex.
The get_tokens_unprocessed() method must return an iterator or iterable containing tuples in the form (index, token, value) . Normally you don’t need to do this since there are base lexers that do most of the work and that you can subclass.
How to add a lexer
To add a lexer, you have to perform the following steps:
-
Select a matching module under pygments/lexers , or create a new module for your lexer class.
Note We encourage you to put your lexer class into its own module, unless it’s a very small derivative of an already existing lexer.
__all__ = ['AutohotkeyLexer', 'AutoItLexer']
$ tox -e mapfiles
How to test your lexer
To add a new lexer test, create a file with just your code snippet under tests/snippets// . Then run tox -- --update-goldens to auto-populate the currently expected tokens. Check that they look good and check in the file.
Lexer tests are run with tox , like all other tests. While working on a lexer, you can also run only the tests for that lexer with tox -- tests/snippets/language-name/ and/or tox -- tests/examplefiles/language-name/ .
Running the test suite with tox will run lexers on the test inputs, and check that the output matches the expected tokens. If you are improving a lexer, it is normal that the token output changes. To update the expected token output for the tests, again use tox -- --update-goldens . Review the changes and check that they are as intended, then commit them along with your proposed code change.
Large test files should go in tests/examplefiles . This works similar to snippets , but the token output is stored in a separate file. Output can also be regenerated with --update-goldens .
When contributing a new lexer, you must provide an example file or test snippet. Lexers which can’t be tested will not be accepted.
RegexLexer
The lexer base class used by almost all of Pygments’ lexers is the RegexLexer . This class allows you to define lexing rules in terms of regular expressions for different states.
States are groups of regular expressions that are matched against the input string at the current position. If one of these expressions matches, a corresponding action is performed (such as yielding a token with a specific type, or changing state), the current position is set to where the last match ended and the matching process continues with the _first_ regex of the current state.
This means you’re always jumping back to the first entry, i.e. you cannot match states in a particular order. For example, a state with the following rules won’t work as intended:
'state': [ (r'\w+', Name,), (r'\s+', Whitespace,), (r'\w+', Keyword,) ]
In the example above, Keyword will never be matched. To match certain token types in order, see below for the bygroups helper.
Lexer states are kept on a stack: each time a new state is entered, the new state is pushed onto the stack. The most basic lexers (like the DiffLexer ) just need one state.
Each state is defined as a list of tuples in the form ( regex , action , new_state ) where the last item is optional. In the most basic form, action is a token type (like Name.Builtin ). That means: When regex matches, emit a token with the match text and type tokentype and push new_state on the state stack. If the new state is '#pop' , the topmost state is popped from the stack instead. To pop more than one state, use '#pop:2' and so on. '#push' is a synonym for pushing a second time the current state on top of the stack.
The following example shows the DiffLexer from the builtin lexers. Note that it contains some additional attributes name , aliases and filenames which aren’t required for a lexer. They are used by the builtin lexer lookup functions.
from pygments.lexer import RegexLexer from pygments.token import * class DiffLexer(RegexLexer): name = 'Diff' aliases = ['diff'] filenames = ['*.diff'] tokens = 'root': [ (r' .*\n', Text), (r'\+.*\n', Generic.Inserted), (r'-.*\n', Generic.Deleted), (r'@.*\n', Generic.Subheading), (r'Index.*\n', Generic.Heading), (r'=.*\n', Generic.Heading), (r'.*\n', Text), ] >
As you can see this lexer only uses one state. When the lexer starts scanning the text, it first checks if the current character is a space. If this is true it scans everything until newline and returns the data as a Text token (which is the “no special highlighting” token).
If this rule doesn’t match, it checks if the current char is a plus sign. And so on.
If no rule matches at the current position, the current char is emitted as an Error token that indicates a lexing error, and the position is increased by one.
Using a lexer
The easiest way to use a new lexer is to use Pygments’ support for loading the lexer from a file relative to your current directory.
First, change the name of your lexer class to CustomLexer:
from pygments.lexer import RegexLexer from pygments.token import * class CustomLexer(RegexLexer): """All your lexer code goes here!"""
Then you can load and test the lexer from the command line with the additional flag -x :
$ python -m pygments -x -l your_lexer_file.py
To specify a class name other than CustomLexer, append it with a colon:
$ python -m pygments -x -l your_lexer.py:SomeLexer
Or, using the Python API:
# For a lexer named CustomLexer your_lexer = load_lexer_from_file(filename, **options) # For a lexer named MyNewLexer your_named_lexer = load_lexer_from_file(filename, "MyNewLexer", **options)
When loading custom lexers and formatters, be extremely careful to use only trusted files; Pygments will perform the equivalent of eval on them.
If you only want to use your lexer with the Pygments API, you can import and instantiate the lexer yourself, then pass it to pygments.highlight() .
Use the -f flag to select a different output format than terminal escape sequences. The HtmlFormatter helps you with debugging your lexer. You can use the debug_token_types option to display the token types assigned to each part of your input file:
$ python -m pygments -x -f html -Ofull,debug_token_types -l your_lexer.py:SomeLexer
Hover over each token to see the token type displayed as a tooltip.
If your lexer would be useful to other people, we would love if you contributed it to Pygments. See Contributing to Pygments for advice.
Regex Flags
You can either define regex flags locally in the regex ( r'(?x)foo bar' ) or globally by adding a flags attribute to your lexer class. If no attribute is defined, it defaults to re.MULTILINE . For more information about regular expression flags see the page about regular expressions in the Python documentation.
Scanning multiple tokens at once
So far, the action element in the rule tuple of regex, action and state has been a single token type. Now we look at the first of several other possible values.
Here is a more complex lexer that highlights INI files. INI files consist of sections, comments and key = value pairs:
from pygments.lexer import RegexLexer, bygroups from pygments.token import * class IniLexer(RegexLexer): name = 'INI' aliases = ['ini', 'cfg'] filenames = ['*.ini', '*.cfg'] tokens = 'root': [ (r'\s+', Text), (r';.*?$', Comment), (r'\[.*?\]$', Keyword), (r'(.*?)(\s*)(=)(\s*)(.*?)$', bygroups(Name.Attribute, Text, Operator, Text, String)) ] >
The lexer first looks for whitespace, comments and section names. Later it looks for a line that looks like a key, value pair, separated by an '=' sign, and optional whitespace.
The bygroups helper yields each capturing group in the regex with a different token type. First the Name.Attribute token, then a Text token for the optional whitespace, after that a Operator token for the equals sign. Then a Text token for the whitespace again. The rest of the line is returned as String .
Note that for this to work, every part of the match must be inside a capturing group (a (. ) ), and there must not be any nested capturing groups. If you nevertheless need a group, use a non-capturing group defined using this syntax: (?:some|words|here) (note the ?: after the beginning parenthesis).
If you find yourself needing a capturing group inside the regex which shouldn’t be part of the output but is used in the regular expressions for backreferencing (eg: r'()(.*?)()' ), you can pass None to the bygroups function and that group will be skipped in the output.
Changing states
Many lexers need multiple states to work as expected. For example, some languages allow multiline comments to be nested. Since this is a recursive pattern it’s impossible to lex just using regular expressions.
Here is a lexer that recognizes C++ style comments (multi-line with /* */ and single-line with // until end of line):
from pygments.lexer import RegexLexer from pygments.token import * class CppCommentLexer(RegexLexer): name = 'Example Lexer with states' tokens = 'root': [ (r'[^/]+', Text), (r'/\*', Comment.Multiline, 'comment'), (r'//.*?$', Comment.Singleline), (r'/', Text) ], 'comment': [ (r'[^*/]+', Comment.Multiline), (r'/\*', Comment.Multiline, '#push'), (r'\*/', Comment.Multiline, '#pop'), (r'[*/]', Comment.Multiline) ] >
This lexer starts lexing in the 'root' state. It tries to match as much as possible until it finds a slash ( '/' ). If the next character after the slash is an asterisk ( '*' ) the RegexLexer sends those two characters to the output stream marked as Comment.Multiline and continues lexing with the rules defined in the 'comment' state.
If there wasn’t an asterisk after the slash, the RegexLexer checks if it’s a Singleline comment (i.e. followed by a second slash). If this also wasn’t the case it must be a single slash, which is not a comment starter (the separate regex for a single slash must also be given, else the slash would be marked as an error token).
Inside the 'comment' state, we do the same thing again. Scan until the lexer finds a star or slash. If it’s the opening of a multiline comment, push the 'comment' state on the stack and continue scanning, again in the 'comment' state. Else, check if it’s the end of the multiline comment. If yes, pop one state from the stack.
Note: If you pop from an empty stack you’ll get an IndexError . (There is an easy way to prevent this from happening: don’t '#pop' in the root state).
If the RegexLexer encounters a newline that is flagged as an error token, the stack is emptied and the lexer continues scanning in the 'root' state. This can help producing error-tolerant highlighting for erroneous input, e.g. when a single-line string is not closed.
Advanced state tricks
There are a few more things you can do with states:
-
You can push multiple states onto the stack if you give a tuple instead of a simple string as the third item in a rule tuple. For example, if you want to match a comment containing a directive, something like:
/* rest of comment */
you can use this rule:
tokens = 'root': [ (r'/\* , Comment, ('comment', 'directive')), . ], 'directive': [ (r'[^>]+', Comment.Directive), (r'>', Comment, '#pop'), ], 'comment': [ (r'[^*]+', Comment), (r'\*/', Comment, '#pop'), (r'\*', Comment), ] >
When this encounters the above sample, first 'comment' and 'directive' are pushed onto the stack, then the lexer continues in the directive state until it finds the closing > , then it continues in the comment state until the closing */ . Then, both states are popped from the stack again and lexing continues in the root state.
New in version 0.9: The tuple can contain the special '#push' and '#pop' (but not '#pop:n' ) directives.
from pygments.lexer import RegexLexer, bygroups, include from pygments.token import * class ExampleLexer(RegexLexer): tokens = 'comments': [ (r'(?s)/\*.*?\*/', Comment), (r'//.*?\n', Comment), ], 'root': [ include('comments'), (r'(function)( )(\w+)( )(<)', bygroups(Keyword, Whitespace, Name, Whitespace, Punctuation), 'function'), (r'.*\n', Text), ], 'function': [ (r'[^>/]+', Text), include('comments'), (r'/', Text), (r'\>', Punctuation, '#pop'), ] >
from pygments.lexer import RegexLexer class ExampleLexer(RegexLexer): tokens = . > def get_tokens_unprocessed(self, text, stack=('root', 'otherstate')): for item in RegexLexer.get_tokens_unprocessed(self, text, stack): yield item
New in version 2.0.
Subclassing lexers derived from RegexLexer
New in version 1.6.
Sometimes multiple languages are very similar, but should still be lexed by different lexer classes.
When subclassing a lexer derived from RegexLexer, the tokens dictionaries defined in the parent and child class are merged. For example:
from pygments.lexer import RegexLexer, inherit from pygments.token import * class BaseLexer(RegexLexer): tokens = 'root': [ ('[a-z]+', Name), (r'/\*', Comment, 'comment'), ('"', String, 'string'), (r'\s+', Text), ], 'string': [ ('[^"]+', String), ('"', String, '#pop'), ], 'comment': [ . ], > class DerivedLexer(BaseLexer): tokens = 'root': [ ('[0-9]+', Number), inherit, ], 'string': [ (r'[^"\\]+', String), (r'\\.', String.Escape), ('"', String, '#pop'), ], >
The BaseLexer defines two states, lexing names and strings. The DerivedLexer defines its own tokens dictionary, which extends the definitions of the base lexer:
- The “root” state has an additional rule and then the special object inherit , which tells Pygments to insert the token definitions of the parent class at that point.
- The “string” state is replaced entirely, since there is not inherit rule.
- The “comment” state is inherited entirely.
Using multiple lexers
Using multiple lexers for the same input can be tricky. One of the easiest combination techniques is shown here: You can replace the action entry in a rule tuple with a lexer class. The matched text will then be lexed with that lexer, and the resulting tokens will be yielded.
For example, look at this stripped-down HTML lexer:
from pygments.lexer import RegexLexer, bygroups, using from pygments.token import * from pygments.lexers.javascript import JavascriptLexer class HtmlLexer(RegexLexer): name = 'HTML' aliases = ['html'] filenames = ['*.html', '*.htm'] flags = re.IGNORECASE | re.DOTALL tokens = 'root': [ ('[^, Text), ('&.*?;', Name.Entity), (r', Name.Tag, ('script-content', 'tag')), (r', Name.Tag, 'tag'), (r'', Name.Tag), ], 'script-content': [ (r'(.+?)()', bygroups(using(JavascriptLexer), Name.Tag), '#pop'), ] >
Here the content of a tag is passed to a newly created instance of a JavascriptLexer and not processed by the HtmlLexer . This is done using the using helper that takes the other lexer class as its parameter.
Note the combination of bygroups and using . This makes sure that the content up to the end tag is processed by the JavascriptLexer , while the end tag is yielded as a normal token with the Name.Tag type.
Since you cannot refer to the class currently being defined, use this (imported from pygments.lexer ) to refer to the current lexer class, i.e. using(this) . This construct may seem unnecessary, but this is often the most obvious way of lexing arbitrary syntax between fixed delimiters without introducing deeply nested states.
The using() helper has a special keyword argument, state , which works as follows: if given, the lexer to use initially is not in the "root" state, but in the state given by this argument. This does not work with advanced RegexLexer subclasses such as ExtendedRegexLexer (see below).
Any other keywords arguments passed to using() are added to the keyword arguments used to create the lexer.
Delegating Lexer
Another approach for nested lexers is the DelegatingLexer which is for example used for the template engine lexers. It takes two lexers as arguments on initialisation: a root_lexer and a language_lexer .
The input is processed as follows: First, the whole text is lexed with the language_lexer . All tokens yielded with the special type of Other are then concatenated and given to the root_lexer . The language tokens of the language_lexer are then inserted into the root_lexer ’s token stream at the appropriate positions.
from pygments.lexer import DelegatingLexer from pygments.lexers.web import HtmlLexer, PhpLexer class HtmlPhpLexer(DelegatingLexer): def __init__(self, **options): super().__init__(HtmlLexer, PhpLexer, **options)
This procedure ensures that e.g. HTML with template tags in it is highlighted correctly even if the template tags are put into HTML tags or attributes.
If you want to change the needle token Other to something else, you can give the lexer another token type as the third parameter:
DelegatingLexer.__init__(MyLexer, OtherLexer, Text, **options)
Callbacks
Sometimes the grammar of a language is so complex that a lexer would be unable to process it just by using regular expressions and stacks.
For this, the RegexLexer allows callbacks to be given in rule tuples, instead of token types ( bygroups and using are nothing else but preimplemented callbacks). The callback must be a function taking two arguments:
- the lexer itself
- the match object for the last matched rule
The callback must then return an iterable of (or simply yield) (index, tokentype, value) tuples, which are then just passed through by get_tokens_unprocessed() . The index here is the position of the token in the input string, tokentype is the normal token type (like Name.Builtin ), and value the associated part of the input string.
You can see an example here:
from pygments.lexer import RegexLexer from pygments.token import Generic class HypotheticLexer(RegexLexer): def headline_callback(lexer, match): equal_signs = match.group(1) text = match.group(2) yield match.start(), Generic.Headline, equal_signs + text + equal_signs tokens = 'root': [ (r'(=+)(.*?)(\1)', headline_callback) ] >
If the regex for the headline_callback matches, the function is called with the match object. Note that after the callback is done, processing continues normally, that is, after the end of the previous match. The callback has no possibility to influence the position.
There are not really any simple examples for lexer callbacks, but you can see them in action e.g. in the SMLLexer class in ml.py.
The ExtendedRegexLexer class
The RegexLexer , even with callbacks, unfortunately isn’t powerful enough for the funky syntax rules of languages such as Ruby.
But fear not; even then you don’t have to abandon the regular expression approach: Pygments has a subclass of RegexLexer , the ExtendedRegexLexer . All features known from RegexLexers are available here too, and the tokens are specified in exactly the same way, except for one detail:
The get_tokens_unprocessed() method holds its internal state data not as local variables, but in an instance of the pygments.lexer.LexerContext class, and that instance is passed to callbacks as a third argument. This means that you can modify the lexer state in callbacks.
The LexerContext class has the following members:
- text – the input text
- pos – the current starting position that is used for matching regexes
- stack – a list containing the state stack
- end – the maximum position to which regexes are matched, this defaults to the length of text
Additionally, the get_tokens_unprocessed() method can be given a LexerContext instead of a string and will then process this context instead of creating a new one for the string argument.
Note that because you can set the current position to anything in the callback, it won’t be automatically be set by the caller after the callback is finished. For example, this is how the hypothetical lexer above would be written with the ExtendedRegexLexer :
from pygments.lexer import ExtendedRegexLexer from pygments.token import Generic class ExHypotheticLexer(ExtendedRegexLexer): def headline_callback(lexer, match, ctx): equal_signs = match.group(1) text = match.group(2) yield match.start(), Generic.Headline, equal_signs + text + equal_signs ctx.pos = match.end() tokens = 'root': [ (r'(=+)(.*?)(\1)', headline_callback) ] >
This might sound confusing (and it can really be). But it is needed, and for an example look at the Ruby lexer in ruby.py.
Handling Lists of Keywords
For a relatively short list (hundreds) you can construct an optimized regular expression directly using words() (longer lists, see next section). This function handles a few things for you automatically, including escaping metacharacters and Python’s first-match rather than longest-match in alternations. Feel free to put the lists themselves in pygments/lexers/_$lang_builtins.py (see examples there), and generated by code if possible.
An example of using words() is something like:
from pygments.lexer import RegexLexer, words, Name class MyLexer(RegexLexer): tokens = 'root': [ (words(('else', 'elseif'), suffix=r'\b'), Name.Builtin), (r'\w+', Name), ], >
As you can see, you can add prefix and suffix parts to the constructed regex.
Modifying Token Streams
Some languages ship a lot of builtin functions (for example PHP). The total amount of those functions differs from system to system because not everybody has every extension installed. In the case of PHP there are over 3000 builtin functions. That’s an incredibly huge amount of functions, much more than you want to put into a regular expression.
But because only Name tokens can be function names this is solvable by overriding the get_tokens_unprocessed() method. The following lexer subclasses the PythonLexer so that it highlights some additional names as pseudo keywords:
from pygments.lexers.python import PythonLexer from pygments.token import Name, Keyword class MyPythonLexer(PythonLexer): EXTRA_KEYWORDS = set(('foo', 'bar', 'foobar', 'barfoo', 'spam', 'eggs')) def get_tokens_unprocessed(self, text): for index, token, value in PythonLexer.get_tokens_unprocessed(self, text): if token is Name and value in self.EXTRA_KEYWORDS: yield index, Keyword.Pseudo, value else: yield index, token, value
The PhpLexer and LuaLexer use this method to resolve builtin functions.
Common pitfalls and best practices
Regular expressions are ubiquitous in Pygments lexers. We have written this section to warn about a few common mistakes you might do when using them. There are also some tips on making your lexers easier to read and review. You are asked to read this section if you want to contribute a new lexer, but you might find it useful in any case.
-
When writing rules, try to merge simple rules. For instance, combine:
(r"\(", token.Punctuation), (r"\)", token.Punctuation), (r"\[", token.Punctuation), (r"\]", token.Punctuation), (", token.Punctuation), (">", token.Punctuation),
(r"[\(\)\[\]<>]", token.Punctuation)
(AAAAAAAAAAAAAAAAA) (AAAAAAAAAAAAAAAA)(A) (AAAAAAAAAAAAAAA)(AA) (AAAAAAAAAAAAAAA)(A)(A) (AAAAAAAAAAAAAA)(AAA) (AAAAAAAAAAAAAA)(AA)(A) .
Thus, the matching has exponential complexity. In a lexer, the effect is that Pygments will seemingly hang when parsing invalid input.
>>> import re >>> re.match('(A+)*B', 'A'*50 + 'C') # hangs
As a more subtle and real-life example, here is a badly written regular expression to match strings:
If the ending quote is missing, the regular expression engine will find that it cannot match at the end, and try to backtrack with less matches in the *? . When it finds a backslash, as it has already tried the possibility \\. , it tries . (recognizing it as a simple character without meaning), which leads to the same exponential backtracking problem if there are lots of backslashes in the (invalid) input string. A good way to write this would be r'"([^\\]|\\.)*?"' , where the inner group can only match in one way. Better yet is to use a dedicated state, which not only sidesteps the issue without headaches, but allows you to highlight string escapes.
'root': [ . , (r'"', String, 'string'), . ], 'string': [ (r'\\.', String.Escape), (r'"', String, '#pop'), (r'[^\\"]+', String), ]
'comment': [ (r'\*/', Comment.Multiline, '#pop'), (r'.', Comment.Multiline), ]
This generates one token per character in the comment, which slows down the lexing process, and also makes the raw token output (and in particular the test output) hard to read. Do this instead:
'comment': [ (r'\*/', Comment.Multiline, '#pop'), (r'[^*]+', Comment.Multiline), (r'\*', Comment.Multiline), ]
© Copyright 2006-2023, Georg Brandl and Pygments contributors. Created using Sphinx 7.2.6.
Pygments logo created by Joel Unger. Backgrounds from subtlepatterns.com.
Writing a lexer for a new programming language in python
I have no idea how/where to start. I'm supposed to be using python, and more specifically, the ply library. So far, all I've done in create a list of tokens that will be part of the language. That list is given below:
tokens = ( # OPERATORS # 'PLUS' , # + 'MINUS' , # - 'MULTIPLY', # * 'DIVIDE', # / 'MODULO', # % 'NOT', # ~ 'EQUALS', # = # COMPARATORS # 'LT', # < 'GT', # >'LTE', # = 'DOUBLEEQUAL', # == 'NE', # # 'AND', # & 'OR', # | # CONDITIONS AND LOOPS # 'IF', # if 'ELSE', # else 'ELSEIF', # elseif 'WHILE', # while 'FOR', # for # 'DOWHILE', # haven't thought about this yet # BRACKETS # 'LPAREN', # ( 'RPAREN', # ) 'LBRACE', # [ 'RBRACE', # ] 'BLOCKSTART', # < 'BLOCKEND', # ># IDENTIFIERS # 'INTEGER', # int 'DOUBLE', # dbl 'STRING', # str 'CHAR', # char 'SEMICOLON', # ; 'DOT', # . 'COMMA', # , 'QUOTES', # ' 'DOUBLEQUOTES', # " 'COMMENTLINE', # -- 'RETURN', # return )
- How do I use the ply library?
- Is this a good start, and if so, what do I go from this?
- Are there any resources I can use to help me with this.
I've tried googling stuff on writing new programming languages, but I haven't yet found anything satisfactory
3,516 3 3 gold badges 30 30 silver badges 52 52 bronze badges
asked Apr 8, 2019 at 10:15
Furqan Lodhi Furqan Lodhi
21 1 1 gold badge 1 1 silver badge 2 2 bronze badges
For starting, that is a tuple not a list.
Apr 8, 2019 at 10:22
1 Answer 1
How do I use the ply library?
Assuming that you already have Ply installed, you should start with exploring the tutorials on the official Ply website. They are well written and easy to follow.
Is this a good start, and if so, what do I go from this?
Ply requires token definitions to begin with. You have already done that. However, the complexities increase when your lexer has to differentiate between say a string like "forget" and a reserved keyword like for . The library provides good support for variable precedence to resolve grammar ambiguity. This can be as easy as defining the precedence as tuples:
precedence = ( ('left', 'STRING', 'KEYWORD'), ('left', 'MULTIPLY', 'DIVIDE') ) However, I recommend you should read more about lexers and yacc before deep diving into the more advanced features like expressions and precedence in Ply. For a start, you should build a simple numerical lexer that successfully parses integers, operators and bracket symbols. I've reduced the token definition to suit this purpose. The following example has been modified from the official tutorials.
-
Library import & Token definition:
import ply.lex as lex #library import # List of token names. This is always required tokens = [ # OPERATORS # 'PLUS' , # + 'MINUS' , # - 'MULTIPLY', # * 'DIVIDE', # / 'MODULO', # % 'NOT', # ~ 'EQUALS', # = # COMPARATORS # 'LT', # < 'GT', # >'LTE', # = 'DOUBLEEQUAL', # == 'NE', # != 'AND', # & 'OR' , # | # BRACKETS # 'LPAREN', # ( 'RPAREN', # ) 'LBRACE', # [ 'RBRACE', # ] 'BLOCKSTART', # < 'BLOCKEND', # ># DATA TYPES# 'INTEGER', # int 'FLOAT', # dbl 'COMMENT', # -- ] # Regular expression rules for simple tokens t_PLUS = r'\+' t_MINUS = r'-' t_MULTIPLY = r'\*' t_DIVIDE = r'/' t_MODULO = r'%' t_LPAREN = r'\(' t_RPAREN = r'\)' t_LBRACE = r'\[' t_RBRACE = r'\]' t_BLOCKSTART = r'\' t_NOT = r'\~' t_EQUALS = r'\=' t_GT = r'\>' t_LT = r'\\=' t_DOUBLEEQUAL = r'\=\=' t_NE = r'\!\=' t_AND = r'\&' t_OR = r'\|' t_COMMENT = r'\#.*' t_ignore = ' \t' ignore spaces and tabs #Rules for INTEGER and FLOAT tokens def t_INTEGER(t): r'\d+' t.value = int(t.value) return t def t_FLOAT(t): r'(\d*\.\d+)|(\d+\.\d*)' t.value = float(t.value) return t # Define a rule so we can track line numbers def t_newline(t): r'\n+' t.lexer.lineno += len(t.value) # Error handling rule def t_error(t): print("Illegal character '%s'" % t.value[0]) t.lexer.skip(1) lexer = lex.lex() data = ''' [25/(3*40) + -16.5] 20 & 30 | 50 # This is a comment ''' # Give the lexer some input lexer.input(data) # Tokenize for tok in lexer: print(tok) You can add this example code to a Python script file like new_lexer.py and run it like python new_lexer.py . You should get the following output. Note that the input data consisted of newline( '\n' ) characters that were successfully ignored in the output.
#Output LexToken(LBRACE,'[',2,1) LexToken(INTEGER,25,2,2) LexToken(DIVIDE,'/',2,4) LexToken(LPAREN,'(',2,5) LexToken(INTEGER,3,2,6) LexToken(MULTIPLY,'*',2,7) LexToken(INTEGER,40,2,8) LexToken(RPAREN,')',2,10) LexToken(PLUS,'+',2,12) LexToken(BLOCKSTART,'<',2,14) LexToken(INTEGER,300,2,15) LexToken(MINUS,'-',2,18) LexToken(INTEGER,20,2,19) LexToken(BLOCKEND,'>',2,21) LexToken(MINUS,'-',2,23) LexToken(INTEGER,16,2,24) LexToken(FLOAT,0.5,2,26) LexToken(RBRACE,']',2,28) LexToken(BLOCKSTART,'<',3,30) LexToken(LPAREN,'(',3,31) LexToken(INTEGER,300,3,32) LexToken(MINUS,'-',3,35) LexToken(INTEGER,250,3,36) LexToken(RPAREN,')',3,39) LexToken(LT,'<',3,40) LexToken(LPAREN,'(',3,41) LexToken(INTEGER,400,3,42) LexToken(MINUS,'-',3,45) LexToken(INTEGER,500,3,46) LexToken(RPAREN,')',3,49) LexToken(BLOCKEND,'>',3,50) LexToken(INTEGER,20,4,52) LexToken(AND,'&',4,55) LexToken(INTEGER,30,4,57) LexToken(OR,'|',4,60) LexToken(INTEGER,50,4,62) LexToken(COMMENT,'# This is a comment',5,65)
There are many other features you can make use of. For instance, debugging can be enabled with lex.lex(debug=True) . The official tutorials provide more detailed information around these features.
I hope this helps to get you started. You can extend the code further to include reserved keywords like if , while and string identification with STRING , character identification with CHAR . The tutorials cover the implementation of reserved words by defining a key-value dictionary mapping like this:
reserved =
extending the tokens list further by defining the reserved token type as 'ID' and including the reserved dict values: tokens.append('ID') and tokens = tokens + list(reserved.values()) . Then, add a definition for t_ID as above.
Are there any resources I can use to help me with this.
There are many resources available to learn about lexers, parsers and compilers. You should start with a good book that covers the theory and implementation. There are many books available that cover these topics. I liked this one. Here's another resource that may help. If you'd like to explore similar Python libraries or resources, this SO answer may help.