
Как из файла Python3 создать .exe на Windows
Мы рассмотрим создание .exe с помощью библиотеки модуля py2exe. Для этого необходим Python 3.4 и ниже.
Если у вас установлена более высокая версия Python, попробуйте использовать Способ 2 (ниже)
В этом примере мы рассмотрим создание .exe на примере Python3.4.
Прежде всего на нужно создать виртуальное окружение для Python3.4. В этом примере мы назовем myenv, Вы можете выбрать любое другое имя, но не забывайте сделать соответствующие изменения.
На терминале наберите следующие команды:
>py -3.4 -m venv myenv > myenv\Scripts\activate.bat
В командной строке появится префикс myenv, а это значит, что виртуальное окружение с именем myenv загружено. Все команды Python теперь будет использовать новое виртуальное окружение.
Теперь давайте установим py2exe (https://pypi.python.org/pypi/py2exe~~HEAD=dobj) в нашем виртуальном окружении:
>pip install py2exeИ, наконец, чтобы создать единый EXE-файл, в нашем виртуальном окружении выполняем команду:
>python -m py2exe.build_exe hello.py -c --bundle-files 0(замените hello.py на имя вашего скрипта. Если скрипт находится в другой папке, то нужно использовать полный путь к вашему сценарию, например, C:\Projects\Python\ hello.py). Это создаст папку DIST, которая содержит исполняемый файл. Для быстрого доступа к нему, наберите в терминале:
> explorer dist
Вы увидите путь к папке, где находится EXE-файл.
Примечание: При выполнении, откроется окно и исчезают так же быстро, как и появилось.
Это происходит потому, что операционная система автоматически закрывает терминал, в котором консольная программа закончена.
Для того, чтобы изменить эту ситуацию, можно добавить строчку
> input (" Нажмите для выхода . ")
в конце файла Python. Интерпретатор будет ждать ввода пользователя, а окно будет оставаться открытым, пока пользователь не нажимает клавишу ввода.
Вы можете подробно изучить использование py2exe в документации на странице модуля: https://pypi.python.org/pypi/py2exe
Выход из виртуального окружения производится командой
>deactivate
Способ 2
Через командную строку Windows устанавливаем pyinstaller:
>pip install pyinstaller
В командной строке переходим в папку, где находится файл
cd c:\.
Затем в командной строке набираем команду
pyinstaller --onefile example.py
Вместо exapmle.py используем имя файла, из которого нужно создать exe файл.
Через пару минут все готово! Скоркее всего, exe файл будет находится во созданной подпапке dist
auto-py-to-exe 2.42.0
Converts .py to .exe using a simple graphical interface.
Навигация
Ссылки проекта
Статистика
Метаданные
Лицензия: MIT License (MIT)
Метки gui, executable
Требует: Python >=3.6
Сопровождающие
Классификаторы
Описание проекта
Auto PY to EXE
A .py to .exe converter using a simple graphical interface and PyInstaller in Python.
Suomenkieliset käyttöohjeet löydät täältä
Türkçe Talimatları burada bulabilirsiniz.
دستور العمل های فارسی
한국어로 된 설명은 여기를 참고하세요.
Demo
Getting Started
Prerequisites
- Python : 3.6-3.12
To have the interface displayed in the images, you will need chrome. If chrome is not installed or —no-chrome is supplied, the default browser will be used.
As of PyInstaller 4.0, Python 2.7 is no longer supported. Read «Python 2.7 Support» below for steps on how to use this tool with Python 2.7.
Installation and Usage
Installing Via PyPI
You can install this project using PyPI:
$ pip install auto-py-to-exe Then to run it, execute the following in the terminal:
$ auto-py-to-exe If you have more than one version of Python installed, you can use python -m auto_py_to_exe instead of auto-py-to-exe .
Installing Via GitHub
$ git clone https://github.com/brentvollebregt/auto-py-to-exe.git $ cd auto-py-to-exe $ python setup.py install Then to run it, execute the following in the terminal:
$ auto-py-to-exe Running Locally Via Github (no install)
You can run this project locally by following these steps:
- Clone/download the repo
- Open cmd/terminal and cd into the project
- Execute python -m pip install -r requirements.txt
Now to run the application, execute python -m auto_py_to_exe . A Chrome window in app mode will open with the project running inside.
Make sure you are in the directory below auto_py_to_exe (you will be after step 3) when calling python -m auto_py_to_exe or you will need to reference the folder auto_py_to_exe absolutely/relatively to where you currently are.
Using the Application
- Select your script location (paste in or use a file explorer)
- Outline will become blue when file exists
- Select other options and add things like an icon or other files
- Click the big blue button at the bottom to convert
- Find your converted files in /output when completed
Arguments
Usage: auto-py-to-exe [-nc] [-c [CONFIG]] [-o [PATH]] [filename]
| Argument | Type | Description |
|---|---|---|
| filename | positional/optional | Pre-fill the «Script Location» field in the UI. |
| -nc, —no-chrome | optional | Open the UI using the default browser (which may be Chrome). Will not try to find Chrome. |
| -nu, —no-ui | optional | Don’t try to open the UI in a browser and simply print out the address that the application can be accessed at. |
| -c [CONFIG], —config [CONFIG] | optional | Provide a configuration file (json) to pre-fill the UI. These can be generated in the settings tab. |
| -o [PATH], —output-dir [PATH] | optional | Set the default output directory. This can still be changed in the ui. |
| -bdo [FOLDER_PATH], —build-directory-override [FOLDER_PATH] | optional | Override the default build directory. Useful if you need to whitelist a folder to stop your antivirus from removing files. |
| -lang [LANGUAGE_CODE], —language [LANGUAGE_CODE] | optional | Hint the UI what language it should default to when opening. Language codes can be found in the table under «Translations» below. |
If you are running this package locally, you will need to call python -m auto_py_to_exe instead of auto-py-to-exe
JSON Configuration
Instead of inserting the same data into the UI over and over again, you can export the current state by going to the «Configuration» section within the settings tab and exporting the config to a JSON file. This can then be imported into the UI again to re-populate all fields.
This JSON config export action does not save the output directory automatically as moving hosts could mean different directory structures. If you want to have the output directory in the JSON config, add the directory under nonPyinstallerOptions.outputDirectory in the JSON file (will need to create a new key).
Video
If you need something visual to help you get started, I made a video for the original release of this project; some things may be different but the same concepts still apply.
Issues Using the Tool
If you’re having issues with the packaged executable or using this tool in general, I recommend you read my blog post on common issues when using auto-py-to-exe. This post covers things you should know about packaging Python scripts and fixes for things that commonly go wrong.
If you believe you’ve found an issue with this tool, please create an issue (click «Get started») and fill out the template provided by the «Bug report» option. If your issue is only associated with your application, please do not create an issue in this repository — instead, comment on the help post, video or create a new discussion.
When filling out the template, be sure to clearly explain what’s happening, give reproduction steps and a minimal reproducible example and explain what you believe should have happened. Without these, it’s going to take longer to identify the issue.
Translations
| Language | Translator | Translated |
|---|---|---|
| Arabic (العربية) | Tayeb-Ali | UI |
| Brazilian Portuguese (Português Brasileiro) | marleyas, reneoliveirajr | UI |
| Bulgarian (Български) | kbkozlev | UI and README |
| Chinese Simplified (简体中文) | jiangzhe11 | UI and README |
| Chinese Traditional (繁體中文) | startgo | UI |
| Czech (Čeština) | Matto58 | UI |
| Dutch (Nederlands) | barremans | UI |
| English | — | UI and README |
| Finnish (Suomen kieli) | ZapX5 | UI and README |
| French (Français) | flaviedesp | UI |
| German (Deutsch) | hebens, ackhh | UI |
| Greek (Ελληνικά) | sofronas | UI |
| Indonesian (Bahasa Indonesia) | MarvinZhong | UI |
| Italian (Italiano) | itsEmax64 | UI |
| Japanese (日本語) | NattyanTV | UI |
| Korean (한국어) | jhk1090 | UI and README |
| Persian (فارسی) | DrunkLeen, Ar.dst | UI and README |
| Polish (Polski) | Akuczaku | UI |
| Russian (Русский) | Oleg | UI |
| Serbian | rina | UI |
| Spanish (Español) | enriiquee | UI |
| Spanish Latam (Español Latam) | Matyrela | UI |
| Thai (ภาษาไทย) | teerut26 | UI (partial) |
| Turkish (Türkçe) | mcagriaksoy | UI and README |
| Ukrainian (Українська) | AndrejGorodnij | UI |
| Vietnamese (Tiếng Việt) | 7777Hecker | UI |
Want to add a translation for another language? Update i18n.js and submit a PR or attach it in an issue.
Python 2.7 Support
As of PyInstaller v4.0 released on Aug 9 2020, Python 2.7 is no longer supported; although you can still use this tool with Python 2.7 by installing an older version of PyInstaller. PyInstaller v3.6 was the last version that supported Python 2.7; to install this, first uninstall any existing versions of PyInstaller and then execute python -m pip install pyinstaller==3.6 .
Testing
Tests are located in tests/ and are run using pytest:
$ pip install pytest $ pip install -e . $ pytest Как создать exe файл для Python кода с помощью PyInstaller
Установка PyInstaller не отличается от установки любой другой библиотеки Python.
pip install PyInstaller Вот так можно проверить версию PyInstaller.
pyinstaller --versionЯ использую PyInstaller версии 4.2.
Создание exe файла с помощью PyInstaller
PyInstaller собирает в один пакет Python-приложение и все необходимые ему библиотеки следующим образом:
- Считывает файл скрипта.
- Анализирует код для выявления всех зависимостей, необходимых для работы.
- Создает файл spec, который содержит название скрипта, библиотеки-зависимости, любые файлы, включая те параметры, которые были переданы в команду PyInstaller.
- Собирает копии всех библиотек и файлов вместе с активным интерпретатором Python.
- Создает папку BUILD в папке со скриптом и записывает логи вместе с рабочими файлами в BUILD.
- Создает папку DIST в папке со скриптом, если она еще не существует.
- Записывает все необходимые файлы вместе со скриптом или в одну папку, или в один исполняемый файл.
Если использовать параметр команды onedir или -D при генерации исполняемого файла, тогда все будет помещено в одну папку. Это поведение по умолчанию. Если же использовать параметр onefile или -F , то все окажется в одном исполняемом файле.
Возьмем в качестве примера простейший скрипт на Python c названием simple.py, который содержит такой код.
import time name = input("Введите ваше имя ") print("Ваше имя ", name) time.sleep(5)Создадим один исполняемый файл. В командной строке введите:
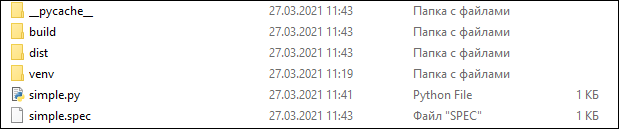
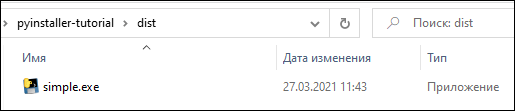
pyinstaller --onefile simple.pyПосле завершения установки будет две папки, BUILD и DIST, а также новый файл с расширением .spec. Spec-файл будет называться так же, как и файл скрипта.
Python создает каталог распространения, который содержит основной исполняемый файл, а также все динамические библиотеки.
Вот что произойдет после запуска файла.
Также, открыв spec-файл, можно увидеть раздел datas, в котором указывается, что файл netflix_titles.csv копируется в текущую директорию.
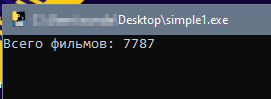
. a = Analysis(['simple1.py'], pathex=['E:\\myProject\\pyinstaller-tutorial'], binaries=[], datas=[('netflix_titles.csv', '.')], .Запустим файл simple1.exe, появится консоль с выводом: Всего фильмов: 7787 .
Добавление файлов с данными и параметр onefile
Если задать параметр --onefile , то PyInstaller распаковывает все файлы в папку TEMP, выполняет скрипт и удаляет TEMP. Если вместе с add-data указать onefile, то нужно считать данные из папки. Путь папки меняется и похож на «_MEIxxxxxx-folder».
import time import sys import os # pip install pandas import pandas as pd def count_records(): os.chdir(sys._MEIPASS) data = pd.read_csv('netflix_titles.csv') print("Всего фильмов:", data.shape[0]) if __name__ == "__main__": count_records() time.sleep(5)Скрипт обновлен для чтения папки TEMP и файлов с данными. Создадим exe-файл с помощью onefile и add-data.
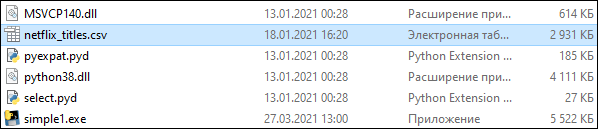
pyinstaller --onefile --add-data "netflix_titles.csv;." simple1.pyПосле успешного создания файл simple1.exe появится в папке DIST.
Можно скопировать исполняемый файл на рабочий стол и запустить, чтобы убедиться, что нет никакой ошибки, связанной с отсутствием файла.
Дополнительные импорты с помощью Hidden Imports
Исполняемому файлу требуются все импорты, которые нужны Python-скрипту. Иногда PyInstaller может пропустить динамические импорты или импорты второго уровня, возвращая ошибку ImportError: No module named …
Для решения этой ошибки нужно передать название недостающей библиотеки в hidden-import.
Например, чтобы добавить библиотеку os, нужно написать вот так:
pyinstaller --onefile --add-data "netflix_titles.csv;." — hidden-import "os" simple1.pyФайл spec
Файл spec — это первый файл, который PyInstaller создает, чтобы закодировать содержимое скрипта Python вместе с параметрами, переданными при запуске.
PyInstaller считывает содержимое файла для создания исполняемого файла, определяя все, что может понадобиться для него.
Файл с расширением .spec сохраняется по умолчанию в текущей директории.
Если у вас есть какое-либо из нижеперечисленных требований, то вы можете изменить файл спецификации:
- Собрать в один бандл с исполняемым файлы данных.
- Включить другие исполняемые файлы: .dll или .so.
- С помощью библиотек собрать в один бандл несколько программы.
Например, есть скрипт simpleModel.py, который использует TensorFlow и выводит номер версии этой библиотеки.
import time import tensorflow as tf def view_model(): print(tf.__version__) if __name__ == "__main__" : model = view_model() time.sleep(5)Компилируем модель с помощью PyInstaller:
pyinstaller -F simpleModel.pyПосле успешной компиляции запускаем исполняемый файл, который возвращает следующую ошибку.
. File "site-packages\tensorflow_core\python_init_.py", line 49, in ImportError: cannot import name 'pywrap_tensorflow' from 'tensorflow_core.python'Исправим ее, обновив файл spec. Одно из решений — создать файл spec.
$ pyi-makespec simpleModel.py -F wrote E:\pyinstaller-tutorial\simpleModel.spec now run pyinstaller.py to build the executableКоманда pyi-makespec создает spec-файл по умолчанию, содержащий все параметры, которые можно указать в командной строке. Файл simpleModel.spec создается в текущей директории.
Поскольку был использован параметр --onefile , то внутри файла будет только раздел exe.
. exe = EXE(pyz, a.scripts, a.binaries, a.zipfiles, a.datas, [], name='simpleModel', debug=False, bootloader_ignore_signals=False, strip=False, upx=True, upx_exclude=[], runtime_tmpdir=None, console=True )Если использовать параметр по умолчанию или onedir, то вместе с exe-разделом будет также и раздел collect.
Можно открыть simpleModel.spec и добавить следующий текст для создания хуков.
# -*- mode: python ; coding: utf-8 -*- block_cipher = None import os spec_root = os.path.realpath(SPECPATH) options = [] from PyInstaller.utils.hooks import collect_submodules, collect_data_files tf_hidden_imports = collect_submodules('tensorflow_core') tf_datas = collect_data_files('tensorflow_core', subdir=None, include_py_files=True) a = Analysis(['simpleModel.py'], pathex=['E:\\myProject\\pyinstaller-tutorial'], binaries=[], datas=tf_datas + [], hiddenimports=tf_hidden_imports + [], hookspath=[], .Создаем хуки и добавляем их в hidden imports и раздел данных.
Хуки
Файлы хуков расширяют возможность PyInstaller обрабатывать такие требования, как необходимость включать дополнительные данные или импортировать динамические библиотеки.
Обычно пакеты Python используют нормальные методы для импорта своих зависимостей, но в отдельных случаях, как например TensorFlow, существует необходимость импорта динамических библиотек. PyInstaller не может найти все библиотеки, или же их может быть слишком много. В таком случае рекомендуется использовать вспомогательный инструмент для импорта из PyInstaller.utils.hooks и собрать все подмодули для библиотеки.
Скомпилируем модель после обновления файла simpleModel.spec.
pyinstaller simpleModel.specСкопируем исполняемый файл на рабочий стол и увидим, что теперь он корректно отображает версию TensorFlow.
Вывод:
PyInstaller предлагает несколько вариантов создания простых и сложных исполняемых файлов из Python-скриптов:
- Исполняемый файл может собрать в один бандл все требуемые данные с помощью параметра --add-data .
- Исполняемый файл и зависимые данные с библиотеками можно собрать в один файл или папку с помощью --onefile или --onedir соответственно.
- Динамические импорты и библиотеки второго уровня можно включить с помощью hidden-imports .
- Файл spec позволяет создать исполняемый файл для обработки скрытых импортов и других файлов данных с помощью хуков.
Create Executable of Python Script using PyInstaller

In this short guide, you’ll see the full steps to create an executable of a Python script using PyInstaller.
The following video tutorial is also included:
Steps to Create an Executable using PyInstaller
Step 1: Add Python to Windows Path
An easy way to add Python to the path is by downloading a recent version of Python, and then checking the box to ‘Add Python to PATH’ at the beginning of the installation:
Add Python to PATH
Finish the installation, and you should be good to go.
Step 2: Install the PyInstaller Package
Next, open the Windows “Command Prompt” and then type the following command to install the PyInstaller package:
pip install pyinstaller
Step 3: Save your Python Script
Now save your Python script at your desired location.
For illustration purposes, let’s create a simple Python script that displays ‘Hello World!’ when clicking a button:
import tkinter as tk root = tk.Tk() canvas1 = tk.Canvas(root, width=300, height=300) canvas1.pack() def hello(): label1 = tk.Label( root, text="Hello World!", fg="blue", font=("helvetica", 12, "bold") ) canvas1.create_window(150, 200, window=label1) button1 = tk.Button(text="Click Me", command=hello, bg="brown", fg="white") canvas1.create_window(150, 150, window=button1) root.mainloop()
For demonstration purposes, let’s say that the Python script is stored in the following folder:
C:\Users\Ron\Desktop\Test
Where the Python script is called ‘hello‘ and the file extension is ‘.py‘
Step 4: Create the Executable using PyInstaller
Now you’ll be able to create the executable of the Python script using PyInstaller.
Simply go to the Command Prompt, and then type:
cd followed by the location where your Python script is stored
Here is the command for our example:
C:\Users\Ron> cd C:\Users\Ron\Desktop\Test
Press Enter (after you typed the location where the Python script is stored on your computer).
Then, refer to the following template to create the executable:
pyinstaller --onefile pythonScriptName.py
Since for our example, the pythonScriptName is ‘hello‘ (and the file extension is .py), then the command to create the executable is:
pyinstaller --onefile hello.py
Press Enter for the last time.
Step 5: Run the Executable
Your executable will be created at the location that you specified.
For our example, it will be under the same folder where the ‘hello’ script was originally stored:
C:\Users\Ron\Desktop\Test
You’ll notice that few additional files were created at that location.
To find the executable file, open the dist folder. You’ll then see the executable file:
Double click on the file, and you should be able to launch your program (if you get an error message, you may need to install Visual C++ Redistributable).
In our case, once you click on the ‘hello’ executable, you’ll get a display with a single button.
And if you click on that button, you’ll see the following expression:
Hello World!You can read more about PyInstaller by visiting the PyInstaller manual.