
How to Open a JAR File on Windows
Occasionally, you find applications or games distributed as .jar files instead of the usual .exe file. You can’t just double-click on a JAR file to run the app. How, then, do you open a JAR file?
Java used to be a popular coding language to create freeware games and applications. Even now, many freeware apps are distributed as .jar files, which Windows does not natively support. This article will walk you through ways to open JAR files on your computer.
Table of Contents
What Is a JAR File?
Internet browsers used Java to offer a dynamic browsing experience. Games and other interactive applets were coded using Java and could run on any platform.
But there was a small problem. It took multiple HTTP requests to download all the assets required for that applet to work, slowing down its load time. A better approach would be to package all the files into a single file that Java could access to run an application.
And that’s exactly what the JAR file is. Inspired by WinZip, JAR is a file archive used by Java to hold anything from multimedia files to code and is accessible to Java applets.
Install Java on Your PC
The most straightforward method to open a JAR file is to install the Java Runtime Environment (JRE) on your computer. Not only does this give you the ability to open .jar files, but it also makes your system capable of running Java apps.
- Download the latest JRE version, head to Oracle’s official download page.
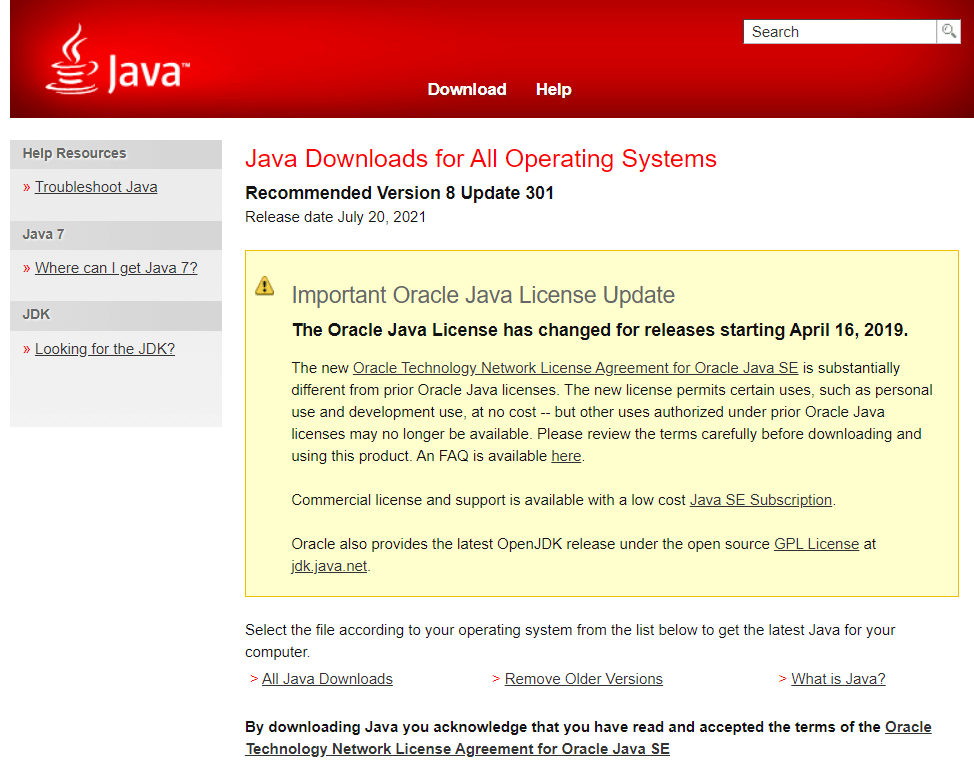
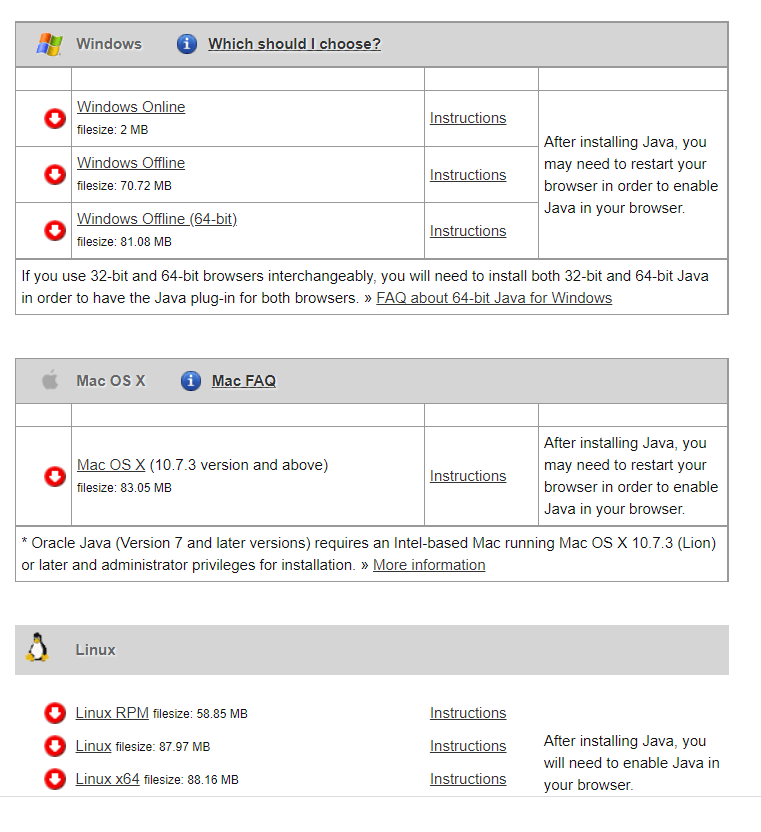
- Scroll down to find the right installation package for your operating system. There are both online and offline installers. The online setup will simply download the necessary files during the installation while the offline version downloads all necessary files first and then will start the installation.
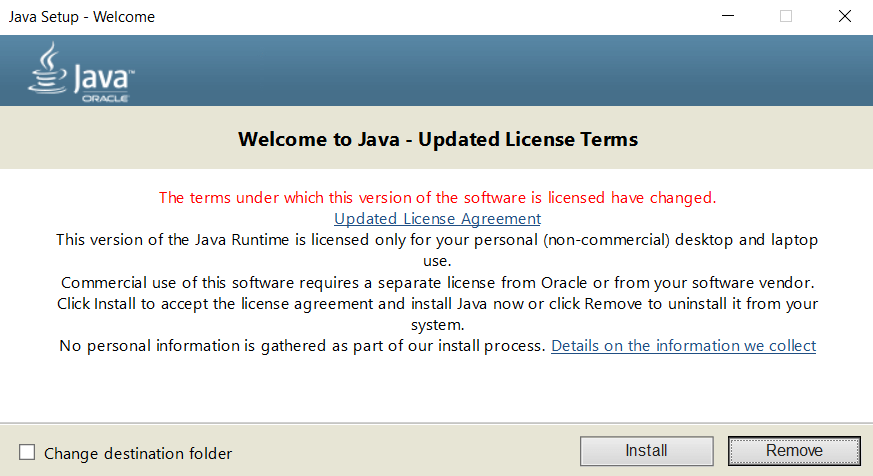
- Run the downloaded file to begin the installation of JRE on your computer. Accept the license agreement to get the setup underway. Usually, the installer will automatically remove older versions of JRE, though you can do that manually if needed.
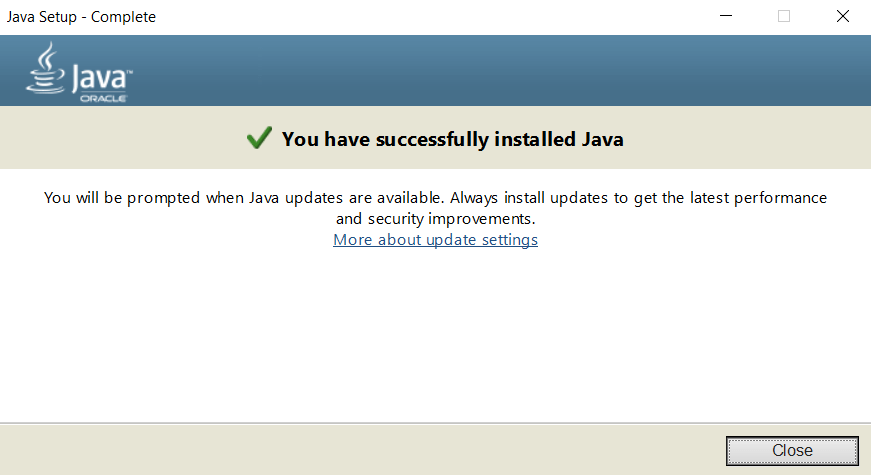
- A completed installation allows you to run any Java app on your PC, including JAR files.
Note that this only allows your computer to open JAR files using the method mentioned below, but it doesn’t associate the .jar extension, which means that if you attempt to double-click a JAR file, Windows still wouldn’t know what to do with the file.
Check the following section to learn how to open a JAR file once JRE has been installed.
Open From Command Prompt
To be clear, this isn’t a different method at all. You still need to have Java installed on your computer to open JAR files from the command prompt, so that step comes first.
Once you’ve installed Java on your computer using the process in the last section, you can then use the command prompt to open JAR files.
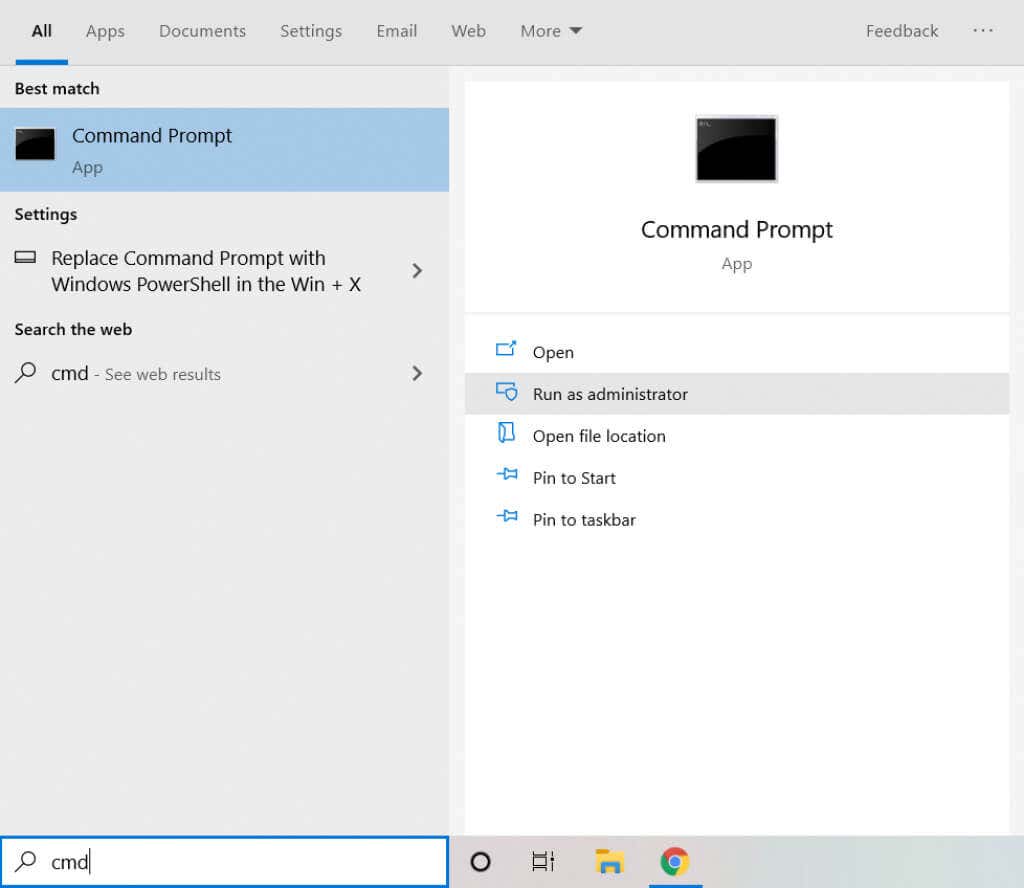
- Open Command Prompt as an administrator. Type cmd in the search bar to locate the application.
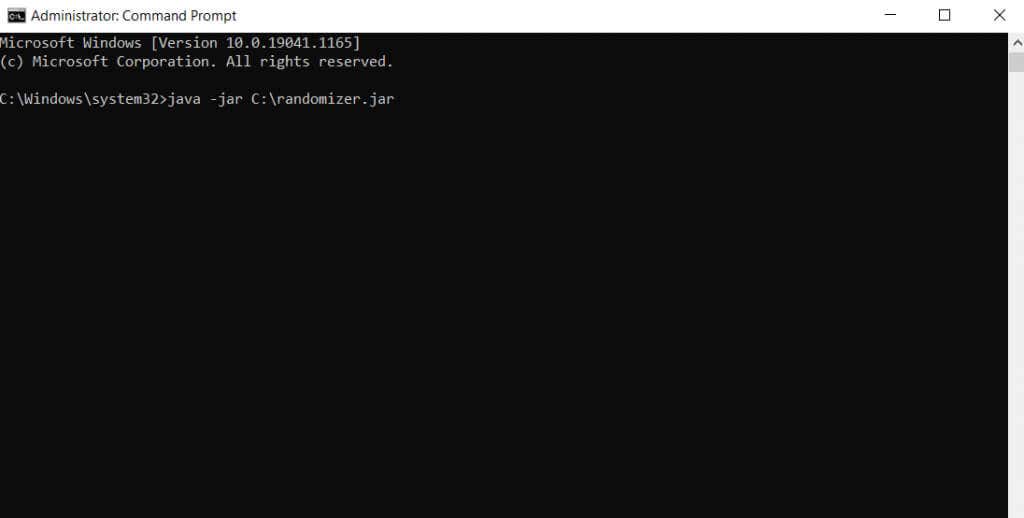
- Enter the command java -jar C:pathtofile.jar , where “pathtofile” is the path of the file in question. You can copy the file to the C drive itself to make it easier, allowing you to enter just the file name.
- Upon execution of the command, Windows will use the JRE to interpret the JAR file. You should now see the Java application running.
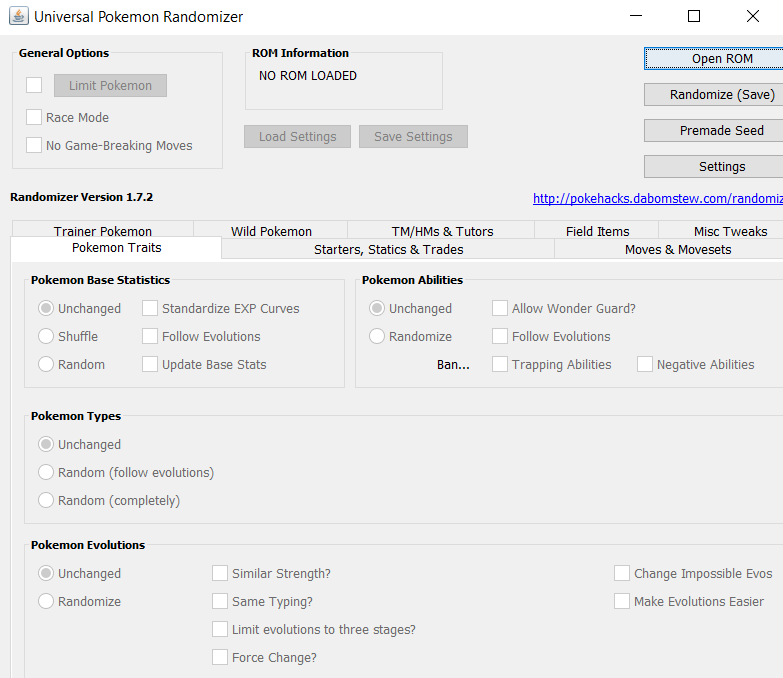
Unless the application you want is distributed as an executable Java file, you’ll need to execute all these steps each time you run a JAR file.
Extract as an Archive
JAR files are archived data with a fancy name. Sure they’re meant for Java applications, but a .jar file only compresses and archives them into a single package, thereby letting you extract JAR files using any leading file extraction tool like WinRAR or 7-Zip. This will let you see the contents of the package, though you’ll still need the JRE if you want to run the application itself.
- Download the 7-Zip installer to extract .jar files.
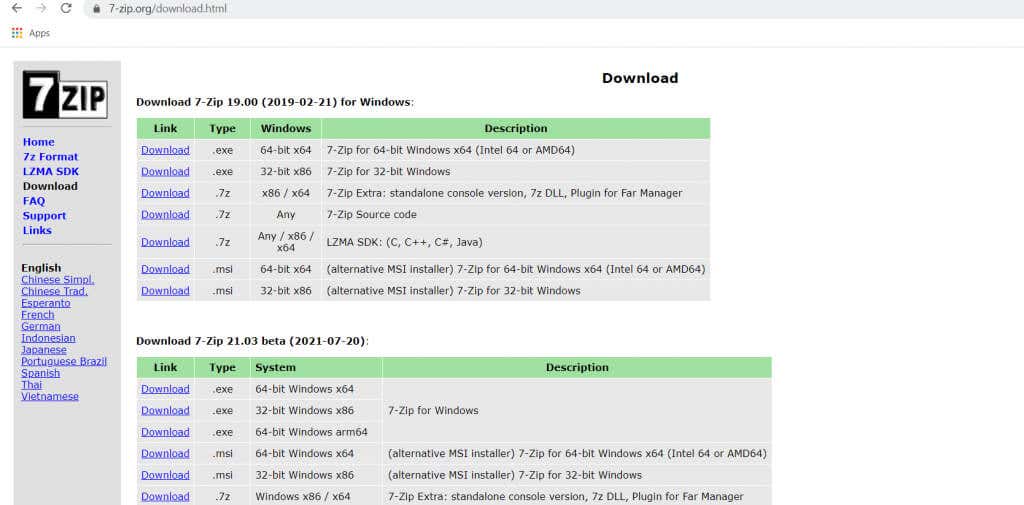
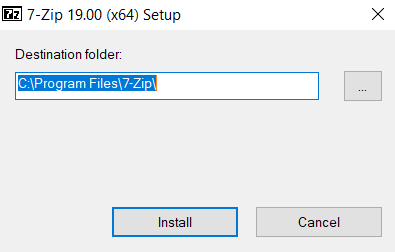
- Run the downloaded .exe file to install 7-Zip on your computer.
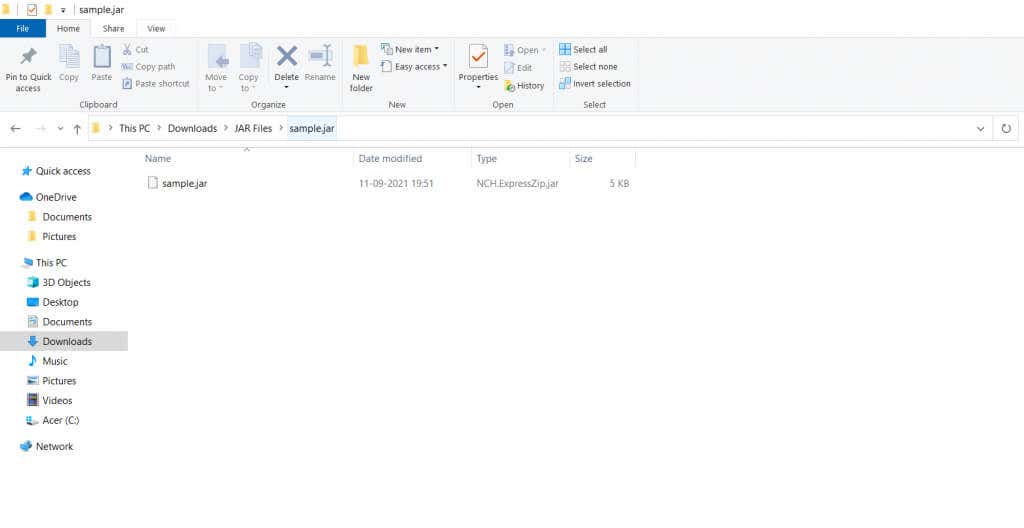
- Navigate to the directory containing the JAR file you wish to extract.
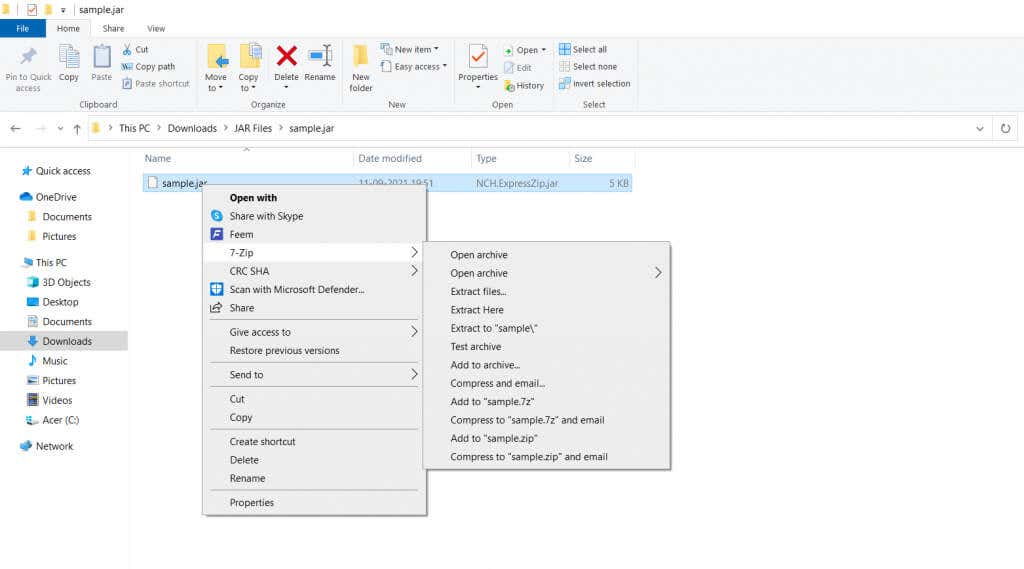
- Right-click on the file, select 7-Zip, and then select Extract All.
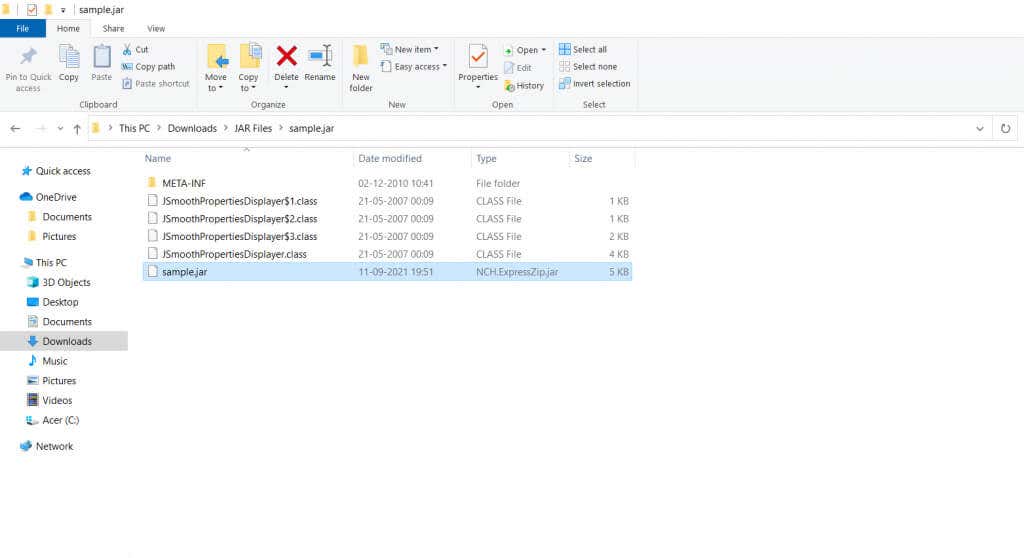
- The JAR file will be extracted into the directory.
What is the Best Method To Open a JAR File on Windows 10?
JAR files are usually Java applications packaged into a single file. To run them, you need to have the Java Runtime Environment installed on your PC. As JRE is free to download, this is the easiest way to get .jar files working on your Windows computer.
On the other hand, if you just want to look at the contents of the JAR archive but not actually run it, you can always use a file extraction tool. Apps like 7-Zip or WinRAR can easily extract the contents of a .jar file.
Levin Roy is a software engineer who loves writing about technology. Whether it is Windows tips-and-tricks or in-depth guides about application development, Levin uses his practical experience and technical skills to create articles that can help solve tricky problems. Read Levin’s Full Bio
Subscribe on YouTube!
Did you enjoy this tip? If so, check out our YouTube channel from our sister site Online Tech Tips. We cover Windows, Mac, software and apps, and have a bunch of troubleshooting tips and how-to videos. Click the button below to subscribe!
Что такое jar файл и зачем он нужен?
Вопрос такой что такое jar файл и зачем он нужен на практике. Ведь если есть файл java, есть файл class который уже переведен в байт-код, зачем тогда jar файл? Какая его функция и можно ли без него обойтись?
Отслеживать
14.2k 1 1 золотой знак 21 21 серебряный знак 31 31 бронзовый знак
задан 20 июн 2017 в 7:19
Виталий Vit Виталий Vit
179 1 1 золотой знак 1 1 серебряный знак 7 7 бронзовых знаков
А если в вашем приложении 200 классов?
20 июн 2017 в 7:20
Это аналог EXE.
23 июн 2017 в 6:09
1 ответ 1
Сортировка: Сброс на вариант по умолчанию
JAR-файл — это Java-архив (Java ARchive). Это простой архивный файл, сжатый (иногда с нулевой компрессией) по алгоритму zip.
Он был создан для удобства распространения программ, написанных на Java. Так как обычная программа содержит сотни, тысячи, а иногда и миллионы файлов. Файл может содержать:
- файл манифеста META-INF/MANIFEST.MF
- java-файлы (исходный код)
- class-файлы
- файлы, необходимые для работы программы: картинки, файлы с настройками и прочее (ресурсы)
- электронные подписи, которые позволяют защитить программу от модификации
Манифест — это текстовый файл формата ключ: значение ; он содержит описание jar-файла. В нем могут быть следующие ключи:
- Manifest-Version — версия манифеста
- Main-Class — имя главного класса (должен содержать метод main ), такой jar-файл можно запустить как обычный исполняемый файл
- Class-Path — позволяет указать CLASSPATH , который необходим для полноценной работы программы
- SHA-Digest — контрольная сумма определенного файла внутри архива
Кроме jar, также существуют другие архивы, связанные с Java:
- WAR (Web Application aRchive) — содержит в себе приложение для веба
- EAR (Enterprise Application aRchive) — содержит в себе энтерпрайз приложение (обычно из нескольких модулей)
- APK (Android aPplication pacKage) — содержит в себе приложение для Android
Можно ли обойтись без?
В принципе, можно, все что вам необходимо — это всегда точно копировать структуру вашего приложения. То есть все класс-файлы и файлы с ресурсами должны располагаться в правильных директориях. Переменная CLASSPATH должна содержать пути ко всем зависимостям. Если эти условия соблюдены, то ваше приложение будет работать без упаковки в jar.
P.S. В переводе с английского, jar — означает банка, стеклянный или керамический цилиндрический контейнер с широким горлом, предназначенный для хранения еды (обычно). Кофе часто хранят в банках, так что тут игра слов: банка с кофе — банка с java-классами.
The jar Command
The jar command is a general-purpose archiving and compression tool, based on the ZIP and ZLIB compression formats. Initially, the jar command was designed to package Java applets (not supported since JDK 11) or applications; however, beginning with JDK 9, users can use the jar command to create modular JARs. For transportation and deployment, it’s usually more convenient to package modules as modular JARs.
The syntax for the jar command resembles the syntax for the tar command. It has several main operation modes, defined by one of the mandatory operation arguments. Other arguments are either options that modify the behavior of the operation or are required to perform the operation.
When modules or the components of an application (files, images and sounds) are combined into a single archive, they can be downloaded by a Java agent (such as a browser) in a single HTTP transaction, rather than requiring a new connection for each piece. This dramatically improves download times. The jar command also compresses files, which further improves download time. The jar command also enables individual entries in a file to be signed so that their origin can be authenticated. A JAR file can be used as a class path entry, whether or not it’s compressed.
An archive becomes a modular JAR when you include a module descriptor, module-info.class , in the root of the given directories or in the root of the .jar archive. The following operations described in Operation Modifiers Valid Only in Create and Update Modes are valid only when creating or updating a modular jar or updating an existing non-modular jar:
- —module-version
- —hash-modules
- —module-path
Note:
All mandatory or optional arguments for long options are also mandatory or optional for any corresponding short options.
Main Operation Modes
When using the jar command, you must specify the operation for it to perform. You specify the operation mode for the jar command by including the appropriate operation arguments described in this section. You can mix an operation argument with other one-letter options. Generally the operation argument is the first argument specified on the command line.
-c or —create Creates the archive. -i= FILE or —generate-index= FILE Generates index information for the specified JAR file. -t or —list Lists the table of contents for the archive. -u or —update Updates an existing JAR file. -x or —extract Extracts the named (or all) files from the archive. -d or —describe-module Prints the module descriptor or automatic module name.
Operation Modifiers Valid in Any Mode
You can use the following options to customize the actions of any operation mode included in the jar command.
Changes the specified directory and includes the files specified at the end of the command line.
-f= FILE or —file= FILE Specifies the archive file name. —release VERSION
Creates a multirelease JAR file. Places all files specified after the option into a versioned directory of the JAR file named META-INF/versions/ VERSION / , where VERSION must be must be a positive integer whose value is 9 or greater.
At run time, where more than one version of a class exists in the JAR, the JDK will use the first one it finds, searching initially in the directory tree whose VERSION number matches the JDK’s major version number. It will then look in directories with successively lower VERSION numbers, and finally look in the root of the JAR.
-v or —verbose Sends or prints verbose output to standard output.
Operation Modifiers Valid Only in Create and Update Modes
You can use the following options to customize the actions of the create and the update main operation modes:
-e= CLASSNAME or —main-class= CLASSNAME Specifies the application entry point for standalone applications bundled into a modular or executable modular JAR file. -m= FILE or —manifest= FILE Includes the manifest information from the given manifest file. -M or —no-manifest Doesn’t create a manifest file for the entries. —module-version= VERSION Specifies the module version, when creating or updating a modular JAR file, or updating a non-modular JAR file. —hash-modules= PATTERN Computes and records the hashes of modules matched by the given pattern and that depend upon directly or indirectly on a modular JAR file being created or a non-modular JAR file being updated. -p or —module-path Specifies the location of module dependence for generating the hash. @ file Reads jar options and file names from a text file.
Operation Modifiers Valid Only in Create, Update, and Generate-index Modes
You can use the following options to customize the actions of the create ( -c or —create ) the update ( -u or —update ) and the generate-index ( -i or —generate-index= FILE) main operation modes:
-0 or —no-compress Stores without using ZIP compression.
Other Options
The following options are recognized by the jar command and not used with operation modes:
-h or —help [ :compat ] Displays the command-line help for the jar command or optionally the compatibility help. —help-extra Displays help on extra options. —version Prints the program version.
Examples of jar Command Syntax
- Create an archive, classes.jar , that contains two class files, Foo.class and Bar.class .
jar —create —file classes.jar Foo.class Bar.class
jar —create —file classes.jar —manifest mymanifest -C foo/
jar —create —file foo.jar —main-class com.foo.Main —module-version 1.0 -C foo/classes resources
jar —update —file foo.jar —main-class com.foo.Main —module-version 1.0 -C foo/module-info.class
jar —create —file foo.jar —main-class com.foo.Hello -C classes . —release 10 -C classes-10 .
The JAR file foo.jar now contains:
% jar -tf foo.jar META-INF/ META-INF/MANIFEST.MF com/ com/foo/ com/foo/Hello.class com/foo/NameProvider.class META-INF/versions/10/com/ META-INF/versions/10/com/foo/ META-INF/versions/10/com/foo/NameProvider.classAs well as other information, the file META-INF/MANIFEST.MF , will contain the following lines to indicate that this is a multirelease JAR file with an entry point of com.foo.Hello .
. Main-Class: com.foo.Hello Multi-Release: trueJar что это
В обоих случаях (IDE или утилита jar) в архиве будет создаваться файл MANIFEST.MF. Как я уже писал — есть смысл почитать о дополнительных свойствах JAR-файлов. Т.к. в документации все очень неплохо написано, не буду заниматься переводом. Так что перейдем к следующему пункту нашего путешествия по JAR-файлам.
Подключение готовых JAR-файлов
Командная строка
Итак, я сказал, что основная функция JAR — содержать набор классов в виде class-файлов. Теперь нам надо понять, как подключать JAR-файлы к запускаемому классу, чтобы запускаемый класс мог использовать классы из JAR-файла.
Как вы уже хорошо знаете, запуск программы на Java включает запуск JVM (для Windows это файл java.exe, для Unix — java) и передача ей из командной строки имени класса, который вы собираетесь запускать. Например, для запуска класса First в пакете edu.javacourse.test надо в каталоге, внутри которого находится каталог edu/javacourse/test набрать такую команду:
java edu . javacourse . test . First
Как видите, в качестве аргумента мы передали полное имя класса, который собираемся запускать. JVM кроме имени класса принимает достаточно много параметров, которые позволяют конфигурировать те или иные свойства JVM. В этой статье мы разберем очень важный элемент — CLASSPATH — который как раз и используется для подключения JAR-файлов.
Сейчас мы проделаем полный цикл создания JAR-файла и его подключения без использования IDE — я очень трепетно отношусь к умению программиста пользоваться командной строкой. Во-первых, это показывает, что вы действительно понимаете суть, во-вторых — этот навык ну просто очень полезен. Например, в том же Unix/Linux очень большое количество работы гораздо удобнее делать в командной строке, да и некоторые продукты содержат утилиты, запускаемые из командной строки. Так что займемся.
Создадим каталог JavaLesson (в принципе мы его уже создавали в разделе Основные шаги. В этом каталоге создадим стуктуру каталогов JarLib/edu/javacourse/jar. С помощью текстового редактора создадим файл SayHello.java
package edu . javacourse . jar ;
public class SayHello
public void sayHello ( ) <
System . out . println ( "HELLO" ) ;
Структура наших каталогов должна выглядеть вот так:
JavaLesson
javacourse
SayHello . java
Теперь время за командной строкой. Запускаем команду «cmd» (если не помните — смотрим раздел Основные шаги). Переходим в каталог JavaLesson/JarLib и в нем сначала компилируем наш файл SayHello.java вот такой командой
javac edu / javacourse / jar / SayHello . java
После успешной компиляции создаем JAR-файл с помощью команды
jar cf say . jar edu / javacourse / jar / SayHello . class
Если у вас все получилось, то в каталоге JavaLesson/JarLib должен появится файл say.jar.
Теперь напишем небольшой класс, который будет использовать наш класс SayHello. ВАЖНО . Для «чистоты эксперимента» создадим этот класс в каталоге JavaLesson. Предлагаю создать класс без использования пакетов (хотя это не должно быть правилом — в реальных проектах создавать классы без пакетов не надо). Вот наш файл UseHello.java, который будет находится в каталоге JavaLesson
import edu . javacourse . jar . SayHello ;
public class UseHello
public static void main ( String [ ] args ) <
SayHello sh = new SayHello ( ) ;
sh . sayHello ( ) ;
Обратите внимание на первую строчку — в ней мы импортируем класс SayHello. В методе main мы создаем объект и вызываем его метод. Структура наших каталогов должна выглядеть вот так:
JavaLesson
javacourse
SayHello . java
UseHello . java
Теперь нам надо скомпилировать наш замечательный класс. Пробуем команду javac. ВНИМАНИЕ . Мы находимся в каталоге JavaLesson.
javac UseHello . java
И мы получаем ошибку:
C : \ JavaLesson > javac UseHello . java
UseHello . java : 1 : error : package edu . javacourse . jar does not exist
import edu . javacourse . jar . SayHello ;
UseHello . java : 6 : error : cannot find symbol
SayHello sh = new SayHello ( ) ;
symbol : class SayHello
location : class UseHello
UseHello . java : 6 : error : cannot find symbol
SayHello sh = new SayHello ( ) ;
symbol : class SayHello
location : class UseHello
Сообщение в данном случае достаточно информативное — «UseHello.java:1: error: package edu.javacourse.jar does not exist» и «UseHello.java:6: error: cannot find symbol». Мы же не подключали наш класс SayHello — вот компилятор и не знает, откуда его брать и вообще откуда такой пакет/класс — edu.javacourse.jar.SayHello. Ну что же — перефразируя классику — «Ваше слово, товарищ CLASSPATH».
Очевидно, что нам надо компилятору подсказать, что он должен использовать не только те JAR-файлы, которые у него уже есть — тот же rt.jar — но и наш JAR-файл. Делается это с помощью специальной опции при запуске компилятора.
javac — cp JarLib / say . jar UseHello . java
В этой команде мы добавили строку -cp JarLib/say.jar. Часть -cp говорит, что за ней должен идти список JAR-файлов, которые содержат нужные классы. Список может включать несколько файлов, разделенных для Windows знаком «;», для Unix/Linux — «:». Например, если мне надо указать два файла — say1.jar и say2.jar — находящихся в каталоге C:/Anton/Libraries, то команда (для Windows) выглядела бы так:
javac — cp C : / Anton / Libraries / say1 . jar ; C : / Anton / Libraries / say2 . jar UseHello . java
Кстати, «-cp» — сокращенно от classpath — раньше надо было писать именно так, да и сейчас тоже можно.
javac — classpath C : / Anton / Libraries / say1 . jar ; C : / Anton / Libraries / say2 . jar UseHello . java
Также важно отметить, что в CLASSPATH можно включать не только JAR-файлы — туда можно включать путь до каталога с файлами .class (опять же — их может быть указано несколько штук). Если бы мы не создавали JAR-файл say.jar, а использовали скомпилированный файл SayHello.class из каталога JarLib, то команда выглядела бы вот так:
java — cp JarLib UseHello . java
Вы можете спросить — почему мы указали путь только до JarLib, а не полностью каталог с файлом SayHello.class. Дело в том, что т.к. наш файл содержится в пакете, то нам надо указать путь именно до пакета, а он находится в каталоге JarLib. Можно указать полный (а не относительный) путь — вот так:
javac — cp C : / JavaLesson / JarLib UseHello . java
Ну что же, скомпилировать нам удалось, самое время запускать наше замечательный класс. Скорее всего, вы уже догадываетесь, что при запуске нам тоже надо указать наш файл say.jar и выглядеть команда должна как-то так. ВНИМАНИЕ . Мы находимся в каталоге JavaLesson.
java — cp JarLib / say . jar UseHello
Но при запуске этой программы нас постигает неудача. Вот такое сообщение выдает JVM:
Error : Could not find or load main class UseHello
JVM не может найти наш класс. Как это, вот же он, прямо в этой директории ? Хитрость в том, что когда вы указываете CLASSPATH в командной строке, то JVM берет классы ТОЛЬКО из этих файлов/каталогов. А наш файл с классом UseHello находится в ТЕКУЩЕМ каталоге, который НЕ УКАЗАН. Вот такая вот эпидерсия. Нам надо указать JVM, чтобы она брала файлы и из текущего каталога тоже. Делается это так — в CLASSPATH надо указать символ «.». Это и будет текущий каталог. Наща команда должна выглядеть вот так:
java — cp . ; JarLib / say . jar UseHello
Ну что же — теперь все должно получится и мы увидим надпись HELLO.
Фокус с CLASSPATH может сыграть с вами достаточно злую шутку. Дело в том, что JVM использует переменную среды, которая так и называется «CLASSPATH». Для Windows она устанавливается точно так же как переменные «PATH» и «JAVA_HOME» — мы делали это в разделе Установка JDK. В этой переменной указывается набор JAR-файлов и каталогов, которые JVM будет использовать в случае, если вы НЕ указываете CLASSPATH при запуске своей программы.
Некоторые программы при своей установке создают (или обновляют) переменную среды «CLASSPATH» и могут даже вам ничего не сказать. И вот вы из командной строки запускаете свой класс, а JVM его НЕ ВИДИТ. Потому? что она dpzkf переменную «CLASSPATH» и в ней нет символа «.». В этом случае происходит то, что мы уже видели — файлы из текущего каталога не загружаются. Так что будьте внимательны.
Подключение JAR-библиотек в IDE NetBeans

Т.к. в данном курсе я использую для демонстрации NetBeans, то наверно будет неправильно не показать, как подлкючать JAR в этой среде. Как я уже упоминал, если появится время на другие IDE, я буду писать их в этой же статье. Но не думаю, что это будет в ближащее время.
Если вы посмотрите служебное окно «Projects», которое обычно находится слева, то вы в нем вы можете увидеть структуру вашего проекта, которая содержит раздел «Libraries». Я создал два проекта SayHello и UseHello
В открытом файле UseHello.java в самой первой строке видно, что компилятор выдает в ней ошибку — как мы уже знаем, она говорит об отсутствии нужного класса. В принципе IDE позволяют подключать не только готовые JAR-файлы, но и проекты, но мы не будем использовать эту функцию (в данном случае специально). Чтобы подключить библиотеку из проекта SayHello нам для начала надо собрать этот проект через команду «Build». Результат можем увидеть в каталоге dist. В нем мы можем увидеть файл SayHello.jar. Предвидя вопрос — а можно поменять имя файла — для того, чтобы файл создавался с другим именем, надо исправлять конфигурационный файл nbproject/project.properties. Найти в нем опцию с именем dist.jar И поменять имя файла. В общем не очень удобно. Так что я обычно этого не делаю.
Теперь нам надо подключить готовый JAR-файл к нашему второму проекту UseHello. Сделать это можно несколькими способами.
- Щелкнуть правой кнопкой мышки на пункте «Libraries» в структуре проекта и в нем выбрать пункт «Add JAR/Folder». После выбора файла его можно будет видеть под веткой «Libraries»
- Целкнуть правой кнопкой мышки на проекте UseHello в окне «Projects» и в выпадающем меню выбрать пункт (обычно самый нижний) «Properties». В открывшемся диалоговом окне выбрать слева пункт «Libraries» и в закладке «Compile» использовать кнопку «Add JAR/Folder».
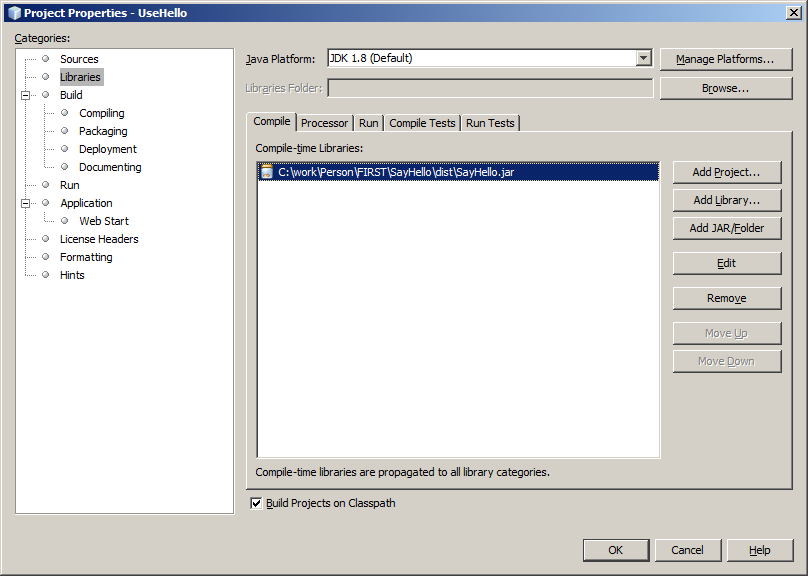
Также предлагаю заглянуть на закладку «Run». В нем можно увидеть, что при запуске будет подключаться те библиотеки, которые подключаются при компиляции исходников («Classpath for Compiling Source»). 
На этом можно закруглиться, хотя конечно же процесс познания бесконечен и вам наверняка встретится еще много интересной информации по использованию и созданию jar-файлов.
Исходный код для проектов под NetBeans можно скачать здесь. Библиотеку в них надо подключить самостоятельно. Так что можете потренироваться. Удачи.
И теперь нас ждет следующая статья: Многопоточность — первые шаги.