
How to Zoom In on CapCut: Complete Guide


Video editing is no longer exclusive to filmmakers with the explosive growth of social video platforms like TikTok. People will ask how to do this or how to do that after seeing some impressive effects, for example, zoom. It is a simple edit you can do even on your phone.
You can create a zoom effect manually when shooting or automatically during post-production with CapCut, one of the most used video editing apps these days. There are three methods on how to zoom in on CapCut. Here’s the only step-by-step guide you’ll need.
How to Zoom In on Capcut
CapCut offers most features you might need in short video creation and editing. You can zoom in on a video on CapCut using the Zoom Lens effect. It’s a preset effect for the one-click operation. Below are the detailed steps.
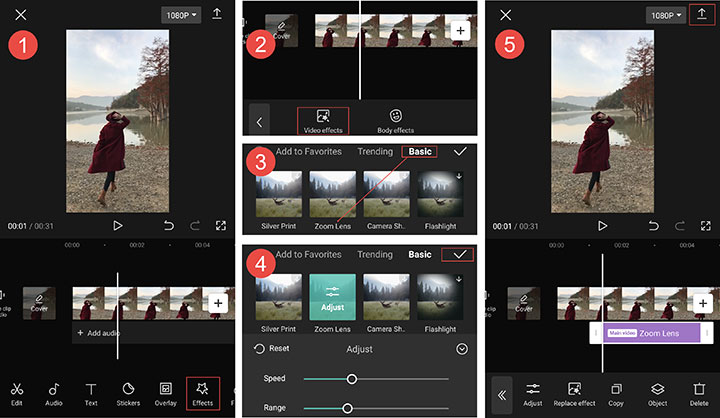
- Launch CapCut on your device and create a new project.
- Add the video to use.
- Click the Effects button at the bottom, then select Video effects.
- Scroll through and choose the Zoom Lens effect in the Basic section.
- Customize the Speed and Range by clicking the Adjust button.
- Tap the checkmark to apply the effect.
- Hold and drag the edge of the effect to set how long the zoom effect will last.
- Save the zoomed video using the Export button in the top right corner.
How to Do Slow Zoom In on CapCut
Presets of Zoom Lens may not always work as expected. The zoom effect may disappear too fast while you want to zoom in slowly, or the zoom effect doesn’t appear where you want it to be. In this case, you can use the keyframe feature to adjust where your video zoom to and how long the zoom effect lasts in your video. Following are the steps on how to do slow zoom in on CapCut.

- Create a new project, and import the video.
- Click the Edit icon in the lower-left corner.
- Move the playhead to the part of the video you want the zoom effect to start.
- Tap the keyframe button in the toolbar to add the first keyframe (a little diamond shape appears on the video layer).
- Scroll the video layer and stop at where you want the zoom effect ends. Then click the keyframe button and insert another keyframe.
- Pinch with your fingers on the screen to zoom in on the frame.
- Swipe the bottom toolbar to the left and find the Graphs button.
- Click the Graphs button to edit the zoom speed. The steeper the curve is, the faster the zoom speed will be. You can flatten the curve to zoom in slowly.
- Save the edits by clicking the checkmark in the bottom right corner.
- Export the video with the zoom-in effect.
How to Do 3D Photo Trend (CapCut 3D Zoom)
You’ll find this CapCut 3D trend if spending some time on TikTok. The trend continues to soar with the short-form video booms. Basically, this effect zooms in on the people or the subject of the picture while pulling the background away to make it look like a 3D photo. Follow the steps below to create the CapCut 3D Zoom effect. Note that this effect is currently only available for images.
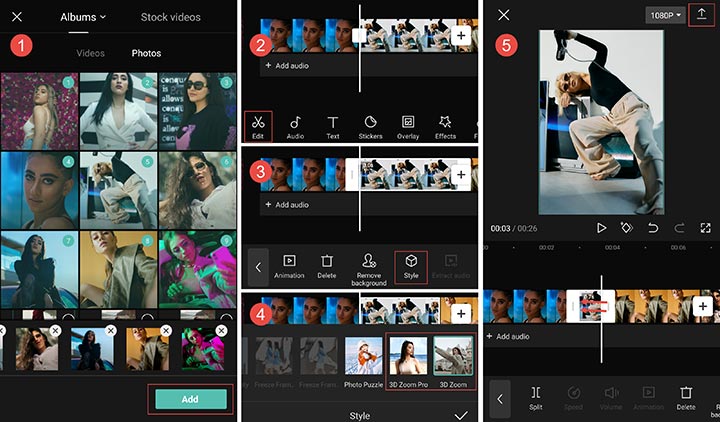
- Start CapCut and create a new project.
- Choose and add 8 to 11 photos to the project.
- Select the picture or click the Edit button once you move the playhead to the image.
- Scroll the bottom toolbar to the left until you see the Style option.
- Click the Style option and select the 3D Zoom style. CapCut will automatically apply it to the selected picture.
- Click the checkmark in the lower right corner to save the effect.
- Reduce or extend the duration of the effect by holding and dragging the edge of the picture.
- Repeat the above steps for the rest of the pictures.
- Click the Export button to save the CapCut 3D Zoom effect.
Best Alternative to CapCut for PC & Mac to Zoom In on Video
CapCut is good for rough cut editing on mobile phones, but if you want to go further in video editing or edit on desktop, you’ll need the CapCut for PC. Desktop software often does more than you can do on a mobile phone.
VideoProc Vlogger is a great alternative. It runs well under both Windows and macOS. Just like CapCut, this program is totally free. And even better than that, it even won’t add the ending clip with that watermark. There will be absolutely no watermark anywhere in the video you export.
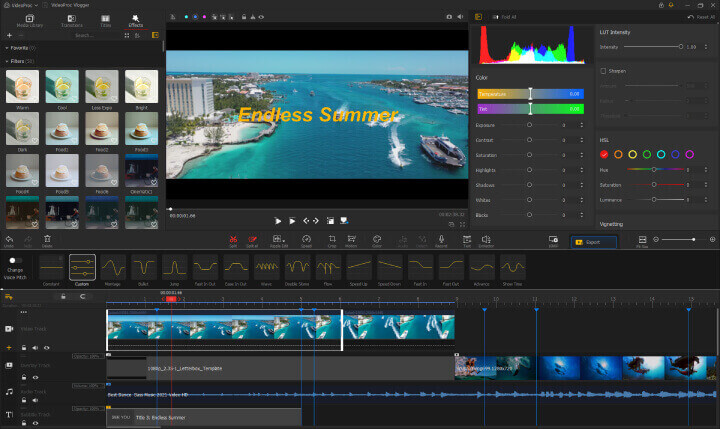
Designed with an intuitive interface, VideoProc Vlogger is very easy to use. You don’t need to invest much time learning how to use it. If you can use CapCut, you can use VideoProc Vlogger. Not all desktop video editing software comes with those dizzying features and complicated settings. But still, you can find almost all the features you may need in the short video creation, like zoom in/out, transitions, motion effects, speed ramping, color grading, and audio editing.

VideoProc Vlogger — Best Alternative to CapCut for PC
- Totally free and forever free with not any watermark.
- Easy to use: compact and self-explaining interface.
- Pro features: camera motion effects, reframing, zooming, panning, speed ramping, color grading, audio editing (cut to the beat).
- Fast editing and rendering process powered by GPU acceleration.
- Comprehensive text guides and video tutorials.
Hesitate no more. Get started and grow your video editing skills with VideoProc Vlogger.
How To Use the Zoom Effect With CapCut

If you’re looking for a way to improve the quality of your videos and photos, you may want to consider using the zoom effect. This effect can make your videos look more polished and professional.

This article will show you how to use the zoom effect with CapCut.
Making Your Video Zoom With CapCut
CapCut is a video editing app that lets you easily create professional-quality photos and videos. The app includes all the tools you need to trim, crop, and edit your videos and add music, text, and transitions. CapCut makes it easy to share your videos with friends and family or post them to social media.
One of CapCut’s standout features is the zoom effect. This editing technique is used to increase the size of the video screen and bring the viewer closer to an object so it can be seen in greater detail. It is commonly used in documentaries, news programs, and other nonfiction programming where it is important to provide viewers with a close-up look at something.
The zoom effect can have several benefits. First, it can help to improve the clarity of the image. This is especially useful when viewing videos recorded in low-light conditions or from a distance.
Second, zooming can also be used to isolate a particular object or person in the frame. This can be helpful when trying to get a closer look at something or identify someone in a crowd.
Finally, zooming can be used to create a sense of depth and perspective in a video. By zooming in and out of the frame, you can create an illusion of movement that can add interest and energy to an otherwise static scene.
When used skillfully, the zoom effect can be an effective way to add visual interest to a video.
Let’s see how you can use the zoom effect whether you’re using iOS or Android.
How to Use the Zoom Effect in CapCut on an iPhone
iPhones are known for their high-quality cameras that capture clear, well-detailed shots. CapCut’s zoom effect is the perfect tool to enhance your videos, emphasize a particular subject, or give a wider view of your surroundings.
There are two variants of the zoom effect: the regular and 3D zoom.
Regular Zoom
The regular zoom is an all-objects effect used to isolate an object from its surroundings and make it more prominent in the frame. It works best with videos.
Here’s how to use the regular zoom effect on your iPhone.
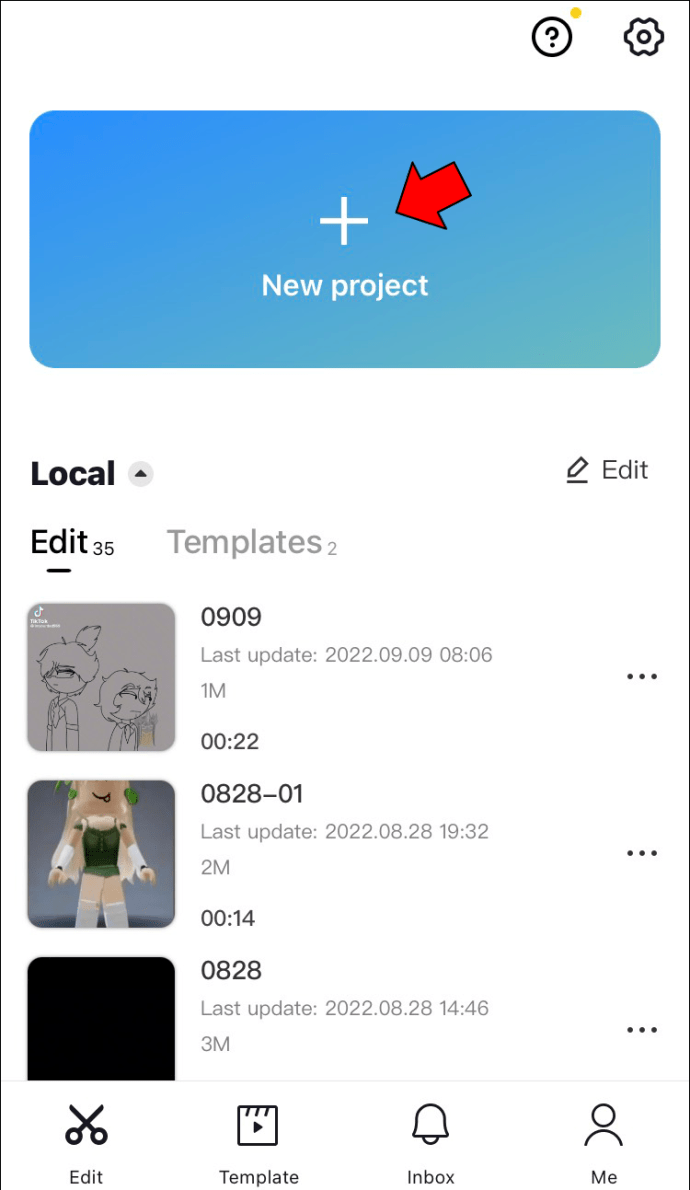
- Open the CapCut app on your iPhone.

- Tap New Project. This should open your gallery and allow you to choose the video you want to zoom in on.
- Tap the Effects button at the bottom of the screen and select Video Effects.

- Tap the zoom lens effect under the Basic section.

- Use the Adjust button to customize the speed and range of the effect.

- Tap the Checkmark to apply the effect.

- At this point, you need to choose the section of the video you want to zoom in on. To do so, hold and drag the effect, with the edges indicating the start and end of the effect.

- Tap the Export button to save your video.

3D Zoom
The 3D zoom effect has become increasingly popular on social media platforms, such as Instagram and Snapchat. It works by zooming in on an object or person and pulling the background to create a three-dimensional picture.
It can be used to create striking and visually interesting images. The effect can be used to add depth and dimension to otherwise flat photos.
Here’s how to go about it.
- Launch CapCut on your iPhone and start a new project.
- Add photos to your project. Each project can hold up to 11 photos.

- Select the picture you want to edit.

- Swipe the bottom toolbar, tap Styles, and select 3D Zoom. At this point, the app will automatically apply the 3D zoom effect to the photo selected.

- Save the changes by tapping the checkmark in the bottom-right corner.

- Repeat steps 3 to 5 for each photo in your newly created project.
How to Use the Zoom Effect in CapCut on Android
You can make zoom videos in two ways on CapCut: the regular zoom effect and the three-dimensional (3D) zoom effect. Here’s a tutorial on how each works.
Regular Zoom
The regular zoom effect is the most basic effect you can use in CapCut.
- Open CapCut on your Android device and initiate a new project.

- Choose the video you want to edit.

- Tap the Effects button and select Video Effects.

- Select Zoom lens from the Basic menu.

- Tap the Adjust button to customize the speed and range of the zoom.

- Once you’re happy with the settings, tap Save and then Export to save the video to your device.

3D Zoom
While regular photos are limited to the two dimensions of height and width, adding the third dimension of depth creates an illusion of space and places the viewer inside the scene. This type of image can be especially effective for showing off landscapes or architecture since it can give the impression of being able to step right into the photo.
To create a 3D photo using CapCut, follow these steps.
- Open CapCut app for Android and launch a new project.
- Add up to 11 photos to your project, comprising items you’d like to zoom in on.

- To edit a photo, tap it and choose Styles at the bottom of your screen.

- Select 3D Zoom. To zoom in or out on the photo, use two fingers to pinch or spread apart on the screen.

- When you’re finished, tap the Save button to make the changes permanent. The edited photo will be saved in your phone’s local storage.

Whether you’re looking to add some extra pizzazz to your photos or just want to have some fun with your friends, the CapCut 3D effect is sure to get you noticed. Why not give it a try? You might just find yourself hooked.
Zoom Your Way to Stunning Videos
Zooming with CapCut is a great way to improve your video editing skills. The experience is similar to editing in professional video editing software, but the interface is much simpler and easier to use. This makes it a great option for beginners or those who want to improve their skills.
The program is free to download and use, so there is no risk involved in trying it out. Zooming with CapCut is a great way to improve your video editing skills and create high-quality videos.
Have you joined the zoom bandwagon using CapCut? If yes, feel free to share your experience in the comments section below.