
Как установить macOS Monterey. Всё, что нужно знать об обновлении
Совсем недавно MacOS Monterey вышла на всеобщее обозрение. Теперь все владельцы актуальных устройств могут попробовать фишки новой операционной системы и оценить каждую из них. Несмотря на сырость операционки, я лично все равно рекомендую поставить ее на все поддерживаемые устройства. Во-первых, тестировать новшества первым — всегда приятно, во-вторых, изменения не столь велики, чтобы переживать на тему стабильности ее работы. Сегодня предлагаю разобраться, как установить MacOS Monterey, что для этого требуется и какие могут быть ограничения.
Подробная инструкция по установке MacOS Monterey.
Какие Mac поддерживают Monterey
К хорошему быстро привыкаешь. Многие владельцы техники Apple пользуются своими девайсами по 5, а то и по 10 лет, и с каждым обновлением операционной системы переживают, что скоро любимой машине пора будет на покой.
Да, с учетом того, что Apple перешла на чипы Apple Silicon, старые компьютеры будут уходить в прошлое гораздо стремительнее. Особенно обидно тем, кто приобрел себе технику в 2020 году. Думаю, что их устройствам жить придется меньше всех. Тем более, что в MacOS Monterey Apple уже ограничила ряд фишек для Intel.

Увы, но MacBook Pro 2014 уже не поддерживает MacOS Monterey.
Хоть Apple и ограничила доступ к некоторым фишкам для Intel в новой системе, список поддерживаемых устройств все еще большой:
- iMac 2015 и новее.
- iMac Pro 2017 и новее.
- MacBook 2016 и новее.
- MacBook Air 2015 и новее.
- MacBook Pro 2015 и новее.
- Mac Pro 2013 и новее.
- Mac mini 2014 и новее.
Если вас интересует детальный список поддерживаемых устройств, милости прошу на официальный сайт компании Apple. Там вы сможете найти более детальную информацию.
Подписывайтесь на нас в Яндекс.Дзен, там вы найдете много полезной и интересной информации из мира мобильных технологий.
Как создать резервную копию Mac
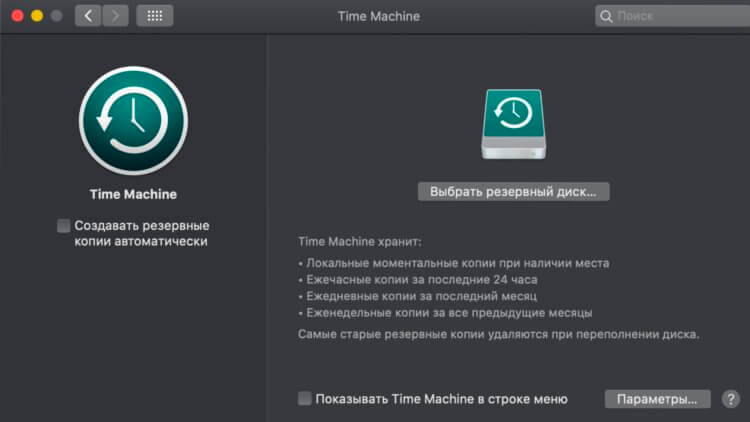
Не забудьте сделать резервную копию перед установкой.
Перед установкой любого крупного обновления операционной системы Apple всегда предупреждает о необходимости создания резервной копии своего устройства. Тем более, что с утилитой Time Machine сделать это проще простого:
- Подключите внешний жесткий диск к Mac. Важно, чтобы объем накопителя был не меньше, чем встроенный SSD.
- Откройте Системные настройки, затем Time Machine.
- Нажмите Выбрать системный диск.
- После этого выберите ваш жесткий диск.
- Система предложит отформатировать его. Согласитесь и нажмите кнопку Стереть.
- После этого macOS приступит к резервному копированию данных.
Форматирование жесткого диска — процесс подготовки жесткого диска к использованию с определенными файловыми системами (NTFS, FAT 32).
Мне данная процедура уж больно напоминает безопасное извлечение флешки на Windows. Сам я ей никогда не пользуюсь. Но учтите, аргументы у меня железные. На моем MacBook нет ни одного уникального файла, который не содержится в облаке или на внешнем накопителе.
Установка macOS Monterey
Следующим этапом идет непосредственно установка Monterey на ваш девайс. Если на нем установлена macOS Mojave и выше, можно загрузить macOS Monterey с помощью функции Обновление ПО:
- Разблокируйте Mac.
- На верхней панели кликнете на значок яблока.

Значок яблока располагается в верхнем правом углу.
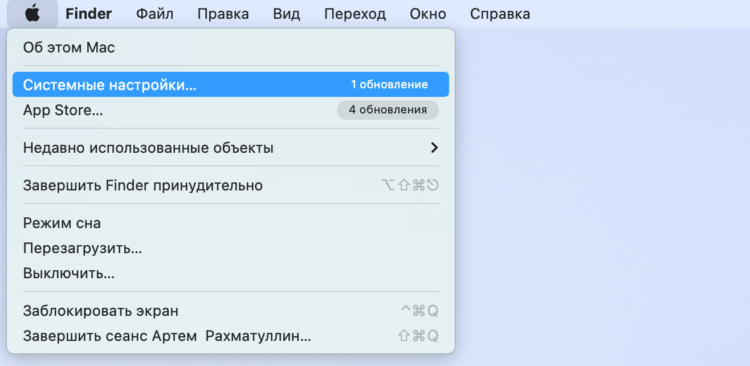
Перейдите в Системные настройки.
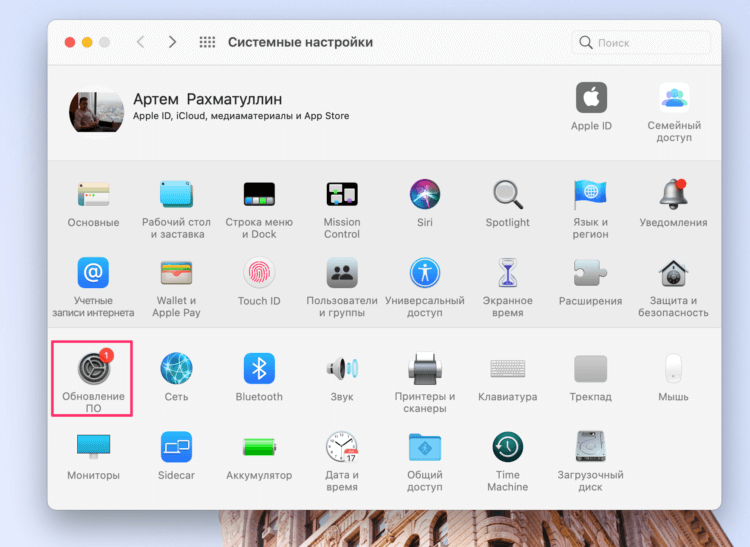
Обновление ПО всегда можно проверить здесь.
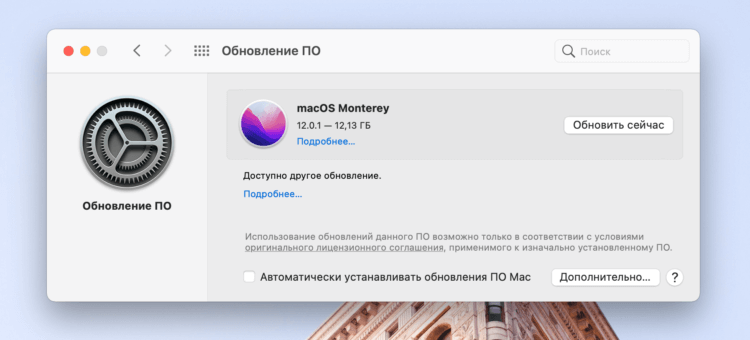
Скачайте и загрузите обновление.
Если в разделе Обновление ПО не высвечивается обновления, можно перейти по ссылке в магазин приложений App Store и загрузить апдейт оттуда.
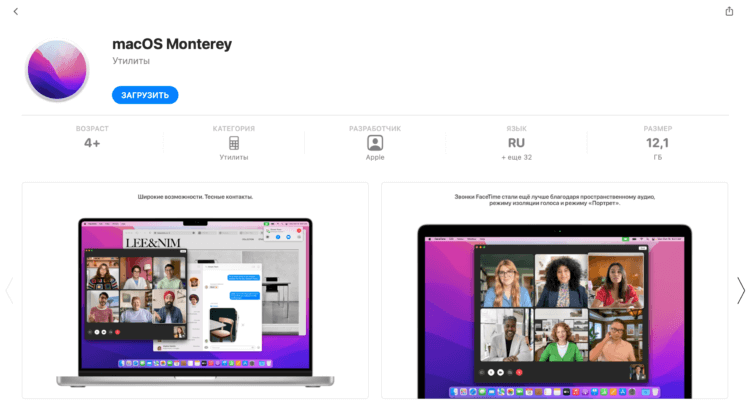
Так выглядит обновление MacOS Monterey в App Store.
Сколько весит MacOS Monterey
Кроме заветной кнопочки Загрузить, здесь говорится о том, сколько места нужно на Mac, чтобы загрузить MacOS Monterey. Как видите, объем обновления составляет 12,1 ГБ. В целом, это количество свободного пространства должно быть у каждого. Чтобы, как минимум, ваш Mac работал стабильно и без лагов. А если не хватает места, решений пруд пруди.
Как только MacOS Monterey скачается на ваш компьютер, начнется загрузка установщика. Не переживайте, он откроется автоматически. Затем вам предложено будет ввести пароль администратора и диск, на который скачивается обновление. Выглядеть это будет следующим образом.
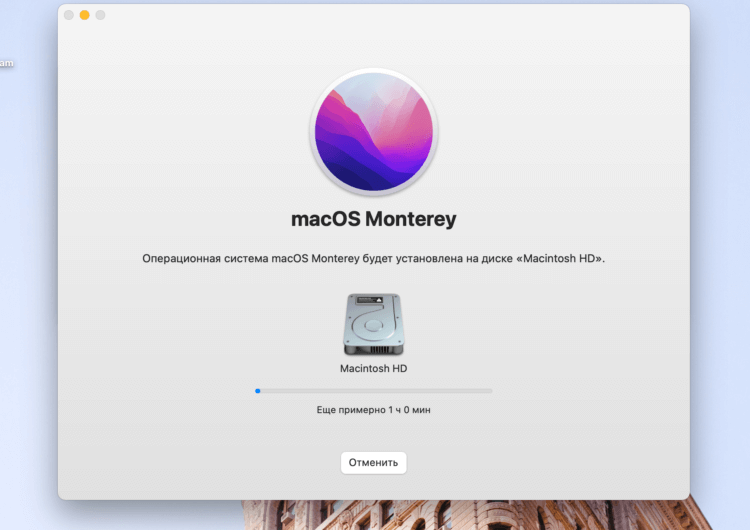
В целом загрузка займет у вас около 1,5 часов.
В России начались продажи AirPods 3. Стоит ли их покупать.
Важно отметить, что во время всей процедуры не стоит переводить Mac в режим сна или закрывать крышку лэптопа. После установки компьютер может несколько раз перезагрузиться. Проявите чуточку терпения. После перезагрузки появится индикатор прогресса, для полной установки системы.
Qt for macOS
macOS (previously known as OS X or Mac OS X) is Apple’s operating system for the Mac line of computers. It’s a UNIX platform, based on the Darwin kernel, and behaves largely similar to other UNIX-like platforms. The main difference is that X11 is not used as the windowing system. Instead, macOS uses its own native windowing system that is accessible through the Cocoa API.
To download and install Qt for macOS, follow the instructions on the Getting Started with Qt page. To build Qt from source, see Qt for macOS — Building from Source.
Supported Versions
When talking about version support on macOS, it’s important to distinguish between the build environment; the platform you’re building on or with, and the target platforms; the platforms you are building for. The following macOS versions are supported.
| Target Platform | Architecture | Build Environment |
|---|---|---|
| macOS 11, 12, 13 | x86_64 , x86_64h , and arm64 | Xcode 13 (macOS 12 SDK), Xcode 14 (macOS 13 SDK) |
Build Environment
The build environment on macOS is defined entirely by the Xcode version used to build your application. Xcode contains both a toolchain (compiler, linker, and other tools), and a macOS platform-SDK (headers and libraries). Together these define how your application is built.
Note: The version of macOS that you are running Xcode on does not matter. As long as Apple ships a given Xcode version that runs on your operating system, the build environment will be defined by that Xcode version.
Xcode can be downloaded from Apple’s developer website (including older versions of Xcode).
You should always be using the latest Xcode available from Apple that has been tested with the Qt version you are using. By always building against the latest available platform SDK, you ensure that Qt can take advantage of new features introduced in recent versions of macOS.
Once installed, choosing an Xcode installation is done using the xcode-select tool.
$ sudo xcode-select --switch /Applications/Xcode.app
You can inspect the globally selected Xcode installation using the same tool.
$ xcode-select -print-path /Applications/Xcode.app/Contents/Developer
The xcrun command can then be used to find a particular tool in the toolchain.
$ xcrun -sdk macosx -find clang /Applications/Xcode.app/Contents/Developer/Toolchains/XcodeDefault.xctoolchain/usr/bin/clang
or show the platform SDK path used when building.
$ xcrun -sdk macosx --show-sdk-path /Applications/Xcode.app/Contents/Developer/Platforms/MacOSX.platform/Developer/SDKs/MacOSX10.14.sdk
Target Platforms
Building for macOS utilizes a technique called weak linking that allows you to build your application against the headers and libraries of the latest platform SDK, while still allowing your application to be deployed to macOS versions lower than the SDK version. When the binary is run on a macOS version lower than the SDK it was built with, Qt will check at runtime whether or not a platform feature is available before utilizing it.
In theory this would allow running your application on every single macOS version released, but for practical (and technical) reasons there is a lower limit to this range, known as the deployment target of your application. If the binary is launched on a macOS version below the deployment target macOS or Qt will give an error message and the application will not run.
Qt expresses the deployment target via the CMAKE_OSX_DEPLOYMENT_TARGET or QMAKE_MACOSX_DEPLOYMENT_TARGET variables, which by default is set to the minimum supported deployment target for Qt.
You only need to raise the deployment target if your own code uses APIs that were added in a macOS version higher than what Qt defaults to, and you are not using @available checks to guard their use at runtime.
To raise the deployment target with CMake:
set(CMAKE_OSX_DEPLOYMENT_TARGET "13.0")
QMAKE_MACOSX_DEPLOYMENT_TARGET = 13.0
Note: You should not lower the deployment target beyond the default value set by Qt. Doing so will likely lead to crashes at runtime if the binary is then deployed to a macOS version lower than what Qt expected to run on.
For more information about SDK-based development on macOS, see Apple’s developer documentation.
Opting out of macOS behavior changes
One caveat to using the latest Xcode version and SDK to build your application is that macOS’s system frameworks will sometimes decide whether or not to enable behavior changes based on the SDK you built your application with.
For example, when dark-mode was introduced in macOS 10.14 Mojave, macOS would only treat applications built against the 10.14 SDK as supporting dark-mode, and would leave applications built against earlier SDKs with the default light mode look. This technique allows Apple to ensure that binaries built long before the new SDK and operating system was released will still continue to run without regressions on new macOS releases.
Building against an older SDK is a last-resort solution, and should only be applied if your application has no other ways of working around the problem.
Architectures
By default, Qt will build for the architecture of your development machine — either x86_64 if you’re on an Intel Mac, or arm64 if you are on an Apple Silicon Mac.
To build for other architectures you can use the CMAKE_OSX_ARCHITECTURES and QMAKE_APPLE_DEVICE_ARCHS variables in your project files or on the command line. This allows you to both cross-compile to a different architecture, and to build universal (multi-architecture) binaries. For example, to build your application for both x86_64 and arm64 with CMake:
cmake ~/src/myapp -DCMAKE_OSX_ARCHITECTURES="x86_64;arm64"
qmake ~/src/myapp QMAKE_APPLE_DEVICE_ARCHS="x86_64 arm64"
When specifying the architectures in a project file they should not be quoted, e.g.:
TEMPLATE = app SOURCES = main.cpp QMAKE_APPLE_DEVICE_ARCHS = x86_64 arm64
Sub-architecture support on Intel Macs
In addition to the baseline x86_64 architecture, Qt also supports the x86_64h («Haswell») sub-architecture, which improves performance on Intel Macs.
Generating Xcode Project Files
By default, CMake and qmake generates project files in Makefile format. If you prefer to build and debug your application from within Xcode, you can request that an Xcode project is generated instead:
cmake ~/src/myapp -GXcode
qmake ~/src/myapp -spec macx-xcode
Deploying Applications on macOS
macOS applications are typically deployed as self-contained application bundles. The application bundle contains the application executable as well as dependencies such as the Qt libraries, plugins, translations and other resources you may need. Third party libraries like Qt are normally not installed system-wide; each application provides its own copy.
To build your application as an application bundle with CMake, set the MACOSX_BUNDLE property on your executable target, as follows:
qt_add_executable(app) if(APPLE) set_target_properties(tst_manual_ios_assets PROPERTIES MACOSX_BUNDLE TRUE) endif()
With qmake, bundles are the default. Set CONFIG -= app_bundle in your project file ( .pro ) to disable it.
A common way to distribute applications is to provide a compressed disk image (.dmg file) that the user can mount in Finder. The deployment tool, macdeployqt (available from the macOS installers), can be used to create the self-contained bundles, and optionally also create a .dmg archive.
Applications can also be distributed through the Mac App Store. macdeployqt (bin/macdeployqt) can be used as a starting point for app store deployment. To ensure that Qt complies with the app store sandbox rules, Qt must be configured with the -feature-appstore-compliant argument.
For details about deployment on macOS, see Qt for macOS — Deployment.
Note: For selling applications in the macOS App Store, special rules apply. In order to pass validation, the application must verify the existence of a valid receipt before executing any code. Since this is a copy protection mechanism, steps should be taken to avoid common patterns and obfuscate the code that validates the receipt as much as possible. Thus, this cannot be automated by Qt, but requires some platform-specific code written specifically for the application itself. More information can be found in Apple’s documentation.
Using Objective-C Code in Qt Applications
Clang, the compiler used for applications on Apple Platforms, allows mixing C++ and Objective-C code. To enable this mode use the .mm extension for the relevant source files and add them to your project as usual.
target_sources(myapp PRIVATE objc_code.mm)
SOURCES += objc_code.mm
You can then use Objective-C frameworks from Apple’s Developer Library in your Qt applications.
To expose functionality to the rest of your application, without having to rename all your source files, declare helper functions in a header, and implement the functionality in an Objective-C++ source file:
// objc_code.h QString localizedHostName(); // objc_code.mm #include QString localizedHostName() < return QString::fromNSString(NSHost.currentHost.localizedName); >
macOS Issues
The page below covers specific issues and recommendations for creating macOS applications.
Where to Go from Here
We invite you to explore the rest of Qt. We prepared overviews to help you decide which APIs to use and our examples demonstrate how to use our API.
- Qt Overviews — list of topics about application development
- Examples and Tutorials — code samples and tutorials
- Qt Reference Pages — a listing of C++ and QML APIs
Qt’s vibrant and active community site, http://qt.io houses a wiki, a forum, and additional learning guides and presentations.
© 2023 The Qt Company Ltd. Documentation contributions included herein are the copyrights of their respective owners. The documentation provided herein is licensed under the terms of the GNU Free Documentation License version 1.3 as published by the Free Software Foundation. Qt and respective logos are trademarks of The Qt Company Ltd. in Finland and/or other countries worldwide. All other trademarks are property of their respective owners.
How to set JAVA_HOME environment variable on Mac OS X 10.9?
I was able to locate the terminal and I think I created some multiple files. I’m getting messages like this:
(1) Another program may be editing the same file. If this is the case, be careful not to end up with two different instances of the same file when making changes. Quit, or continue with caution.
(2) An edit session for this file crashed. If this is the case, use «:recover» or «vim -r /Users/Erwin/.bash_profile» to recover the changes (see «:help recovery»). If you did this already, delete the swap file «/Users/Erwin/.bash_profile.sw p» to avoid this message.
Can somebody tell how to set Java in Mac OSX environment step by step?
Install Qt Creator on macOS
Ensure your macOS operating system is up-to-date. Select menu -> «System Preferences» -> «Software Update» and check whether any system updates are available. If so, first install these updates and only then proceed with the rest of this installation guide.
Qt requires that you are running macOS version 14.0 (Sonoma), version 13.0 (Ventura), version 12.0 (Monterey), or version 11.0 (Big Sur). If your macOS version is older, you will need to update. Here are instructions from Apple on how to upgrade older macOS versions.
2) Install Xcode command-line tools
Open the Terminal application (located in folder Applications -> Utilities or find using Spotlight). In the terminal window, type the command xcode — select — install as shown in the screenshot below:
$ xcode-select --install If the command responds command line tools are already installed , you are good to go. Otherwise, the installer window will open, click «Install» to download and install the command line tools. This process can take up to an hour depending on your network connection speed.

3) Download and run the Qt installer
If you have previously installed Qt Creator, you must first uninstall that one before re-installing the latest. To uninstall, find the Qt Maintenance Tool application and run it. On the first panel, select Uninstall only to proceed with uninstall. Now continue below to download and install the latest Qt version.
Download the Qt installer from its official download site at https://www.qt.io/download-qt-installer. The site should detect that your computer is running macOS and automatically download the correct installer to your Downloads folder.
The downloaded file will be named something like qt — unified — macOS — x64 — 4 — online . dmg . Double-click the . dmg file to open and run the Qt installer.
The Qt installer will walk you through a set of steps. For most steps, you can use the default settings and simply click «Next» or «Agree» to move on, with the following exceptions:
- At the Welcome step, sign up (or sign in) for your own Qt Account.
- Enter your @stanford.edu email and verify your account via email.
- When setting up your account, you do not have to enter a phone number or city.
- Register as an individual user, not as part of a company/organization and not for commercial use.
- Do not change the default name and location of the directory where Qt will be installed.
- Select the option for «Qt 6.5 for desktop development» Qt libraries for clang.

During the Qt install, you may get an alert about not being able to find Xcode, this warning is harmless and safe to ignore.
Wait until the installation process is finished (it can take a while), exit the installer when done.
4) Install CS106-specific package
After installing Qt, you must install the CS106-specific package and do a complete build and run cycle to confirm all is working properly.
Download CS106 package and extract
- Download this archive file: �� CS106.zip
- Un-zip the download contents (on a Windows computer, click «Extract all») to a location of your choice. You should have a folder named CS106 with several files and folders inside.
Open and configure CS106 project
A Qt Creator project includes a file named with a . pro extension. Double-clicking the . pro file opens the project in Qt Creator.
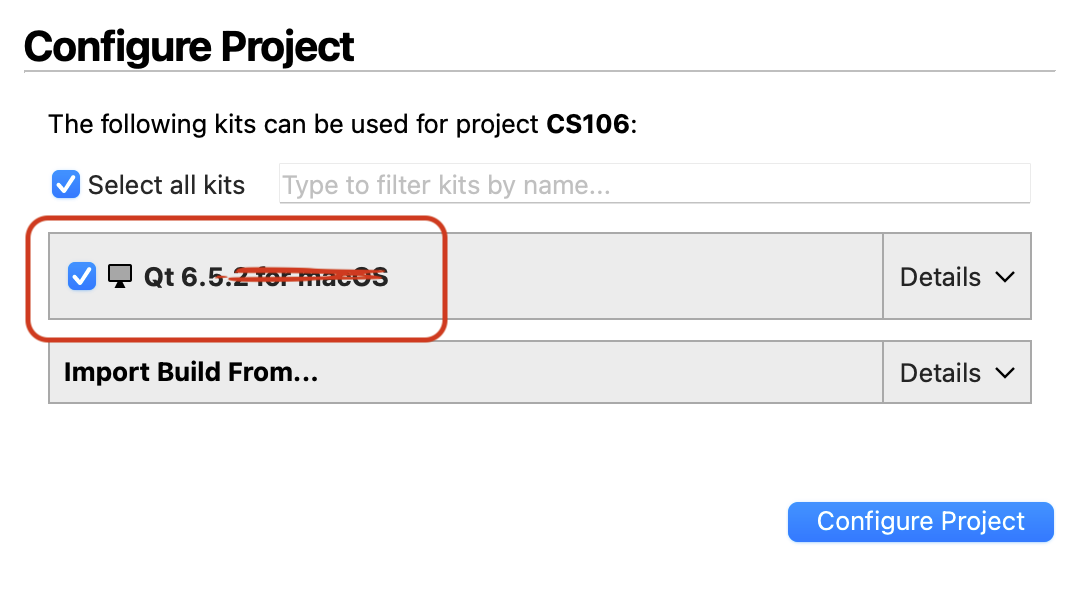
- Find the CS106 . pro file and open it now.
- Recent versions of Qt install a new tool called Qt Design Studio in addition to Qt Creator. Qt Design Studio is set as default app to open .pro files, but it doesn’t actually work for this class – you need to use Qt Creator! To choose which application opens a file, right-click (control-click) on the file in the Finder and select Qt Creator from the Open With submenu. You can also change the default application used for all .pro files using ‘Get Info` in the Finder.
- When opening a project for the first time, Qt Creator will ask you to configure the project build kit. The «Configure Project» panel shows the list of available build kits (see screenshot below). The default kit should already be selected; it will match the desktop kit you selected when installing Qt Creator (version Qt 6.x.x).
- Accept the default by clicking the «Configure Project» button.
If your Qt Creator shows no kits are available, review the Qt install instructions. You can repeat the steps to re-install Qt if you missed selecting the correct option.
Build the program
C++ code must be compiled or built before it is run; this means converting the source code into executable binary code.
- Click the Build icon
 in the lower-left of the Qt Creator window.
 - Watch the build progress meter
 in the lower-right. The first time you build a project, it can take a minute or more to compile the library code. When the bar turns green, it indicates the program successfully built.
Run the program
Now that the program is built, you are ready to run it.
- Click the Play/Run icon
 in lower-left of window.
 - As shown in the screenshot below, the welcome program prints a message to the console window and draws the Stanford logo on graphics window.

✔️ Congratulations, your installation is good to go! You may now discard the CS106 project, you will not need it again.
5) Configure settings
For a better experience, we encourage changing some of the default settings, see our recommended configuration settings.
All content © Stanford University 2023 Website programming by Julie Zelenski • This page last updated 2023-Sep-28