
Сони Вегас Урок 3 Рендер.
Для того чтобы сохранить ваш видеофильм на комп необходимо точно знать что для этого нужно.
Существует масса настроек для сохранения роликов в Вегасе, но если мы будем касаться их всех, то не хватит времени на производство
роликов.
Поэтому новичкам лучше всего пользоваться шаблонами настроек.
Желательно чтобы формат не занимал огромное место.
Итак коснемся сохранения роликов на комп или рендера или просчета видео.
1
Для начала выделим весь регион фильма или же проекта созданного нами в Loop region.
Для этого имеются маркеры ,
обозначающие начало и конец фильма .
Заходим в меню файлы и там находим Render as. Выберем папку куда будем устанавливать файл.Укажем имя файла.
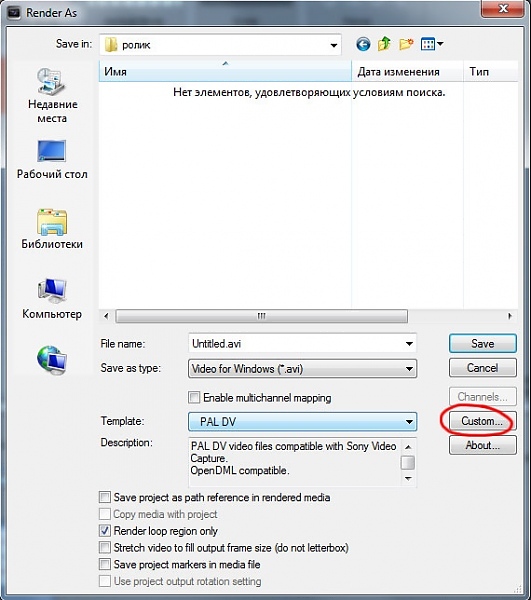
1. Save as type (выбор типа конечного файла) оставляем Video for Windows (avi).( К ПРИМЕРУ)
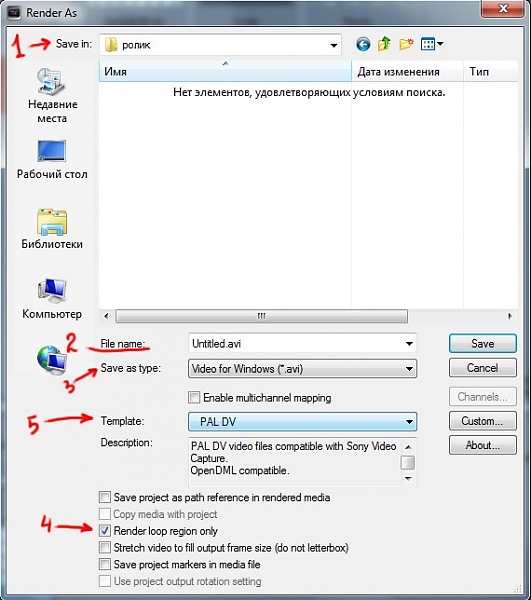
2. Render loop region only (просчёт только выделенной области loop region) по умолчанию эта функция включена. Так как мы выделили весь проект в loop region, то оставляем её включённой. Если случайно её выключить ничего страшного, проект просчитается от начала до конца.
3. Переходим к Template, и выбираем шаблон, с подходящими параметрами для сохранения видео.
Если ни один из шаблонов не устраивает можно настроить Template с
индивидуальными параметрами для сохранения видео.
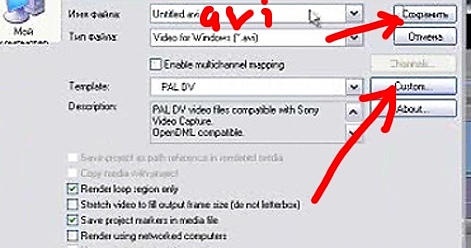
Рассмотрим пример просчёта в формате DivX. Для этого нажимаем, кнопку Custom.
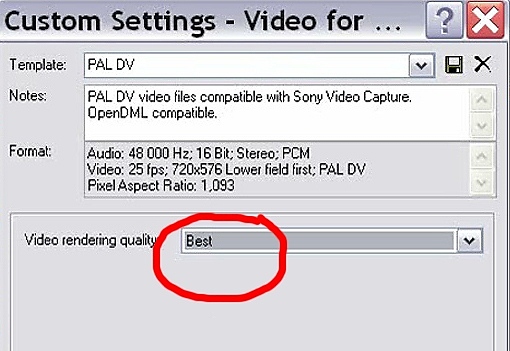
Переходим на вкладку Project и в Video rendering quality выставляем Best.
Далее переходим на вкладку Video.
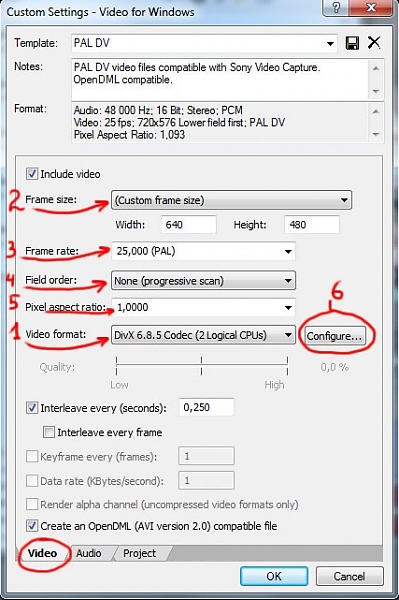
Выбираем Video format, в списке находим кодек DivX 6.8.5, возможна другая версия.
Frame size указываем желаемое разрешение, к примеру 640х480.
Вы можете указывать своё разрешение или пользоваться шаблонами.
Frame rate указываем количество кадров в секунду, 25.000 (pal).
Field order очерёдность полей ставим none (progressive scan-смешение полей (деинтерлейсинг).
Pixel aspect ratio (соотношение сторон пикселя) я чаще всего ставлю 1.000.
Нажимаем кнопку Configure, открывается окно для настройки кодека.
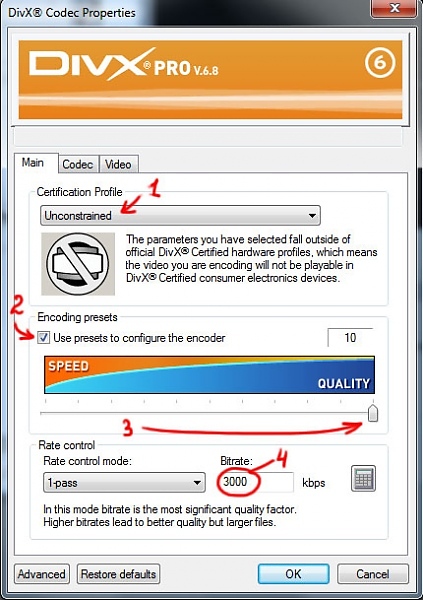
В Certification profile выставляем Unconstrained, это снимает все ограничения.
Ставим галочку Use presets to configure the encoder.
Перетягиваем ползунок на максимальное качество кодирования.
В поле Bitrate вводим 3000.
Можно и другое число, чем выше будет битрейт тем лучше качество, но тем больше объём файла и тем тяжелее его воспроизводить компьютеру.
С кодеком закончили, жмём ОК.
Переходим на вкладку Audio
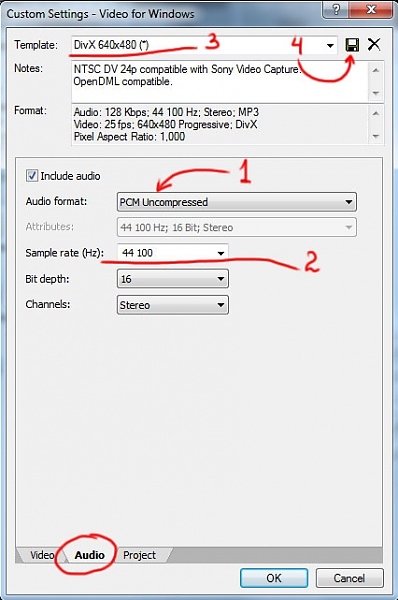
Audio format выбираем кодек для звука, я пользуюсь чаще всего Uncompressed.
В Sample rate ставим частоту 44100, остальные настройки оставляем по умолчанию.
В Template можно ввести название изменённого профиля и сохранить настройки рендера (4), чтобы потом не настраивать заново.
Далее жмём Save, и ожидаем завершение процесса.
Пример взят мной отсюдаhttp://recandplay.ru/2011/01/render-v-vegas-pro-ili-kak-soxranit-proekt-v-videofajl/
-если возникнут претензии то сюда) лично я рендерю по другому. Но примеров, как я говорю выше, может быть сотни, посему и приведен данный.Матералы по Вегасу подготовлены мной лично, кроме данного примера.

Написать комментарий
Render Loop Region?
I am running Vegas Movie Studio 14 and have been noticing an export issue regarding the render loop region. When I select a specific part of the timeline to be exported, it seems to ignore this and just export the entire video. Has anyone else noticed this?
Comments
vkmast wrote on 9/5/2017, 10:08 AM
john, have you checked this?
A volunteer forum moderator as of 11/27/2017. I don’t work for VEGAS Creative Software.
My Time Zone (FI) EET (UTC +2h) from 10/29/2023 (DST end) until 03/31/2024 (DST start)
Vegas Creative Software in Madison WI US: CST (UTC -6h) from 11/05/2023 until 03/10/2024
FGAs / Bookmarks
Online Live Chat Pre-sales and registration help
Transfer of license (see to the end of that thread)
Movie Studio 18 support (all Movie Studio versions later than #17)
john-hong wrote on 9/5/2017, 2:26 PM
I hadn’t noticed that switch on that menu. I was clicking on the make movie button and a separate menu popped up where after hitting save to hard drive, I selected render loop region. Next time I export something I will be sure to check to see if it is switched on in the actual preset menu. But it is strange that it didn’t do it otherwise.
vkmast wrote on 9/5/2017, 3:21 PM
. it is strange that it didn’t do it otherwise.
Are you using the latest build of MVMS 14 Platinum?
A volunteer forum moderator as of 11/27/2017. I don’t work for VEGAS Creative Software.
My Time Zone (FI) EET (UTC +2h) from 10/29/2023 (DST end) until 03/31/2024 (DST start)
Vegas Creative Software in Madison WI US: CST (UTC -6h) from 11/05/2023 until 03/10/2024
FGAs / Bookmarks
Online Live Chat Pre-sales and registration help
Transfer of license (see to the end of that thread)
Movie Studio 18 support (all Movie Studio versions later than #17)
john-hong wrote on 9/6/2017, 8:30 AM
I had purchased it from a tech shop a few weeks ago. I’ll be able to confirm what version I have when I get home from work later in the evening.
john-hong wrote on 9/7/2017, 2:13 AM
It’s 14.0 build 91, I’m guessing this was the initial release?
There doesn’t seem to be any check for updates in the program.
Last changed by john-hong on 9/7/2017, 2:13 AM, changed a total of 1 times.
vkmast wrote on 9/7/2017, 3:30 AM
@john-hong, a lot of important bug fixes in the updates/builds since the initial release. See e.g. the following posts to find the links to download the current builds. You need only download and install the latest build to get the fixes. Strongly recommended.
There doesn’t seem to be any check for updates in the program.
Learn also about these options (Somewhat confusingly, the support is «all split between the Vegas and Magix domains»)
These links are also mentioned in sections 3. and 4. of the Downloading shortcut in the comment here
Last changed by vkmast on 9/7/2017, 4:25 AM, changed a total of 7 times.
A volunteer forum moderator as of 11/27/2017. I don’t work for VEGAS Creative Software.
My Time Zone (FI) EET (UTC +2h) from 10/29/2023 (DST end) until 03/31/2024 (DST start)
Vegas Creative Software in Madison WI US: CST (UTC -6h) from 11/05/2023 until 03/10/2024
FGAs / Bookmarks
Online Live Chat Pre-sales and registration help
Transfer of license (see to the end of that thread)
Movie Studio 18 support (all Movie Studio versions later than #17)
The Solution:
john-hong wrote on 9/7/2017, 8:42 AM
@john-hong, a lot of important bug fixes in the updates/builds since the initial release. See e.g. the following posts to find the links to download the current builds. You need only download and install the latest build to get the fixes. Strongly recommended.
There doesn’t seem to be any check for updates in the program.
Learn also about these options (Somewhat confusingly, the support is «all split between the Vegas and Magix domains»)
These links are also mentioned in sections 3. and 4. of the Downloading shortcut in the comment here
Thanks for the links, that helps in a huge way! Cause whenever I click on the Check for News in the app, it just says no new news.
Render loop region only что такое
Post by Gusher » Wed Oct 14, 2020 5:02 am
Saving selected loop region still
not possible? Very important
feature that even video editors
have. if it doesn’t have it
consider it medium request
on your list including hide
markers feature.
TrevsAudio Posts: 3526 Joined: Sun May 06, 2012 1:59 am Location: Rhode Island
Re: Render/Save Loop Region
Post by TrevsAudio » Wed Oct 14, 2020 6:31 am
Works for me (if we’re talking about the same thing?)
Saved this on the original and it opens back up like that multiple times.
Untitled.png (17.54 KiB) Viewed 1216 times
Old Dudes Rock!
Trevor
Official OFC™ Founding Member
Asus Razen 5 12 core 32 Gig RAM, Win 10, Mixcraft 10 Pro
Focusrite Solo, Sennheiser cans, Rode and Behringer mics
Sample Projects: https://soundcloud.com/trevs_audio
Mark Bliss Posts: 7300 Joined: Fri Jan 20, 2012 3:59 pm Location: Out there
Re: Render/Save Loop Region
Post by Mark Bliss » Wed Oct 14, 2020 10:16 am
I think maybe the OP desires to render a selected region?
In the mix down dialog box theres an option to «use selection» that might be what you are looking for.
If not.
We need a clearer description.
Stay in tune, Mark
Gusher Posts: 62 Joined: Sat Jan 28, 2012 6:20 am Location: United States
Re: Render/Save Loop Region
Post by Gusher » Wed Oct 14, 2020 2:00 pm
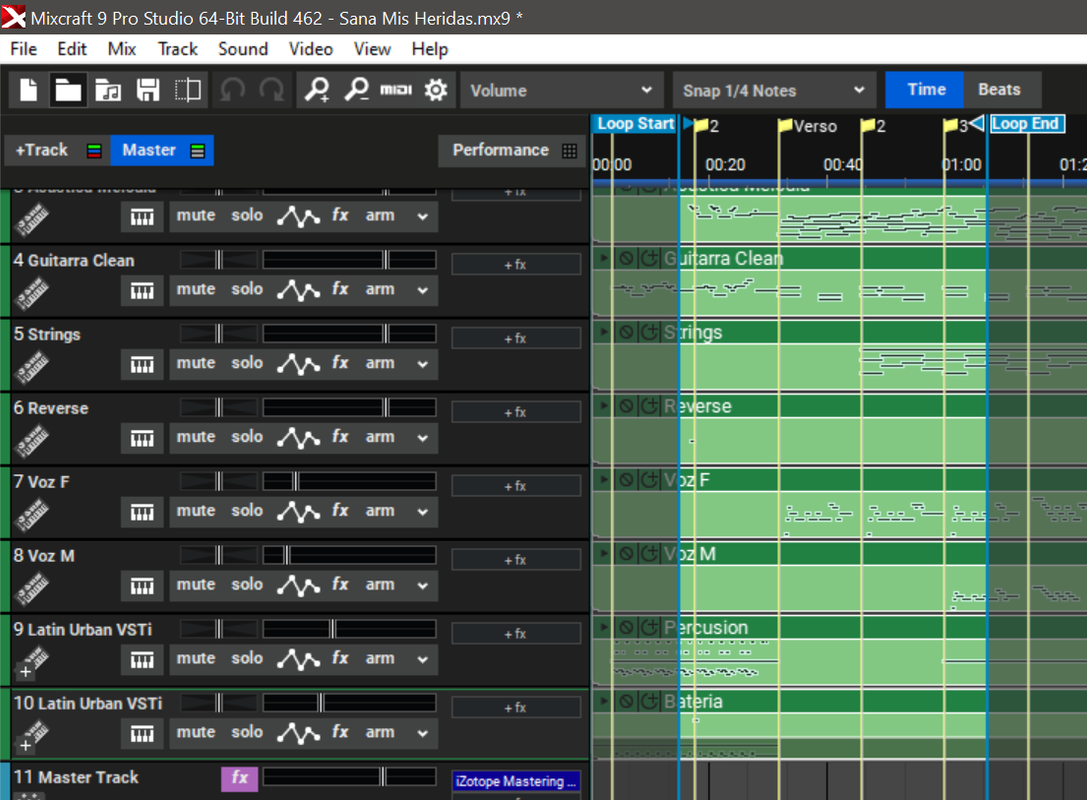
What am trying to do is save a midi file, only the
loop region, but it’s saving the whole midi file
which is not what I want. Also, look at the markers,
no way to hide them to get them out of the way,
kinda messy.. I have not tried saving/rendering
loop region on audio yet.
Mark Bliss Posts: 7300 Joined: Fri Jan 20, 2012 3:59 pm Location: Out there
Re: Render/Save Loop Region
Post by Mark Bliss » Wed Oct 14, 2020 11:14 pm
OK, you said «render» in your OP, which confused me.
It occurs to me I have never saved as MIDI. Ever.
So I took a look around, and it looks like you are right, there is no apparent way to save as a MIDI file and use just the selected area that I am aware of. Perhaps one of those various «send to sampler» functions I have also never used, or something.
I dunno.
Sorry, my use of MIDI is pretty much drum/piano/string pad programming and I render to audio. I am primarily an audio guy.
Possible workaround to try-
1: «Save as» and rename your project file so you dont effect the previous project.
2: Slice the desired track(s) at the beginning and end of the desired region and deleted the unwanted regions.
3: Save as MIDI file.
How to Fix Sony Vegas Not Rendering Whole Video



Summary: Looking into how to fix Sony Vegas not rendering full video? This post explains why Sony Vegas only renders part of a video and shares 6 efficient yet easy solutions to fix the error.
Sony Vegas (Vegas Pro) is a fabulous video editing program that offers a vast number of creative features such as unlimited timeline tracks, scene detection, multi-region motion tracking and Automate audio mixes. However, every program has its problems, so Sony Vegas is no exception.
Many users have reported on the official Sony Vegas forums and Sony Vegas Reddit community that they frequently encounter issues like Sony Vegas Pro 15 not rendering whole video and Sony Vegas won’t render. But don’t worry, we’ve collected some useful solutions to fix Sony Vegas not rendering full video. Keep reading to know.
Solution 1. Disable Render Loop Region Only
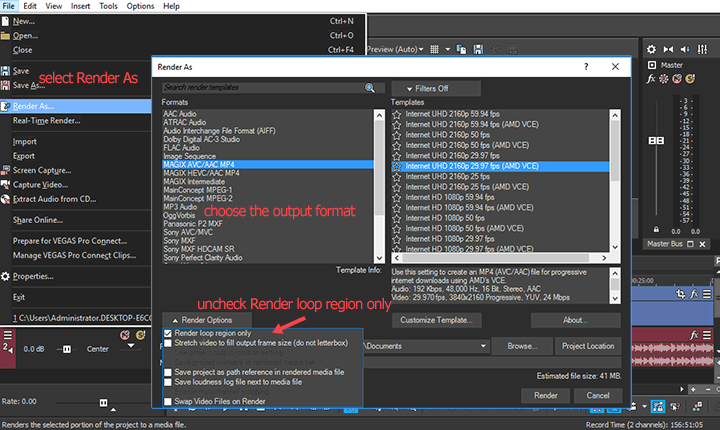
The Sony Vegas not rendering the whole video error can happen for several reasons, but in most cases, it’s caused by you’ve selected Render Loop Region Only under the Render As window. The Loop Playback feature itself is great for improving editing efficiency. After marking a certain section by adding I/O points on the timeline and enabling the Loop Playback feature, you can play back the marked section repeatedly. However, the problem is Sony Vegs renders only the loop region by default, which often leads to Sony Vegas not rendering full video. To fix this error, simply follow the below steps:
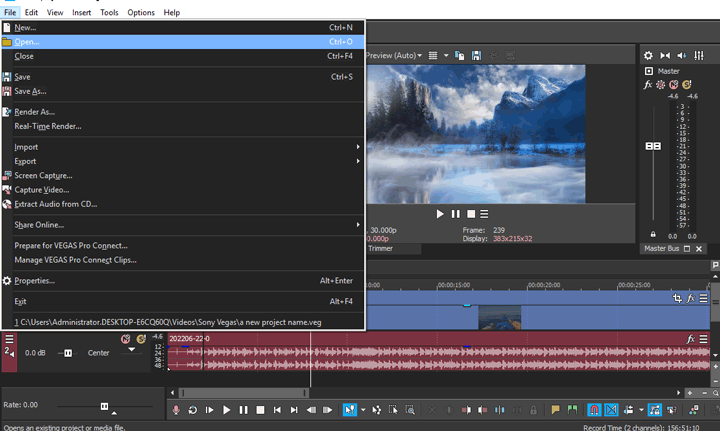
Step 1. Hit File on the top menu bar and choose Render As.
Step 2. Select the target export format under the Format section.
Step 3. Hit Render Options and uncheck Render loop region only.
Solution 2. Save as a New Project
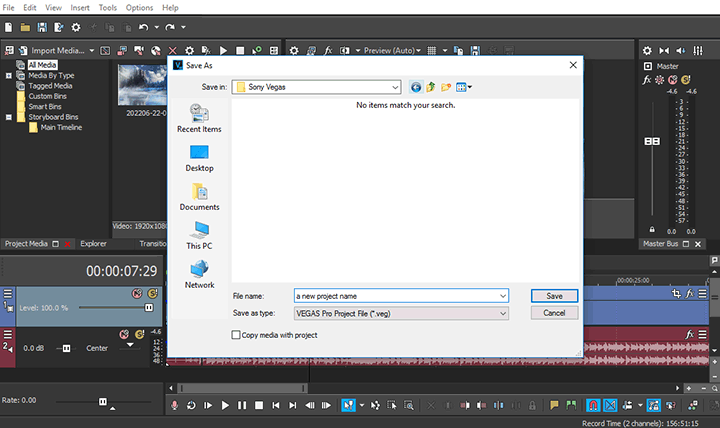
Some unknown glitches might also lead to Sony Vegas not rendering the whole video. If you have Render Loop Region Only turned off but Sony Vegas still renders only part of the video, then you may try to save the current project with a new name and then render the new version. Here’s how:
Step 1. Go to the top menu bar to find File. Select it and choose Save As.
Step 2. Enter a new project name and hit Save.
Step 3. Hit File and choose Open. Find and select the project that is saved with the new name.
Step 4. Hit File > Render As, select the target output format, and hit Render.
Solution 3. Change File Permission
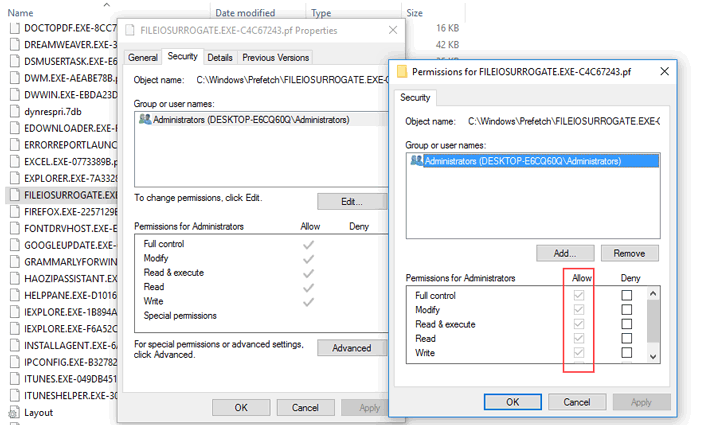
Some Windows users reported an error in the permissions the installer assigns to «fileiosurrogatee.exe» (an application that VEGAS relies on to read and write files) might also cause the Sony Vegas not rendering the whole video error.
Step 1. Go to c:/program files/VEGAS/18.0/x86.
Step 2. Go to fileiosurrogate.exe, right on it, and select properties.
Step 3. Come over to the security table, hit Edit, and assign full permissions to that file.
Solution 4. Convert the Source Video Files
Sony Vegas lets you add videos in different formats, resolutions, and frame rates to one project. However, editing them together requires massive transcoding work. If your computer is not powerful enough, you might encounter the error that Sony Vegas cannot render full video. Luckily, it’s easy to convert the source video files if you’re using VideoProc Converter AI. This simple yet full-featured video converter software allows you to convert multiples video to make them the same format, resolution, and frame rate within a simple click.
Step 1. Download and install VideoProc Converter AI on Windows or Mac. Launch it up.
Free Download For Win 7 or later
Free Download For Mac OS X 10.6 or later

For mobile users, click here >
Note: The Windows version now supports AI-powered Super Resolution, Frame Interpolation, and Stabilization to enhance video and image quality. These AI features are not yet available in the Mac version but will be coming soon.
Step 2. Hit Video and drag the source videos to this best video converter to the program.
Step 3. Select the desired format under the Target Format section. If necessary, hit the small tool icone, adjust the video properties such as frame rate and bitrate rate, and then hit Apply To All.
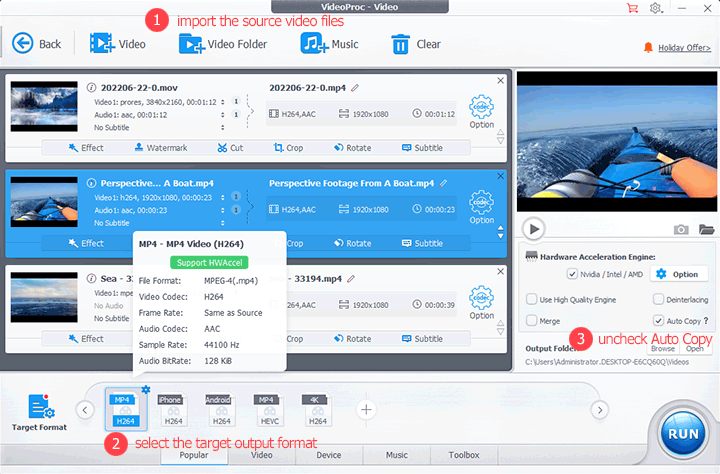
Step 4. Uncheck Auto Copy and hit Run. This best video converter starts to process your video files.
Solution 5. Restart the Computer
Massive amounts of logs and temporary caches are created when we edit the videos with Sony Vegas and operate other programs and the majority of them are stored in the RAM (Random Access Memory). When the RAM is insufficient in the space, it leads to Sony Vegas not rendering the whole video and many other sorts of errors. Restarting the computer can clear the RAM and hereby fix the error.
Step 1. Save the project on the computer.
Step 2. Restart the computer.
Step 3. Relaunch the project and re-render the project.
Solution 6. Render the Video Out into Separate Parts
If the error still exists after trying all these fixes, you can render the project as several parts, create a new project, bring these individual clips to the timeline, and then render them into one video.
Bottom Line
To summarize, this post has shown you 6 ways to fix Sony Vegas not rending whole video error. If you’ve tried trying solutions one by one but still get no luck to fix the error, you can just switch to an easier alternative Sony Vegas — VideoProc Vlogger. This amazing piece of video editing software is developed to maximize creativity and minimize efforts, so it’s incredibly easy to use. It supports 999+ timeline tracks, packs a full range of editing tools, and offers a loads of cool yet easy-to-master features such as motion crop, time remap, music beat marker, and PiP, allowing you quickly make appealing content. Just try it and explore more!
Free Download For Win 7 or later
Free Download For Mac OS X 10.11 or later
For mobile users, click here >