
Как преобразовать код с интерфейсом на Python для использования с .ui файлом (Qt Designer)?
Все примеры с использованием PyQt5 написаны с инициализацией интерфейса на Python.
Как правильно преобразовывать его на использование с .ui файлом?
Например из вопроса код для затухания при смене вкладки в QTabWidget :
import sys from PyQt5.Qt import * class FaderWidget(QWidget): def __init__(self, *args, **kwargs): QWidget.__init__(self, *args, **kwargs) self.pixmap_opacity = None self.timeline = QTimeLine(333, self) self.timeline.valueChanged.connect(self.animate) self.timeline.finished.connect(self.close) def start(self, old_widget, new_widget): self.pixmap_opacity = 1.0 self.old_pixmap = QPixmap(new_widget.size()) old_widget.render(self.old_pixmap) self.timeline.start() self.resize(new_widget.size()) self.show() def paintEvent(self, event): if self.pixmap_opacity: QWidget.paintEvent(self, event) painter = QPainter(self) painter.setOpacity(self.pixmap_opacity) painter.drawPixmap(0, 0, self.old_pixmap) def animate(self, value): self.pixmap_opacity = 1.0 - value self.update() class FaderTabWidget(QTabWidget): def __init__(self, parent=None): QTabWidget.__init__(self, parent) self.currentChanged.connect(self.onCurrentIndex) self.last = -1 self.current = self.currentIndex() def onCurrentIndex(self, index): self.last = self.current self.current = self.currentIndex() if self.widget(self.last): self.widget(self.last).setCurrentIndex(1) old_widget = self.widget(self.last).widget(0) current_widget = self.widget(self.current).widget(0) fade = self.widget(self.current).widget(1) fade.start(old_widget, current_widget) def addTab(self, widget, text): stack = QStackedWidget(self) stack.addWidget(widget) fade = FaderWidget(self) fade.timeline.finished.connect(lambda: stack.setCurrentIndex(0)) stack.addWidget(fade) stack.setCurrentIndex(0 if self.currentIndex() == -1 else 1) QTabWidget.addTab(self, stack, text) if __name__ == "__main__": app = QApplication(sys.argv) window = QWidget() tabWidget = FaderTabWidget() tabWidget.addTab(QCalendarWidget(), "Tab1") editor = QTextEdit() editor.setPlainText("Hello world! " * 100) tabWidget.addTab(editor, "Tab2") layout = QVBoxLayout(window) layout.addWidget(tabWidget) window.show() sys.exit(app.exec_()) Как данный код адаптировать под использование с .ui файлом?
И можно ли будет по аналогии так делать с другими элементами: кнопками, текстовыми полями и т.д. Моя попытка совместить код (неправильная и нерабочая): main.py:
import sys from PyQt5 import uic from PyQt5.Qt import * class Window(QMainWindow): def __init__(self): super(Window, self).__init__() uic.loadUi('fading.ui', self) self.tabWidget = FaderTabWidget() self.tabWidget.addTab(QCalendarWidget(), "Tab3") self.tabWidget.addTab(QTextEdit(), "Tab4") class FaderWidget(QWidget): def __init__(self, *args, **kwargs): QWidget.__init__(self, *args, **kwargs) self.pixmap_opacity = None self.timeline = QTimeLine(333, self) self.timeline.valueChanged.connect(self.animate) self.timeline.finished.connect(self.close) def start(self, old_widget, new_widget): self.pixmap_opacity = 1.0 self.old_pixmap = QPixmap(new_widget.size()) old_widget.render(self.old_pixmap) self.timeline.start() self.resize(new_widget.size()) self.show() def paintEvent(self, event): if self.pixmap_opacity: QWidget.paintEvent(self, event) painter = QPainter(self) painter.setOpacity(self.pixmap_opacity) painter.drawPixmap(0, 0, self.old_pixmap) def animate(self, value): self.pixmap_opacity = 1.0 - value self.update() class FaderTabWidget(QTabWidget): def __init__(self, parent=None): QTabWidget.__init__(self, parent) self.currentChanged.connect(self.onCurrentIndex) self.last = -1 self.current = self.currentIndex() def onCurrentIndex(self, index): self.last = self.current self.current = self.currentIndex() if self.widget(self.last): self.widget(self.last).setCurrentIndex(1) old_widget = self.widget(self.last).widget(0) current_widget = self.widget(self.current).widget(0) fade = self.widget(self.current).widget(1) fade.start(old_widget, current_widget) def addTab(self, widget, text): stack = QStackedWidget(self) stack.addWidget(widget) fade = FaderWidget(self) fade.timeline.finished.connect(lambda: stack.setCurrentIndex(0)) stack.addWidget(fade) stack.setCurrentIndex(0 if self.currentIndex() == -1 else 1) QTabWidget.addTab(self, stack, text) if __name__ == "__main__": app = QApplication(sys.argv) w = Window() w.show() sys.exit(app.exec_()) fading.ui:
MainWindow 0 0 691 488 MainWindow -
0 Tab 1 -
Tab 2 -
Hello world! Hello world! Hello world! Hello world! Hello world! Hello world! Hello world! Hello world! Hello world! Hello world! Hello world! Hello world! Hello world! Hello world! Hello world! Hello world! Hello world! Hello world! Hello world! Hello world! Hello world! Hello world! Hello world! Hello world! Hello world! Hello world! Hello world! Hello world! Hello world! Hello world! Hello world! Hello world! Hello world! Hello world! Hello world! Hello world! Hello world! Hello world! Hello world! Hello world! Hello world! Hello world! Hello world! Hello world! Hello world! Hello world! Hello world! Hello world! Hello world! Hello world! Hello world! Hello world! Hello world! Hello world! Hello world! Hello world! Hello world! Hello world! Hello world! Hello world! Hello world! Hello world! Hello world! Hello world! Hello world! Hello world! Hello world! Hello world! Hello world! Hello world! Hello world! Hello world! Hello world! Hello world! Hello world! Hello world! Hello world! Hello world! Hello world! Hello world! Hello world! Hello world! Hello world! Hello world! Hello world! Hello world! Hello world! Hello world! Hello world! Hello world! Hello world! Hello world! Hello world! Hello world! Hello world! Hello world! Hello world! Hello world! Hello world! Hello world! 0 0 691 21 Отслеживать
73.1k 109 109 золотых знаков 38 38 серебряных знаков 55 55 бронзовых знаков
задан 30 июн 2021 в 20:18
51 3 3 серебряных знака 15 15 бронзовых знаков
1 ответ 1
Сортировка: Сброс на вариант по умолчанию
Данный код можно адаптировать следующим образом:
- встраиваем виджет FaderTabWidget в форму Qt Designer. Подробно как это делается уже публиковалось.

Получаем fading.ui
MainWindow 0 0 691 488 MainWindow -
1 Tab 1 -
Tab 2 -
Hello world! Hello world! Hello world! Hello world! Hello world! Hello world! Hello world! Hello world! Hello world! Hello world! Hello world! Hello world! Hello world! Hello world! Hello world! Hello world! Hello world! Hello world! Hello world! Hello world! Hello world! Hello world! Hello world! Hello world! Hello world! Hello world! Hello world! Hello world! Hello world! Hello world! Hello world! Hello world! Hello world! Hello world! Hello world! Hello world! Hello world! Hello world! Hello world! Hello world! Hello world! Hello world! Hello world! Hello world! Hello world! Hello world! Hello world! Hello world! Hello world! Hello world! Hello world! Hello world! Hello world! Hello world! Hello world! Hello world! Hello world! Hello world! Hello world! Hello world! Hello world! Hello world! Hello world! Hello world! Hello world! Hello world! Hello world! Hello world! Hello world! Hello world! Hello world! Hello world! Hello world! Hello world! Hello world! Hello world! Hello world! Hello world! Hello world! Hello world! Hello world! Hello world! Hello world! Hello world! Hello world! Hello world! Hello world! Hello world! Hello world! Hello world! Hello world! Hello world! Hello world! Hello world! Hello world! Hello world! Hello world! Hello world! Hello world! Hello world! 0 0 691 21 FaderTabWidget QTabWidget fadertabwidget 1 - конвертируем pyuic5 fading.ui -o fading_ui.py -x
fading_ui.py
from PyQt5 import QtCore, QtGui, QtWidgets class Ui_MainWindow(object): def setupUi(self, MainWindow): MainWindow.setObjectName("MainWindow") MainWindow.resize(691, 488) self.centralwidget = QtWidgets.QWidget(MainWindow) self.centralwidget.setObjectName("centralwidget") self.horizontalLayout = QtWidgets.QHBoxLayout(self.centralwidget) self.horizontalLayout.setObjectName("horizontalLayout") self.tabWidget = FaderTabWidget(self.centralwidget) self.tabWidget.setObjectName("tabWidget") self.tab = QtWidgets.QWidget() self.tab.setObjectName("tab") self.horizontalLayout_2 = QtWidgets.QHBoxLayout(self.tab) self.horizontalLayout_2.setContentsMargins(0, 0, 0, 0) self.horizontalLayout_2.setObjectName("horizontalLayout_2") self.calendarWidget = QtWidgets.QCalendarWidget(self.tab) self.calendarWidget.setObjectName("calendarWidget") self.horizontalLayout_2.addWidget(self.calendarWidget) self.tabWidget.addTab(self.tab, "") self.tab_2 = QtWidgets.QWidget() self.tab_2.setObjectName("tab_2") self.horizontalLayout_3 = QtWidgets.QHBoxLayout(self.tab_2) self.horizontalLayout_3.setContentsMargins(0, 0, 0, 0) self.horizontalLayout_3.setObjectName("horizontalLayout_3") self.plainTextEdit = QtWidgets.QPlainTextEdit(self.tab_2) self.plainTextEdit.setObjectName("plainTextEdit") self.horizontalLayout_3.addWidget(self.plainTextEdit) self.tabWidget.addTab(self.tab_2, "") self.horizontalLayout.addWidget(self.tabWidget) MainWindow.setCentralWidget(self.centralwidget) self.menubar = QtWidgets.QMenuBar(MainWindow) self.menubar.setGeometry(QtCore.QRect(0, 0, 691, 21)) self.menubar.setObjectName("menubar") MainWindow.setMenuBar(self.menubar) self.statusbar = QtWidgets.QStatusBar(MainWindow) self.statusbar.setObjectName("statusbar") MainWindow.setStatusBar(self.statusbar) self.retranslateUi(MainWindow) self.tabWidget.setCurrentIndex(1) QtCore.QMetaObject.connectSlotsByName(MainWindow) def retranslateUi(self, MainWindow): _translate = QtCore.QCoreApplication.translate MainWindow.setWindowTitle(_translate("MainWindow", "MainWindow")) self.tabWidget.setTabText(self.tabWidget.indexOf(self.tab), _translate("MainWindow", "Tab 1")) self.plainTextEdit.setPlainText(_translate("MainWindow", "Hello world! Hello world! Hello world! Hello world! Hello world! Hello world! Hello world! Hello world! Hello world! Hello world! Hello world! Hello world! Hello world! Hello world! Hello world! Hello world! Hello world! Hello world! Hello world! Hello world! Hello world! Hello world! Hello world! Hello world! Hello world! Hello world! Hello world! Hello world! Hello world! Hello world! Hello world! Hello world! Hello world! Hello world! Hello world! Hello world! Hello world! Hello world! Hello world! Hello world! Hello world! Hello world! Hello world! Hello world! Hello world! Hello world! Hello world! Hello world! Hello world! Hello world! Hello world! Hello world! Hello world! Hello world! Hello world! Hello world! Hello world! Hello world! Hello world! Hello world! Hello world! Hello world! Hello world! Hello world! Hello world! Hello world! Hello world! Hello world! Hello world! Hello world! Hello world! Hello world! Hello world! Hello world! Hello world! Hello world! Hello world! Hello world! Hello world! Hello world! Hello world! Hello world! Hello world! Hello world! Hello world! Hello world! Hello world! Hello world! Hello world! Hello world! Hello world! Hello world! Hello world! Hello world! Hello world! Hello world! Hello world! Hello world! Hello world! Hello world! ")) self.tabWidget.setTabText(self.tabWidget.indexOf(self.tab_2), _translate("MainWindow", "Tab 2")) from fadertabwidget import FaderTabWidget # . - создаем модуль fadertabwidget.py
from PyQt5.Qt import * class FaderWidget(QWidget): def __init__(self, *args, **kwargs): QWidget.__init__(self, *args, **kwargs) self.pixmap_opacity = None self.timeline = QTimeLine(333, self) self.timeline.valueChanged.connect(self.animate) self.timeline.finished.connect(self.close) def start(self, old_widget, new_widget): self.pixmap_opacity = 1.0 self.old_pixmap = QPixmap(new_widget.size()) old_widget.render(self.old_pixmap) self.timeline.start() self.resize(new_widget.size()) self.show() def paintEvent(self, event): if self.pixmap_opacity: QWidget.paintEvent(self, event) painter = QPainter(self) painter.setOpacity(self.pixmap_opacity) painter.drawPixmap(0, 0, self.old_pixmap) def animate(self, value): self.pixmap_opacity = 1.0 - value self.update() class FaderTabWidget(QTabWidget): def __init__(self, parent=None): QTabWidget.__init__(self, parent) self.currentChanged.connect(self.onCurrentIndex) self.last = -1 self.current = self.currentIndex() def onCurrentIndex(self, index): self.last = self.current self.current = self.currentIndex() if self.widget(self.last): self.widget(self.last).setCurrentIndex(1) old_widget = self.widget(self.last).widget(0) current_widget = self.widget(self.current).widget(0) fade = self.widget(self.current).widget(1) fade.start(old_widget, current_widget) def addTab(self, widget, text): stack = QStackedWidget(self) stack.addWidget(widget) fade = FaderWidget(self) fade.timeline.finished.connect(lambda: stack.setCurrentIndex(0)) stack.addWidget(fade) stack.setCurrentIndex(0 if self.currentIndex() == -1 else 1) QTabWidget.addTab(self, stack, text) import sys from PyQt5.Qt import * from fading_ui import Ui_MainWindow # +++ class Window(QMainWindow, Ui_MainWindow): # +++ Ui_MainWindow def __init__(self): super(Window, self).__init__() # uic.loadUi('fading.ui', self) # --- self.setupUi(self) # +++ self.tabWidget.setTabText(0, "Tab 1") # + self.tabWidget.setTabText(1, "Tab 2") # + # self.tabWidget = FaderTabWidget() # --- self.tabWidget.addTab(QCalendarWidget(), "Tab3") self.tabWidget.addTab(QTextEdit('Hello World'), "Tab4") if __name__ == "__main__": app = QApplication(sys.argv) w = Window() w.show() sys.exit(app.exec_()) Как конвертировать из ui в py?
Знакомлюсь с PyQt. Накидал форму в QtDesigner. Как конвертировать из ui в py чтоб допилить форму ума не приложу. Из того что нагуглил — конвертером является некий pyuic, но у меня он располагается не в тех папках как на примерах и имеет расширение .py, а не .bat. Как быть, посоветуйте люди добрые.
- Вопрос задан более трёх лет назад
- 95792 просмотра
Комментировать
Решения вопроса 3
Макс Антонов @Cialkowsky Автор вопроса
Ответ таки найден:
pyuic5 name.ui -o name.py — запускаем из папки с файлом ui в cmd
после чего наблюдаем скрипт в той же папке
Ответ написан более трёх лет назад
Нравится 18 2 комментария
У меня не работает. Подскажите, как мне это сделать, если:
стоит анаконда, сделал env c python 3.5 и туда же установил PyQT5.
Консоль выдает: ImportError: DLL load failed: %1 не является приложением Win32.
Студент СПбПУ (примат)
Если не проходит pyuic5 . и т. п., попробуйте из консоли
python -m PyQt5.uic.pyuic -x [FILENAME].ui -o [FILENAME].py(Windows) (при этом находясь в папке со скриптом)
Посмотрел здесь: https://stackoverflow.com/questions/43028904/conve.
Ответ написан более трёх лет назад
Нравится 15 3 комментария
Спасибо. Так работает.
добрый человек, живи долго
ДЯДЬ, ТЫ ГЕНИЙ, ЦЕЛУЮ!
Сергей Горностаев @sergey-gornostaev Куратор тега Python
Седой и строгий
Во-первых, какая разница где он располагается, лишь бы работал. Во-вторых, ui-файлы можно использовать и без конвертации:
from PyQt5 import uic from PyQt5.QtWidgets import QMainWindow class MainWindow(QMainWindow): def __init__(self): super(MainWindow, self).__init__() uic.loadUi('mainwindow.ui', self)Ответ написан более трёх лет назад
Нравится 11 6 комментариев
Макс Антонов @Cialkowsky Автор вопроса
Спасибо за ответ, действительно, классная фишка! Но я бы хотел покопаться в самом коде формы, посмотреть редактор его строит. Питон мой первый ЯП и я пытаюсь понять как писать код без редактора, а примеров крайне мало.
Сергей Горностаев @sergey-gornostaev Куратор тега Python
Макс Антонов: так используйте pyuic. Что вам мешает?
Макс Антонов @Cialkowsky Автор вопроса
Спасибо, разобрался!
Сергей Горностаев @sergey-gornostaev Куратор тега Python
Макс Антонов: для спасибо можно принять ответ.
studprogrammist @studprogrammist
Блин, почему то не работает, хотя при этом не ругается.
Код у меня получился такой:
#!/usr/bin/python3
# -*- coding: utf-8 -*-
import sys
from PyQt5.QtWidgets import QApplication, QWidget, QMainWindow
from PyQt5 import uic
class MainWindow(QMainWindow):
def __init__(self):
super(MainWindow, self).__init__()
uic.loadUi(‘window.ui’, self)
if __name__ == ‘__main__’:
app = QApplication(sys.argv)
w = QWidget()
w.resize(250, 150)
w.move(300, 300)
w.setWindowTitle(‘Simple’)
w.show()
При этом в файл «window.ui» на форму добавил кнопку, а при компиляции «main.py», появляется пустая форма:(
ModuleNotFoundError: No module named ‘PyQt5.uic’
Помогите пожалуйста, использовал pyuic5 test.ui -o name.py
How to Import a PyQt5 .ui File in a Python GUI
In this tutorial, I explain how to import .ui files created using PyQt5’s designer tool in Python and how to connect widgets from the GUI to methods in Python.
- Introduction
- Installing PyQt5
- Generating the UI File
- Importing the UI File In Python
- Getting Widget Object Pointers
- Giving Widgets Unique Names to Find Them With
- Using These Names to Find the Widgets
- Searching For A Pointer
In my tutorial on Python GUI’s with PyQt, I had many people bring up the fact that when modifying the GUI, as soon as pyuic5 is executed again to rebuild the Python file, all original changes will be lost.
In a sense, this is true. For demonstration proposes, I had put all code into the Python file generated, but a smarter way to add code would be have been to import the generated file so that when it changes (executed pyuic5 again to create an updated .py file), it would only have affected the imported file. This method also allows for separation of the GUI and logic.
In this tutorial, I am going to cover a method that allows you to import the .ui file generated by PyQt Designer directly in Python. Please be aware that there is a lot more effort when importing it this way and it can be a lot harder to find where errors are occurring.
Go to my previous tutorial to learn how to install PyQt5. Generally, you can install it using python -m pip install pyqt5 regarding your environment is set up correctly.
If you haven’t got the designer, you can use python -m pip install pyqt5-tools to install tools that contain the designer. Finding the executable can be a bit tough to find if you don’t know where packages install so I would recommend reading the other post to help you find it.
Generating the UI File
As covered in my original PyQt5 tutorial, install the designer, locate it and use it. When saving the GUI you have created, it will be saved as a .ui . This .ui file is XML that contains the layout of the GUI and other things you may have set in the designer application. Here is a snippet of an example .ui file:
version="4.0"> MainWindow class="QMainWindow" name="MainWindow"> name="geometry"> 0 0 367 339 name="windowTitle"> MainWindow class="QWidget" name="centralwidget"> contents.Regarding you know what XML is, this is pretty basic; knowing a little bit of XML is required for this.
Importing the UI File In Python
First we need to import the modules required. We need QtWidgets from PyQt5 for the base widget and uic from PyQt5 also to load the file. We also need sys to access arguments.
from PyQt5 import QtWidgets, uic import sysNext we need to create a base class that will load the .ui file in the constructor. It will need to call the __init__ method of the inherited class, load the .ui file into the current object and then show the window.
class Ui(QtWidgets.QMainWindow): def __init__(self): super(Ui, self).__init__() # Call the inherited classes __init__ method uic.loadUi('basic.ui', self) # Load the .ui file self.show() # Show the GUIIt is very important here to inherit the correct class. In this example I inherit QtWidgets.QMainWindow because I created a new «Main Window» when selecting the form type when first creating the .ui file in PyQt Designer. If you look back to the source of the .ui file, we can actually identify the class we need to inherit.
version="4.0"> MainWindow class="QMainWindow" name="MainWindow"> name="geometry">This is a snippet of the XML from before. You can see «MainWindow» is the root widget as all the content is wrapped in the
. element. This tag has a class attribute; in this example, the value is QMainWindow , which explains why I used QtWidgets.QMainWindow .Your widget class may be different so be sure to double-check!
After this, we then need to create an instance of this class we just made and execute it.
app = QtWidgets.QApplication(sys.argv) # Create an instance of QtWidgets.QApplication window = Ui() # Create an instance of our class app.exec_() # Start the applicationPutting this all together, we get:
from PyQt5 import QtWidgets, uic import sys class Ui(QtWidgets.QMainWindow): def __init__(self): super(Ui, self).__init__() uic.loadUi('basic.ui', self) self.show() app = QtWidgets.QApplication(sys.argv) window = Ui() app.exec_()This assumes that the .ui file is called basic.ui
Run the script to make sure everything runs, if the GUI that you created appears, congratulations! If not, look back over what you may have missed and READ THE ERROR (I cannot stress this enough).
A small check-list for things that may go wrong:
- PyQt5 isn’t installed
- The .ui file you are importing does not exist (incorrect reference)
- You did not inherit the correct class (found in the XML)
Getting Widget Object Pointers
Once you have the GUI being imported, you now need to identify some pointers for the objects you want to use. For this example I am going to use the .ui linked below:
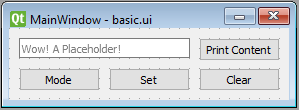
This GUI contains 5 widgets that we can see:
- Text input line
- A button to the right of this saying «Print Content»
- 3 buttons below the input saying «Mode», «Set» and «Clear»
When looking at the XML, we can see that there is a centralwidget inside a QMainWindow and inside the centralwidget are the 5 widgets I created.
Giving Widgets Unique Names to Find Them With
The most important part of getting a pointer to one of these widgets is to give each widget a unique name, preferably something that is friendly to read. Open my .ui file in the Designer or in notepad to see the names I have given each widget. In the XML you can see the 5 widgets I created have friendly name attributes; these names can help us identify the widgets.
To set these names, when clicking on an object in the designer, the property editor on the left provides a field called objectName
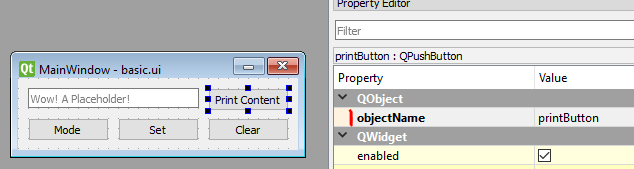
Set this to what you want the object to be called and you should see this in the XML when you save the file.
You don’t have to look at the XML, seeing/modifying it in the designer is enough.
Using These Names to Find the Widgets
Now that each widget has a name attribute, we can get pointers of these objects. When I say pointers, I mean a variable that we can use to access this widget and modify it.
When uic.loadUi(‘basic.ui’, self) is called, the names of the widgets will be used to create pointers to the widgets themselves. This means to get our button named «printButton», we can access it using self.printButton within the same class that uic.loadUi(‘basic.ui’, self) was called in after it has been called (technically we can call that on whatever self is).
class Ui(QtWidgets.QMainWindow): def __init__(self): super(Ui, self).__init__() uic.loadUi('basic.ui', self) # Set the print button text to "Text Changed" self.printButton.setText('Text Changed') # This should not throw an error as `uic.loadUi` would have created `self.printButton` self.show()Searching For A Pointer
In the case that the method above doesn’t work for some widgets, you can still search for them. To find an object, we can use findChild on any one of its parent objects while supplying the type of widget we are getting and the name.
class Ui(QtWidgets.QMainWindow): def __init__(self): super(Ui, self).__init__() uic.loadUi('basic.ui', self) # Find the button with the name "printButton" self.button = self.findChild(QtWidgets.QPushButton, 'printButton') # We have now created `self.printButton` ourselves (will overwrite whatever was there if something existed already) self.show()Alternatively, you can leave the name out to find the first object of the type you provided. You can also call findChildren to find more than one object.
In the example above, I have searched for a QPushButton object with the name «printButton». To find the object type you need to search for, each widget in the XML will have a class attribute beside the name attribute. If you look at the .ui file I provided and search for «printButton», you will see an attribute class on the same line with a value QPushButton ; this is how I knew to use QtWidgets.QPushButton .
class="QWidget" name="centralwidget"> class="QPushButton" name="printButton"> name="geometry">To find the name of this class in the designer, click on a widget and look at the «Object Inspector» window to the right. In the image below you can see that the type of the widget named «input» is QLineEdit ; so I would then use QtWidgets.QLineEdit .
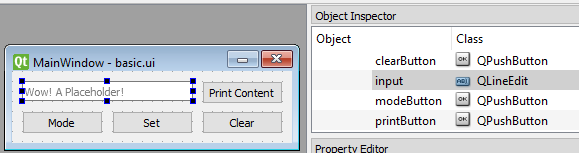
The method above simply helps you get a pointer to the object. Now that the hardest part is done, you are free to do what you would normally do after you have located all your widgets you want to use.
Please note, this is not a full tutorial on PyQt5. I am simply demonstrating how to import .ui files
Connecting Buttons to Methods
To connect a button to a method, we need to get a pointer (as shown before) and then connect it like we normally would. Here is a full example:
from PyQt5 import QtWidgets, uic import sys class Ui(QtWidgets.QMainWindow): def __init__(self): super(Ui, self).__init__() uic.loadUi('basic.ui', self) self.button = self.findChild(QtWidgets.QPushButton, 'printButton') # Find the button self.button.clicked.connect(self.printButtonPressed) # Remember to pass the definition/method, not the return value! self.show() def printButtonPressed(self): # This is executed when the button is pressed print('printButtonPressed') app = QtWidgets.QApplication(sys.argv) window = Ui() app.exec_()To read inputs, I will use the button method from before to trigger an event and also get another pointer to the input widget.
from PyQt5 import QtWidgets, uic import sys class Ui(QtWidgets.QMainWindow): def __init__(self): super(Ui, self).__init__() uic.loadUi('basic.ui', self) self.button = self.findChild(QtWidgets.QPushButton, 'printButton') # Find the button self.button.clicked.connect(self.printButtonPressed) # Remember to pass the definition/method, not the return value! self.input = self.findChild(QtWidgets.QLineEdit, 'input') self.show() def printButtonPressed(self): # This is executed when the button is pressed print('Input text:' + self.input.text()) app = QtWidgets.QApplication(sys.argv) window = Ui() app.exec_()These are only the basics but are great to build up from.
This Seems Like A Lot Of Effort?
Yes, at first it will be a lot of effort, but once you have set up all the pointers, you no longer need to worry about the GUI changing (regarding you keep the names of widgets the same). This is a small price to pay in ‘overhead’ for more smooth development later.
Owner of PyTutorials and creator of auto-py-to-exe. I enjoy making quick tutorials for people new to particular topics in Python and tools that help fix small things.
- �� Apps 2
- �� General 8
- �� Investigations 2
- �� Projects 15
- ✂ Snippets 1
- �� Tools 6
- �� Tutorials 30
- �� YouTube 15
Qt Designer
Summary: in this tutorial, you’ll learn how to use the Qt Designer tool to design user interfaces for PyQt applications.
Install the PyQt tools
PyQt6 tools are compatible with Python 3.9 at the time of writing this tutorial. Therefore, you need to install Python 3.9 to continue the tutorial.
Note that if you have Python 3.10 or higher, you can install Python 3.9 in a separate directory and use PyQt6 tools. For example, you can install Python 3.9 in the C:\Python39 directory on Windows.
Create a new virtual environment
First, create a directory to host the PyQt6 projects e.g., D:\pyqt6
mkdir pyqt6Code language: Python (python)Second, create a virtual environment using Python 3.9 using the venv module:
python -m venv D:\pyqt6\pyqt6-envCode language: Python (python)Activate the virtual environment
First, navigate to the pyqt6-env virtual environment directory:
cd D:\pyqt6\pyqt6-envCode language: Python (python)Second, navigate to the Scripts folder:
cd ScriptsCode language: Python (python)Third, activate the virtual environment by executing the activate.bat file:
activateCode language: Python (python)It’ll show the following on Windows:
(pyqt6-env) d:\pyqt6\pyqt6-env\Scripts>Code language: Python (python)Install PyQt6 and its tools
First, execute the following command to install pyqt6 package in the pyqt6-env virtual environment:
pip install pyqt6Code language: Python (python)Second, install the pyqt6-tools package that contains the Qt Designer and other related tools:
pip install pyqt6-toolsCode language: Python (python)The pyqt-tools package will install the Qt Designer in the following location:
D:\pyqt6\pyqt6-env\Lib\site-packages\qt6_applications\Qt\bin\designer.exeCode language: Python (python)Third, execute the pyuic6 command (within the pyqt6-env virtual environment) to check the version:
pyuic6 -VCode language: Python (python)And you’ll see the following output:
6.1.0Code language: Python (python)The pyuic6 is a tool for converting a design file ( .ui ) generated by Qt Designer to a Python file ( .py ).
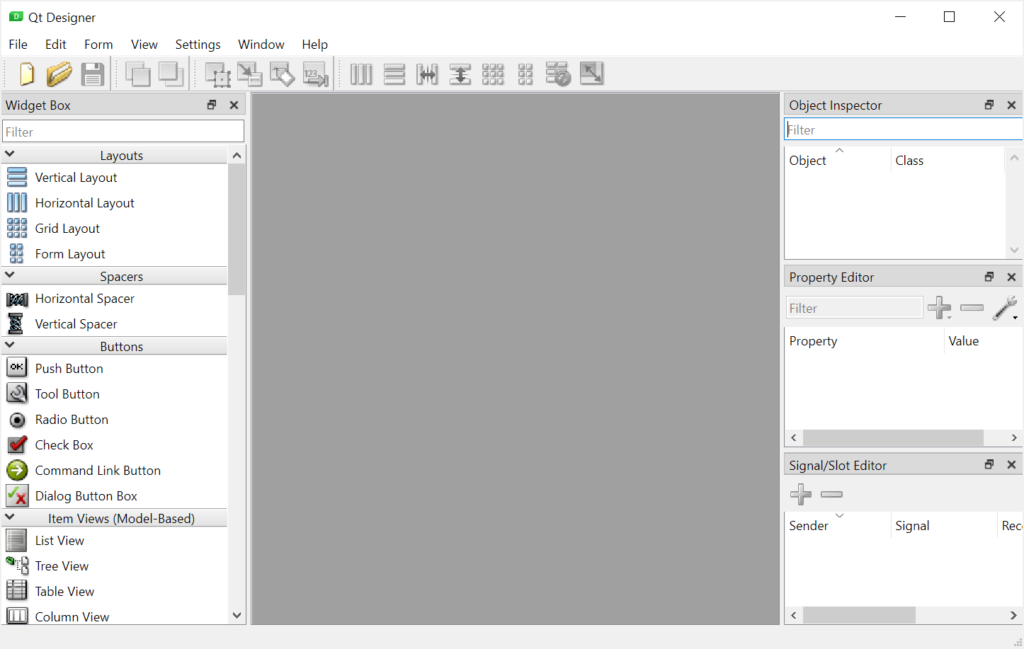
Launch the Qt Designer
From the Shell, type the designer command to launch the Qt Designer:
(pyqt6-env) d:\pyqt6\pyqt6-env\Scripts>designerCode language: Python (python)The Qt Designer will look like this:
Creating a login form
We’ll create a simple login form using the Qt designer and load it into our Python program.
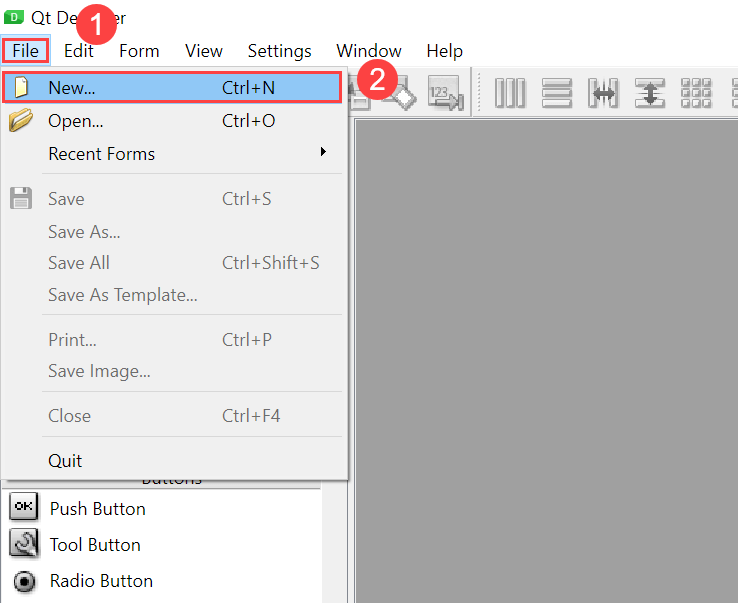
First, select File > New or press Ctrl-N keyboard shortcut to open the New Form dialog:
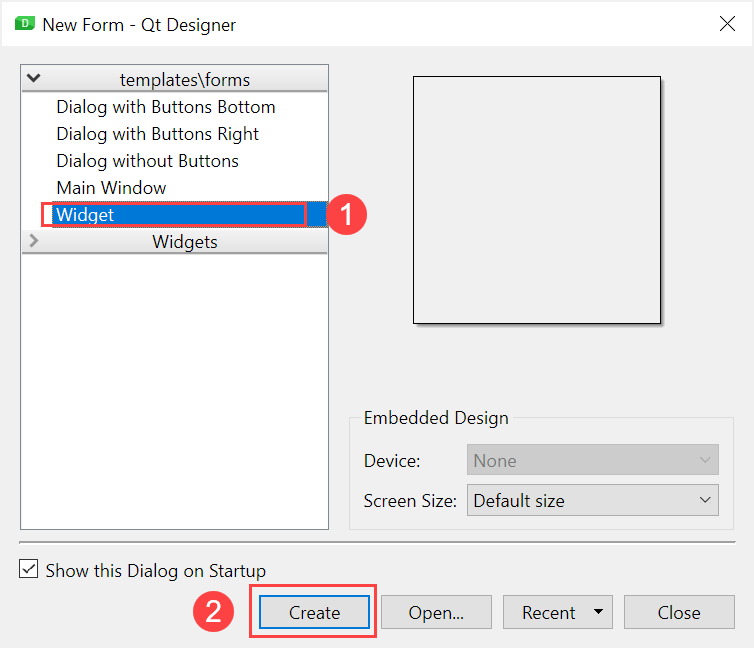
Second, select the Widget from the templates\forms and click the Create button:
It’ll create a QWidget as follows:
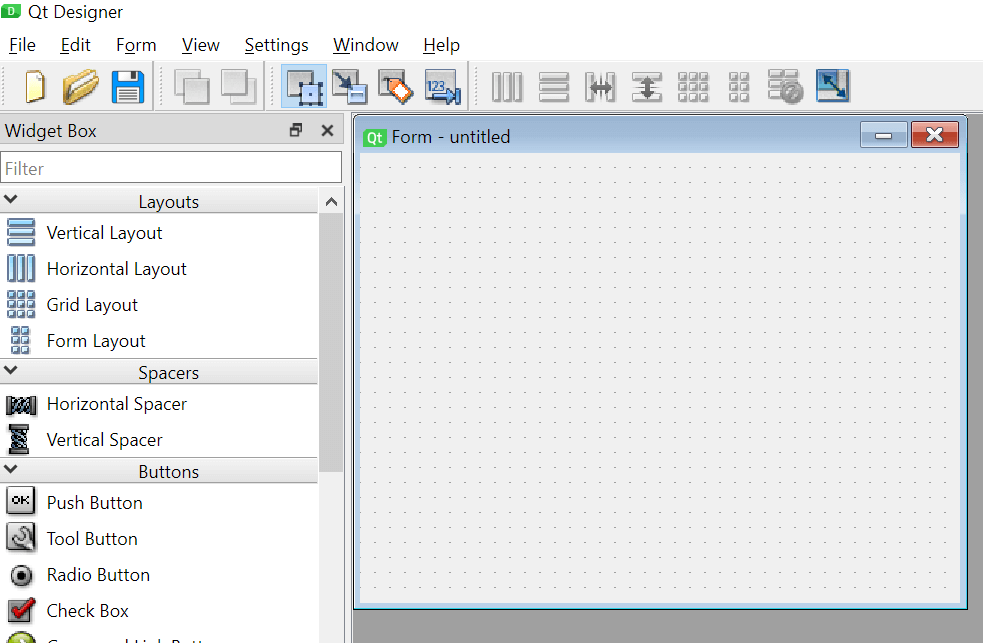
You can set the layout for the widget, and drag and drop widgets from the Widget Box to the form.
Setting widget properties
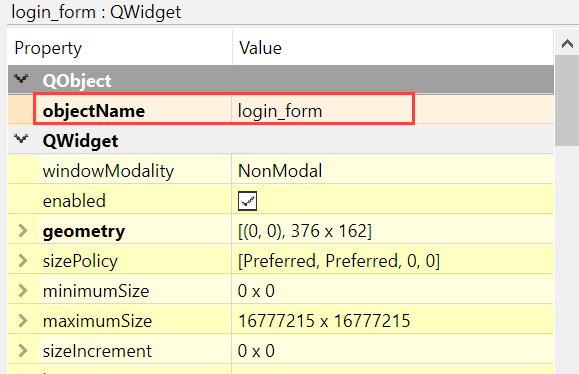
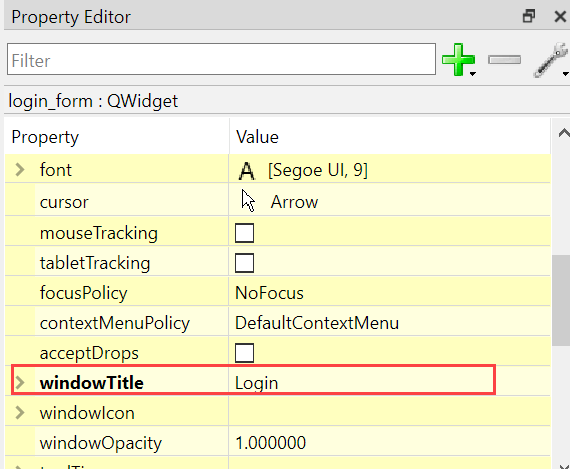
In the Property Editor, you can set a name for the widget e.g., login_form
and the window title:
Adding widgets to the login form
First, add the widgets QLabel , QLineEdit , and QPushButton to the form:
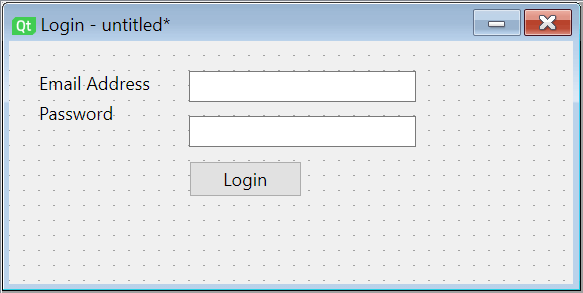
The following table lists the fields, their types, and names:
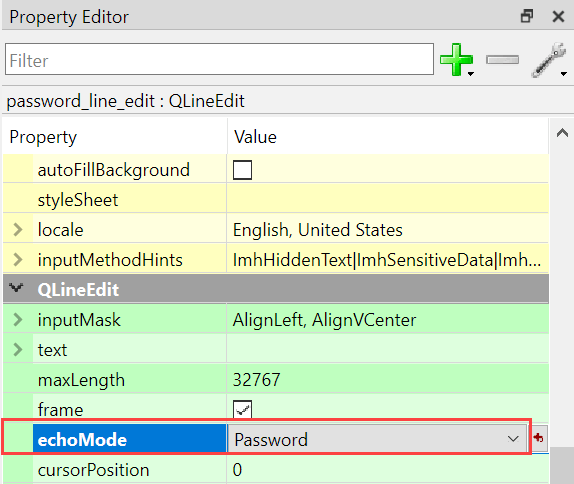
Field Widget Object Name Login Window QWidget login_form Email Address QLineEdit email_line_edit Password QLineEdit password_line_edit Login Button QPushButton btn_login Second, set the echo mode of the password field to Password :
Third, right-click the widget and set its layout to Form Layout:
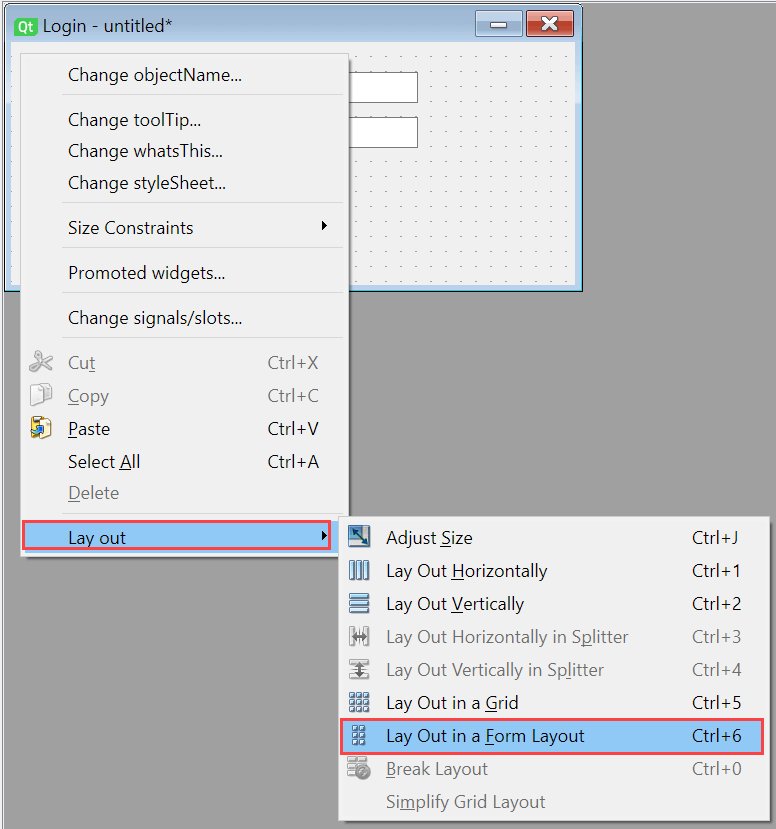
The form will change to the following:
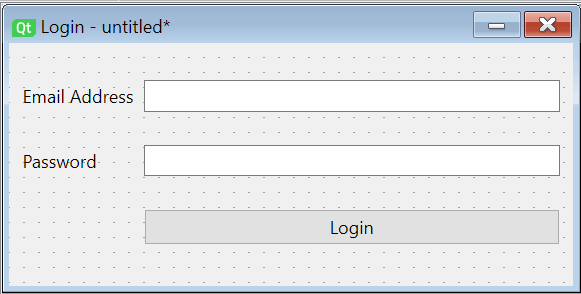
Fourth, change the size of the Login button by setting its Horizontal Size Policy to Fixed:
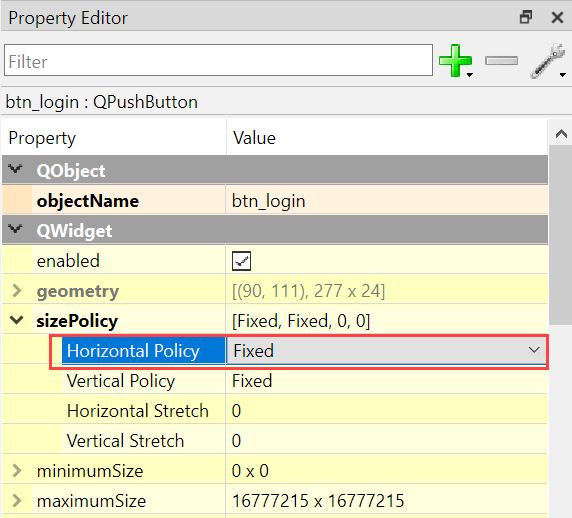
Fifth, save the form to the D:\pyqt6 directory as login_form.ui file.
Sixth, select Form > Preview. menu or the keyboard shortcut Ctrl-R to preview the form:
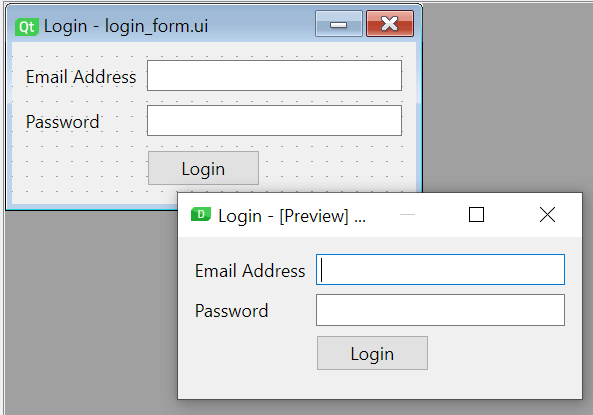
Finally, close the Qt Designer.
There’re two ways to use the login_form .ui from a Python program:
- Convert the .ui file to Python code and use the generated code from the program.
- Directly use the .ui file in the program.
Converting .ui file to Python code
First, execute the following command to convert the login_form.ui file to login_form.py file:
pyuic6 -o login_form.py login_form.uiCode language: Python (python)Note that you need to run the pyuic6 from the pyqt6-env virtual environment.
The pyuic6 generated the login_form.py from the login_form.ui file. The login_form.py contains the following generated Python code:
# Form implementation generated from reading ui file 'login_form.ui' # # Created by: PyQt6 UI code generator 6.1.0 # # WARNING: Any manual changes made to this file will be lost when pyuic6 is # run again. Do not edit this file unless you know what you are doing. from PyQt6 import QtCore, QtGui, QtWidgets class Ui_login_form(object): def setupUi(self, login_form): login_form.setObjectName("login_form") login_form.resize(269, 108) self.formLayout = QtWidgets.QFormLayout(login_form) self.formLayout.setObjectName("formLayout") self.label = QtWidgets.QLabel(login_form) self.label.setObjectName("label") self.formLayout.setWidget(0, QtWidgets.QFormLayout.ItemRole.LabelRole, self.label) self.email_line_edit = QtWidgets.QLineEdit(login_form) self.email_line_edit.setObjectName("email_line_edit") self.formLayout.setWidget(0, QtWidgets.QFormLayout.ItemRole.FieldRole, self.email_line_edit) self.label_2 = QtWidgets.QLabel(login_form) self.label_2.setObjectName("label_2") self.formLayout.setWidget(1, QtWidgets.QFormLayout.ItemRole.LabelRole, self.label_2) self.password_line_edit = QtWidgets.QLineEdit(login_form) self.password_line_edit.setEchoMode(QtWidgets.QLineEdit.EchoMode.Password) self.password_line_edit.setObjectName("password_line_edit") self.formLayout.setWidget(1, QtWidgets.QFormLayout.ItemRole.FieldRole, self.password_line_edit) self.btn_login = QtWidgets.QPushButton(login_form) sizePolicy = QtWidgets.QSizePolicy(QtWidgets.QSizePolicy.Policy.Fixed, QtWidgets.QSizePolicy.Policy.Fixed) sizePolicy.setHorizontalStretch(0) sizePolicy.setVerticalStretch(0) sizePolicy.setHeightForWidth(self.btn_login.sizePolicy().hasHeightForWidth()) self.btn_login.setSizePolicy(sizePolicy) self.btn_login.setObjectName("btn_login") self.formLayout.setWidget(2, QtWidgets.QFormLayout.ItemRole.FieldRole, self.btn_login) self.retranslateUi(login_form) QtCore.QMetaObject.connectSlotsByName(login_form) def retranslateUi(self, login_form): _translate = QtCore.QCoreApplication.translate login_form.setWindowTitle(_translate("login_form", "Login")) self.label.setText(_translate("login_form", "Email Address")) self.label_2.setText(_translate("login_form", "Password")) self.btn_login.setText(_translate("login_form", "Login"))Code language: Python (python)It’s important to note that you should never manually change the login_form.py file. Because all your manual adjustments will be lost if you edit the login_form.ui in the Qt Designer and regenerate the login_form.py again.
Second, create the login.py file and import the login_ui.py file:
import sys from PyQt6.QtWidgets import QApplication, QWidget from login_form import Ui_login_form class Login(QWidget): def __init__(self): super().__init__() # use the Ui_login_form self.ui = Ui_login_form() self.ui.setupUi(self) # show the login window self.show() if __name__ == '__main__': app = QApplication(sys.argv) login_window = Login() sys.exit(app.exec())Code language: Python (python)- Import Ui_login_form class from the login_form.py file
- Create a new instance of the Ui_login_form and call the setupUi() method to set up the user interfaces.
Third, execute the login.py file:
python login.pyCode language: Python (python)It’ll show the login window:
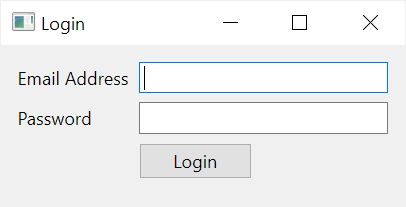
Referencing child widgets
To use the child widgets of Ui_login_form widget, you reference their names using the self.ui variable.
For example, you can add a simple authentication when the user enters an email address and password and click the Login button as follows:
import sys from PyQt6.QtWidgets import QApplication, QWidget, QMessageBox from login_form import Ui_login_form class Login(QWidget): def __init__(self): super().__init__() # use the Ui_login_form self.ui = Ui_login_form() self.ui.setupUi(self) # authenticate when the login button is clicked self.ui.btn_login.clicked.connect(self.authenticate) # show the login window self.show() def authenticate(self): email = self.ui.email_line_edit.text() password = self.ui.password_line_edit.text() if email == '[email protected]' and password == '123456': QMessageBox.information(self, 'Success',"You're logged in!") else: QMessageBox.critical(self, 'Error',"Invalid email or password.") if __name__ == '__main__': app = QApplication(sys.argv) login_window = Login() sys.exit(app.exec())Code language: Python (python)First, connect the clicked signal of the button to the authenticate method. Notice that we reference the btn_login button via the self.ui variable:
self.ui.btn_login.clicked.connect(self.authenticate)Code language: Python (python)Second, define the authenticate() method that gets values from the email_line_edit and password_line_edit and perform a simple check of these values against hard-coded values:
def authenticate(self): email = self.ui.email_line_edit.text() password = self.ui.password_line_edit.text() if email == '[email protected]' and password == '123456': QMessageBox.information(self, 'Success',"You're logged in!") else: QMessageBox.critical(self, 'Error',"Invalid email or password.")Code language: Python (python)Security Notice: Never do this in real applications.
Besides creating an instance of the Ui_login_form inside the login window, you can inherit the Ui_login_form window using multiple inheritances and directly reference the child widgets like this:
import sys from PyQt6.QtWidgets import QApplication, QWidget, QMessageBox from login_form import Ui_login_form class Login(QWidget,Ui_login_form): def __init__(self): super().__init__() # setup the UI self.setupUi(self) # authenticate when the login button is clicked self.btn_login.clicked.connect(self.authenticate) # show the login window self.show() def authenticate(self): email = self.email_line_edit.text() password = self.password_line_edit.text() if email == '[email protected]' and password == '123456': QMessageBox.information(self, 'Success',"You're logged in!") else: QMessageBox.critical(self, 'Error',"Invalid email or password.") if __name__ == '__main__': app = QApplication(sys.argv) login_window = Login() sys.exit(app.exec())Code language: Python (python)Using .ui file directly
Another way to use the design generated by the Qt Designer is to load the .ui file directly using the loadUi() function of the uic module:
from PyQt6.QtWidgets import QApplication, QWidget, QMessageBox from PyQt6 import uic import sys class Login(QWidget): def __init__(self): super().__init__() self.ui = uic.loadUi('login_form.ui', self) # authenticate when the login button is clicked self.ui.btn_login.clicked.connect(self.authenticate) self.show() def authenticate(self): email = self.email_line_edit.text() password = self.password_line_edit.text() if email == '[email protected]' and password == '123456': QMessageBox.information(self, 'Success',"You're logged in!") else: QMessageBox.critical(self, 'Error',"Invalid email or password.") if __name__ == '__main__': app = QApplication(sys.argv) login_window = Login() sys.exit(app.exec())Code language: Python (python)The loadUi() function returns an instance of the QWidget and you can reference the child widgets via the self.ui variable.
When you should use Qt Designer
The .ui file generated by the Qt designer creates an abstraction layer between the available widget and the code that consumes it.
Therefore, if you are starting out with PyQt, you should code the UI manually instead of using Qt Designer. By doing this, you know exactly what widgets are available in the application.
However, if you’re familiar with PyQt and work on a large application, you should use Qt Designer to create a good design and improve productivity.
Summary
- Use Qt Designer to design user interfaces for large applications.
- Use the pyuic6 tool to convert a .ui file into a Python source code file.
- Use loadUi() function of the uic module to load the .ui file directly.