
Подключение PHP к Apache
Если Вам понравился данный материал, поделитесь им с вашими друзьями в соц сетях
Основной особенностью веб-сервера Apache является расширяемость его функциональных возможностей, по средствам подключения различных дополнительных модулей. Каждый из них выполняет определенные задачи. Часть модулей разрабатывается командой Apache Software Foundation, другая часть, отдельными open source разработчиками.
Используя данный функционал, к веб-серверу Apache, возможно подключить, к примеру, поддержку различных языков программирования, таких как: PHP, PERL, Python, Ruby, ASP и др.
В одном из предыдущих материалов Установка Apache 2.4, был описан процесс установки и запуска локального веб-сервера Apache на ОС Microsoft Windows 7. Теперь подключим к нему язык программирования PHP. Какую версию PHP выбрать и где ее скачать описано в материале Что необходимо для установки веб-сервера?
Подключение PHP к Apache
Итак, имея в наличии, ранее скаченный архив с необходимой версией PHP, создадим в корне локального диска «C:\» директорию «php», и распакуем в нее содержимое архива.
Перейдем в директорию «C:\php\» и найдем 2 файла: «php.ini-development» и «php.ini-production». Эти файлы — примеры конфигурационных файлов PHP. Сделайте копию файла «php.ini-development» с именем «php.ini», в дальнейшем это будет основным конфигурационным файлом настройки PHP. Текущих настроек файла ««php.ini»» будет достаточно, для того, что бы подключить модуль PHP к веб-серверу Apache и проверить его корректную работу.
Теперь необходимо сообщить нашему веб-сервер Apache, что необходимо подключить модуль PHP.
Открываем конфигурационный файл веб-сервера «C:\Apache24\conf\httpd.conf» и раскомментируем следующие строки (данные строки отвечают за подключение необходимый модулей):
LoadModule negotiation_module modules/mod_negotiation.so LoadModule rewrite_module modules/mod_rewrite.so LoadModule setenvif_module modules/mod_setenvif.so
Сразу после блока с подключением модулей, добавляем в конф. файл следующие строки:
PhpIniDir "C:/php" LoadModule php5_module "C:/php/php5apache2_4.dll" AddHandler application/x-httpd-php .php
В первой строке указываем путь до директории с конфигурационным файлом PHP — «C:\php\php.ini».
Во второй строке говорим веб-серверу, что необходимо загружать модуль PHP, который отвечает за обработку php файлов, указывая при этом полный путь до библиотеки dll. Необходимо помнить, что имя библиотеки может отличаться от указанного.
В третей строке указываем расширение файлов, которые будут обрабатываться интерпретатором PHP.
Ниже в конфигурационном файле ищем блок:
DirectoryIndex index.html
и добавляем в конце второй строки «index.php»
DirectoryIndex index.html index.php
Перезагружает веб-сервер любым удобным для Вас способом (используя ApacheMonitor, сервис Службы или командную строку). Если при перезагризки веб-сервера возникли ошибки и он не запустился, проверьте все измененые Вами данные, возможно была допущена опечатка в указании путей.
Проверяем работает ли PHP
После успешного запуска веб-сервера, необходимо проверить, что PHP работает. Для этого создаем в корневой директории управления сайтами «C:\Apache24\htdocs\» файл c именем «phpinfo.php», открываем его в текстовом редакторе и добавляем следующие строки:
phpinfo — это системная PHP-функция, выводящая различную информацию об интерпретаторе: настройки, текущие значения системных переменных и т.д.
Открываем в браузере страницу http://localhost/phpinfo.php. Если все настроено правильно, то странице Вы увидите таблицу с версией PHP и значением переменных.
Работа с конфигурационным файлом php.ini
Открываем конфигурационный файл php «C:\php\php.ini» в текстовом редакторе.
;extension_dir = "ext"
это значение указывает на директорию (каталог), в котором хранятся динамически загружаемые расширения.
раскомментируем и изменим значение директивы
extension_dir = "C:\php\ext"
Предлагаю разобраться, что нам дало выполнение данного действия и что такое динамически загружаемые расширения.
Если Вы откройте директорию «C:\php\ext», то увидите множество файлов с расширением .dll. Каждый из этих файлов и есть то самое динамически загружаемое расширение. Подключение данных расширений позволяют увеличивать функциональные возможности PHP.
Итак, путь до динамически загружаемых расширений мы указали, теперь давайте подключим наиболее важные и необходимые из них. Для это построчно раскомментируем необходимые расширения, удалив в начале каждой строки знак комментирования «;» (точка с запятой).
найдем блок Dynamic Extensions (Динамические Расширения)
;;;;;;;;;;;;;;;;;;;;;; ; Dynamic Extensions ; ;;;;;;;;;;;;;;;;;;;;;; . extension=php_bz2.dll extension=php_curl.dll extension=php_gd2.dll extension=php_imap.dll extension=php_mbstring.dll extension=php_exif.dll ; Must be after mbstring as it depends on it extension=php_mysql.dll extension=php_mysqli.dll extension=php_pdo_mysql.dll .
раскомментируем необходимые расширения
По итогам изучения данного материала мы расширили функциональные возможности веб-сервера Apache подключив к нему модуль языка программирования PHP.
- Установка Apache 2.4
- Подключение MySQL к PHP
Как подключить php к apache
This section contains notes and hints specific to Apache 2.x installs of PHP on Unix systems.
Warning
We do not recommend using a threaded MPM in production with Apache 2. Use the prefork MPM, which is the default MPM with Apache 2.0 and 2.2. For information on why, read the related FAQ entry on using Apache2 with a threaded MPM
The » Apache Documentation is the most authoritative source of information on the Apache 2.x server. More information about installation options for Apache may be found there.
The most recent version of Apache HTTP Server may be obtained from » Apache download site, and a fitting PHP version from the above mentioned places. This quick guide covers only the basics to get started with Apache 2.x and PHP. For more information read the » Apache Documentation. The version numbers have been omitted here, to ensure the instructions are not incorrect. In the examples below, ‘NN’ should be replaced with the specific version of Apache being used.
There are currently two versions of Apache 2.x — there’s 2.4 and 2.2. While there are various reasons for choosing each, 2.4 is the current latest version, and the one that is recommended, if that option is available to you. However, the instructions here will work for either 2.4 or 2.2. Note that Apache httpd 2.2 is officially End Of Life, and no new development or patches are being issued for it.
-
Obtain the Apache HTTP server from the location listed above, and unpack it:
tar -xzf httpd-2.x.NN.tar.gz
tar -xzf php-NN.tar.gz
cd httpd-2_x_NN ./configure --enable-so make make install
/usr/local/apache2/bin/apachectl start
and stop the server to go on with the configuration for PHP:
/usr/local/apache2/bin/apachectl stop
cd ../php-NN ./configure --with-apxs2=/usr/local/apache2/bin/apxs --with-pdo-mysql make make install
cp php.ini-development /usr/local/lib/php.ini
LoadModule php_module modules/libphp.so
LoadModule php7_module modules/libphp7.so
SetHandler application/x-httpd-php
Or, if we wanted to allow .php, .php2, .php3, .php4, .php5, .php6, and .phtml files to be executed as PHP, but nothing else, we’d use this:
SetHandler application/x-httpd-php
And to allow .phps files to be handled by the php source filter, and displayed as syntax-highlighted source code, use this:
SetHandler application/x-httpd-php-source
mod_rewrite may be used To allow any arbitrary .php file to be displayed as syntax-highlighted source code, without having to rename or copy it to a .phps file:
RewriteEngine On RewriteRule (.*\.php)s$ $1 [H=application/x-httpd-php-source]
/usr/local/apache2/bin/apachectl start
service httpd restart
Following the steps above you will have a running Apache2 web server with support for PHP as a SAPI module. Of course there are many more configuration options available Apache and PHP. For more information type ./configure —help in the corresponding source tree.
Apache may be built multithreaded by selecting the worker MPM, rather than the standard prefork MPM, when Apache is built. This is done by adding the following option to the argument passed to ./configure, in step 3 above:
--with-mpm=worker
This should not be undertaken without being aware of the consequences of this decision, and having at least a fair understanding of the implications. The Apache documentation regarding » MPM-Modules discusses MPMs in a great deal more detail.
Note:
The Apache MultiViews FAQ discusses using multiviews with PHP.
Note:
To build a multithreaded version of Apache, the target system must support threads. In this case, PHP should also be built with Zend Thread Safety (ZTS). Under this configuration, not all extensions will be available. The recommended setup is to build Apache with the default prefork MPM-Module.
User Contributed Notes 17 notes
1 year ago
I had just installed php8.1.12 on a machine used for writing C code.
Below are some libraries that I needed to download on a debian-based OS.
apt-get install libpcre3 libpcre3-dev
apt-get install apache2-dev
apt-get install libxml2-dev
apt-get install libsqlite3-dev
These were the missing packages that I required.
If you get an error regarding a missing package or library, for example when I needed sqlite3, run the command:
apt search sqlite3
And you’ll be able to see if there’s any dev or lib packages.
The apache2 instructions worked flawlessly at the time of php8.1.12; and in order to get certain requirements for an application, I had to run the php configure file like so:
./configure —with-apxs2=/usr/local/apache2/bin/apxs —with-pdo-mysql —with-mysqli —with-zip —enable-gd
The extra flags allowed me to use both types of mysql, allowed me to utilize PHP zip archiving, and allowed me to use Gnatt stuff.
14 years ago
When I upgrade to apache 2.2, this:
AddType application/x-httpd-php .php5
AddType application/x-httpd-php .php42
AddType application/x-httpd-php .php4
AddType application/x-httpd-php .php3
AddType application/x-httpd-php .php
AddType application/x-httpd-php .phtm
AddType application/x-httpd-php .phtml
AddType application/x-httpd-php .asp
. does not worked for me, so I did this:
Another interesting point with Apache 2.2 is following.
Let suppose we installed PHP as module. But for some directory, we need to use PHP as CGI (probably because of custom configuration). This can be done using:
AddType application/x-httpd-php-custom .php
Action application/x-httpd-php-custom /cgi-bin/php-huge
Note type must be different than «application/x-httpd-php» and also you need to deactivate the handler on sertain extention. You can do mixed configuration:
AddType application/x-httpd-php-custom .php
Action application/x-httpd-php-custom /cgi-bin/php-huge
in such case files like *.php5 and so on will be parsed via module, but *.php will go to php-huge executable.
4 years ago
解析PHP,需要Apache 2.4.9 以后
SetHandler «proxy:fcgi://127.0.0.1:9000»
18 years ago
during the make process should u receive an error declaring ext/ctype/ctype.lo (or another file) is truncated then you need to ‘make clean’ prior to a healthy ‘make’ and ‘make install.’
looking into your ext/ directory you may find the offensive file to be 1 byte long.
17 years ago
I’ve (painfully) discovered that installing PHP5 with «make install» under SuSe 9.2 is NOT a good idea.
http://www.aditus.nu/jpgraph/apache2suse.php
This page explains how to install it without breaking everything that’s php-related in the Apache2 configuration. Its first purpose, though, is to show how to have php 4 and 5 to cohabit properly.
6 years ago
Building php 7.1.3 with mysql 5.7.17 and httpd 2.4.25 on Debian 8, step 5 failed for me. Instead of
12 years ago
On 64-bit Fedora systems (I’m using Fedora 14), configuring PHP to use the MySQL libraries installed as part of the distribution gives the following error if you follow the default instructions in this manual.
Cannot find libmysqlclient under /usr
Modifying he following invocation of configure as follows:
./configure —with-apxs2=/path/to/apxs —with-libdir=lib64 —with-mysql
Note the addition of —with-libdir=lib64
This points the configure script to look for 64-bit mysqlclient libraries.
14 years ago
I have successfully installed Apache 2.2.11 and PHP 5.2.8 under Red Hat 9.0 on a Pentium 166 with 32 MB of RAM.
While I used RH9, the worst possible case, these notes are probably good for RH-based distributions too (Red Hat Enterprise, Fedora, CentOS. )
If you want to install MySQL, it needs to be installed before PHP because PHP requires some libraries be available.
One think important when picking up a binary distribution of MySQL is to download all four packages: MySQL-server, MySQL-devel, MySQL-client and MySQL-shared. Note: The MySQL was bundled with PHP 4 but is not anymore in PHP 5.
Then you need to install Apache before PHP, because again PHP needs some libraries be available. I installed Apache 2 from source, using the very last version available, which is 2.2.11.
I installed PHP 5.2.8 from source. Here, I had a number of problems, but none which I could not resolve easily, some of them with a little help from different forums I found through Google.
Rembember: When it says you need a package named xyz and you notice there is also one named xyz-devel, grab it.
Most of the packages I got from:
http://legacy.redhat.com/pub/redhat/linux/9/en/os/i386/RedHat/RPMS/
A similar page exists for other versions of Red Hat
and:
http://rpmfind.net/
This site has an updated version of some of the packages. Make sure to use only the one labeled for you version (in my case, Red Hat 9.0) or it will not likely work.
You already have glibc and glibc-common installed, but you need to get glibc-devel and glibc-kernheaders. Make sure to match glibc’s version (rpm -q glibc). Note: When it says kernel-header is a required dependency, that’s glibc-kernheader (not kernel-source). You will also need binutils (no need to match the version), and gcc and cpp (version must match).
You need zlib-devel (zlib is probably already installed, match the version you have).
If you install the GD extension, the actual library is already bundled with PHP 5 (use that one, they have done some changes in there, so don’t upgrade), but you will need to install libpng and libpng-devel (match version, or disable in configure if you don’t want) and libjpeg (no -devel with that one).
You will also need libxml2. Now there were a problem, because PHP requires libxml2 be 2.6 or greater, but Red Hat only supplied 2.5.4-1 for RH9 (if you have a more recent distro, you might be more lucky). After looking for a while, I decided to grab the source code for the most recent distribution at the official website (http://xmlsoft.org/) and compiled.
Hope my post is useful to someone. Please, share your experience when compiling/installing for your particular platform and setup. Remember how hard it’s been for you the very first time. I confess, my very first server installation took me nearly a week and I was glad others helped me.
19 years ago
Hi too had same problem with multiview like when i execute http://huey/admin/test.php it used to compile but when i use http://huey/admin/test it wouldnt recognise it as php file. i worked it out with the addhandler method and AddType in different line and setting multiview for directive
«multiviews Options Indexes FollowSymLinks MultiViews»
the directives u can set it to root directory so now when u type pn test it will search in precendence for test.php, test.html if any .
its working for me with apache2.0.47 and php 4.3.9 on solaris
Установка Apache и PHP на Windows
Рассмотрим установку веб-сервера Apache Lounge на Windows Server 2016. Создание других веб-серверов Апач происходит по аналогии, так как программы под Windows поставляются в виде установочных файлов, либо просто в виде собственно исполняемых файлов. Перед созданием веб-сервера прежде всего скачиваем и устанавливаем исполняемые библиотеки Visual C для Вашей версии ОС по ссылке.
Потом скачаем сам дистрибутив с сайта apache по следующей ссылке. Распакуйте zip-архив. В нем есть папка Apache24 которая содержит весь веб-сервер Apache — исполняемые файлы, библиотеки, документацию и другое.
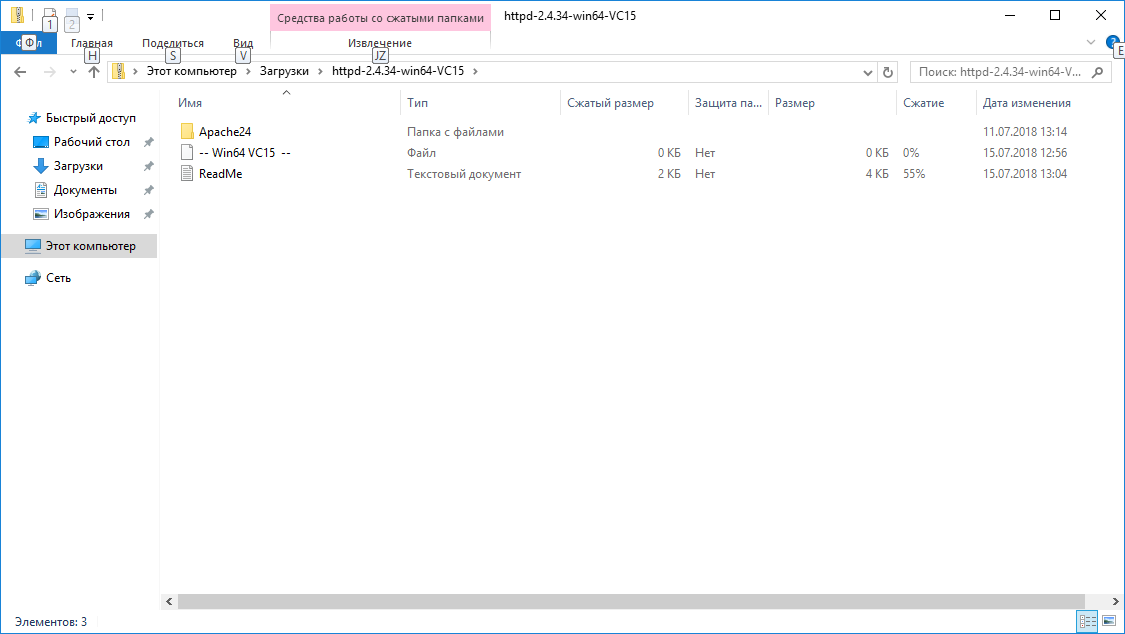
Эту папку надо распаковать туда, где вы хотите расположить Ваш веб-сервер, например на один из локальных дисков. Это можно сделать просто копированием — вставкой, так как в Windows интегрирована полная поддержка Zip-архивов. После этого откроем командную строку Windows нажав комбинацию клавиш Win+R и введя туда cmd.
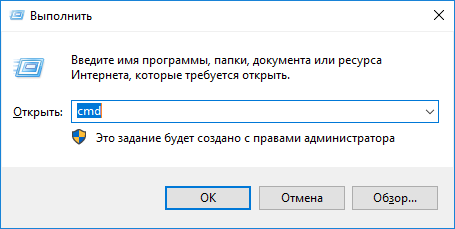
В открывшемся окне пишем c:\Apache24\bin\httpd -k install — то есть полное имя до исполняемого файла Apache вместе с путем (так называемое Абсолютное имя файла). Это установит Apache как системный сервис — службу — Windows.
Также как Apache для Linux, основной файл конфигурации называется httpd.conf. Располагается он в подпапке conf веб-сервера, т.е в нашем случае c:\Apache24\conf\httpd.conf.
Для первоначальной настройки веб-сервера Apache необходимо раскомментировать строку ServerName — имя или ip сервера, а также порт apache для виртуальных хостов — в случае если сайт один достаточно просто раскомментировать. А также проверить параметр Listen — порт на котором работает Apache. Если ip не указан то Apache работать на всех ip-адресах данного хоста.
ServerName 78.140.223.57:80 Listen 78.140.223.57:80
Затем запускаем командой c:\Apache24\bin\httpd -k start.
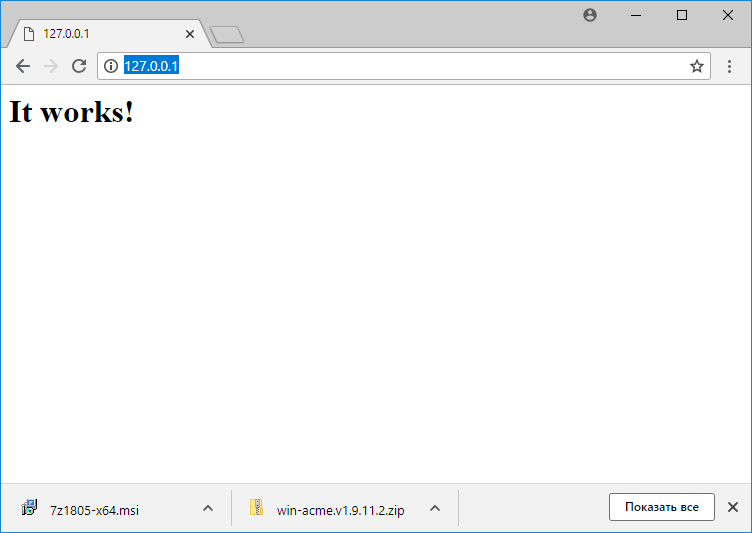
Проверить, что апач сервер сервер запустился, можно набрав в браузере http://78.140.223.57. Если хотите чтобы сайт был доступен из внешней сети необходимо настроить правило Firewall.
Для этого нажимите Win+R и введите в командную строку firewall.cpl
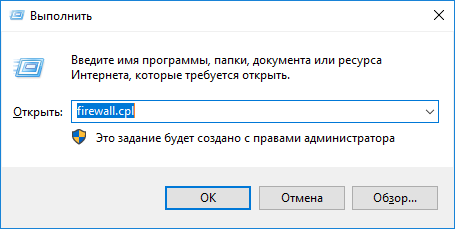
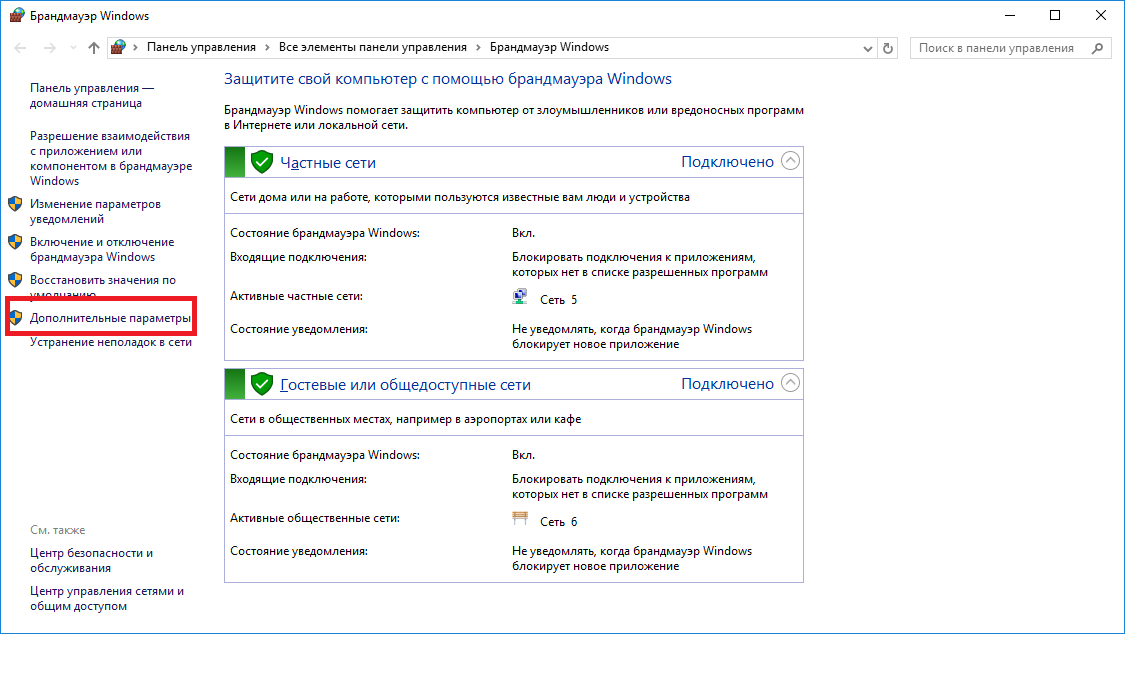
Выберите в левом столбце “Дополнительные параметры”.
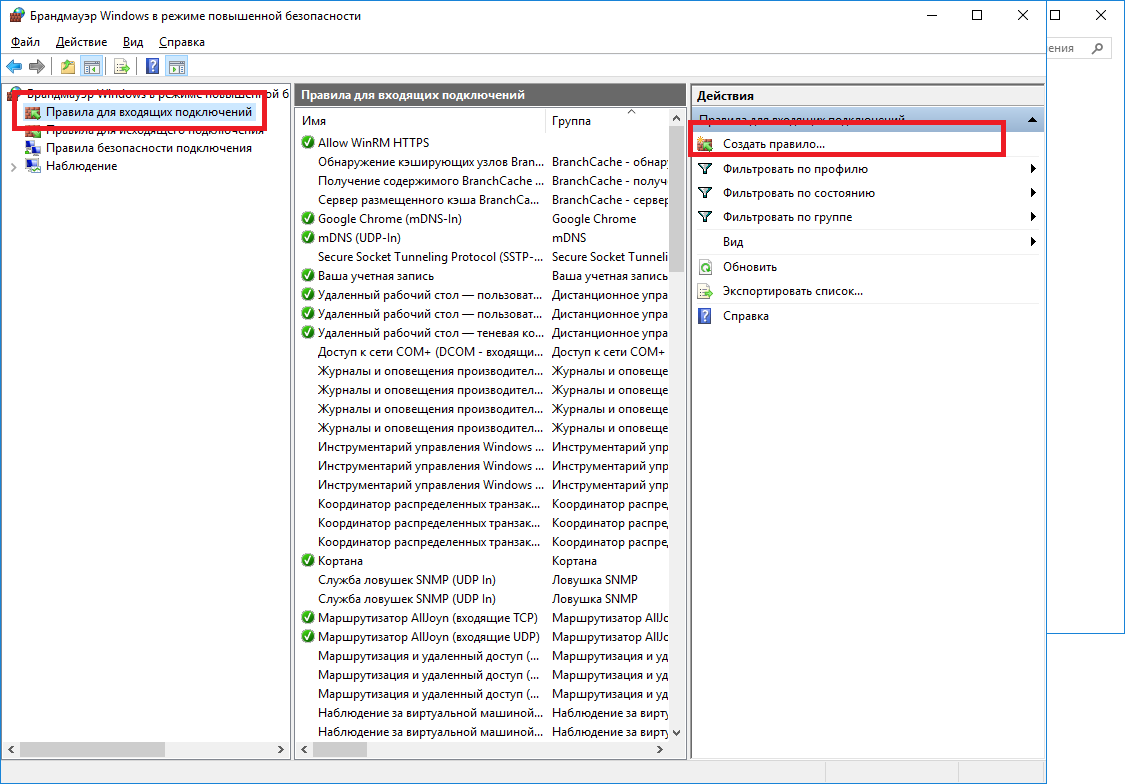
В открывшемся окне повышенной безопасности перейдите в раздел “Правила для входящих подключений”, после чего нажмите “Создать правило”.
Создадим правило для порта 80.
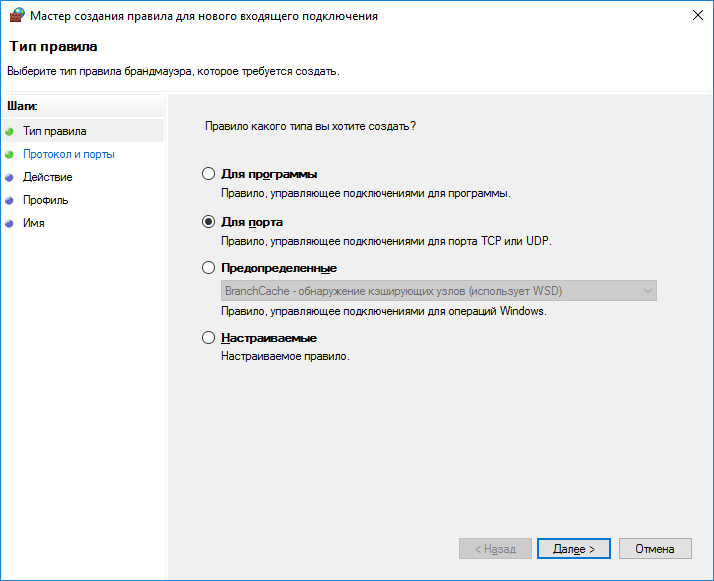
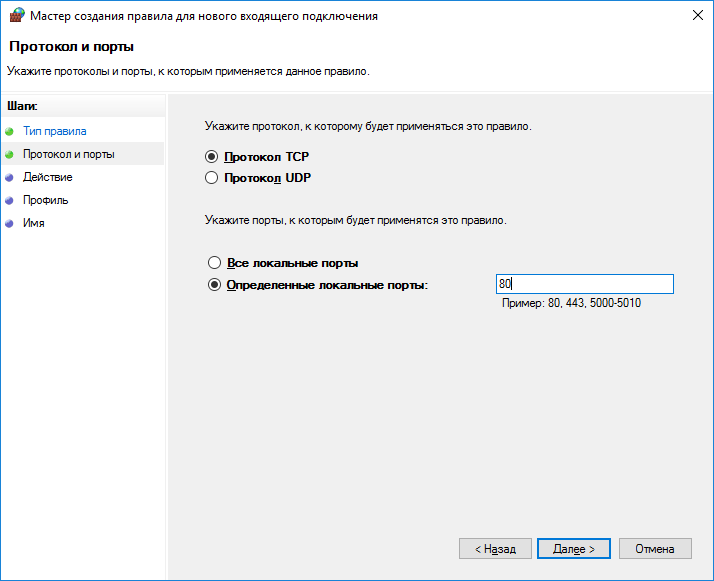
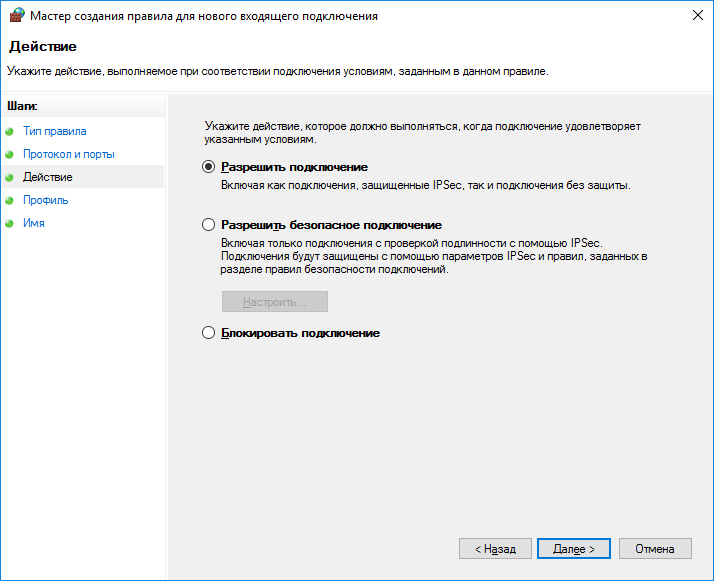
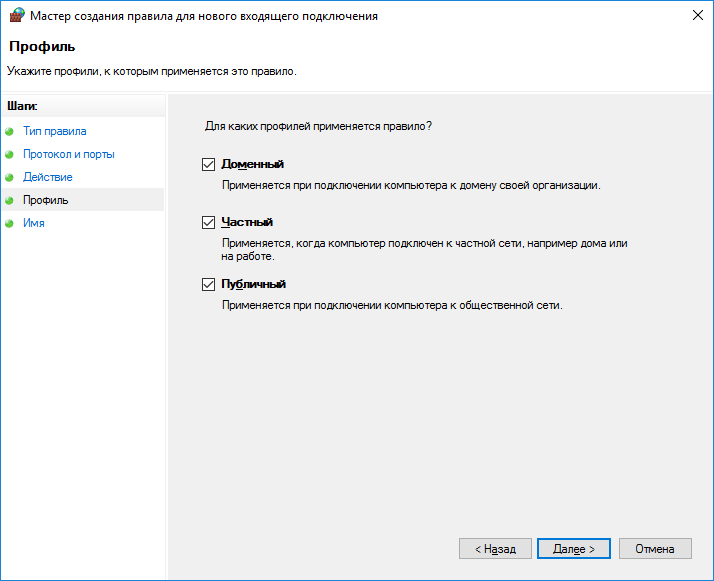
На последнем шаге задайте имя правила. После этого можно соединяться по этому порту.
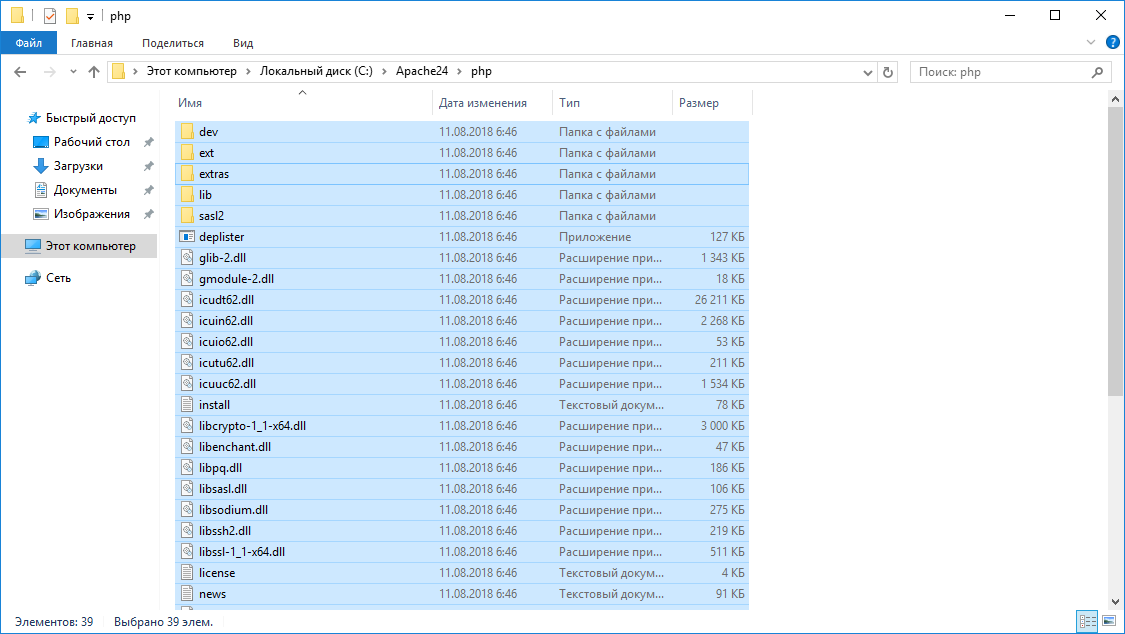
Теперь настроим PHP. PHP это распространенный язык программирования для веб. Скачать его можно с официального сайта. Оно также поставляется в виде zip-архива.Распакуем скачанный архив в отдельную папку. Например в c:\apache24\php.
Теперь еще раз поправим файл c:\Apache24\conf\httpd.conf. Внесем туда следующие параметры в секцию LoadModule.
#Подключение модуля обработки php для Apache LoadModule php7_module "c:/Apache24/php/php7apache2_4.dll" AddHandler application/x-httpd-php .php # Путь к файлу php.ini PHPIniDir "c:/Apache24/php"
Также поправим параметр DirectoryIndex — индексный файл сайта на Index.php, так как Мы будем использовать PHP.
Создадим индексный файл php файл c:\Apache24\htdocs\index.php выводящий версию php.
После этого еще раз перезапускаем Apache командой.
c:\Apache24\bin\httpd -k restart
И проверим что php работает.
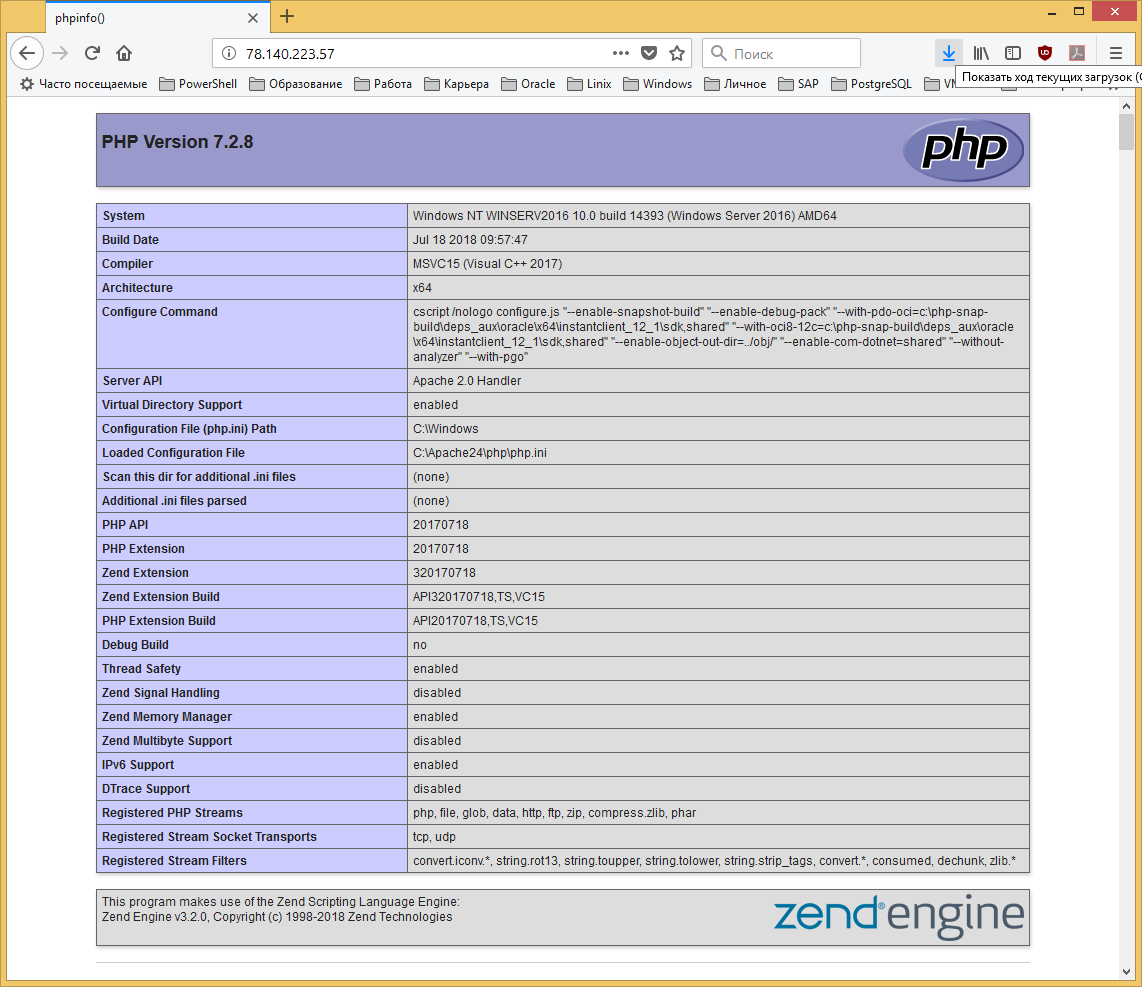
На этом установка и настройка сервера Apache Lounge на Windows Server 2016 окончена. В нашей базе знаний вы найдёте ещё множество статей не только по Apache сервер. Если вы ищете надежный виртуальный сервер под управлением Windows, обратите внимания на нашу услугу — Аренда виртуального сервера Windows.
Последнее обновление: 02.11.2023
Средняя оценка: 5,0 , всего оценок: 4 Спасибо за Вашу оценку! К сожалению, проголосовать не получилось. Попробуйте позже
Как подключить php к apache

Написать в поддержку

Помощь онлайн

Проверить домен

Войти Валюта:
Как установить Apache и PHP 5.6 на CentOS 6

28 марта

4184

Комментариев: 0
При установке Apache+PHP на CentOS 6 автоматически устанавливается PHP 5.3. Если вам нужна версия 5.6, придется подключить репозитории.
yum install httpd
Установите репозиторий EPEL:
rpm -Uvh http://dl.fedoraproject.org/pub/epel/6/x86_64/epel-release-6-8.noarch.rpm
Установите репозиторий Webtatic:
rpm -Uvh https://mirror.webtatic.com/yum/el6/latest.rpm
Установите PHP 5.6:
yum install php56w
Проверьте, установилась ли нужная версия PHP:
php -v
service httpd start
Перейдите в папку /var/www/html и создайте в ней файл info.php:
nano info.php
Скопируйте в него текст:
Откройте файл php.ini в режиме редактирования:
nano /etc/php.ini
Воспользуйтесь сочетанием клавиш Ctrl+W, чтобы найти строчку short_open_tag, а затем измените в ней Off на On:
short_open_tag = On
Выполните перезагрузку сервера:
service httpd restart
Чтобы окончательно убедиться в том, что нужная версия PHP работает, откройте браузер и впишите в адресную строку ваш-IP/info.php:
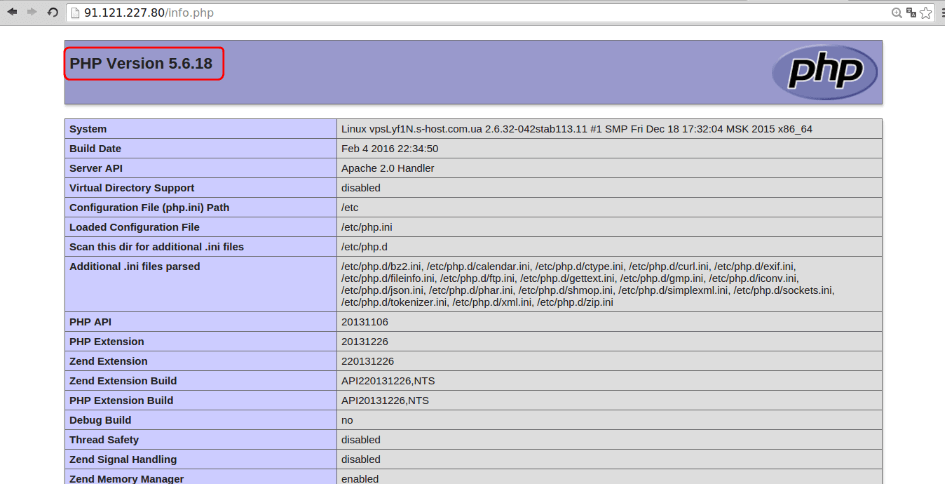

Также рекомендуем почитать:
Инструкция по установке Python на CentOS 6 Как установить редактор nano на CentOS 6? Проверка загруженности сервера на CentOS Как установить сервер Samba на CentOS 6? Обзор Netstat в популярных примерах использования Как установить Apache и php, как cgi на CentOS 6? Как установить окружение WMBitrix на CentOS 6
- Блог
- Хостинг, домены, мировые новости, обзоры ПО
- Рейтинги, обзоры, отзывы
- Наши новости, акции, нововведения
- Руководства, статьи, инструкции
- RSS
Популярное в категории


Июнь
77777

Июнь
68381
Октябрь
56093

Март
44442

Сентябрь
37638