
Presets for export, and other settings
Export presets make it faster to export photos for common uses. For example, you can use a Lightroom Classic preset to export JPEG files suitable to e-mail to clients or friends.
Video tutorial: Saving export presets
Infinite Skills
Export photos using presets
Select the photos you want to export and then choose File > Export With Preset or click the Export button.
Choose a preset. Lightroom Classic offers the following built-in export presets:
Burn Full-Sized JPEGs
Exports photos as JPEGs converted to and tagged as sRGB with maximum quality, no scaling, and a resolution of 240 pixels per inch. By default, this preset saves the exported files to the Files On CD/DVD destination specified at the top of the Export dialog box, in a subfolder named Lightroom Classic Burned Exports.
Export To DNG
Exports photos in DNG file format. By default, this preset specifies no postprocessing action and allows you to choose a destination folder after you click Export.
Opens a message to allow you to send the photos to someone using email. See Email photos from Lightroom Classic.
For Email (Hard Drive)
Exports photos to the hard drive as sRGB JPEG files. Exported photos have a maximum size of 640 pixels (width or height), medium quality, and a resolution of 72 pixels per inch. Upon completion, Lightroom Classic shows the photos in the Explorer (Windows) or the Finder (Mac OS). Choose the destination folder after you click Export.
Save export settings as presets
In the Export dialog box, specify the export settings you want to save.
Click Add at the bottom of the Preset panel on the left side of the dialog box.
In the New Preset dialog box, type a name in the Preset Name box and click Create.
Export photos using the previous settings
You can export photos using the same settings from the most recent export session that was set manually, including modified presets. Otherwise, the Export With Previous command does not work with export presets.
Select the photos to export.
Choose File > Export With Previous.
Create export actions
You can put any item in the Export Actions folder that can be opened with a set of photo files. For example, you can place an executable file or shortcut (Windows), or application or alias (Mac OS) in the Export Actions folder. Items added to the folder are listed in the After Export menu of the Export dialog box the next time you export photos.
You can also add Photoshop droplets or script files to the Export Actions folder.
Do any of the following to open the Export Actions folder:
- In the Export dialog box, choose After Export > Go To Export Actions Folder Now.
- Windows 7 and 8: Navigate to \Users\[user name]\AppData\Roaming\Adobe\Lightroom\Export Actions\.
- Mac OS: Navigate to /Users/[user name]/Library/Application Support/Adobe/Lightroom/Export Actions/.
Add the item to the Export Actions folder.
Export plug-ins
Lightroom Classic supports plug-ins from third parties that add functionality to the Export dialog box. Depending on what third-party plug-ins you have installed, different options may be available in the Export dialog box. Check with the plug-in developer for support or documentation for their software.
Plug-ins located in the following folders are automatically loaded by Lightroom Classic and can be enabled and disabled by the Plug-In Manager, but not removed:
- Mac OS: /Library/Application Support/Adobe/Lightroom/Modules
- Windows 7 and 8: C:\Users\[user name]\AppData\Roaming\Adobe\Lightroom\Modules
For documentation on the Lightroom Classic SDK, visit www.adobe.com/go/devnet.
Manage export plug-ins
Choose File > Plug-In Manager or click the Plug-In Manager button in the lower-left corner of the Export dialog box.
The Lightroom Classic Plug-In Manager dialog box lists installed plug-ins in the left panel.
Do any of the following:
- Select a plug-in from the left panel to view information about it in the main panel.
- To add a plug-in to Lightroom Classic, click the Add button. Navigate to the plug-in, select it, and then click Add Plug-In.
- To remove a plug-in from Lightroom Classic, select it from the left panel and then click Remove.
- Click Plug-In Exchange to go to the Adobe website and search for plug-ins.
How to Export Lightroom Presets
As an Amazon Associate we earn from qualifying purchases.
When you install a preset in Lightroom or even create one yourself within the program, you might initially think that it can only be used on that specific computer. If you edit with Lightroom on multiple computers or want to sell presets, this may seem problematic. Luckily, Adobe created a way for you to export presets, and I’ll walk through how to export Lightroom Presets.
- How to Export Lightroom Presets
- Export a Single Preset in Lightroom Classic CC
- Export a Presets Folder in Lightroom Classic CC
- Create a Backup of All Your Presets
- Share the Presets to Other Devices
- Sell Your Presets
How to Export Lightroom Presets
I will begin my guide to exporting presets assuming that you already have your presets added and saved in Lightroom.
There are some different steps you need to take depending if you are exporting a single preset or multiple presets, so I’ll cover both processes below.

Export a Single Preset in Lightroom Classic CC
Whether you download and add a free preset, a paid one, or create a preset yourself; they are saved in Lightroom Classic CC in the XMP format. You need to trace where that XMP file is saved before copying it on another folder on your pc or your external hard drive.
- After opening the Lightroom Classic CC, go to the Develop Module.
- Go to the left toolbar and navigate to the Presets tab.

- Click on the Presets tab to view all your presets.
- Select the preset you want to export.
- Right-click on the preset and click Export.

- You will see a dialogue box asking you to select the destination where you want to export your preset. You can also name your preset here if you want to rename it.

- After selecting a folder and naming the preset, click Save.
Your preset is now exported! From here, you can send the preset file to other computers.
Alternatively, you can find your preset by:

- Right-clicking on the preset in the Presets tab.
- Click on Show in Explorer (it might say “Show in Finder” if you are on a Mac).
- When the folder opens, you can select your preset and copy it.
- Paste it into any other folder on your computer so you can easily find it.
- Once it’s copied to another location, you can rename it and send it to other devices.
Export a Presets Folder in Lightroom Classic CC
Let’s suppose you want to create a whole folder of presets and export it to your computer or external hard drive. There are two ways in which you can do that very easily. But first, let’s give you a quick guide on creating a folder of presets in Lightroom.
Create a Presets Folder
Your presets are listed under the Presets tab where you can organize them into a folder.
- After creating a new preset, you’ll have the option to select a Group.
- If you don’t have a group created yet or you don’t have one you want to add your new preset into, select New Group.
- Create a Group Name and click Create.

- Your new folder will populate in the Presets toolbar.
- To add any additional presets to the folder, right click on a preset and click Move.
- Pick the preset folder you want to move your preset to.
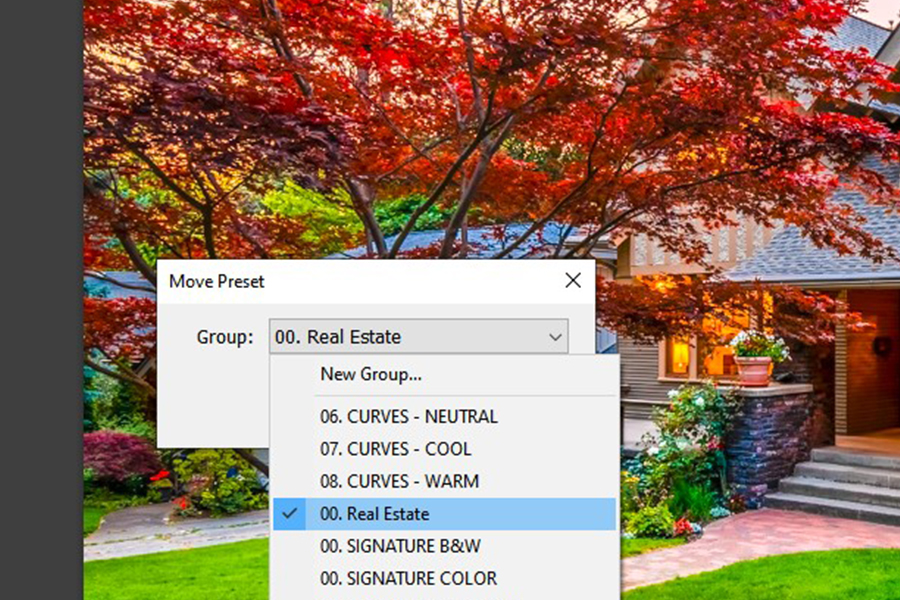
- Click on Done. The preset will now be shown under the new folder.
Export the Folder
- Right-click on the folder in the Presets tab.
- Click on Export Group.

- From the dialogue box that opens, choose the location where you want to save the presets folder.
- Click Save. The presets folder will be saved as a compressed ZIP file.

The other way to export the presets folder is also easy to follow.
- In Lightroom, go to the Edit tab on the top right. From the drop-down, click on Preferences.
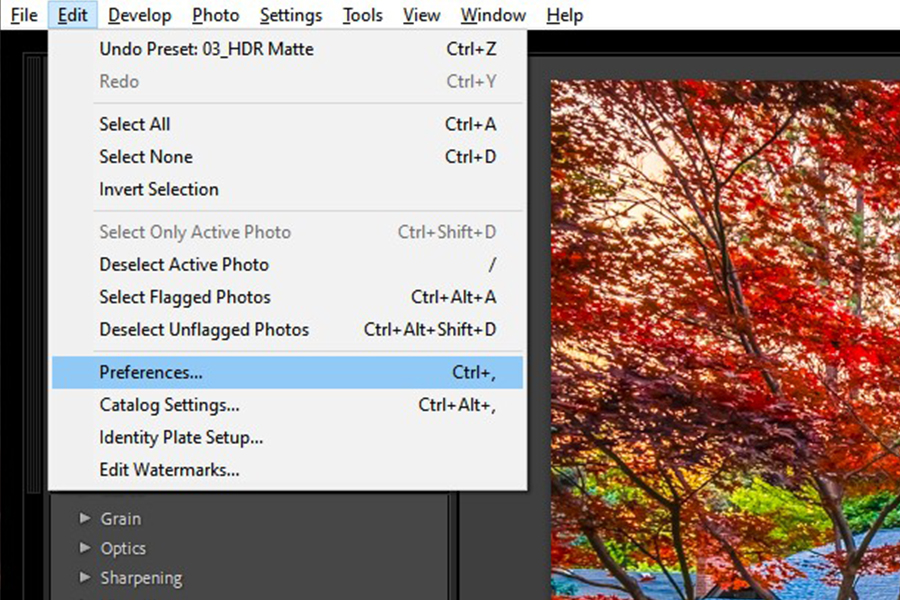
- A window will open — click on the Presets tab.
- Scroll down to the Location section.
- Click on Show Lightroom Develop presets.
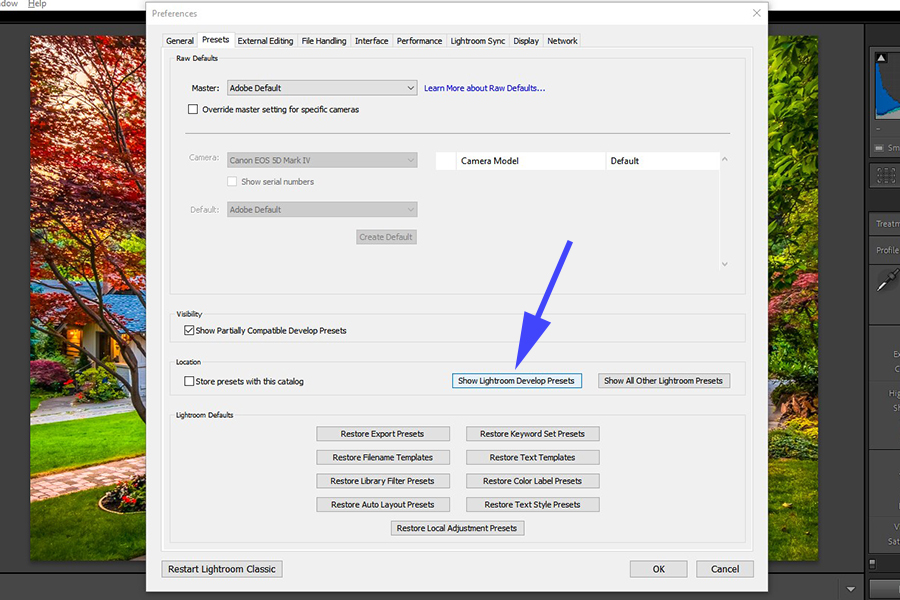
- From the Finder or File Explorer, copy the selected folder and paste it into your external hard drive or another folder on the computer.
Why Do I Need to Export Lightroom Presets?
Even though you have your Lightroom presets stored within your computer and can use them in your Lightroom Catalogs, there are 3 main reasons you’d want to export them:
- Creating preset backups
- Sharing presets to other devices
- Selling presets
Create a Backup of All Your Presets
If your only copy of your Lightroom presets is on your computer, you risk losing them if your computer crashes. Exporting your presets and creating a backup of them on an external drive, another computer, or on the Cloud will ensure you have a second copy of them.
Share the Presets to Other Devices
Don’t spend time trying to re-create a preset you previously made. If you take time developing a preset, you can export it to easily share it across your other devices. This is really useful if you typically work on a desktop at home and then use a laptop when traveling.
Sell Your Presets
Here comes the fun part. By creating presets and selling them you can actually make money with your photo editing skills. Wouldn’t it be nice to earn some passive income with the presets that you created?

However; in order to sell presets, you need to export them outside Lightroom in any of the ways mentioned above.
Just create a pack of some professional-quality presets and name them in a way that describes the basic effect they do. Export them and create a zip file. You can now promote your presets and send the zip file link to anyone who buys your real estate preset pack!
Bottom Line
Exporting presets is a vital step in preset management in Lightroom Classic CC. Successfully exporting presets will give you peace of mind that your presets are safely backed up.
Экспорт пресетов Lightroom
Нужно перенести свои пользовательский пресеты с одного компьютера на другой компьютер.
В C:\Users\Имя пользователя\AppData\Roaming\Adobe\Lightroom\Develop Presets пресетов нет
Если через Lightroom посмотреть расположение User Presets, получится C:\Users\Имя пользователя \AppData\Roaming\Adobe \CameraRaw \Setting\User Presets, и они будут в формате .xmp, что не дает импортировать их в Lightroom на другом компьютереЛучший ответ
xmp — это пресеты и установки Camera Raw. НЕ Lightroom.
В настройках лайтрум в строке меню «preferences» нажми («предпочтения» в русск. версии), выбери вкладку «пресеты» и открой каталог (кнопочка есть). Там еще по папкам надо будет пошарить, но ничего сложного. Просто по названию дальше уже найдёшь (обычный виндовсовский поиск), если знаешь свои пресеты.
Короче дальше уже не проблема, если мозгами немножко пораскинуть.Никита КовалёвУченик (125) 5 лет назад
я и создал этот вопрос, потому что ни в одной из папок моих пресетов нету! И поиск виндовс их тоже не находит
Установка пресетов в Adobe Lightroom
В профессиональном фоторедакторе можно не только быстро рассортировать фотографии, и быстро отредактировать пакеты, но и создать уникальные изображения с помощью плагинов (пресетов). Используя пресеты, гораздо проще обрабатывать фото, в особенности, если их не один десяток.
Подобные пресеты достаточно просто установить в Lightroom. Плагины для обработки изображений создаются многими известными компаниями, выпускающими фотооборудование. Приобрести такие плагины можно на официальных сайтах производителя. Чтобы попробовать поработать с пресетами рекомендуем Адоб Лайтрум купить у нас по лучшей цене.
Как создать пресет в Lightroom
Вы можете использовать уже готовые пресеты, либо создавать свои, для мгновенной обработки фотографий. Для того чтобы создать пресет, достаточно один раз пошагово применить все настройки, и потом сохранить все шаги в программе.
Зайдите в папку Presets и кликните на изображении со знаком «+». Вам необходимо создать новую папку (New Folder) и дать ей название. Затем нажмите «Create». Перед вами появится диалоговое окно, где вы сможете выставить настройки. В дальнейшем вы сможете применять данный плагин к другим фото.
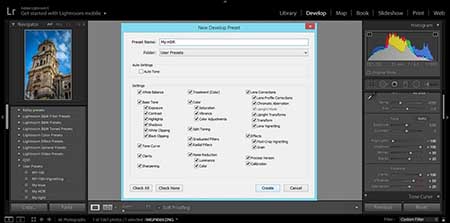
Как добавить пресет в Lightroom
Если вы не создаете пресеты самостоятельно, а приобретаете их официальные версии из проверенных источников, их необходимо добавлять в программу. После того, как вы скачали плагины на компьютер, нужно распаковать их из архива. В фоторедактор нужно добавлять только плагины, так как другие вспомогательные файлы фоторедактором не распознаются.
Скопируйте пресеты при помощи горячих клавиш «Ctrl+C» или, кликнув на них правой кнопкой мыши и нажав «Копировать». Все плагины нужно отправить в папку дополнений. Например, для ОС Windows это будет папка /Documents and Settings/username/Application Data/Adobe/Lightroom/Modules/. Чтобы плагины были видны в фоторедакторе нужно перезагрузить программу.
Как открывать пресеты в Lightroom
Чтобы использовать пресеты в Лайтруме, нужно знать их месторасположение. Так, если вы не создавали пресет, а приобрели его, то нужно для начала добавить плагин в программу. После установки перейдите в рабочий модуль Develop.
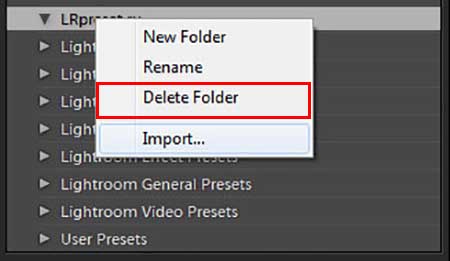
Найдите папку «Presets» и щелкните правой кнопкой мыши по ней. В открывшемся списке действий выберите «Import». Файл с установленным или созданным пресетом откроется, и вы сможете применять его для обработки фотографий.
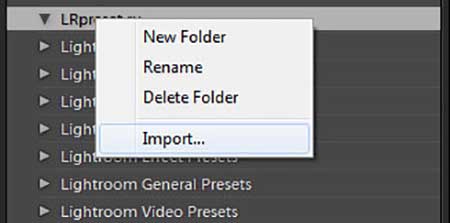
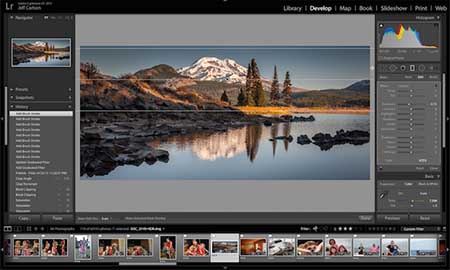
Как использовать пресеты в Lightroom
Пресеты в Лайтруме значительно упрощают обработку фотографий. Комплекс настроек можно применить как к отдельно взятому изображению, так и для нескольких десятков фотографий. Для того чтобы воспользоваться пресетами нужно находиться в рабочей области Develop.
Слева от изображений в списке функций нужно открыть вкладку «Presets». Выберите из нескольких настроек нужный пресет и кликните на него левой кнопкой мыши. Изменения сразу отобразятся на фотографии.
Как сохранить пресет в Lightroom
При создании авторских пресетов в фоторедакторе они автоматически сохраняются в программе, после того как вы нажимаете клавишу Create. Настройки хранятся в папке с остальными плагинами, которые вы до этого скачали или создали.
При добавлении пресетов через интерфейс программы или непосредственно в папку следите за тем, чтобы файлы имели нужное расширение и не были повреждены. В противном случае Lr просто не распознает пресет и не откроет его.
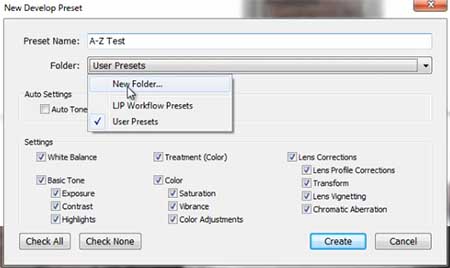
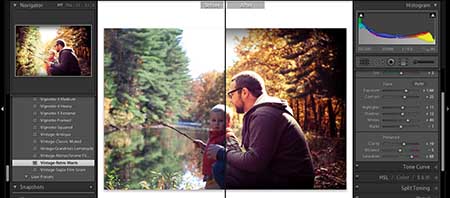
Как сохранить пресет из Lightroom на компьютер
По умолчанию, когда вы создаете новый пресет в фоторедакторе либо добавляете его через интерфейс с помощью кнопки «Import», все файлы настроек сохраняются на компьютер. Таким образом, все пресеты хранятся в папке вместе с другими дополнениями к Adobe Lightroom.
Как удалить пресет в Lightroom
При работе с большим количеством изображений фотографы создают множество пресетов. Со временем некоторые комплексы настроек уже не нужны, так как создаются новые либо меняется стиль обработки фото. В таких случаях требуется удалять лишние плагины.
Чтобы удалить плагин, можно воспользоваться двумя способами:
- На панели пресетов, при работе во вкладке Develop нужно правой кнопкой мыши кликнуть по ненужному плагину и нажать «Delete».
- Зайти с помощью проводника в папку с дополнениями Adobe Lightroom, и удалить непосредственно из локации.
Где сохраняются пресеты в Lightroom
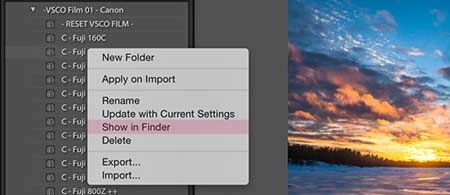
В Лайтруме пресеты сохраняются в папке с дополнениями. Найти их можно через проводник в Documents and Settings. Если же возникают трудности с определением местонахождения можно найти их через интерфейс программы.
Зайдите во вкладку «Edit» и затем «Catalog Settings». В окне отобразится путь к папке с пресетами, а также кнопка для перехода к ним «Show».
Как перенести пресеты Lightroom на другой компьютер
При обновлении операционной системы ПК, смене жесткого диска необходимо сохранение всех настроек программы. Также сохранение и перенос Lr актуален при смене вашего ПК. Для того чтобы после изменений работать в обычном режиме в фоторедакторе необходимо перенести все изображения(исходники), каталог Лайтрум и пресеты с основными настройками.
Встроенные плагины не нужно переносить на новый компьютер, так как они автоматически установятся при обновлении. Чтобы перенести сохраненные индивидуальные пресеты, нужно скопировать их из локации /Documents and Settings/username/Application Data/Adobe/Lightroom/Modules/ на съемный внешний носитель, и затем перенести в папку Lightroom на новом ПК. Если вы просто обновляли систему, пресеты переносятся в ту же папку, где они и были.