
Системы сборки и проекты C/C++ в Visual Studio
Visual Studio можно использовать для изменения, компиляции и сборки любой базы кода C++ с полной поддержкой IntelliSense без преобразования этого кода в проект Visual Studio или компиляции с помощью набора инструментов MSVC. Например, можно изменить кроссплатформенный проект CMake в Visual Studio на компьютере Windows, а затем скомпилировать его для Linux с помощью g++ на удаленном компьютере Linux.
Компиляция C++
Сборка программы C++ — это компиляция исходного кода из одного или нескольких файлов и последующее связывание этих файлов в исполняемый файл (EXE), библиотеку динамической загрузки (DLL) или статическую библиотеку (LIB).
Процесс базовой компиляции C++ состоит из трех основных этапов.
- Препроцессор C++ преобразует все определения #директив и макросов в каждом исходном файле. При этом создается единица трансляции.
- Компилятор C++ компилирует каждую единицу трансляции в объектные файлы (OBJ), применяя заданные параметры компилятора.
- Компоновщик объединяет объектные файлы в один исполняемый файл, применяя заданные параметры компоновщика.
Набор инструментов MSVC
В набор инструментов компилятора MSVC (также называемого цепочкой инструментов или средствами сборки) входят компилятор, компоновщик, стандартные библиотеки и связанные служебные программы Microsoft C++. Они включены в состав в Visual Studio. Вы также можете скачать и использовать набор инструментов командной строки в качестве бесплатного автономного пакета. Дополнительные сведения см. в разделе «Средства сборки для Visual Studio» на странице «Загрузки Visual Studio «.
Вы можете создавать простые программы, вызывая компилятор MSVC (cl.exe) непосредственно из командной строки. Следующая команда принимает один файл исходного кода и вызывает cl.exe для создания исполняемого файла с именем hello.exe:
cl /EHsc hello.cpp Здесь компилятор (cl.exe) автоматически вызывает препроцессор и компоновщик C++ для создания окончательного выходного файла. Дополнительные сведения см. в статье Сборка из командной строки.
Системы сборки и проекты
Большинство реальных программ используют некую систему сборки для управления сложностями компиляции нескольких исходных файлов для нескольких конфигураций (для отладки и выпуска), нескольких платформ (x86, x64, ARM и т. д.), настраиваемых шагов сборки и даже нескольких исполняемых файлов, которые должны быть скомпилированы в определенном порядке. Вы выполняете настройки в файле конфигурации сборки, а система сборки принимает этот файл в качестве входных данных перед вызовом компилятора. Набор файлов исходного кода и файлов конфигурации сборки, необходимых для создания исполняемого файла, называется проектом.
Далее приведены различные варианты для проектов Visual Studio — C++.
- Создайте проект Visual Studio с помощью интегрированной среды разработки Visual Studio и настройте его, используя страницы свойств. Проекты Visual Studio создают программы, работающие в Windows. Общие сведения см. в статье Компиляция и сборка в документации по Visual Studio.
- Откройте папку, содержащую файл CMakeLists.txt. Поддержка CMake интегрирована в Visual Studio. Интегрированную среду разработки можно использовать для редактирования, тестирования и отладки без изменения файлов CMake. При этом вы можете работать в том же проекте CMake, что и другие пользователи, которые могут использовать другие редакторы. Поэтому CMake является рекомендуемым вариантом для кроссплатформенной разработки. Дополнительные сведения см. в статье Проекты CMake.
- Откройте свободную папку исходных файлов, где нет файла проекта. Для создания файлов в Visual Studio будет использоваться эвристика. Это простой способ компиляции и запуска небольших консольных приложений. Дополнительные сведения см. в статье Проекты «Открыть папку» для C++.
- Откройте папку, содержащую файл makefile или любой другой файл конфигурации системы сборки. Вы можете настроить Visual Studio для вызова любых произвольных команд сборки, добавив файлы JSON в папку. Дополнительные сведения см. в статье Проекты «Открыть папку» для C++.
- Откройте файл makefile Windows в Visual Studio. Дополнительные сведения см. в разделе Справочник по программе NMAKE.
Использование MSBuild из командной строки
Вы можете вызвать систему MSBuild из командной строки, передав ей VCXPROJ-файл вместе с параметрами командной строки. Для реализации этого подхода требуется хорошее понимание MSBuild, а использовать его рекомендуется только в случае необходимости. Дополнительные сведения см. в разделе MSBuild.
В этом разделе
Проекты Visual Studio
Создание, настройка и сборка проектов C++ в Visual Studio с помощью собственной системы сборки (MSBuild).
Проекты CMake
Создание, сборка и развертывание проектов CMake в Visual Studio.
Проекты в виде папок
Создание, сборка и развертывание проектов C++ в Visual Studio с помощью любой произвольной системы сборки или без нее.
Сборки выпуска
Создание и устранение неполадок оптимизированных сборок выпуска для развертывания в системах конечных пользователей.
Использование набора инструментов MSVC из командной строки
Описание использования компилятора C/C++ и средств сборки непосредственно из командной строки, а не с помощью интегрированной среды разработки Visual Studio.
Создание библиотек DLL в Visual Studio
Создание, отладка и развертывание библиотек DLL (общих библиотек) C/C++ в Visual Studio.
Создание изолированных приложений и параллельных сборок C/C++
Описывает модель развертывания для классических приложений Windows, основанную на концепции изолированных приложений и параллельных сборок.
Настройка проектов C++ для 64-разрядных целевых объектов с архитектурой x64
Нацеливание на 64-разрядное оборудование с архитектурой x64 с использованием средств сборки MSVC.
Настройка проектов C++ для процессоров ARM
Нацеливание на оборудование ARM с использованием средств сборки MSVC.
Оптимизация кода
Оптимизация кода различными способами, включая программную оптимизацию.
Настройка программ для Windows XP
Нацеливание на Windows XP с использованием средств сборки MSVC.
Справочные сведения о сборке C/C++
Содержит ссылки на справочные статьи о сборке программ на C++, о параметрах компилятора и компоновщика, а также о различных средствах сборки.
Изменение компилятора С++ VS Code
Раньше я использовал Visual Studio для своих проектов на C++. Но я решил перейти на VS Code и установить GCC компилятор. Я скачал MinGw, установил, добавл в путь. С помощью расширения C++ через UI настроил MinGw. Но каждый раз при перезапуске компьютера у меня компилятор автоматически меняется на тот, что в Visual Studio.
[11.03.2021, 00:25:25] Для исходных файлов C++ cppStandard был изменен с «gnu++20» на «c++20» на основе аргументов компилятора и compilerPath запроса: «C:/Program Files (x86)/Microsoft Visual Studio/2019/Community/VC/Tools/MSVC/14.28.29333/bin/Hostx64/x64/cl.exe»
Как можно исправить эту проблему и что посоветуете?
Отслеживать
122k 24 24 золотых знака 124 124 серебряных знака 299 299 бронзовых знаков
задан 10 мар 2021 в 21:37
maksim-mshp maksim-mshp
114 2 2 серебряных знака 12 12 бронзовых знаков
При перезагрузке компа или при перезапуске VS Code? Что если закрыть его до перезагрузки компа? И зачем вообще в этой схеме расширение?
10 мар 2021 в 22:02
@qwertiy при перезагрузке компа, vs code закрываю. Расширение для IntelliSense
10 мар 2021 в 22:27
Но ты же про настройку компилятора говоришь. Что всё-таки не работает — компиляция или подсветка?
11 мар 2021 в 0:51
@qwertiy проблема в том, что при перезагрузке компа автоматически менятся компилятор и мне приходится каждый раз менять его на MinGw
11 мар 2021 в 8:00
0
Сортировка: Сброс на вариант по умолчанию
Знаете кого-то, кто может ответить? Поделитесь ссылкой на этот вопрос по почте, через Твиттер или Facebook.
- c++
- visual-studio-code
- gcc
Как изменить компилятор в Visual Studio без проблем
Хотите использовать другой компилятор в Visual Studio? Не проблема! Наша статья покажет, как менять компилятор и настраивать его в Visual Studio. Следуйте нашим простым инструкциям и наслаждайтесь новым компилятором в своих проектах.
Microsoft Visual Studio — это одна из самых популярных интегрированных сред разработки (IDE) на рынке программного обеспечения. Она используется для создания приложений для Windows, мобильных устройств и веб-приложений. В Visual Studio по умолчанию используется компилятор от Microsoft (MSVC), который позволяет создавать быстрый и надежный код. Однако, в некоторых случаях, можно захотеть использовать другой компилятор, который удовлетворит специфическим требованиям проекта.
В этой статье мы рассмотрим, как изменить компилятор в Visual Studio. Наши пошаговые инструкции помогут вам настроить новый компилятор и настроить ваш проект для его использования. Мы также рассмотрим, как работать с несколькими компиляторами в рамках одного проекта, что может быть полезно для дополнительной оптимизации и отладки кода.
Прежде чем продолжить, необходимо знать, какие компиляторы поддерживаются в Visual Studio. Это могут быть сторонние компиляторы, такие как Clang или GCC. Но инструкции могут различаться в зависимости от того, какой компилятор вы хотите использовать. Хорошей практикой является проверка документации компилятора или поиска подходящих руководств и инструкций в сети.
Шаг 1. Открыть настройки Visual Studio
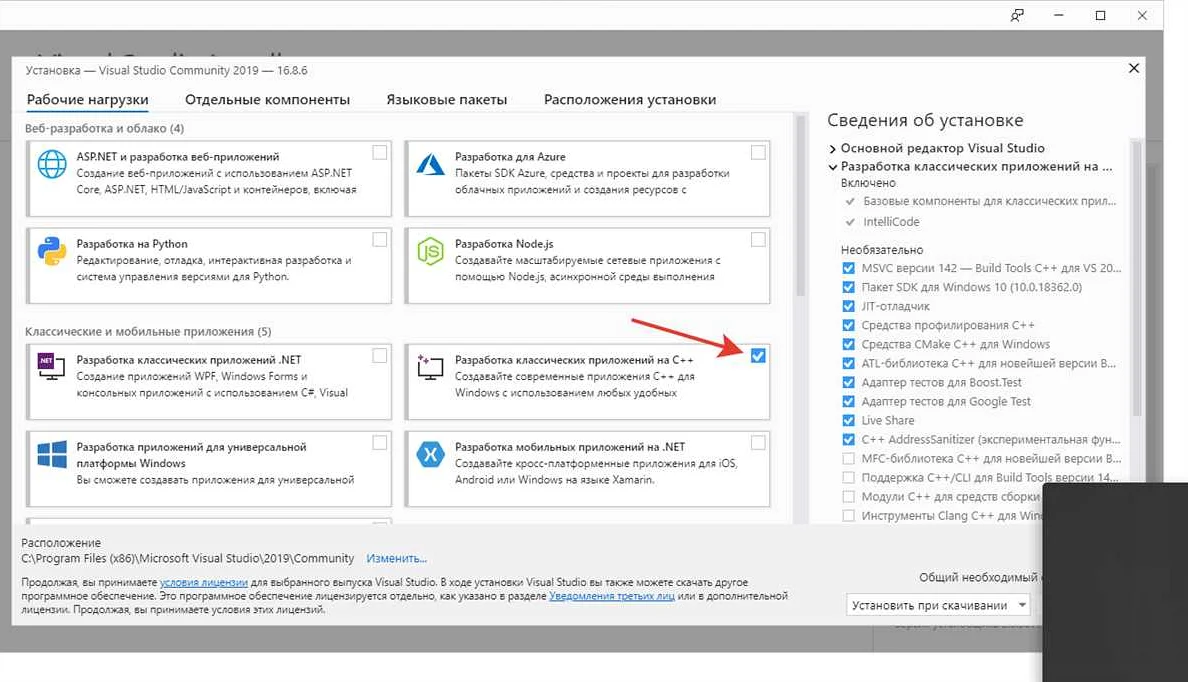
Для изменения компилятора в Visual Studio необходимо открыть настройки данной программы. Для этого нужно первым делом запустить Visual Studio на своем компьютере и создать проект. После этого необходимо выбрать в меню «Инструменты» необходимую настройку: «Параметры».
Как только Вы выбрали «Параметры», Вам откроется окно с настройками Visual Studio. Здесь можно задавать необходимые вопросы для изменения параметров Вашего проекта. Не забудьте, что управление настройками Visual Studio очень важно для работы Вашего проекта, поэтому будьте внимательны при выполнении данного шага.
Шаг 2. Найти пункт «Компиляторы»
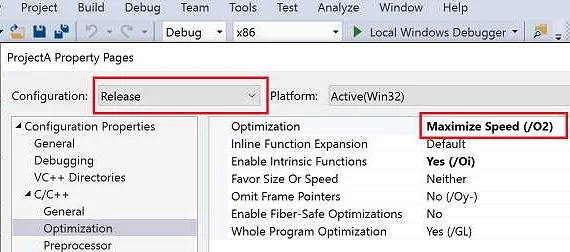
Чтобы изменить компилятор в Visual Studio, нужно найти соответствующий пункт в настройках программы. В версии Visual Studio 2019 единственный способ открыть настройки — это через Quick Launch (быстрый запуск). Для этого нажмите на клавиатуре сочетание клавиш «Ctrl+Q», далее введите «компиляторы» в поисковую строку и выберите опцию «Компиляторы, определение языка и сборка».
Если же у вас устаревшая версия Visual Studio, то настройки можно открыть по другому. Нажмите на «Инструменты» в верхнем меню, затем выберите «Параметры». В появившемся окне выберите «Проекты и решения», затем «Компиляторы».
Читать далее«Знак больше и меньше в математике: картинки и уроки для понимания направления» — Научитесь правильно использовать знаки больше и меньше в математике с помощью понятных картинок и подробных уроков. Узнайте, в какую сторону обращается каждый из этих знаков и как это влияет на решение уравнений и неравенств.
Обратите внимание, что в настройках компилятора можно изменять настройки для каждого языка программирования отдельно. Например, вы можете настроить компилятор для C++ по-разному от компилятора для C#.
Шаг 3. Выбрать нужный компилятор
После того как вы открыли свой проект в Visual Studio, вы должны зайти в свойства проекта, чтобы выбрать нужный компилятор. Для этого необходимо сделать следующее:
- Щелкните правой кнопкой мыши на проекте в обозревателе решений.
- Выберите пункт «Свойства» в выпадающем меню.
- В окне «Свойства» выберите пункт «Компилятор» в левой части окна.
- В правой части окна выберите нужный компилятор, например, «Microsoft Visual C++» или «Microsoft Visual Basic».
- Нажмите кнопку «ОК», чтобы сохранить изменения.
Теперь ваш проект будет скомпилирован с использованием того компилятора, который вы выбрали.
Шаг 4. Установить компилятор по умолчанию
После того, как вы добавили новый компилятор в Visual Studio, вам нужно установить его по умолчанию, чтобы использовать его для всех новых проектов. Вот как это сделать:
- Откройте главное меню Visual Studio и выберите пункт «Инструменты».
- Выберите «Параметры» в контекстном меню.
- В меню «Параметры» выберите «Проекты и решения».
- В разделе «Общие» найдите «Компилятор по умолчанию» и выберите новый компилятор из выпадающего списка.
- Нажмите «ОК», чтобы сохранить изменения.
Теперь выбранный вами компилятор будет использоваться по умолчанию для всех новых проектов в Visual Studio. Если вы хотите использовать другой компилятор для конкретного проекта, вы можете изменить его в настройках проекта.
Шаг 5. Проверить, что компилятор изменен
После изменения компилятора в Visual Studio необходимо убедиться, что изменения сохранены и компилятор действительно изменился. Для этого можно выполнить несколько простых действий.
- Откройте проект, который вы хотите скомпилировать.
- Выберите пункт меню «Сборка» и затем «Скомпилировать проект».
- Проверьте, что в выводимой консоли отображается выбранный вами компилятор.
Также можно проверить версию компилятора, которую использует Visual Studio, в пункте меню «Справка» -> «О программе». Здесь вы можете найти информацию о версии Visual Studio и о его компонентах, включая выбранный вами компилятор.
Если компилятор не изменился, необходимо повторить процесс с изменением пути к новому компилятору или проверить наличие ошибок в процессе замены. Если все выполнено правильно, вы можете спокойно продолжать работу с новым компилятором в Visual Studio.
Шаг 6. Сохранить изменения и закрыть настройки
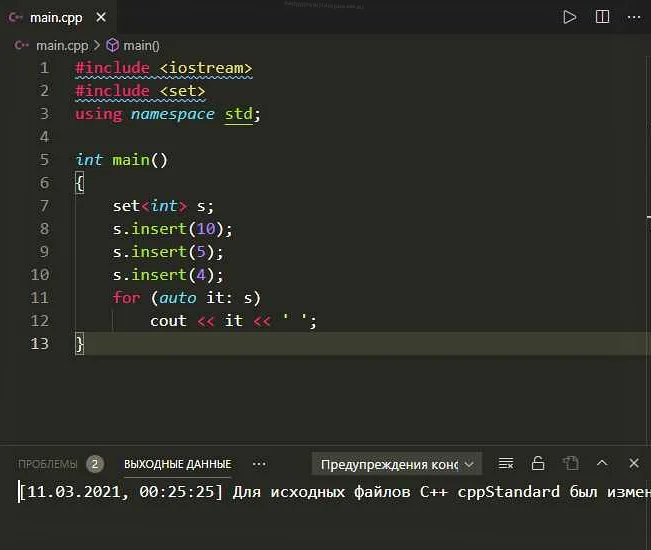
Читать далее«Как центрировать заголовок на сайте: правила установки в HTML» — в формате Как центрировать заголовок на сайте: правила установки в HTML.
После того, как вы выбрали нужный вам компилятор и настроили его параметры в Visual Studio, не забудьте сохранить все изменения и закрыть настройки.
Для этого нажмите кнопку «ОК» или «Применить» в окне настроек компилятора, чтобы сохранить выбранные параметры.
После того, как вы сохранили изменения, закройте окно настроек компилятора, нажав на кнопку «Закрыть».
Теперь вы можете использовать выбранный вами компилятор для написания и отладки кода в Visual Studio.
Шаг 7. Запустить сборку проекта
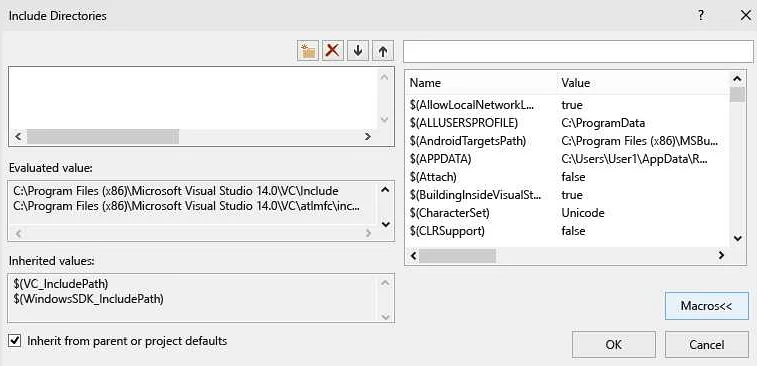
После того, как мы изменили компилятор на необходимый, необходимо собрать проект, чтобы изменения вступили в силу. Для этого выполните следующие действия:
- Выберите в меню «Build» пункт «Build Solution» или нажмите сочетание клавиш «Ctrl+Shift+B».
- Ожидайте окончания сборки проекта. Если во время сборки возникнут ошибки, то они будут отображены в окне «Error List».
- После успешной сборки проекта можно запустить его, нажав клавишу «F5» или выбрав в меню «Debug» пункт «Start Debugging».
Теперь вы можете использовать выбранный вами компилятор при разработке своего проекта в Visual Studio.
Шаг 8. Проверить результаты сборки
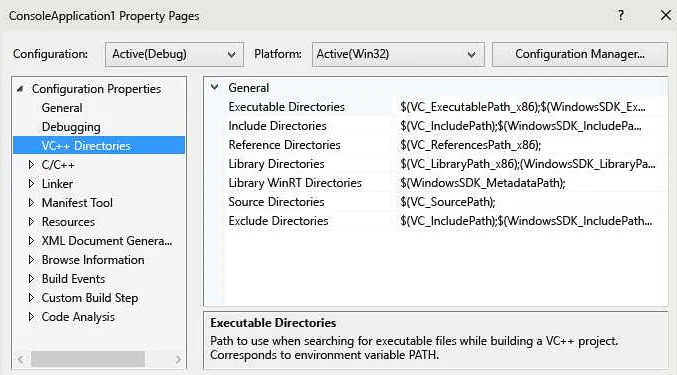
После того как вы сменили компилятор в Visual Studio, обязательно нужно проверить результаты сборки. Для этого откройте проект и кликните на кнопку «Сборка» или «Build».
Если сборка прошла успешно, то внизу экрана вы увидите сообщение «Build succeeded». Если же произошла ошибка, то вам высветится окно с сообщениями об ошибках.
В случае ошибок необходимо вернуться к предыдущим шагам и исправить проблемы. Повторно проверить результаты сборки.
После того, как результаты сборки оказались успешными, можно запустить программу и убедиться, что она работает корректно.
Обратите внимание на все функции и опции, которые используются в вашем проекте, и убедитесь, что они продолжают работать после изменения компилятора.
Шаг 9. Устранить возможные ошибки
После изменения компилятора в Visual Studio может возникнуть ряд ошибок, связанных с новыми настройками среды разработки. Чтобы устранить эти ошибки, следует проверить следующие параметры:
- Путь к компилятору – убедитесь, что путь к новому компилятору указан правильно и он доступен по этому пути.
- Версия компилятора – убедитесь, что выбрана подходящая версия компилятора, которая соответствует вашей версии Visual Studio и требованиям вашего проекта.
- Зависимости и библиотеки – проверьте, что ваш проект использует верные зависимости и библиотеки, которые совместимы с новым компилятором. Если необходимо, обновите их до соответствующей версии.
- Компиляторные ключи и опции – перепроверьте настройки компиляции и убедитесь, что они корректно настроены для вашего проекта и нового компилятора.
Также, необходимо обратить внимание на любые предупреждения и сообщения об ошибках, которые могут появиться во время компиляции. Исправьте их в соответствии с рекомендациями Visual Studio и вашими собственными знаниями и опытом.
Если не удается устранить ошибку, можно попробовать связаться с сообществом разработчиков Visual Studio или обратиться к документации для получения дополнительной помощи.
Шаг 10. Запустить приложение
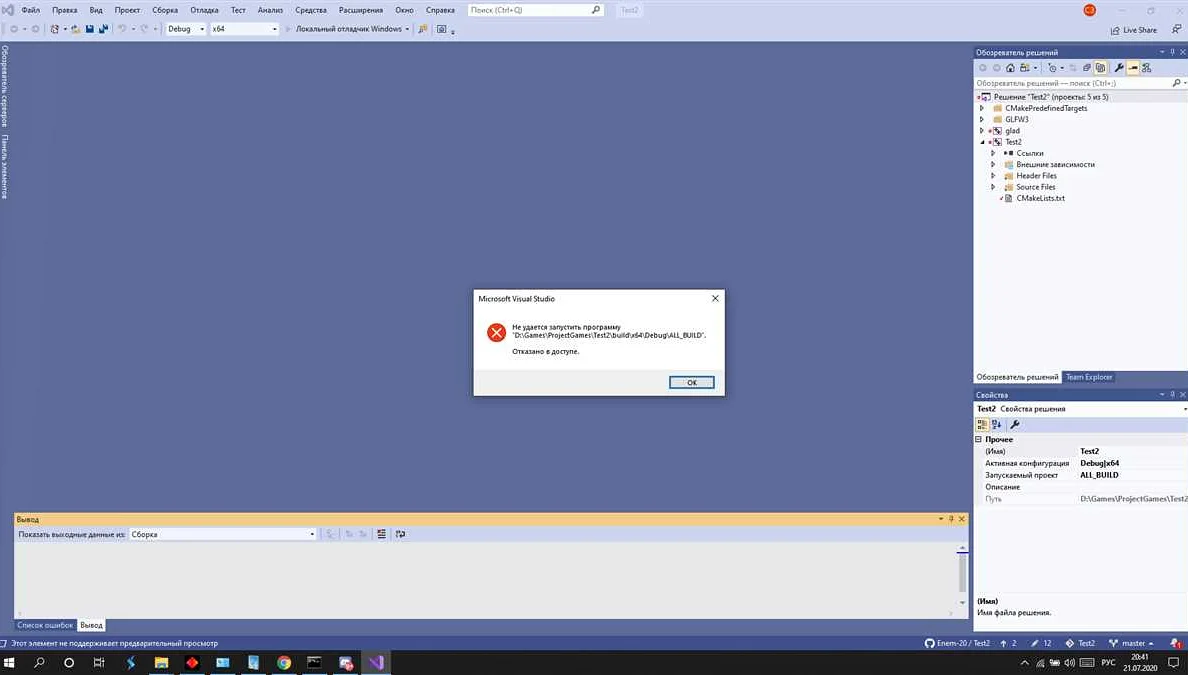
После успешной сборки приложения требуется запустить его для проверки работоспособности. Для этого следует выбрать пункт меню «Отладка» или «Debug» и нажать на кнопку «Начать отладку» или «Start Debugging».
Если приложение работает правильно, откроется окно программы на экране компьютера. В противном случае появится сообщение об ошибке в окне отладчика.
При необходимости отладки программы может быть нажата кнопка «Приостановить» или «Pause» для остановки ее работы, а затем произведен анализ кода и исправление ошибок.
Когда приложение успешно проходит процесс отладки, его можно сохранить и запустить вне отладчика, выбрав соответствующий пункт меню. Теперь пользователи смогут получить доступ к работающей версии программы и использовать ее функционал.
Вопрос-ответ:
Как изменить компилятор в Visual Studio?
Чтобы изменить компилятор в Visual Studio, сначала запустите приложение. Далее откройте настройки проекта и перейдите на вкладку «С/С++». В разделе «Компилятор» выберите нужный вариант и сохраните настройки.
Какие компиляторы поддерживает Visual Studio?
Visual Studio поддерживает компиляторы Microsoft C++, Clang и LLVM.
Можно ли использовать другие компиляторы в Visual Studio?
Да, можно. Для этого необходимо установить соответствующие расширения в Visual Studio. Например, можно установить расширение для использования GCC.
Какие дополнительные настройки необходимо задать при изменении компилятора?
При изменении компилятора необходимо также изменить пути к заголовочным файлам и библиотекам, которые использует проект. Это можно сделать в настройках проекта.
Как проверить, что новый компилятор работает корректно?
Чтобы проверить работоспособность нового компилятора, необходимо запустить проект и проверить, что все функции работают корректно и нет ошибок компиляции. Также можно провести ручное тестирование, чтобы удостовериться, что новый компилятор не привел к появлению новых ошибок.
Какой компилятор лучше использовать в Visual Studio для создания быстрых и эффективных приложений?
Наибольшую скорость и эффективность можно достичь при использовании компилятора Clang.
Если у меня возникнут трудности при изменении компилятора в Visual Studio, где я могу получить помощь?
При возникновении трудностей с изменением компилятора в Visual Studio, можно обратиться в сообщество разработчиков Microsoft или на специализированные форумы и сайты, посвященные Visual Studio и средам разработки.
Шаг 11. Проверить работу приложения
После изменения компилятора в Visual Studio, необходимо проверить корректность работы самого приложения. Для этого необходимо запустить проект и убедиться, что он успешно компилируется и запускается.
Чтобы убедиться, что приложение работает корректно, нужно протестировать его на различных операционных системах и различных аппаратных платформах. Также необходимо проверить работу всех функций, которые используются в приложении. В случае обнаружения ошибок, необходимо вернуться к предыдущим шагам и исправить все проблемы.
После успешного прохождения тестирования и убедившись в корректной работе приложения, можно перейти к следующему этапу разработки.
Как поменять компилятор в visual studio
In this tutorial, you configure Visual Studio Code to use the Microsoft Visual C++ compiler and debugger on Windows. After configuring VS Code, you will compile and debug a simple Hello World program in VS Code. This tutorial does not teach you details about the Microsoft C++ toolset or the C++ language. For those subjects, there are many good resources available on the Web. If you have any problems, feel free to file an issue for this tutorial in the VS Code documentation repository. To successfully complete this tutorial, you must do the following: Install the C/C++ extension for VS Code. You can install the C/C++ extension by searching for ‘c++’ in the Extensions view ( kb(workbench.view.extensions) ).  Install the Microsoft Visual C++ (MSVC) compiler toolset. If you have a recent version of Visual Studio, open the Visual Studio Installer from the Windows Start menu and verify that the C++ workload is checked. If it’s not installed, then check the box and select the Modify button in the installer. You can also install the Desktop development with C++ workload without a full Visual Studio IDE installation. From the Visual Studio Downloads page, scroll down until you see Tools for Visual Studio 2022 under the All Downloads section and select the download for Build Tools for Visual Studio 2022.
  This will launch the Visual Studio Installer, which will bring up a dialog showing the available Visual Studio Build Tools workloads. Check the Desktop development with C++ workload and select Install.

Note : You can use the C++ toolset from Visual Studio Build Tools along with Visual Studio Code to compile, build, and verify any C++ codebase as long as you also have a valid Visual Studio license (either Community, Pro, or Enterprise) that you are actively using to develop that C++ codebase.
Check your Microsoft Visual C++ installation
To use MSVC from a command line or VS Code, you must run from a Developer Command Prompt for Visual Studio. An ordinary shell such as PowerShell, Bash, or the Windows command prompt does not have the necessary path environment variables set. To open the Developer Command Prompt for VS, start typing ‘developer’ in the Windows Start menu, and you should see it appear in the list of suggestions. The exact name depends on which version of Visual Studio or the Visual Studio Build Tools you have installed. Select the item to open the prompt.  You can test that you have the C++ compiler, cl.exe , installed correctly by typing ‘cl’ and you should see a copyright message with the version and basic usage description.
  If the Developer Command Prompt is using the BuildTools location as the starting directory (you wouldn’t want to put projects there), navigate to your user folder ( C:\users\ \ ) before you start creating new projects.
Note : If for some reason you can’t run VS Code from a Developer Command Prompt, you can find a workaround for building C++ projects with VS Code in Run VS Code outside a Developer Command Prompt.
Create Hello World
- tasks.json (build instructions)
- launch.json (debugger settings)
- c_cpp_properties.json (compiler path and IntelliSense settings)
Add a source code file
In the File Explorer title bar, select the New File button and name the file helloworld.cpp .
Add hello world source code
Now paste in this source code:
Now press kb(workbench.action.files.save) to save the file. Notice how the file you just added appears in the File Explorer view ( kb(workbench.view.explorer) ) in the side bar of VS Code:

You can also enable Auto Save to automatically save your file changes, by checking Auto Save in the main File menu.
The Activity Bar on the far left lets you open different views such as Search, Source Control, and Run. You’ll look at the Run view later in this tutorial. You can find out more about the other views in the VS Code User Interface documentation.
Note : When you save or open a C++ file, you may see a notification from the C/C++ extension about the availability of an Insiders version, which lets you test new features and fixes. You can ignore this notification by selecting the X (Clear Notification).
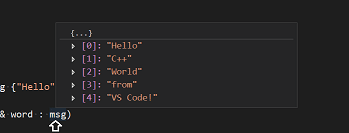
In your new helloworld.cpp file, hover over vector or string to see type information. After the declaration of the msg variable, start typing msg. as you would when calling a member function. You should immediately see a completion list that shows all the member functions, and a window that shows the type information for the msg object:

You can press the kbstyle(Tab) key to insert the selected member; then, when you add the opening parenthesis, you will see information about any arguments that the function requires.
Remember, the C++ extension uses the C++ compiler you have installed on your machine to build your program. Make sure you have a C++ compiler installed before attempting to run and debug helloworld.cpp in VS Code.
Open helloworld.cpp so that it is the active file.
Press the play button in the top right corner of the editor.
Choose C/C++: cl.exe build and debug active file from the list of detected compilers on your system.
You’ll only be asked to choose a compiler the first time you run helloworld.cpp . This compiler will be set as the «default» compiler in tasks.json file.
After the build succeeds, your program’s output will appear in the integrated Terminal.
If you get an error trying to build and debug with cl.exe, make sure you have started VS Code from the Developer Command Prompt for Visual Studio using the code . shortcut.
The first time you run your program, the C++ extension creates tasks.json , which you’ll find in your project’s .vscode folder. tasks.json stores build configurations.
Your new tasks.json file should look similar to the JSON below:
Note : You can learn more about tasks.json variables in the variables reference.
The command setting specifies the program to run; in this case that is «cl.exe». The args array specifies the command-line arguments that will be passed to cl.exe. These arguments must be specified in the order expected by the compiler.
This task tells the C++ compiler to take the active file ( $ ), compile it, and create an executable file ( /Fe: switch) in the current directory ( $ ) with the same name as the active file but with the .exe extension ( $ .exe ), resulting in helloworld.exe for our example.
The label value is what you will see in the tasks list; you can name this whatever you like.
The detail value is what you will as the description of the task in the tasks list. It’s highly recommended to rename this value to differentiate it from similar tasks.
The problemMatcher value selects the output parser to use for finding errors and warnings in the compiler output. For cl.exe, you’ll get the best results if you use the $msCompile problem matcher.
From now on, the play button will read from tasks.json to figure out how to build and run your program. You can define multiple build tasks in tasks.json , and whichever task is marked as the default will be used by the play button. In case you need to change the default compiler, you can run Tasks: Configure default build task. Alternatively you can modify the tasks.json file and remove the default by replacing this segment:
You can modify your tasks.json to build multiple C++ files by using an argument like «$ /*.cpp» instead of $ .This will build all .cpp files in your current folder. You can also modify the output filename by replacing «$ \\$ .exe» with a hard-coded filename (for example «$ \\myProgram.exe» ).
- Go back to helloworld.cpp so that it is the active file.
- Set a breakpoint by clicking on the editor margin or using F9 on the current line.
- From the drop-down next to the play button, select Debug C/C++ File.
- Choose C/C++: cl.exe build and debug active file from the list of detected compilers on your system (you’ll only be asked to choose a compiler the first time you run/debug helloworld.cpp ).
The play button has two modes: Run C/C++ File and Debug C/C++ File. It will default to the last-used mode. If you see the debug icon in the play button, you can just click the play button to debug, instead of selecting the drop-down menu item.
If you get an error trying to build and debug with cl.exe, make sure you have started VS Code from the Developer Command Prompt for Visual Studio using the code . shortcut.
Explore the debugger
Before you start stepping through the code, let’s take a moment to notice several changes in the user interface:
The Integrated Terminal appears at the bottom of the source code editor. In the Debug Output tab, you see output that indicates the debugger is up and running.
The editor highlights the line where you set a breakpoint before starting the debugger:
The Run and Debug view on the left shows debugging information. You’ll see an example later in the tutorial.
At the top of the code editor, a debugging control panel appears. You can move this around the screen by grabbing the dots on the left side.

Step through the code
Now you’re ready to start stepping through the code.
Click or press the Step over icon in the debugging control panel.
This will advance program execution to the first line of the for loop, and skip over all the internal function calls within the vector and string classes that are invoked when the msg variable is created and initialized. Notice the change in the Variables window on the left.

In this case, the errors are expected because, although the variable names for the loop are now visible to the debugger, the statement has not executed yet, so there is nothing to read at this point. The contents of msg are visible, however, because that statement has completed.
Press Step over again to advance to the next statement in this program (skipping over all the internal code that is executed to initialize the loop). Now, the Variables window shows information about the loop variables.
Press Step over again to execute the cout statement. (Note that as of the March 2019 release, the C++ extension does not print any output to the Debug Console until the loop exits.)
If you like, you can keep pressing Step over until all the words in the vector have been printed to the console. But if you are curious, try pressing the Step Into button to step through source code in the C++ standard library!

To return to your own code, one way is to keep pressing Step over. Another way is to set a breakpoint in your code by switching to the helloworld.cpp tab in the code editor, putting the insertion point somewhere on the cout statement inside the loop, and pressing kb(editor.debug.action.toggleBreakpoint) . A red dot appears in the gutter on the left to indicate that a breakpoint has been set on this line.

Then press kb(workbench.action.debug.start) to start execution from the current line in the standard library header. Execution will break on cout . If you like, you can press kb(editor.debug.action.toggleBreakpoint) again to toggle off the breakpoint.
Sometimes you might want to keep track of the value of a variable as your program executes. You can do this by setting a watch on the variable.
Place the insertion point inside the loop. In the Watch window, select the plus sign and in the text box, type word , which is the name of the loop variable. Now view the Watch window as you step through the loop.

Add another watch by adding this statement before the loop: int i = 0; . Then, inside the loop, add this statement: ++i; . Now add a watch for i as you did in the previous step.
To quickly view the value of any variable while execution is paused on a breakpoint, you can hover over it with the mouse pointer.

Customize debugging with launch.json
When you debug with the play button or kb(workbench.action.debug.start) , the C++ extension creates a dynamic debug configuration on the fly.
There are cases where you’d want to customize your debug configuration, such as specifying arguments to pass to the program at runtime. You can define custom debug configurations in a launch.json file.
To create launch.json , choose Add Debug Configuration from the play button drop-down menu.
You’ll then see a dropdown for various predefined debugging configurations. Choose C/C++: cl.exe build and debug active file.
VS Code creates a launch.json file, which looks something like this:
In the JSON above, program specifies the program you want to debug. Here it is set to the active file folder ( $ ) and active filename with the .exe extension ( $ .exe ), which if helloworld.cpp is the active file will be helloworld.exe . The args property is an array of arguments to pass to the program at runtime.
By default, the C++ extension won’t add any breakpoints to your source code and the stopAtEntry value is set to false .
Change the stopAtEntry value to true to cause the debugger to stop on the main method when you start debugging.
From now on, the play button and kb(workbench.action.debug.start) will read from your launch.json file when launching your program for debugging.
If you want more control over the C/C++ extension, you can create a c_cpp_properties.json file, which will allow you to change settings such as the path to the compiler, include paths, C++ standard (default is C++17), and more.
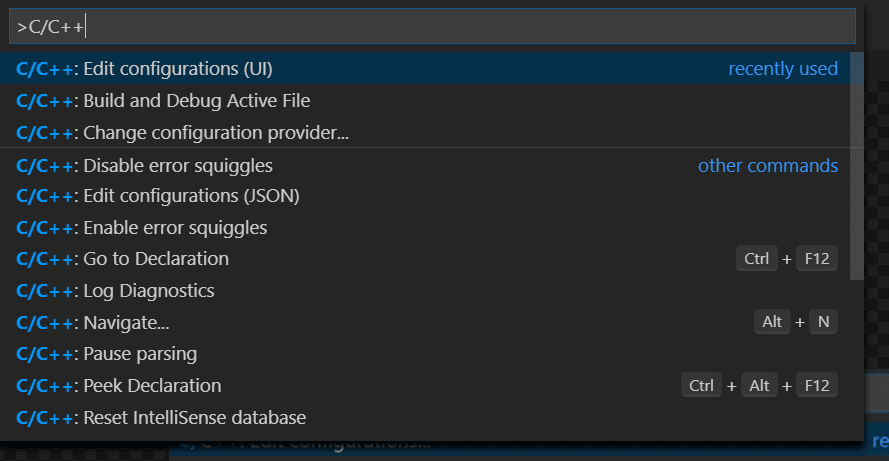
You can view the C/C++ configuration UI by running the command C/C++: Edit Configurations (UI) from the Command Palette ( kb(workbench.action.showCommands) ).

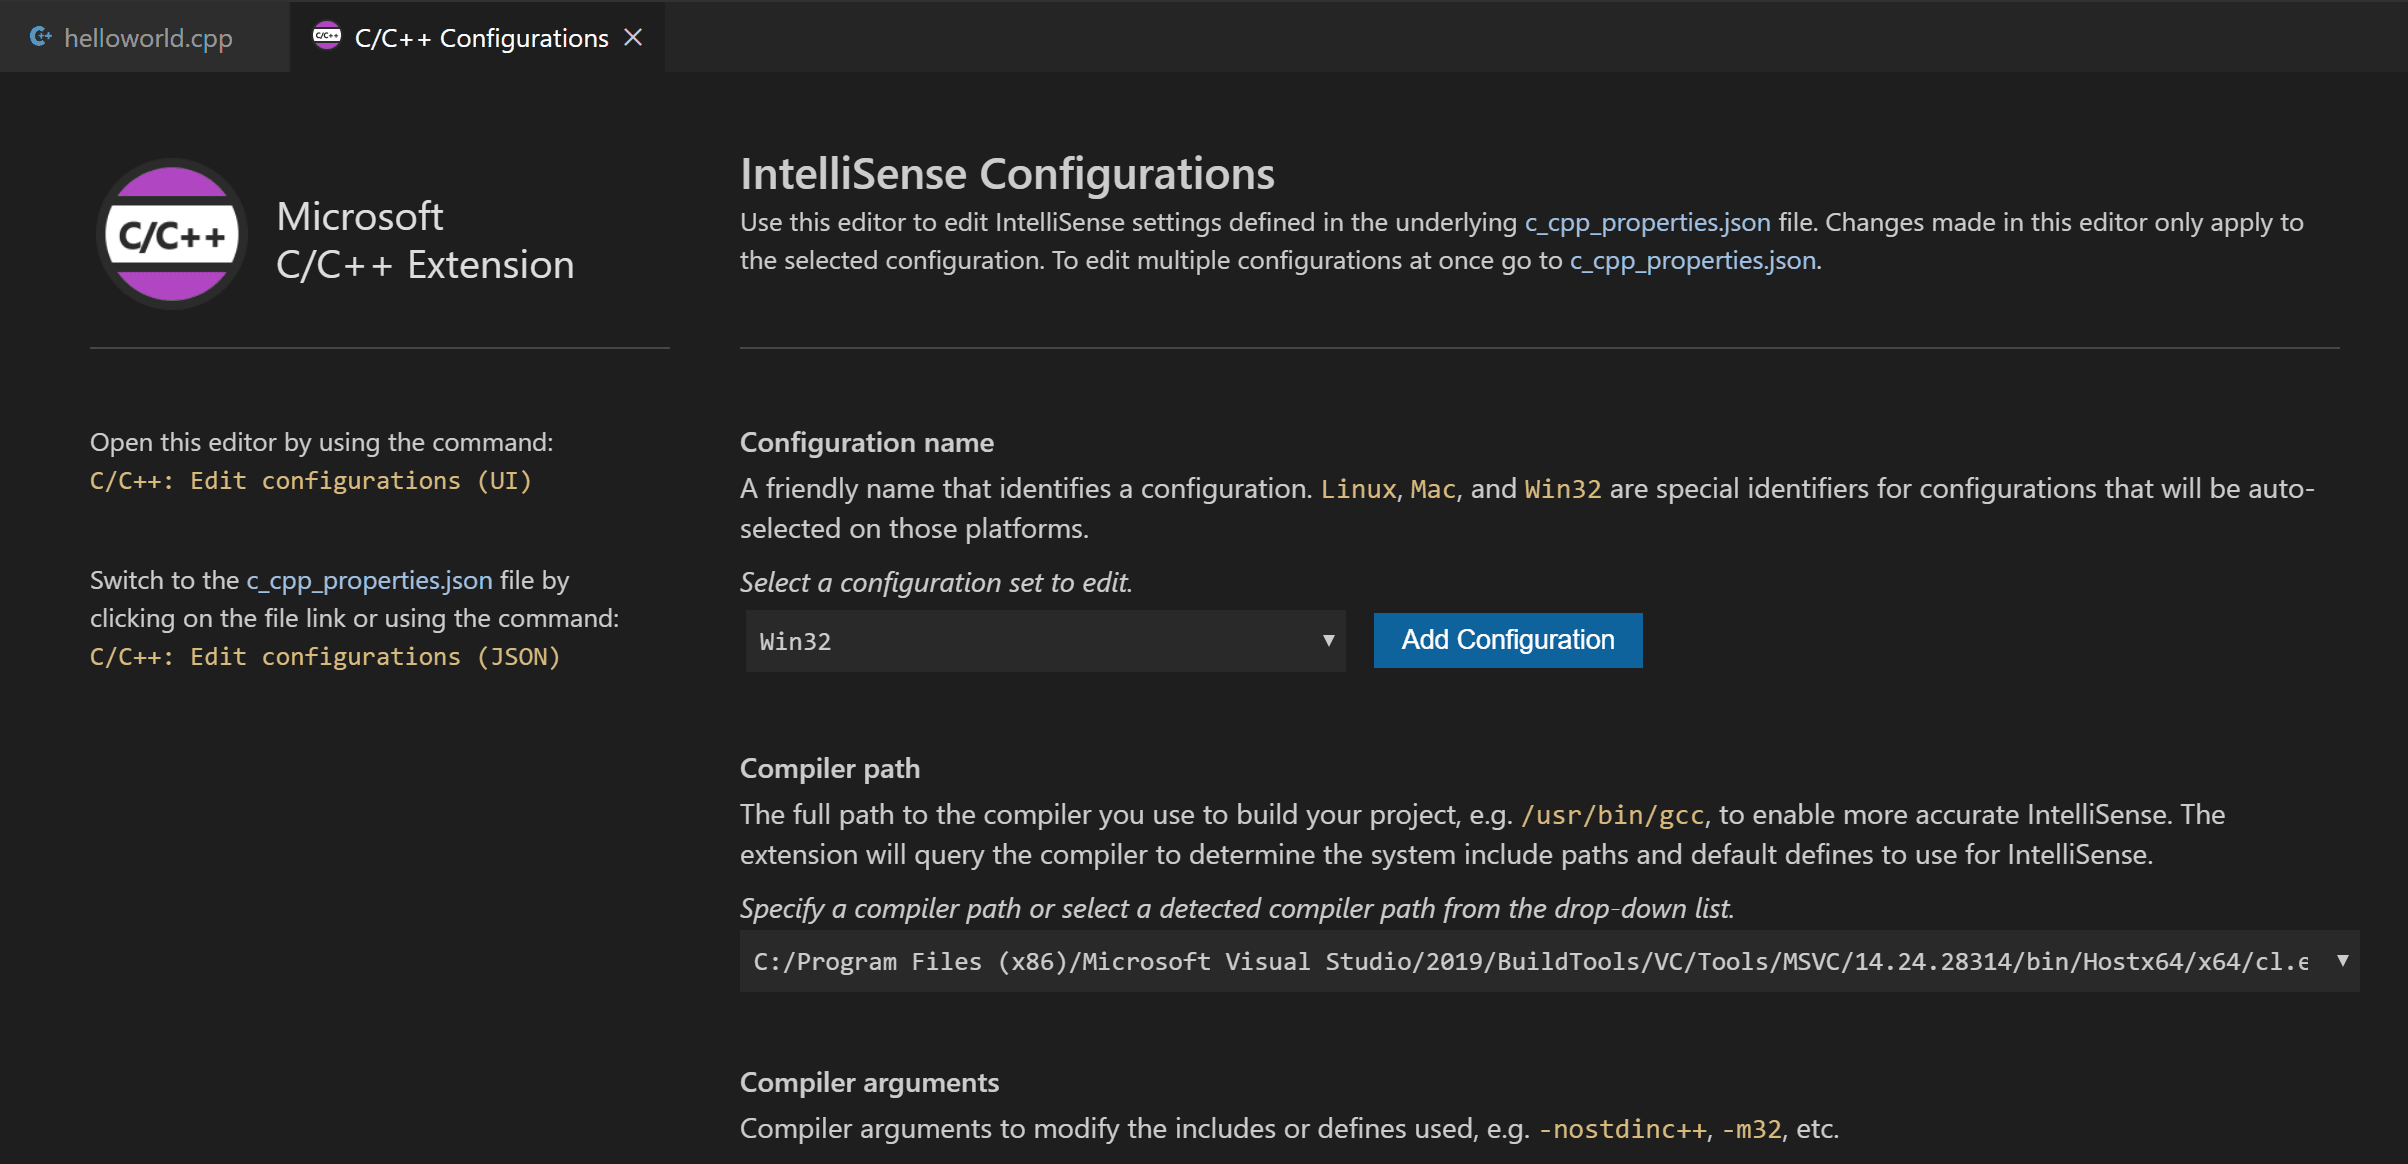
This opens the C/C++ Configurations page. When you make changes here, VS Code writes them to a file called c_cpp_properties.json in the .vscode folder.

Visual Studio Code places these settings in .vscode\c_cpp_properties.json . If you open that file directly, it should look something like this:
You only need to add to the Include path array setting if your program includes header files that are not in your workspace or in the standard library path.
The compilerPath setting is an important setting in your configuration. The extension uses it to infer the path to the C++ standard library header files. When the extension knows where to find those files, it can provide useful features like smart completions and Go to Definition navigation.
The C/C++ extension attempts to populate compilerPath with the default compiler location based on what it finds on your system. The extension looks in several common compiler locations.
The compilerPath search order is:
- First check for the Microsoft Visual C++ compilerOpe
- Then look for g++ on Windows Subsystem for Linux (WSL)
- Then g++ for Mingw-w64.
If you have g++ or WSL installed, you might need to change compilerPath to match the preferred compiler for your project. For Microsoft C++, the path should look something like this, depending on which specific version you have installed: «C:/Program Files (x86)/Microsoft Visual Studio/2017/BuildTools/VC/Tools/MSVC/14.16.27023/bin/Hostx64/x64/cl.exe».
Reusing your C++ configuration
VS Code is now configured to use the Microsoft C++ compiler. The configuration applies to the current workspace. To reuse the configuration, just copy the JSON files to a .vscode folder in a new project folder (workspace) and change the names of the source file(s) and executable as needed.
Run VS Code outside the Developer Command Prompt
In certain circumstances, it isn’t possible to run VS Code from Developer Command Prompt for Visual Studio (for example, in Remote Development through SSH scenarios). In that case, you can automate initialization of Developer Command Prompt for Visual Studio during the build using the following tasks.json configuration:
Note : The path to VsDevCmd.bat might be different depending on the Visual Studio version or installation path. You can find the path to VsDevCmd.bat by opening a Command Prompt and running dir «\VsDevCmd*» /s .
The term ‘cl.exe’ is not recognized
If you see the error «The term ‘cl.exe’ is not recognized as the name of a cmdlet, function, script file, or operable program.», this usually means you are running VS Code outside of a Developer Command Prompt for Visual Studio and VS Code doesn’t know the path to the cl.exe compiler.
VS Code must either be started from the Developer Command Prompt for Visual Studio, or the task must be configured to run outside a Developer Command Prompt.
Установка поддержки C++ в Visual Studio Code (VSCode)

Для разработки программ на языке c++ вы можете использовать среду разработки Visual Studio Code (VSCode).
Сегодня мы рассмотрим установку поддержки языка программирования с++ в этой IDE.
Выбор компилятора
Перед установкой расширения для поддержки с++ в VSCode нам нужно сначала определиться какой компилятор использовать.
Под Windows существует несколько возможностей:
- Вы можете использовать Windows Subsystem for Linux (WSL) и установив в виртуальной машине все необходимые пакеты компилировать программы с помощью специального расширения для VSCode.
- Вы можете установить MinGW или MSYS2 и использовать их компиляторы.
- Вы можете установить компилятор Microsoft C++ compiler (MSVC)
Сегодня мы рассмотрим самый простой способ – установку Microsoft C++ compiler (MSVC).
Установка Microsoft C++ compiler (MSVC)
Для начала скачаем установщик по ссылке:
Скачиваем файл, в моем случае он называется:
Запускаем, откроется окно:
Будет запущена консоль разработчика:
Компилятор успешно установлен и доступен.
Теперь пришло время установить расширение для поддержки с++ в VSCode.
Установка расширения для поддержки С++ в VSCode
Откроется панель Extensions: Marketplace – это каталог, из которого мы можем скачать все необходимые расширения и темы, достаточно знать их название.


Выберите указанный пункт и нажмите install

Будет начато скачивание дополнительных компонентов. После окончания загрузок расширение будет готово к использованию.
Настройка VSCode для использования компилятора MSVC
Для того, чтобы протестировать работу компилятора создадим тестовый проект.
Для нормального функционирования компилятора MSVC нужно установить несколько переменных окружения. Чтобы упростить задачу воспользуемся Visual Studio 2019 Developer Command Prompt.
Запустите его из меню Пуск введя слово developer, откроется консоль:
Создадим данную папку и перейдем в нее:
Создадим папку для проекта test
Запустим VSCode из этой папки
Откроется окно VSCode

Обратите внимание наша папка уже открыта.
Добавим новый файл для этого нажмите на кнопку:
Настройка компилятора для проекта
Теперь у нас есть программа, осталось её скомпилировать, давайте настроим задачу сборки для проекта.
Конфигурация компилятора: Выбор стандарта языка С++
Как с огромным количеством различных версий языка C++ (C++98, C++03, C++11, C++14, C++17, C++20) компилятор понимает, какую из них ему следует использовать? Как правило, компилятор выбирает стандарт языка по умолчанию (часто не самый последний языковой стандарт). Если вы хотите использовать другой стандарт, то вам придется внести изменения в настройки вашей IDE/компилятора. Эти настройки применяются только к текущему проекту. При создании нового проекта вам придется всё делать заново.
Кодовые имена для версий языка С++
Обратите внимание на то, что каждый языковый стандарт имеет название, указывающее на год его принятия/утверждения (например, C++17 был принят/утвержден в 2017 году).
Однако, когда согласовывается новый языковой стандарт, неясно, в каком году удастся его принять, поэтому действующим языковым стандартам присваиваются кодовые имена, которые затем заменяются фактическими именами при доработке стандарта. Например, C++11 назывался c++1x , пока над ним вели работу. Вы можете по-прежнему видеть на просторах Интернета подобные кодовые имена (особенно, когда речь заходит о будущей версии языкового стандарта, у которого еще нет окончательного названия).
Вот сопоставление кодовых имен версий С++ с их окончательными названиями:
Например, если вы видите c++1z , то знайте, что речь идет о стандарте C++17.
Установка стандарта языка С++ в Visual Studio
На момент написания данной статьи, Visual Studio 2019 по умолчанию использует возможности C++14, что не позволяет использовать более новые фичи, представленные в C++17 и в C++20.
Чтобы использовать новый функционал, вам необходимо подключить новый языковой стандарт. К сожалению, сейчас нет способа сделать это глобально — вы должны делать это к каждому проекту индивидуально.
Чтобы использовать новый языковый стандарт в Visual Studio, откройте ваш проект, затем щелкните правой кнопкой мышки по названию вашего проекта в меню «Обозреватель решений» > «Свойства» :

В диалоговом окне вашего проекта убедитесь, что в пункте «Конфигурация» установлено значение «Все конфигурации» . Затем перейдите на вкладку «C/C++» > «Язык» и в пункте «Стандарт языка С++» выберите ту версию языка С++, которую хотели бы использовать:

На момент написания данной статьи, я рекомендую выбрать «Стандарт ISO C++17 (/std:c++17)» , который является последним стабильным стандартом.
Если вы хотите поэкспериментировать с возможностями грядущего стандарта языка C++ — C++20, то вы можете выбрать пункт «Предварительная версия . (/std:c++latest)» . Просто помните, что его поддержка может иметь баги.
Установка стандарта языка C++ в Code::Blocks
Code::Blocks по умолчанию может использовать стандарт C++11. Хорошей новостью является то, что Code::Blocks позволяет устанавливать ваш стандарт языка С++ глобально, поэтому вы можете установить его один раз и сразу на все проекты (а не для каждого проекта в индивидуальном порядке). Для этого перейдите в меню «Settings» > «Compiler» :

Затем на вкладке «Compiler flags» найдите следующие пункты меню:

Отметьте тот пункт, у которого число обозначает ближайший (к текущему) год утверждения стабильной версии и нажмите «ОК» (на вышеприведенном скриншоте этим пунктом является «Have g++ follow the C++17 ISO C++ language standard [-std=c++17]» ).
Примечание: Если вы не нашли в ваших настройках опцию с C++17, то вам следует обновить вашу версию Code::Blocks.
Установка стандарта языка С++ в GCC/G++
В GCC/G++ вы можете прописать соответствующие флаги -std=c++11 , -std=c++14 , -std=c++17 или -std=c++2a , чтобы подключить функционал C++11/14/17/20, соответственно.
Тестирование вашего компилятора
После подключения версии C++17 или выше, вы можете провести тест, который позволит понять, всё ли верно сделано и действительно ли подключена новая версия языка С++. Следующая программа в С++17 должна выполниться без каких-либо предупреждений или ошибок:
Configure VS Code for Microsoft C++
In this tutorial, you configure Visual Studio Code to use the Microsoft Visual C++ compiler and debugger on Windows.
After configuring VS Code, you will compile and debug a simple Hello World program in VS Code. This tutorial does not teach you details about the Microsoft C++ toolset or the C++ language. For those subjects, there are many good resources available on the Web.
If you have any problems, feel free to file an issue for this tutorial in the VS Code documentation repository.
Prerequisites
To successfully complete this tutorial, you must do the following:
Install the C/C++ extension for VS Code. You can install the C/C++ extension by searching for ‘c++’ in the Extensions view ( ⇧⌘X (Windows, Linux Ctrl+Shift+X ) ).
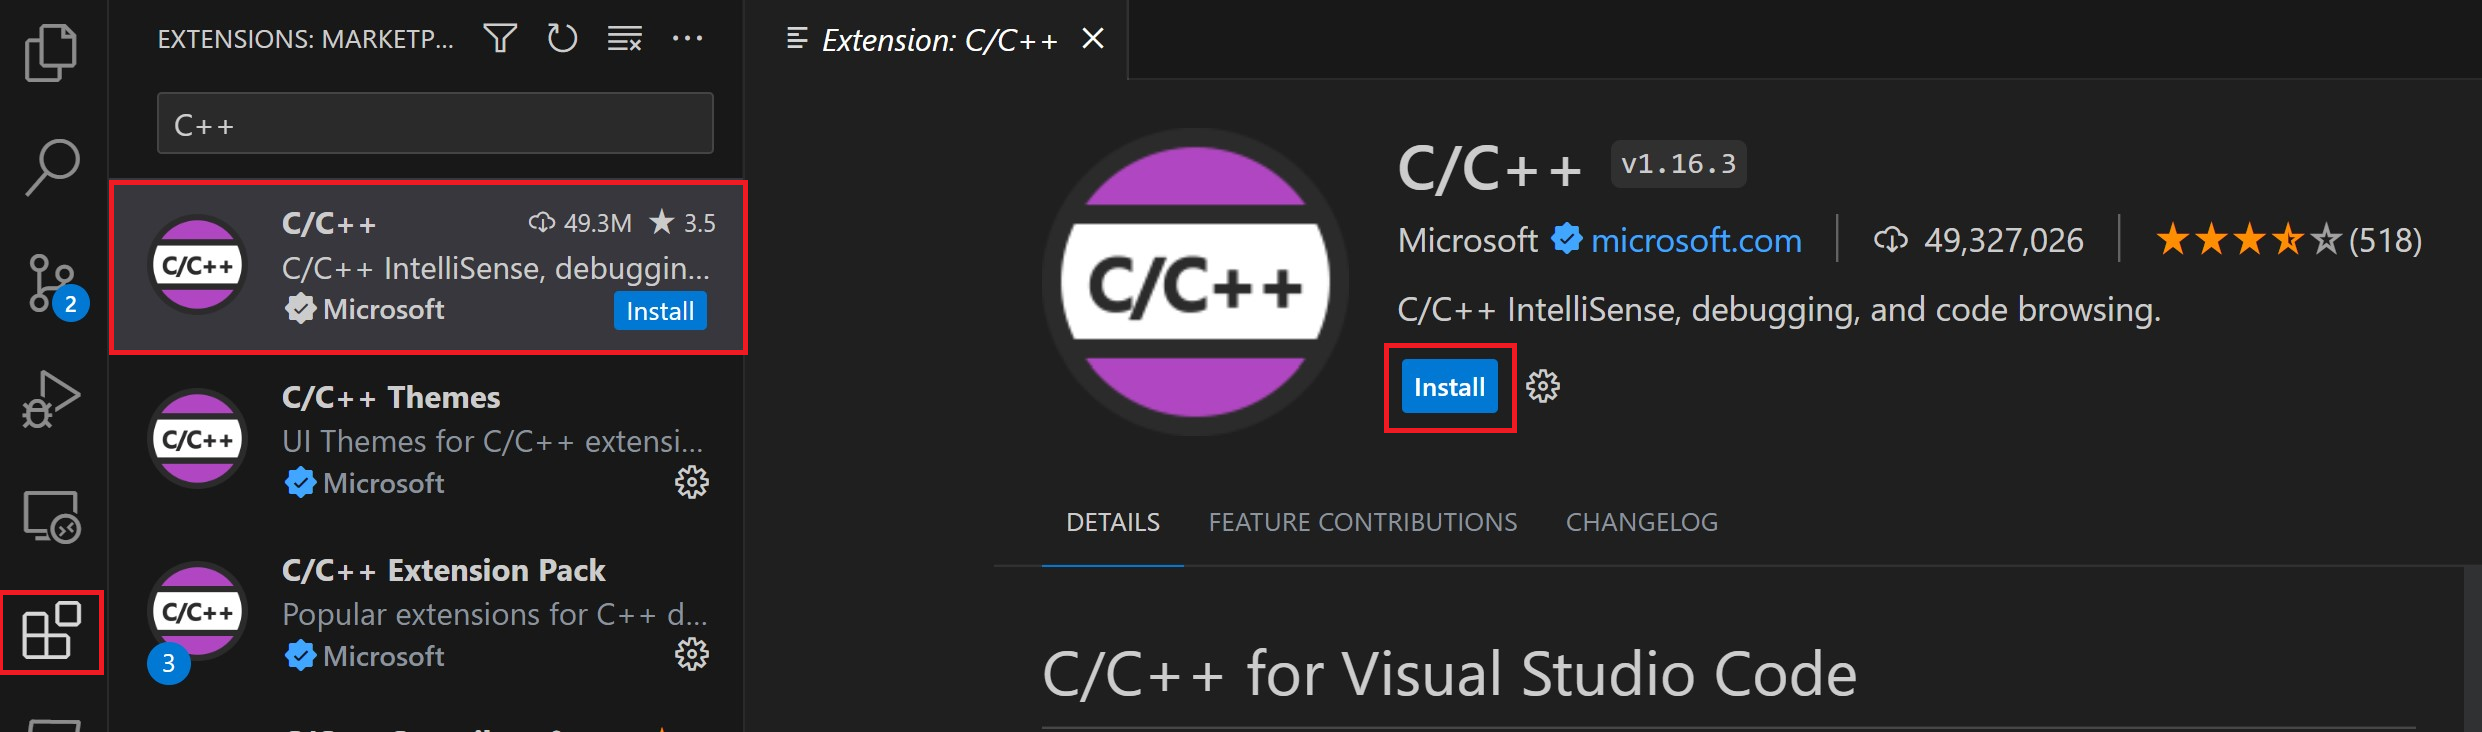
Install the Microsoft Visual C++ (MSVC) compiler toolset.
If you have a recent version of Visual Studio, open the Visual Studio Installer from the Windows Start menu and verify that the C++ workload is checked. If it’s not installed, then check the box and select the Modify button in the installer.
You can also install the Desktop development with C++ workload without a full Visual Studio IDE installation. From the Visual Studio Downloads page, scroll down until you see Tools for Visual Studio 2022 under the All Downloads section and select the download for Build Tools for Visual Studio 2022.

This will launch the Visual Studio Installer, which will bring up a dialog showing the available Visual Studio Build Tools workloads. Check the Desktop development with C++ workload and select Install.

Note: You can use the C++ toolset from Visual Studio Build Tools along with Visual Studio Code to compile, build, and verify any C++ codebase as long as you also have a valid Visual Studio license (either Community, Pro, or Enterprise) that you are actively using to develop that C++ codebase.
Check your Microsoft Visual C++ installation
To use MSVC from a command line or VS Code, you must run from a Developer Command Prompt for Visual Studio. An ordinary shell such as PowerShell, Bash, or the Windows command prompt does not have the necessary path environment variables set.
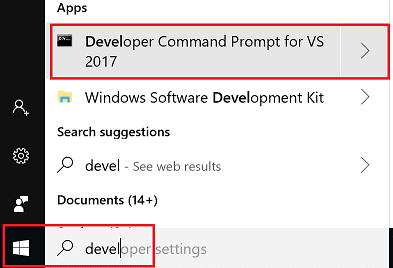
To open the Developer Command Prompt for VS, start typing ‘developer’ in the Windows Start menu, and you should see it appear in the list of suggestions. The exact name depends on which version of Visual Studio or the Visual Studio Build Tools you have installed. Select the item to open the prompt.
You can test that you have the C++ compiler, cl.exe , installed correctly by typing ‘cl’ and you should see a copyright message with the version and basic usage description.
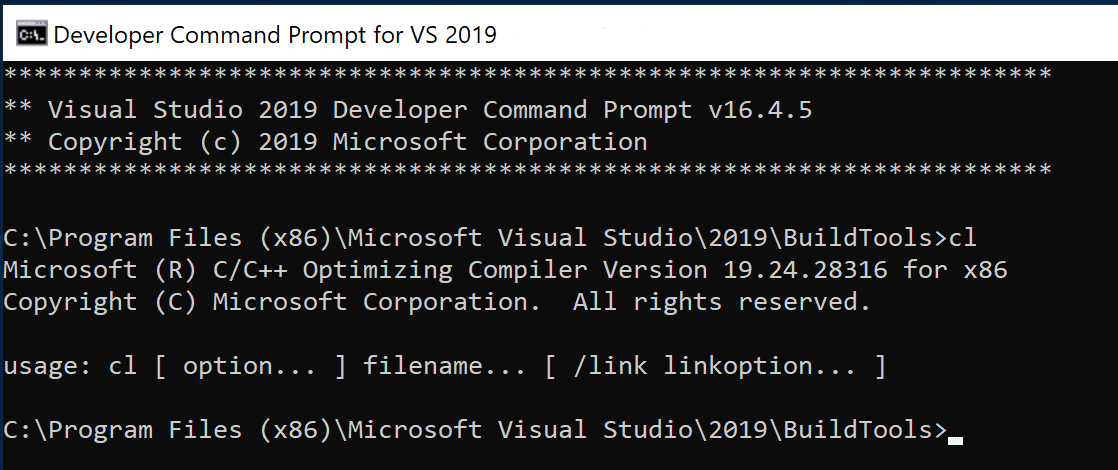
If the Developer Command Prompt is using the BuildTools location as the starting directory (you wouldn’t want to put projects there), navigate to your user folder ( C:\users\ \ ) before you start creating new projects.
Note: If for some reason you can’t run VS Code from a Developer Command Prompt, you can find a workaround for building C++ projects with VS Code in Run VS Code outside a Developer Command Prompt.
Create Hello World
From the Developer Command Prompt, create an empty folder called «projects» where you can store all your VS Code projects, then create a subfolder called «helloworld», navigate into it, and open VS Code ( code ) in that folder ( . ) by entering the following commands:
The «code .» command opens VS Code in the current working folder, which becomes your «workspace». As you go through the tutorial, you will see three files created in a .vscode folder in the workspace:
- tasks.json (build instructions)
- launch.json (debugger settings)
- c_cpp_properties.json (compiler path and IntelliSense settings)
Add a source code file
In the File Explorer title bar, select the New File button and name the file helloworld.cpp .
Add hello world source code
Now paste in this source code:
Now press ⌘S (Windows, Linux Ctrl+S ) to save the file. Notice how the file you just added appears in the File Explorer view ( ⇧⌘E (Windows, Linux Ctrl+Shift+E ) ) in the side bar of VS Code:
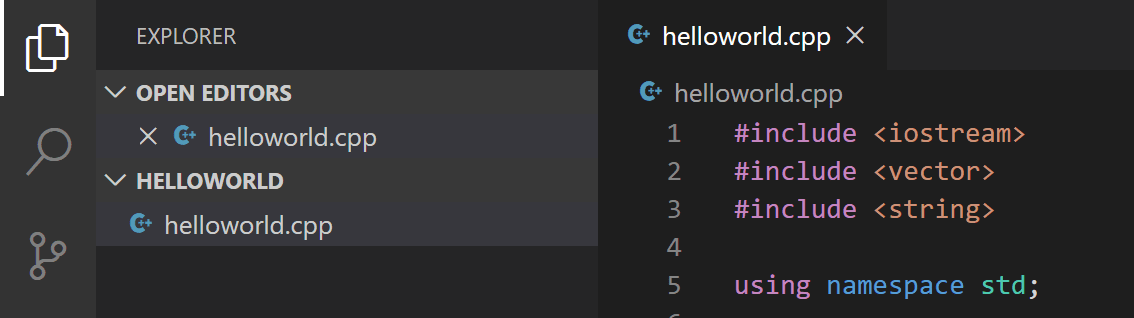
You can also enable Auto Save to automatically save your file changes, by checking Auto Save in the main File menu.
The Activity Bar on the far left lets you open different views such as Search, Source Control, and Run. You’ll look at the Run view later in this tutorial. You can find out more about the other views in the VS Code User Interface documentation.
Note: When you save or open a C++ file, you may see a notification from the C/C++ extension about the availability of an Insiders version, which lets you test new features and fixes. You can ignore this notification by selecting the X (Clear Notification).
Explore IntelliSense
In your new helloworld.cpp file, hover over vector or string to see type information. After the declaration of the msg variable, start typing msg. as you would when calling a member function. You should immediately see a completion list that shows all the member functions, and a window that shows the type information for the msg object:
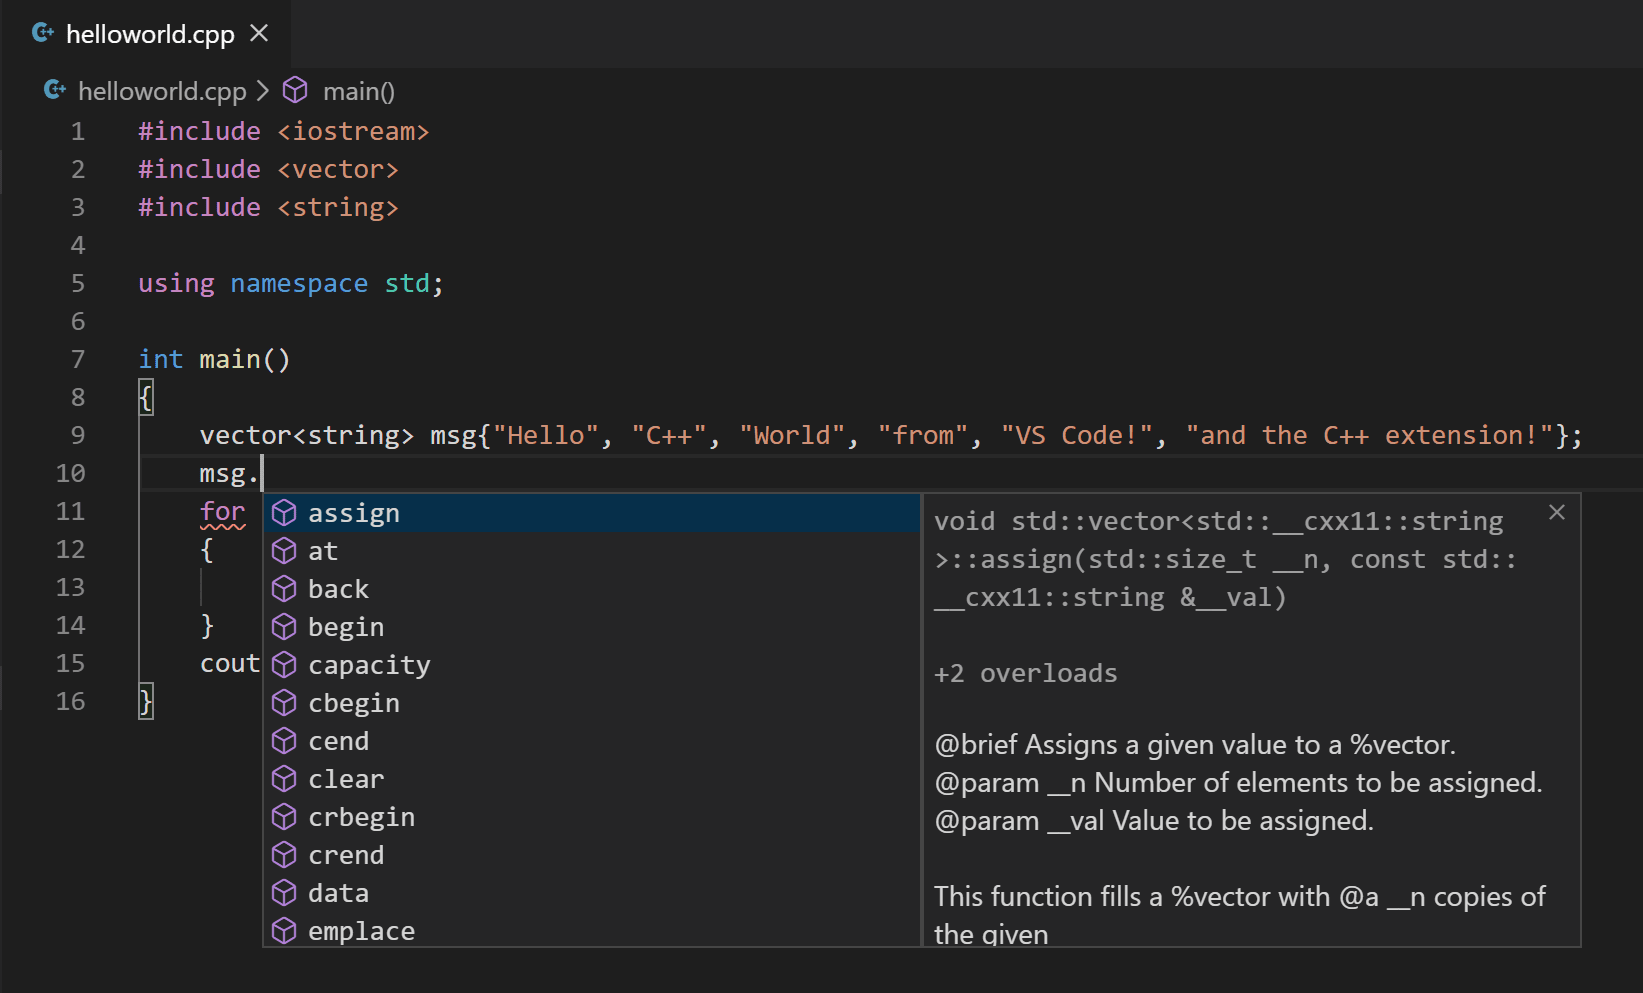
You can press the Tab key to insert the selected member; then, when you add the opening parenthesis, you will see information about any arguments that the function requires.
Run helloworld.cpp
Remember, the C++ extension uses the C++ compiler you have installed on your machine to build your program. Make sure you have a C++ compiler installed before attempting to run and debug helloworld.cpp in VS Code.
Open helloworld.cpp so that it is the active file.
Press the play button in the top right corner of the editor.
Choose C/C++: cl.exe build and debug active file from the list of detected compilers on your system.
You’ll only be asked to choose a compiler the first time you run helloworld.cpp . This compiler will be set as the «default» compiler in tasks.json file.
After the build succeeds, your program’s output will appear in the integrated Terminal.
If you get an error trying to build and debug with cl.exe, make sure you have started VS Code from the Developer Command Prompt for Visual Studio using the code . shortcut.
The first time you run your program, the C++ extension creates tasks.json , which you’ll find in your project’s .vscode folder. tasks.json stores build configurations.
Your new tasks.json file should look similar to the JSON below:
Note: You can learn more about tasks.json variables in the variables reference.
The command setting specifies the program to run; in this case that is «cl.exe». The args array specifies the command-line arguments that will be passed to cl.exe. These arguments must be specified in the order expected by the compiler.
This task tells the C++ compiler to take the active file ( $ ), compile it, and create an executable file ( /Fe: switch) in the current directory ( $ ) with the same name as the active file but with the .exe extension ( $ .exe ), resulting in helloworld.exe for our example.
The label value is what you will see in the tasks list; you can name this whatever you like.
The detail value is what you will as the description of the task in the tasks list. It’s highly recommended to rename this value to differentiate it from similar tasks.
The problemMatcher value selects the output parser to use for finding errors and warnings in the compiler output. For cl.exe, you’ll get the best results if you use the $msCompile problem matcher.
From now on, the play button will read from tasks.json to figure out how to build and run your program. You can define multiple build tasks in tasks.json , and whichever task is marked as the default will be used by the play button. In case you need to change the default compiler, you can run Tasks: Configure default build task. Alternatively you can modify the tasks.json file and remove the default by replacing this segment:
Modifying tasks.json
You can modify your tasks.json to build multiple C++ files by using an argument like «$ /*.cpp» instead of $ .This will build all .cpp files in your current folder. You can also modify the output filename by replacing «$ \\$ .exe» with a hard-coded filename (for example «$ \\myProgram.exe» ).
Debug helloworld.cpp
- Go back to helloworld.cpp so that it is the active file.
- Set a breakpoint by clicking on the editor margin or using F9 on the current line.
- From the drop-down next to the play button, select Debug C/C++ File.
- Choose C/C++: cl.exe build and debug active file from the list of detected compilers on your system (you’ll only be asked to choose a compiler the first time you run/debug helloworld.cpp ).
The play button has two modes: Run C/C++ File and Debug C/C++ File. It will default to the last-used mode. If you see the debug icon in the play button, you can just click the play button to debug, instead of selecting the drop-down menu item.
If you get an error trying to build and debug with cl.exe, make sure you have started VS Code from the Developer Command Prompt for Visual Studio using the code . shortcut.
Explore the debugger
Before you start stepping through the code, let’s take a moment to notice several changes in the user interface:
The Integrated Terminal appears at the bottom of the source code editor. In the Debug Output tab, you see output that indicates the debugger is up and running.
The editor highlights the line where you set a breakpoint before starting the debugger:
The Run and Debug view on the left shows debugging information. You’ll see an example later in the tutorial.
At the top of the code editor, a debugging control panel appears. You can move this around the screen by grabbing the dots on the left side.

Step through the code
Now you’re ready to start stepping through the code.
Click or press the Step over icon in the debugging control panel.
This will advance program execution to the first line of the for loop, and skip over all the internal function calls within the vector and string classes that are invoked when the msg variable is created and initialized. Notice the change in the Variables window on the left.
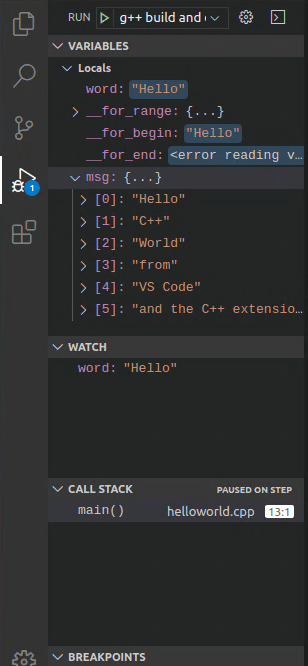
In this case, the errors are expected because, although the variable names for the loop are now visible to the debugger, the statement has not executed yet, so there is nothing to read at this point. The contents of msg are visible, however, because that statement has completed.
Press Step over again to advance to the next statement in this program (skipping over all the internal code that is executed to initialize the loop). Now, the Variables window shows information about the loop variables.
Press Step over again to execute the cout statement. (Note that as of the March 2019 release, the C++ extension does not print any output to the Debug Console until the loop exits.)
If you like, you can keep pressing Step over until all the words in the vector have been printed to the console. But if you are curious, try pressing the Step Into button to step through source code in the C++ standard library!
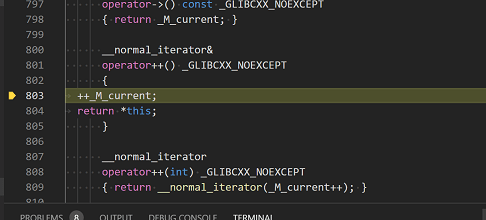
To return to your own code, one way is to keep pressing Step over. Another way is to set a breakpoint in your code by switching to the helloworld.cpp tab in the code editor, putting the insertion point somewhere on the cout statement inside the loop, and pressing F9 . A red dot appears in the gutter on the left to indicate that a breakpoint has been set on this line.
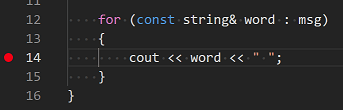
Then press F5 to start execution from the current line in the standard library header. Execution will break on cout . If you like, you can press F9 again to toggle off the breakpoint.
Set a watch
Sometimes you might want to keep track of the value of a variable as your program executes. You can do this by setting a watch on the variable.
Place the insertion point inside the loop. In the Watch window, select the plus sign and in the text box, type word , which is the name of the loop variable. Now view the Watch window as you step through the loop.
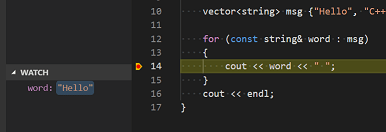
Add another watch by adding this statement before the loop: int i = 0; . Then, inside the loop, add this statement: ++i; . Now add a watch for i as you did in the previous step.
To quickly view the value of any variable while execution is paused on a breakpoint, you can hover over it with the mouse pointer.
Customize debugging with launch.json
When you debug with the play button or F5 , the C++ extension creates a dynamic debug configuration on the fly.
There are cases where you’d want to customize your debug configuration, such as specifying arguments to pass to the program at runtime. You can define custom debug configurations in a launch.json file.
To create launch.json , choose Add Debug Configuration from the play button drop-down menu.
You’ll then see a dropdown for various predefined debugging configurations. Choose C/C++: cl.exe build and debug active file.
VS Code creates a launch.json file, which looks something like this:
In the JSON above, program specifies the program you want to debug. Here it is set to the active file folder ( $ ) and active filename with the .exe extension ( $ .exe ), which if helloworld.cpp is the active file will be helloworld.exe . The args property is an array of arguments to pass to the program at runtime.
By default, the C++ extension won’t add any breakpoints to your source code and the stopAtEntry value is set to false .
Change the stopAtEntry value to true to cause the debugger to stop on the main method when you start debugging.
From now on, the play button and F5 will read from your launch.json file when launching your program for debugging.
C/C++ configurations
If you want more control over the C/C++ extension, you can create a c_cpp_properties.json file, which will allow you to change settings such as the path to the compiler, include paths, C++ standard (default is C++17), and more.
You can view the C/C++ configuration UI by running the command C/C++: Edit Configurations (UI) from the Command Palette ( ⇧⌘P (Windows, Linux Ctrl+Shift+P ) ).
This opens the C/C++ Configurations page. When you make changes here, VS Code writes them to a file called c_cpp_properties.json in the .vscode folder.
Visual Studio Code places these settings in .vscode\c_cpp_properties.json . If you open that file directly, it should look something like this:
You only need to add to the Include path array setting if your program includes header files that are not in your workspace or in the standard library path.
Compiler path
The compilerPath setting is an important setting in your configuration. The extension uses it to infer the path to the C++ standard library header files. When the extension knows where to find those files, it can provide useful features like smart completions and Go to Definition navigation.
The C/C++ extension attempts to populate compilerPath with the default compiler location based on what it finds on your system. The extension looks in several common compiler locations.
The compilerPath search order is:
- First check for the Microsoft Visual C++ compilerOpe
- Then look for g++ on Windows Subsystem for Linux (WSL)
- Then g++ for Mingw-w64.
If you have g++ or WSL installed, you might need to change compilerPath to match the preferred compiler for your project. For Microsoft C++, the path should look something like this, depending on which specific version you have installed: «C:/Program Files (x86)/Microsoft Visual Studio/2017/BuildTools/VC/Tools/MSVC/14.16.27023/bin/Hostx64/x64/cl.exe».
Reusing your C++ configuration
VS Code is now configured to use the Microsoft C++ compiler. The configuration applies to the current workspace. To reuse the configuration, just copy the JSON files to a .vscode folder in a new project folder (workspace) and change the names of the source file(s) and executable as needed.
Run VS Code outside the Developer Command Prompt
In certain circumstances, it isn’t possible to run VS Code from Developer Command Prompt for Visual Studio (for example, in Remote Development through SSH scenarios). In that case, you can automate initialization of Developer Command Prompt for Visual Studio during the build using the following tasks.json configuration:
Note: The path to VsDevCmd.bat might be different depending on the Visual Studio version or installation path. You can find the path to VsDevCmd.bat by opening a Command Prompt and running dir «\VsDevCmd*» /s .
Troubleshooting
The term ‘cl.exe’ is not recognized
If you see the error «The term ‘cl.exe’ is not recognized as the name of a cmdlet, function, script file, or operable program.», this usually means you are running VS Code outside of a Developer Command Prompt for Visual Studio and VS Code doesn’t know the path to the cl.exe compiler.
VS Code must either be started from the Developer Command Prompt for Visual Studio, or the task must be configured to run outside a Developer Command Prompt.
Похожие публикации:
- Как изменить цвет текста в libreoffice impress
- Как называется вот эта программа
- Как вывести последнюю цифру числа в c
- System image в twrp что это