
How to run a C program in Visual Studio Code?
A visual studio code is a lightweight software application with a powerful source code editor that runs on the desktop. It is a free source code editor developed by Microsoft for Windows, Mac OS and Linux. It is a software editor that has a rich extension of various languages like C++, C+, C, Java, Python, PHP, Go, etc. and runtime language extensions such as .NET and Unity. It is easy to edit, build, syntax highlighting, snippets, code refactoring and debugging. In visual studio code, we can change the application’s background theme, keyboard shortcuts set on our preferences, install an extension and add additional functionality.
Prerequisites for running a C program in Visual Studio Code
- We should have a basic knowledge of C programming.
- The Visual Studio Code Editor must be installed in the system.
- Download the C/C++ Extension. It is an extension provided by Microsoft that support visual studio code. It helps in IntelliSence, debugging and code browsing of the programming code in the visual studio.
- Download the C/C++ compilers. There are some popular compilers are:
- GCC on Linux
- GCC via Mingw-w64 on Windows
- Microsoft C++ compiler on windows
- Clang for XCode on MacOS
We have already installed the Visual Studio Code in our system. The user interface of VS code look like the following:
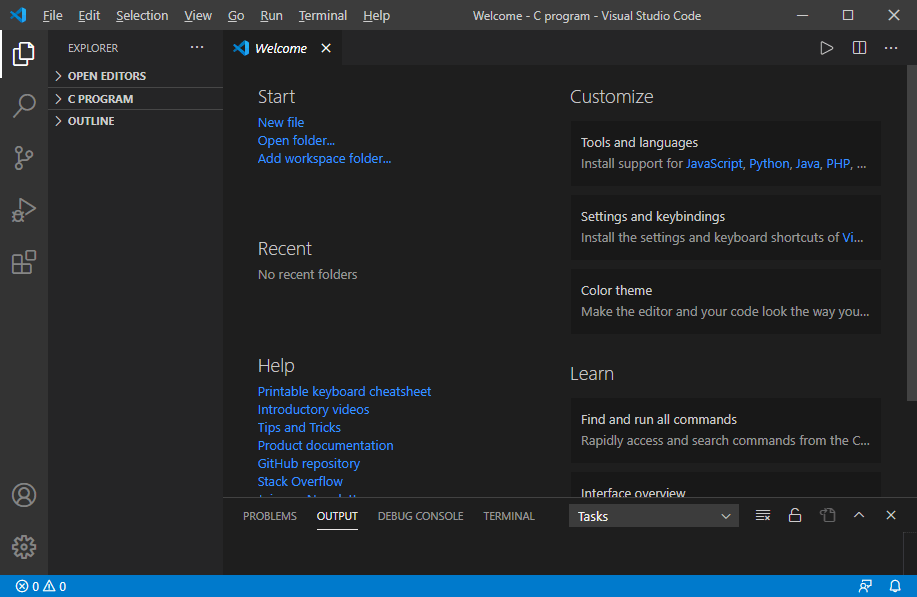
Download & Install the C/C++ Extension
1. We need to click on the extension button that displays a sidebar for downloading and installing the C/C++ extension in the visual studio code. In the sidebar, type C Extension.
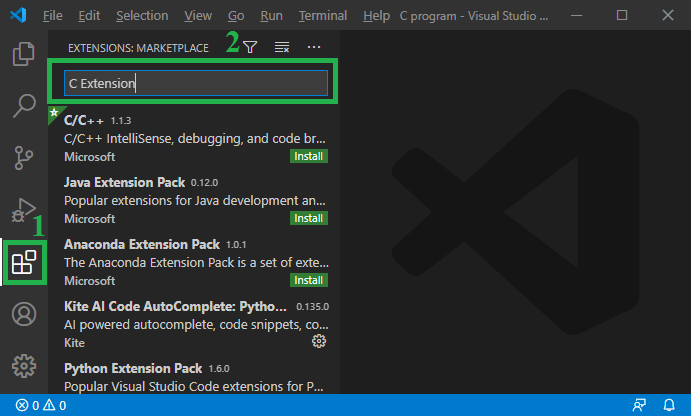
2. After that, click on the C/C++
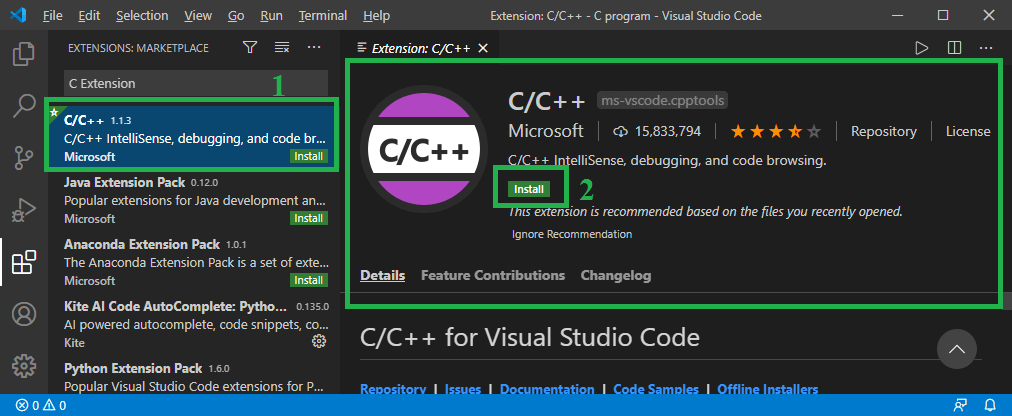
In this image, click on the Install button to install the C/C++ extension.
3. After clicking the Install button, it shows the below image.
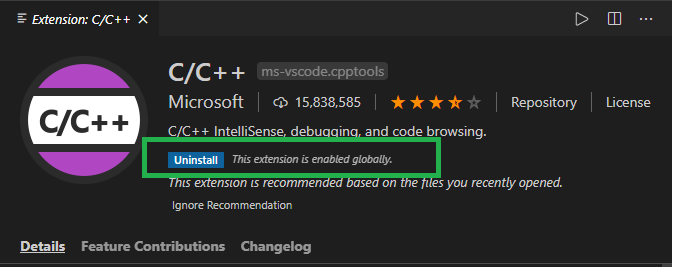
In this image, we can see it shows the Uninstall button that means the C/C++ extension has been successfully downloaded in the visual studio code.
In this image, we can see it shows the Uninstall button that means the C/C++ extension has been successfully downloaded in the visual studio code.
Download and Install Compiler Extension
A MinGW is an advanced GCC compiler software used to compile and execute code. It is software that supports only the window operating system.
Download the MinGW-w64 Compiler
1. Go to the https://sourceforge.net/projects/mingw We land on the following page.
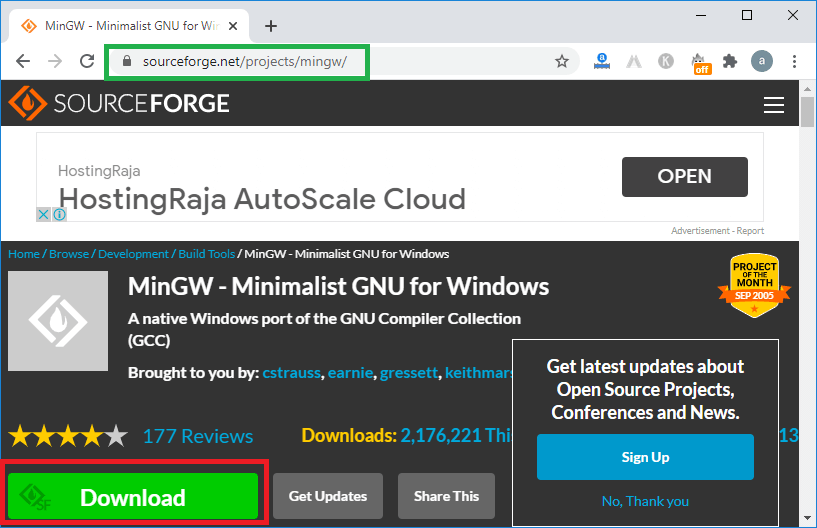
2. After that, click on the Download button, then it starts the downloading of the MinGW GCC compiler, as we can see in the below image.
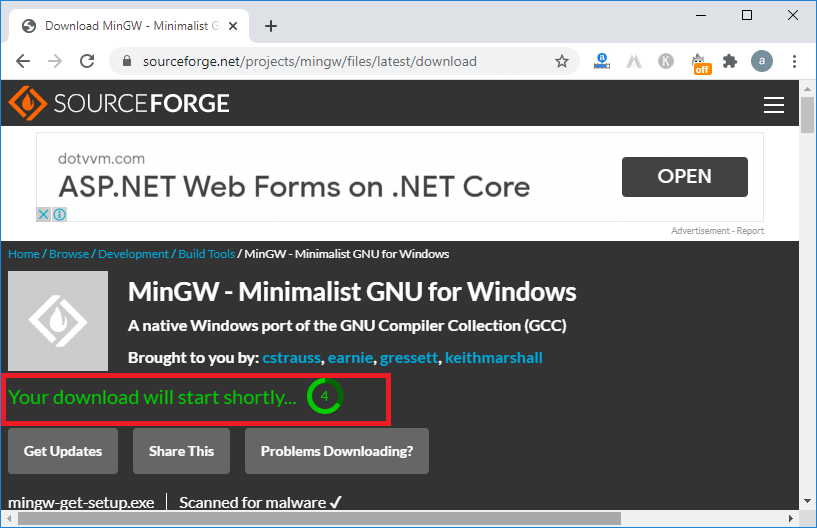
3. MinGW software has been successfully downloaded into the system.
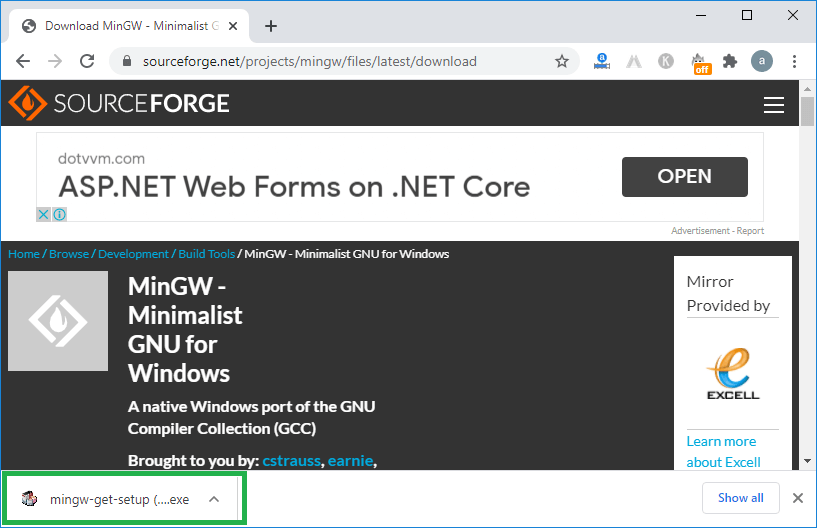
4. Now we double-click on the MinGW set up to install the compiler.
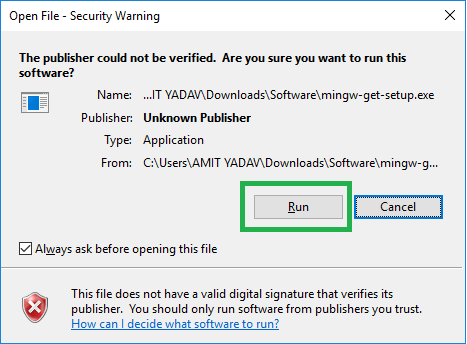
As we can see, it shows that it is a harmful file click on the Run button to proceed with installing the setup.
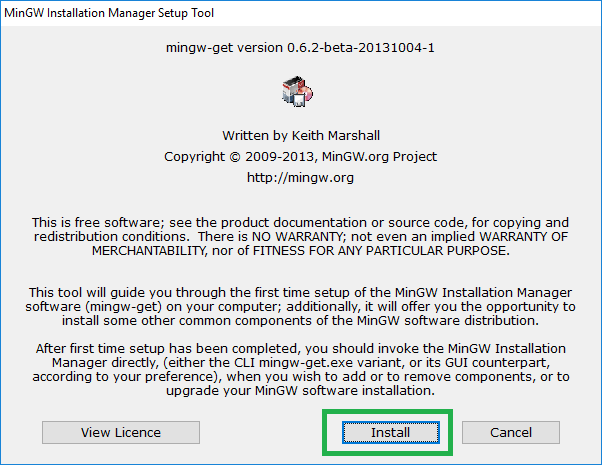
5. Click on the Install
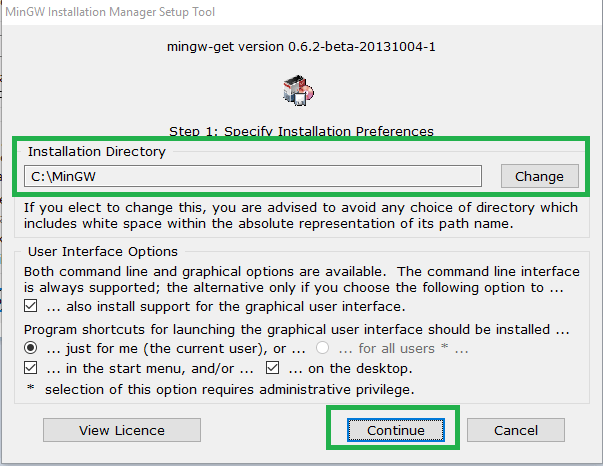
6. Set it defaults, or we can change the storage location of the setup. After that, click on the Continue
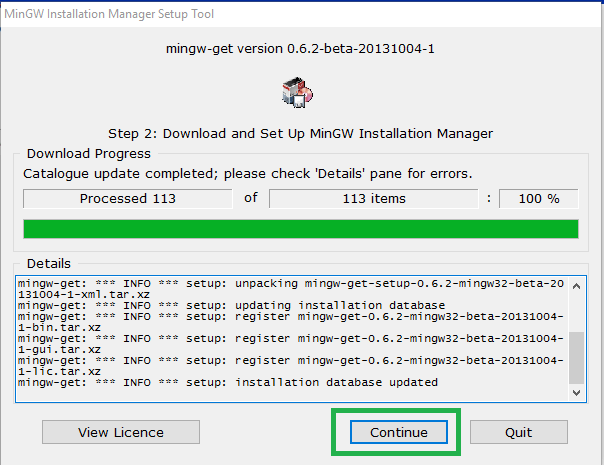
7. After clicking the continue button, it shows step 2 of MinGW Installation Manager.
8. As we click on the Continue, it shows the below image. In the MinGW Installation Manager, we need to check the Mingw32-base package and Ming32-gcc-g++ package to run and compile the C/ C++ program in the visual studio code editor.
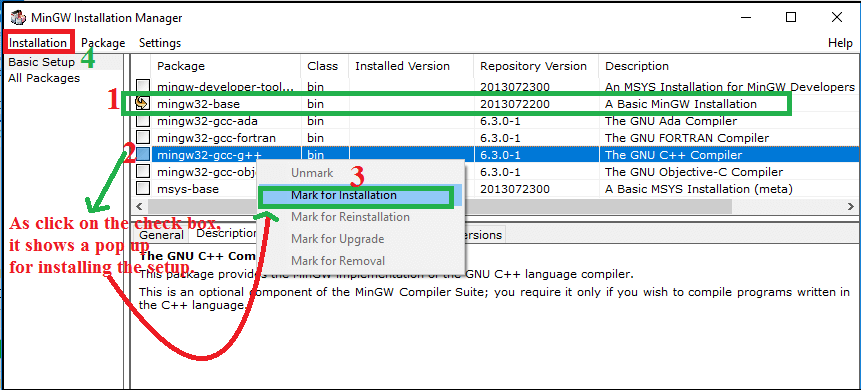
9. After selecting the checkbox, click on the Installation tab (at the top left corner of the dialog box).
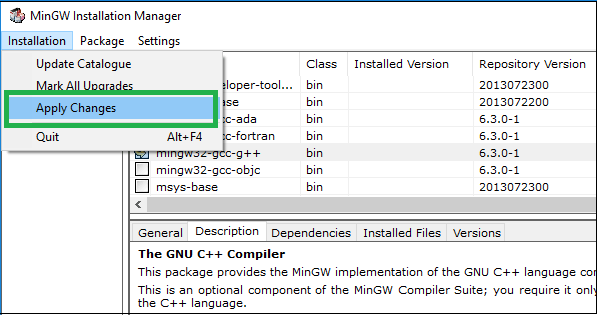
Here we click on Apply Changes to set the package’s installation in MinGW, as given below.
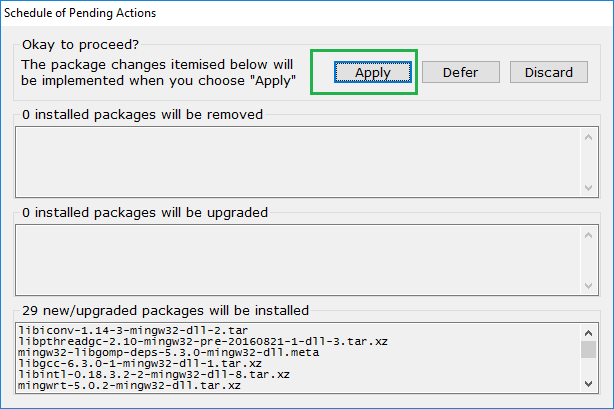
10. After click on the Apply button, it shows the below image.
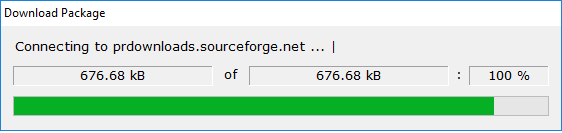
11. After downloading the packages, it shows the installation process of the package, as shown below.
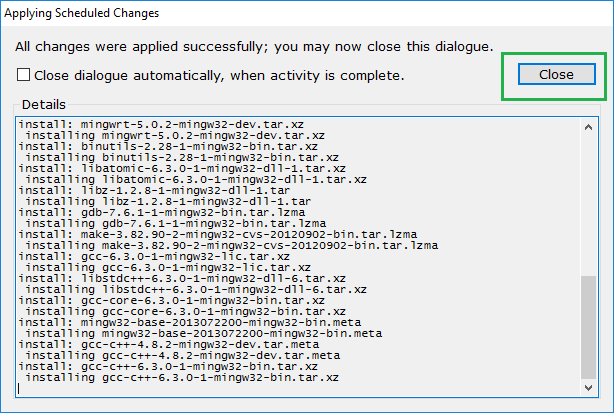
Here we can see all the changes have been successfully applied and then click on the Close button.
Set the Environment Path for the MinGW Set Up
After downloading and installing the MinGW compiler, we now set the environment path to include the C/C++ compiler directory.
1. Go to the installation directory of the MinGW Set Up. Here we installed the setup at the C drive, as shown below.
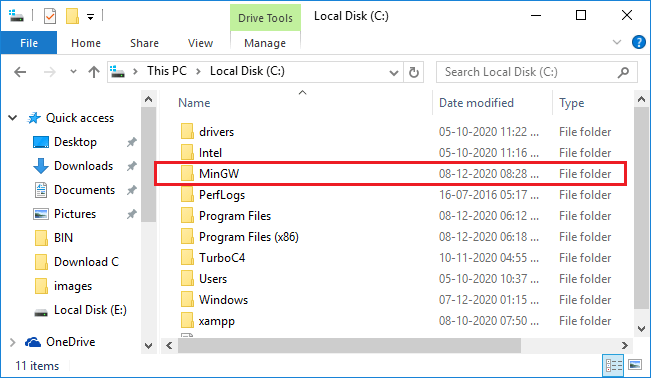
2. Double click on the MinGW folder. It shows the below image.
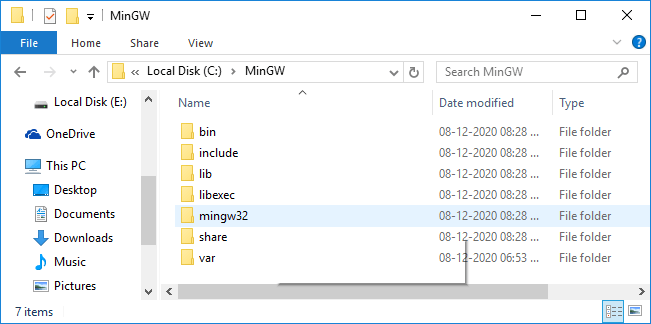
3. After that, click on the bin folder and then copy the directory path, as shown below.
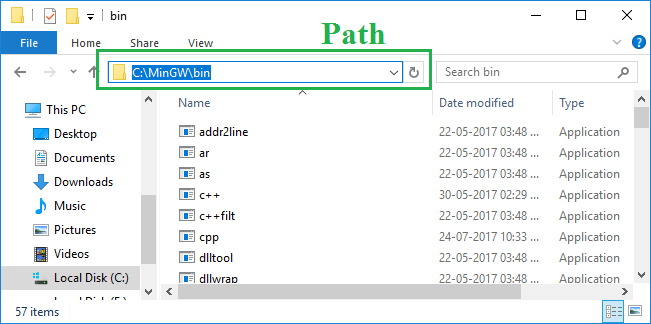
Here is the path of the MinGW folder path: C:\MinGW\bin
4. After copying the directory path, go to This PC -> Right Click on This PC -> Select/ Click on the Properties. It shows the below image.
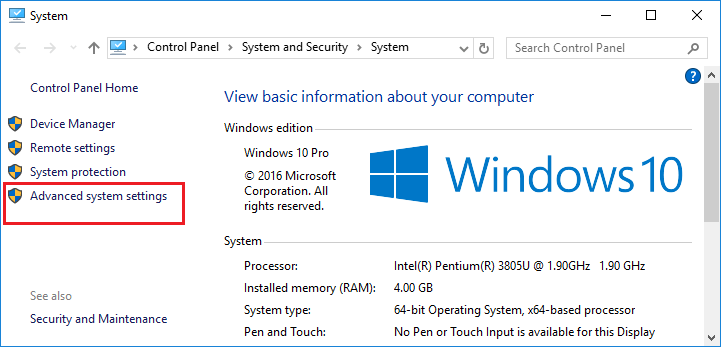
5. After that, click on the Advanced system settings to display a popup box of System Properties, as shown below.
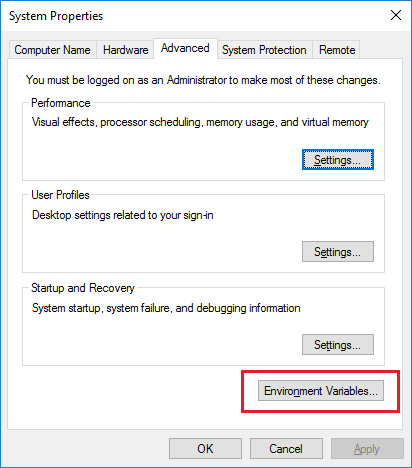
6. Click on the Environment Variables to set the directory path, as shown below.
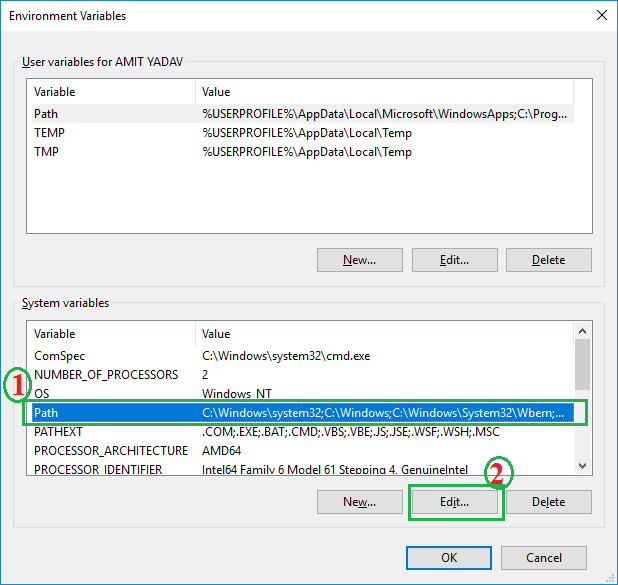
First, we have to click on the System Variables Path and then click on the Edit button, as shown in the above image.
7. As we click on the Edit button, it shows a popup window to set a new path, as shown below.
In the above image, first, we click on the New button and then paste the C:\MinGW\bin path; after that, click the OK button.
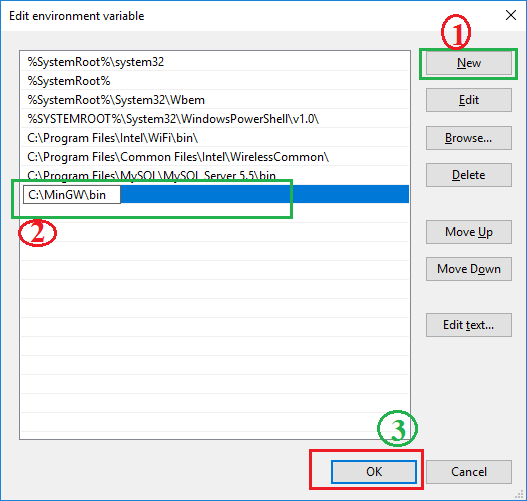
8. Similarly, click the OK button to the Environment Variables and System Properties.
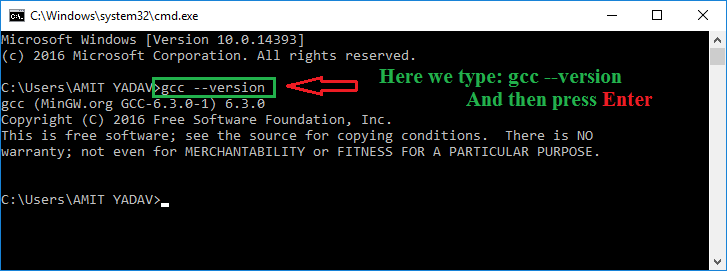
9. If we want to check that the MinGW has been successfully installed in the system: go to the Command Prompt or cmd, write the gcc -version, and press the Enter
Start Coding in the Visual Studio Code Editor
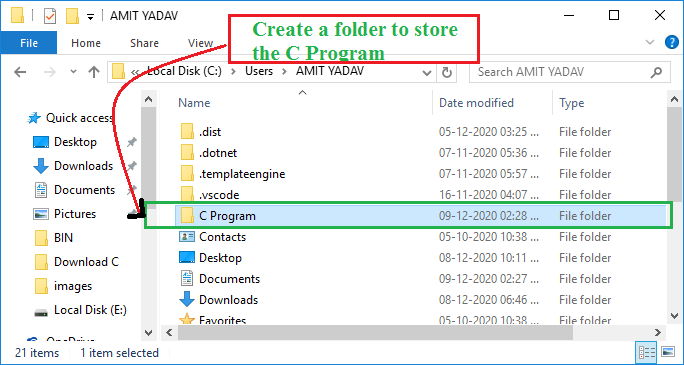
1. Here we created a C Program folder to store all program code. We can create a folder with any name in any directory.
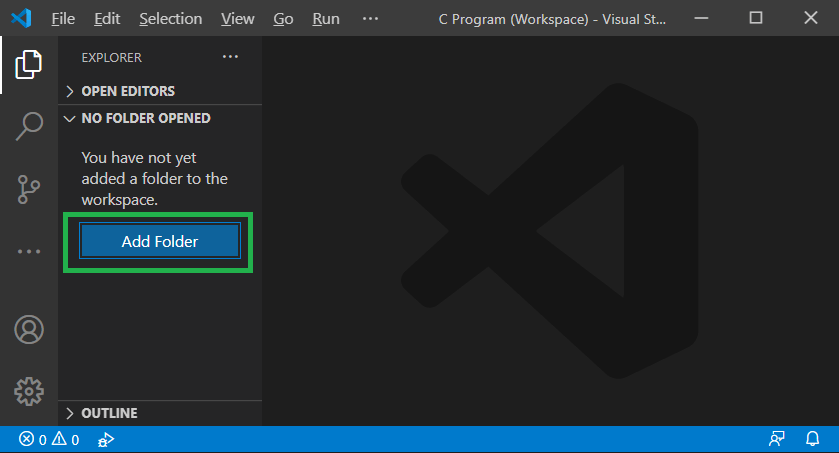
2. Go to the VS Code and click on the Add Folder.
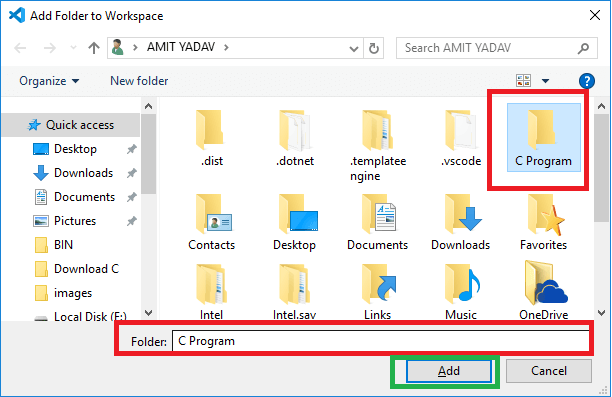
3. As we click on the Add Folder, it shows a popup dialog box to select the folder to store the program.
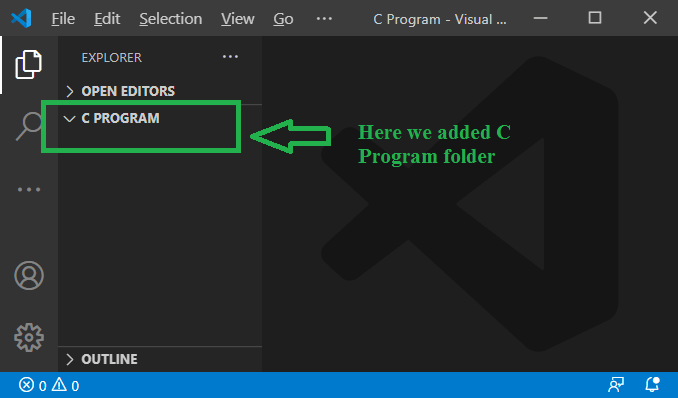
4. After selecting the folder, click on the Add The selected folder appears in the explorer section, as we have shown below.
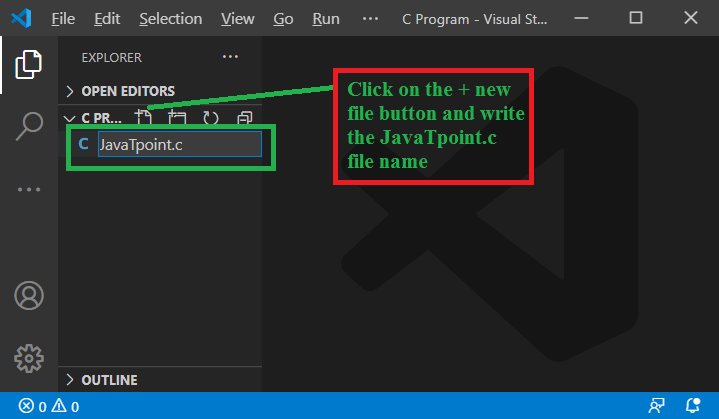
5. Move the mouse over the C PROGRAM folder; it shows a + Click on the button and write the file name as JavaTpoint.c, as shown below.
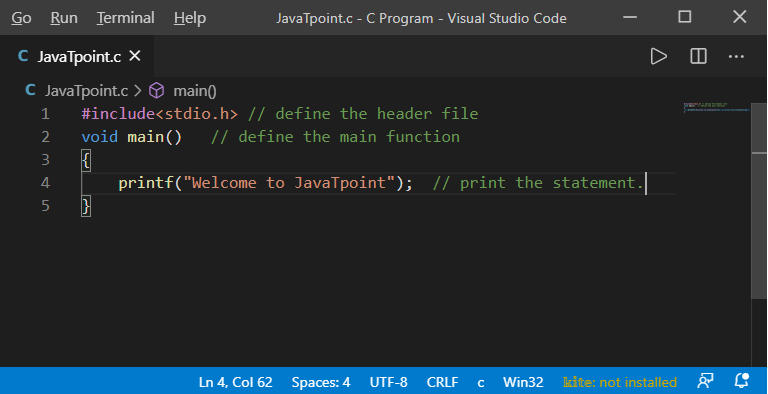
Now write and understand simple C programming in the VS Code editor.
JavaTpoint.c
After writing the code, right-click on the program, as shown below.
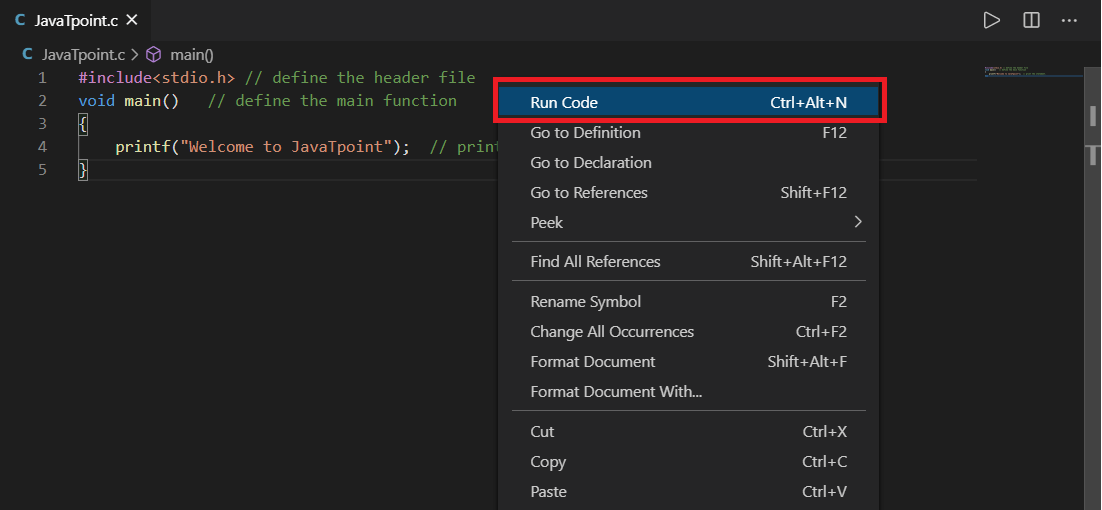
Click on the Run Code option or press Ctrl + Alt + N from the button. It shows the following output.
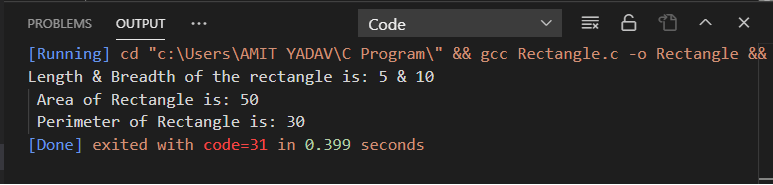
Let’s write a program to calculate the area and perimeter of the rectangle in the VS Code editor.
Rectangle.c
We can click on the Run button or press the Ctrl + Alt + N from the keyboard. It displays the below output.
Let’s write another C program to take an input from the user in the Visual Studio Code Editor.
Rectangle2.c
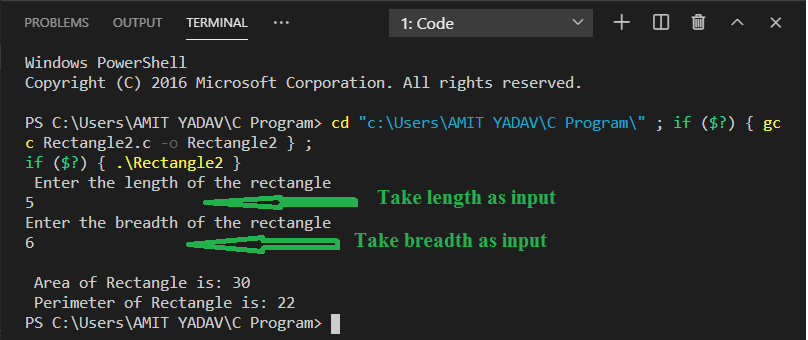
When we click on the Run button or press the Ctrl + Alt + N, it displays the below output.
In the above program, we take length and breadth as input from the keyboard. As the program is compiled, it produces the below statement.

Here Output tab is read-only, and hence we cannot take any input from the user. So, we need to add some steps in the code editor to take user inputs from the console/user.
Following are the steps to take input from the user.
- First of all, we need to stop the background running the c program by pressing the Alt + Ctrl + M from the keyboard.
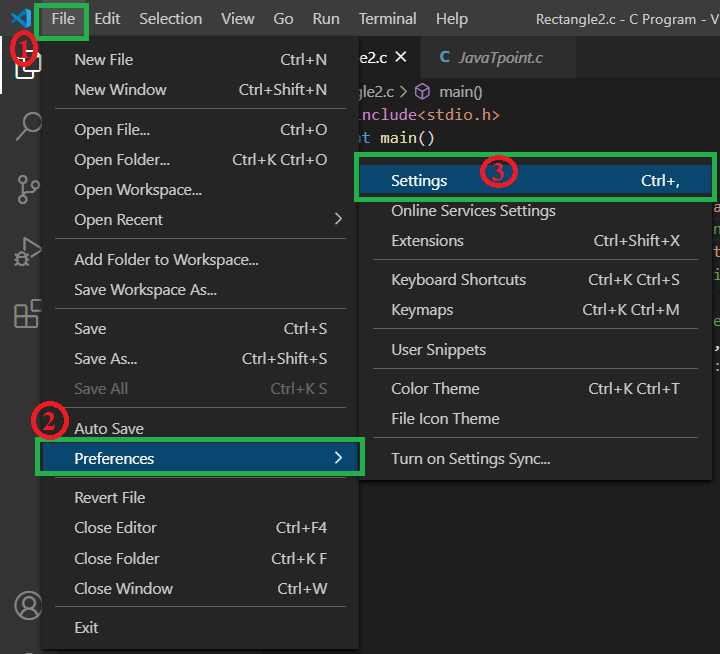
- After stopping the C file, go & click the File button at the top left corner of the Visual Studio Code Editor, and select the Settings via Preferences, as shown below image.
- After clicking the Settings, it shows the image below.
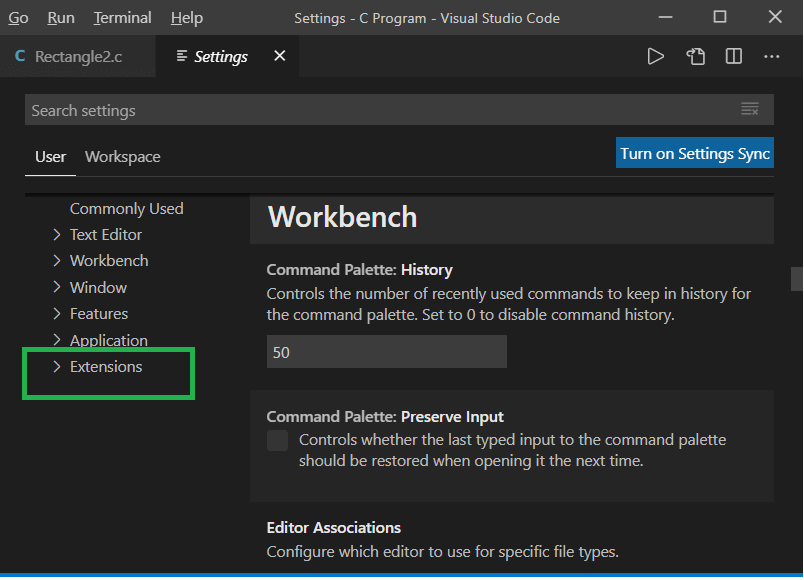
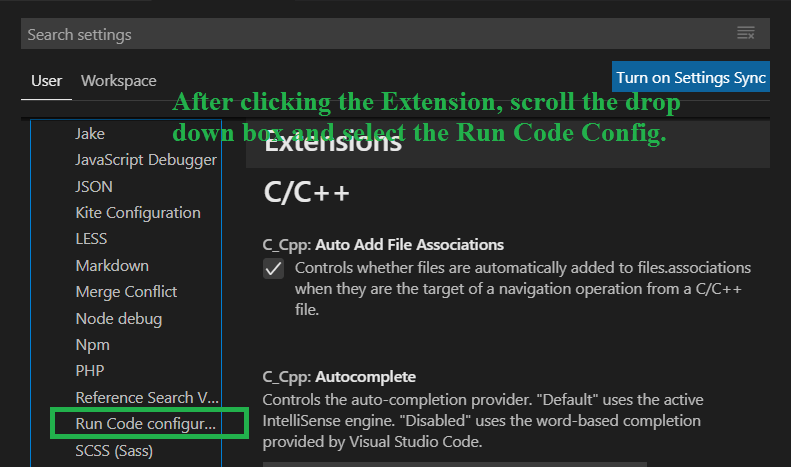
In this image, select the extension button to set the settings for the C Compiler. - Click on the Extension button and scroll the drop-down box to select the Run Code Configuration.
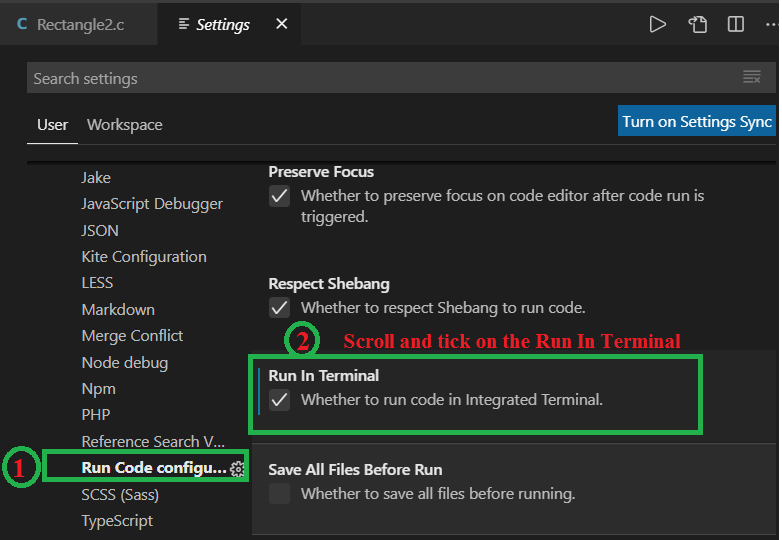
- Now scroll the right-side pane and Tick on the Run In Terminal.
- Go to the c and again execute the program by clicking on the Run, it produces the following results, as shown below.
Next Topic Modulus Operator in C/C++

For Videos Join Our Youtube Channel: Join Now
Feedback
- Send your Feedback to [email protected]
Как запустить код в Visual Studio Code

Работа в VS Code
Автор admin На чтение 4 мин Просмотров 10.3к. Опубликовано 18.10.2021
Один из самых популярных редакторов исходного кода Visual Studio Code очень удобен для начинающих. Удобный интерфейс и расширенные возможности привлекают как начинающих, так и опытных программистов.
Если вы новичок в VS Code и ищете упрощенное руководство по запуску кода, вы попали по адресу. Мы расскажем вам о настройке необходимого программного обеспечения и выполнении кода с использованием знакомых языков, таких как C/C++ и Python.
Запуск C++ кода
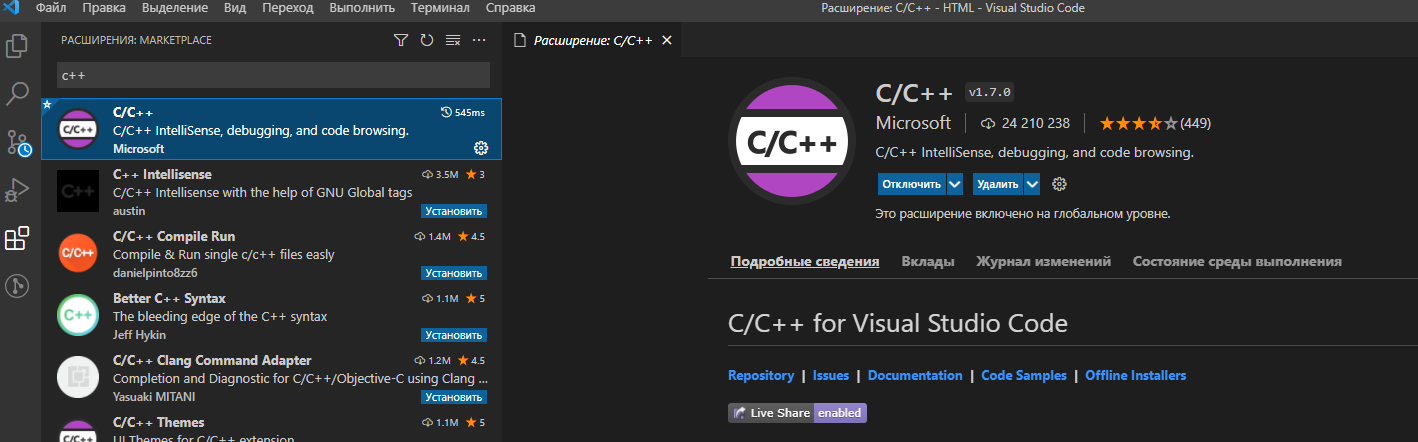
- Откройте VS Code.
- Выберите значок просмотра расширений на панели активности или используйте комбинацию клавиш (Ctrl+Shift+X).
- Введите в строку поиска ‘C++’.
- Установите плагин.
После установки расширения, при открытии или создании *.cpp файла у вас будет подсветка синтаксиса, интеллектуальные завершения (IntelliSense), а также проверка ошибок.
Установка компилятора
C++ — компилируемый язык, то есть исходный код программы должен быть переведен (скомпилирован), прежде чем он будет запущен на компьютере. VS Code — это, прежде всего, редактор, и для выполнения большей части рабочего процесса разработки он полагается на инструменты командной строки. Расширение C/C++ не включает компилятор C++ или отладчик. Нужно будет установить эти инструменты или использовать уже установленные на вашем компьютере.
Возможно, компилятор и отладчик C++ уже есть в вашей учебной или рабочей среде разработки. Узнайте у своих преподавателей или коллег, как установить рекомендуемый набор инструментов C++ (компилятор, отладчик, проектную систему, линтер).
На некоторых платформах, таких как Linux или macOS, компилятор C++ уже установлен. В большинстве дистрибутивов Linux установлен GNU Compiler Collection (GCC), а пользователи macOS могут получить инструменты Clang вместе с Xcode.
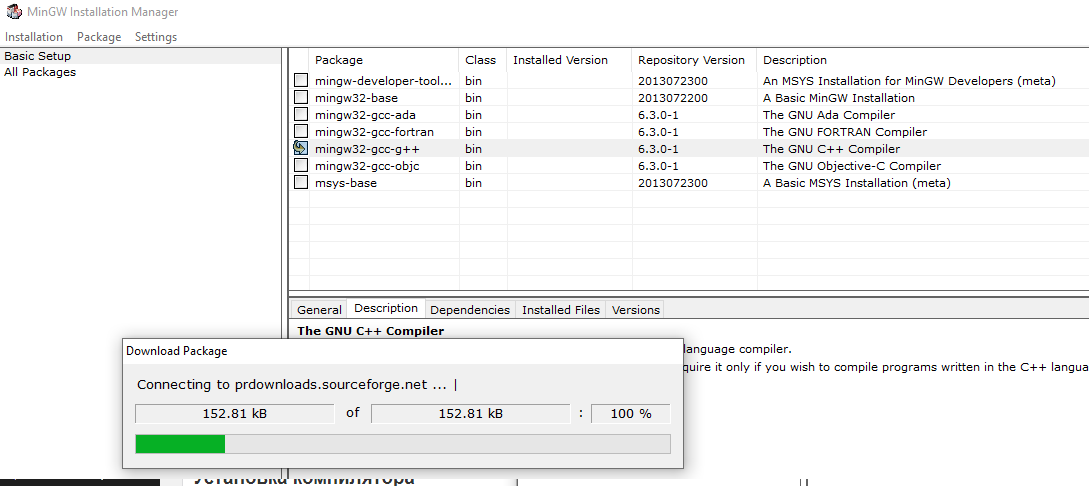
- Установите MinGW
- Выберите нужный компилятор, потом перейдите в вкладку installation и нажмите apply change для сохранения настроек. Компилятор начнет скачиваться.
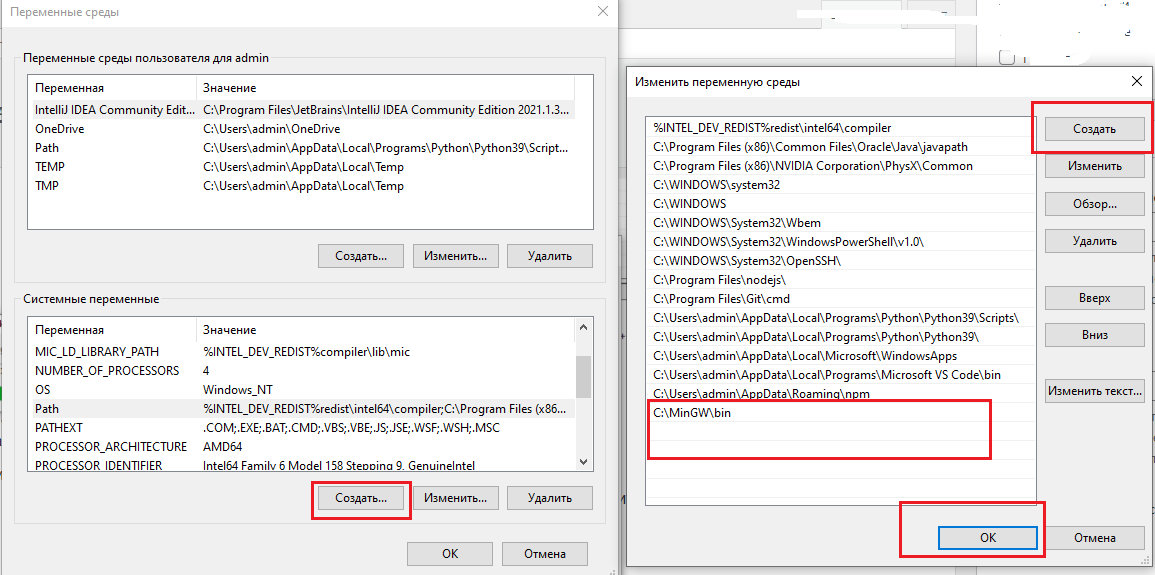
- Нужно, чтобы Windows распознал установленный компилятор. Для этого зайдите в папку где он установлен, обычно C:\MinGW\bin .
Вам необходимо найти вкладку «переменные среды». Для этого зайдите в мой компьютер, щелкните вкладку «свойства системы» => «дополнительные параметры системы» => «переменные среды». - Перейдите в раздел Системные переменные и нажмите создать. Добавьте новую переменную среды C:\MinGW\bin . Сохраните.
- Но и это еще не все =). Теперь вы можете написать свою программу в редакторе кода. Но запустить еще не сможете, осталось сделать файл сборки. Для этого нажмите компбинацию CTRL+SHIFT+B => Создать файл tasks.json из шаблона => others.
- В json файл вставьте данный код
Где main.cpp — имя вашего файлы.
При сохранении файла, копилятор скомпилирует программу и можно будет запустить ее в терминале.
Видеоинструкция для подробного ознакомления
- Как компилировать C/C++ в Visual Studio Code на Windows?
Запуск Python кода
- используйте сочетание клавиш Ctrl + Alt + N;
- или нажмите F1, а затем выберите Run Code (Запуск кода);
- или щелкните правой кнопкой мыши в текстовом редакторе и выберите Run Code в контекстном меню редактора;
- или нажмите кнопку Run Code в меню заголовка редактора.
Чтобы остановить запущенный код:
- используйте сочетание клавиш Ctrl + Alt + M
- или нажмите F1, а затем выберите Stop Code Run
- или щелкните правой кнопкой мыши на выходном канале и выберите Stop Code Run в контекстном меню.
Если вы хотите добавить путь к Python, вы можете перейти в меню Файл → Предпочтения → Настройки и добавить путь к Python, как показано ниже:
«code-runner.executorMap»:
«python»: «\»C:\\\Program Files\\\\Python35\\\python.exe\» -u»
>Если вы уже установили расширение Python и вручную настроили интерпретатор, вы можете настроить ваш файл settings.json следующим образом:
«python.pythonPath»: «C:\\\\python36\\\\python36.exe»,
«code-runner.executorMap»:
«python»: «$pythonPath -u $fullFileName».
>
>Как запустить HTML, JS
Html файл вы можете открыть с помощью браузера, VS code может только редактировать содержимое документа.
Запуск JS кода приведен в видео руководстве.

- Настройка Visual Studio Code для разработчика 2021 // Vs code для html, css, javascript, php
Working with C#
The C# support in Visual Studio Code is optimized for cross-platform .NET development (see working with .NET and VS Code for another relevant article). Our focus with VS Code is to be a great editor for cross-platform C# development by providing a rich C# editing experience, AI-powered development, solution management, and integrated testing experiences
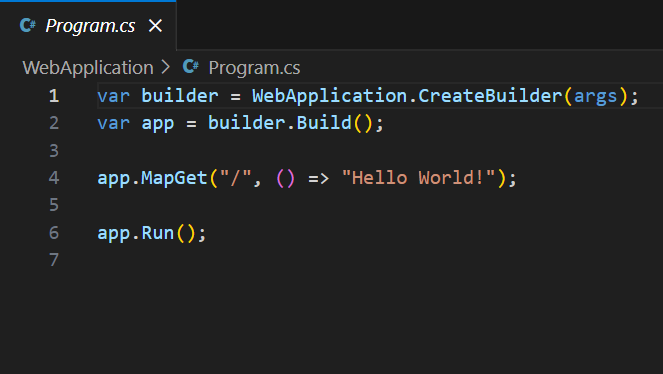
VS Code supports debugging of C# applications running on either .NET or Mono.
For detailed instructions on:
- .NET debugging — see the C# Dev Kit debugging documentation.
- Mono debugging — see the Mono Debug extension’s README.
Installing C# support
C# language support is provided with the C# Dev Kit extension. You can install it from within VS Code by searching for ‘C# Dev Kit’ in the Extensions view ( ⇧⌘X (Windows, Linux Ctrl+Shift+X ) ) or if you already have a project with C# files, VS Code will prompt you to install the extension as soon as you open a C# file.
For more information about the C# Dev Kit extension, see the C# documentation.
C# Dev Kit
Visual Studio Code uses the power of Roslyn and C# Dev Kit to offer an enhanced C# experience. We offer support for:
- .NET projects
- MSBuild projects
- C# scripts (CSX)
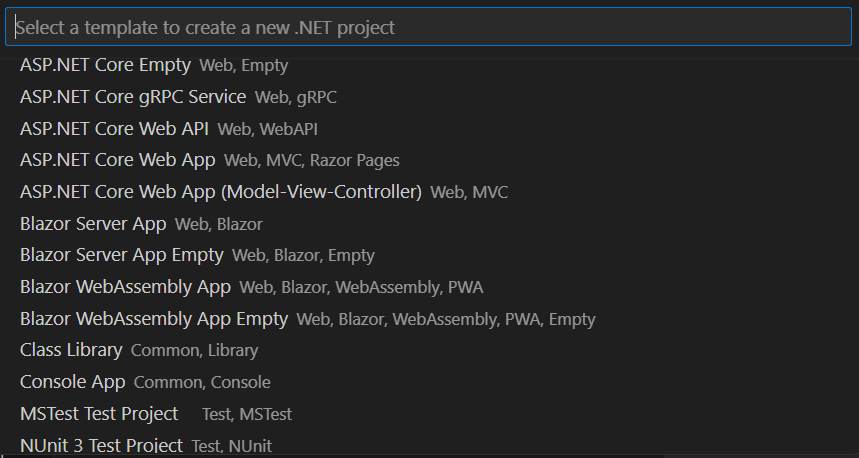
Supported .NET project types include:
- ASP.NET Core App
- ASP.NET Core Web API
- ASP.NET Core MVC Web App
- Blazor Server App
- Blazor WebAssembly App
- Console App
To find a full list of supported project types within VS Code, open the Command Palette and search for .NET: New Project... This will display a full list of supported project types.
When you open a Workspace that contains .NET solution files or project files, the Solution Explorer will automatically appear. If you have a single solution file (.sln file) in the workspace, the Solution Explorer will detect that file and automatically load it after the workspace is loaded. For more information on managing your C# projects in VS Code, look at the documentation on Project Management.
Editing Evolved
There is a lot to discover with C# and the editor, such as format on type, IntelliSense, the rename-refactoring, etc.

For more information on the C# Dev Kit editing features, go to the Navigate and Edit documentation. For a full description of VS Code editing features, go to the Basic Editing and Code Navigation documentation.
Here are a few highlights.
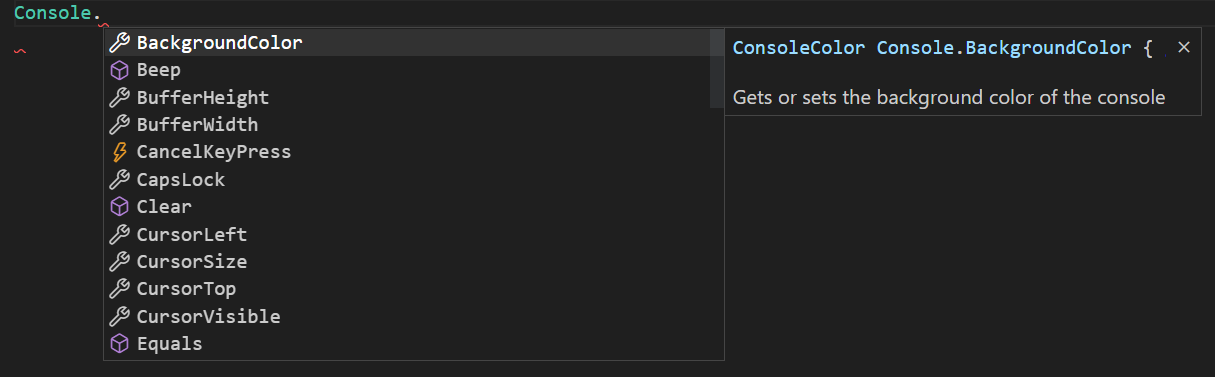
IntelliSense
IntelliSense just works: hit ⌃Space (Windows, Linux Ctrl+Space ) at any time to get context specific suggestions.
Enhance completions with AI
GitHub Copilot is an AI-powered code completion tool that helps you write code faster and smarter. You can use the GitHub Copilot extension in VS Code to generate code, or to learn from the code it generates.

GitHub Copilot provides suggestions for numerous languages and a wide variety of frameworks, and it works especially well for Python, JavaScript, TypeScript, Ruby, Go, C# and C++.
You can learn more about how to get started with Copilot in the Copilot documentation.
Snippets for C#
For information on snippets in C# Dev Kit, go to the Navigate and Edit documentation. There are also several built-in snippets included in VS Code that will come up as you type or you can press ⌃Space (Windows, Linux Ctrl+Space ) (Trigger Suggest) and we will give you a context specific list of suggestions.
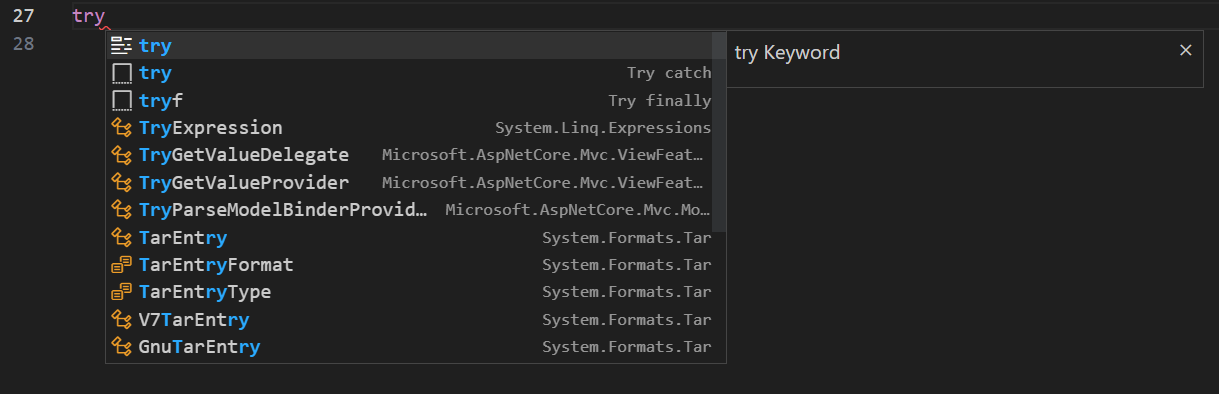
Tip: You can add in your own User Defined Snippets for C#. Take a look at User Defined Snippets to find out how.
Search for Symbols
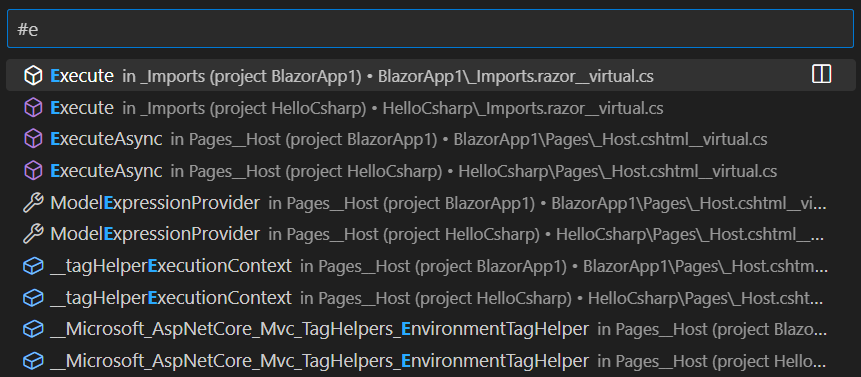
There are also features outside the editor. One is the ability to search for symbols from wherever you are. Hit ⌘T (Windows, Linux Ctrl+T ) , start typing, and see a list of matching C# symbols. Select one and you’ll be taken straight to its code location.
CodeLens
Another cool feature is the ability to see the number of references to a method directly above the method. Click on the reference info to see the references in the Peek view. This reference information updates as you type.
Note: Methods defined in object , such as equals and hashCode do not get reference information due to performance reasons.
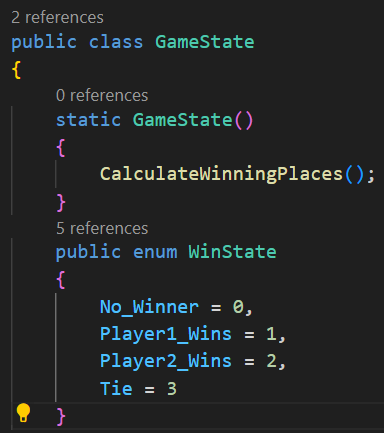
Tip: You can turn off references information displayed in CodeLens with the editor.codeLens setting.
Find References/Peek Definition
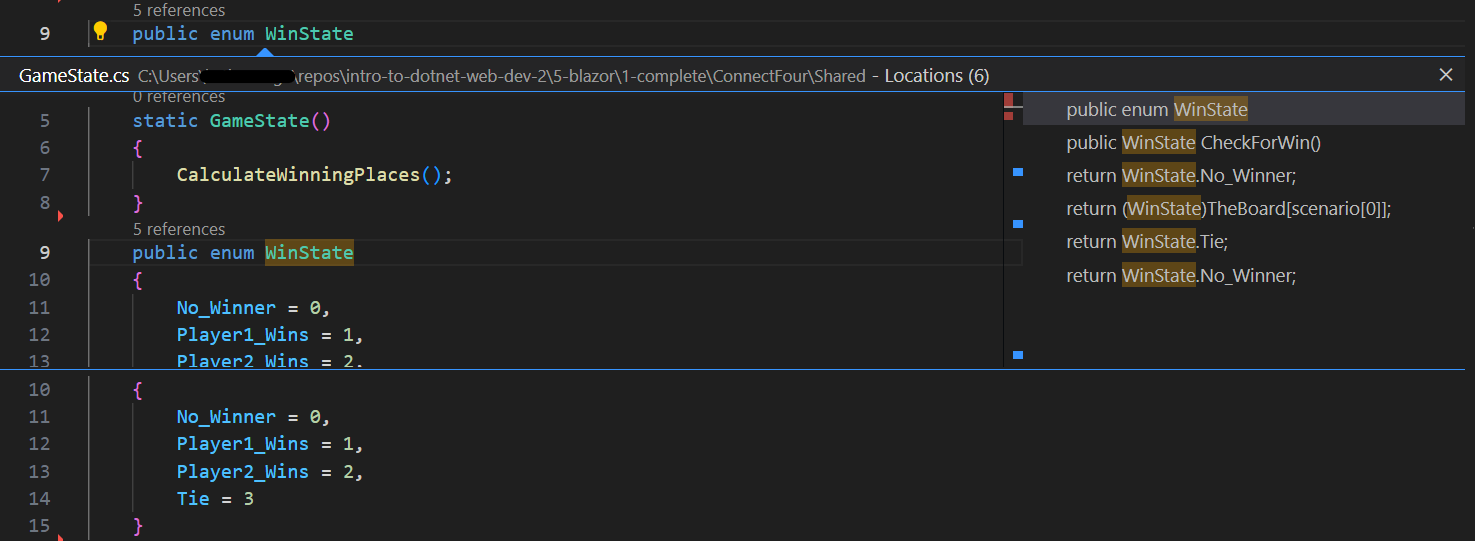
You can click on the references of an object to find the locations of its use in place without losing context. This same experience works in reverse where you can Peek the definition of an object and see it inline without leaving your location. For information on Peek Definition in C# Dev Kit, go to the Navigate and Edit documentation.
Quick Fixes / Suggestions
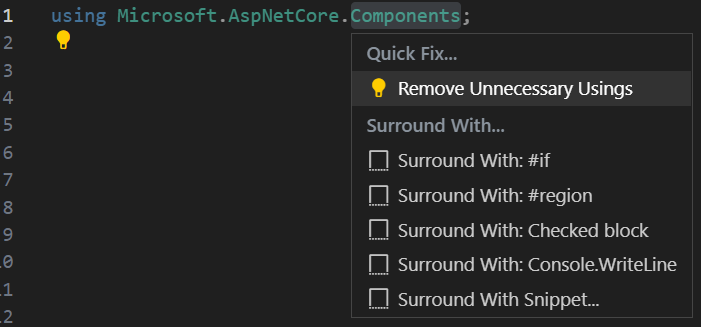
There are some basic quick fixes supported in VS Code. You will see a lightbulb and clicking on it, or pressing ⌘. (Windows, Linux Ctrl+. ) provides you with a simple list of fixes/suggestions.
Testing
The extension supports the following test frameworks:
The C# Dev Kit extension provides the following features:
- Run/Debug tests cases
- View test report
- View tests in Testing Explorer
Next steps
Read on to find out about:
- C# Dev Kit documentation
- .NET Development — get up and running with cross-platform .NET
- Basic Editing — Learn about the powerful VS Code editor.
- Tasks — Use tasks to build your project and more.
- Debugging — Find out how to use the debugger with your project.
- Unity development — Learn about using VS Code with your Unity projects.
Как настроить Visual Studio Code на работу с С++?
как настроить Visual Studio Code на работу с С++ после установки нужных плагинов? Visual Studio не подходит, ест много ресурсов, да и функционал немного другой.
Отслеживать
задан 31 авг 2020 в 19:41
usernameusername usernameusername
23 1 1 золотой знак 1 1 серебряный знак 3 3 бронзовых знака
Документацию читали?
31 авг 2020 в 19:47
Компилятор установлен? VSCode просто навороченный блокнот.
31 авг 2020 в 19:48
Visual Studio ест меньше ресурсов, VS Code — это же браузерное решение.
31 авг 2020 в 20:11
нужно мало ресурсов — vim/emacs наше все:)
31 авг 2020 в 20:14«после установки нужных плагинов» Вопрос интересно поставлен. Половина настройки как раз в выборе хороших плагинов. Что вы уже поставили?
31 авг 2020 в 20:27
1 ответ 1
Сортировка: Сброс на вариант по умолчанию
примерно год назад я точно так же не мог с первого раза настроить VS Code.
Как справедливо указали в комментариях — есть прекрасная официальная документация по настройке. Тем не менее, я оставлю свой ответ, так как он более детальный в некоторых моментах. А в других моментах — менее детальный 🙂
Чтобы настроить VSC, хорошо бы научиться компилировать и запускать Вашу программу из командной строки. А потом настройки, котрые для этого понадобились, добавить в правильные места в файлах конфигурации VS code.
Труднность этого процесса именно в «зоопарке» разных возможностей. На этого не стоит пугаться.
Кроме того, настройка немного отличатся для разных систем (Linux, windows, macos), а Вы не указали, какая система у вас.
Я приведу пример настройки для компилятора gcc под Win64. Можно повторить мои шаги, а когда получится — сделать самостотельную настройку, например, на другой компилятор.
- Устанавливаем msys2. Я установил его в C:\Programs\msys64 . При этом сам msys2 позаботился о том, чтобы путь к его директории C:\Programs\msys64\mingw64\bin оказался в path. Проверить это можно, выполнив в консоли команду path
- Устанавливаем компилятор и дебаггер. Я делаю это с помощью пакета msys2, выполнив в окне, котрое открывает msys2, следующие команды:
pacman -SyuuЭта команда обновляет msys2. Она может закрыть консоль — это нормально, нужно перезапустить ее и ввести ту же команду, чтобы завершить обновление. Хорошей идеей будет время от времени обновляться, чтобы всегда иметь последнюю версию компилятора. Затем:
pacman -S mingw-w64-x86_64-gcc pacman -S mingw-w64-x86_64-gdbТеперь в Вашей системе есть компилятор и дебаггер. Проверить это просто: открываем новое окно консоли, пишем g++ —version
Если ответом не является версия — надо поискать, что пошло не так. Проверить path, возможно, отредактировать его вручную.
Такую же проверку хорошо бы сделат для дебаггера: gdb —version
-
Пишем hello world. Это позволит нам окончательно убедиться, что компилятор работает. в любой директории созадем файл hello.cpp с текстом
#include int main() < std::cout ;потом в этой папке в командной строке компилируем командой g++ hello.cpp -o hello.exe Если появился файл hello.exe, и он запускается и вывоит строчку - ок, этот шаг завершен.
- А вот теперь можно поставить VSC. Обратите внимание, что редакций есть несколько, во первых для 32 и 64 битных систем, а во вторых - то, что назывется "User Installer" и "System Installer". Выбираем 64 битный System Installer на странице загрузки
- В VSC ставим расширение для работы с C++, оно называется C/C++ for Visual Studio Code и написано Microsoft
- Теперь запустим VSC в папке Вашего проекта. Пусть это будет папка C:\Projects\ . Делается это так: запускам консоль. Переходим в консоли в папку ( cd C:\Projects\ ). Запускаем VSC командой code . .
Важно то, что при этом создаётся папка настроек VSC, котрые находятся по пути C:\Projects\.vscode . В этой папке нужно создать 4 файла, я приведу их в минимальном варианте. Пути - для моей системы, где msys2 установлен в C:\Programs\msys64\ .
Файл tasks.json - отвечает за то, чтобы работала комбинация клавиш Ctrl+shift+B для сборки программы:
< "version": "2.0.0", "tasks": [ < "type": "shell", "label": "g++.exe build active file", "command": "C:/Programs/msys64/mingw64/bin/g++.exe", "args": [ "-std=c++17", "-g", "$", "-o", "$\\$.exe" ], "options": < "cwd": "C:\\Programs\\msys64\\mingw64\\bin" >, "problemMatcher": [ "$gcc" ], "group": < "kind": "build", "isDefault": true >> ] >Файл launch.json - отвечает за работу дебаггера:
< "version": "0.2.0", "configurations": [ < "name": "g++.exe build and debug active file", "type": "cppdbg", "request": "launch", "program": "$\\$.exe", "args": [], "stopAtEntry": false, "cwd": "$", "environment": [], "externalConsole": false, "MIMode": "gdb", "miDebuggerPath": "C:\\Programs\\msys64\\mingw64\\bin\\gdb.exe", "setupCommands": [ < "description": "Enable pretty-printing for gdb", "text": "-enable-pretty-printing", "ignoreFailures": true >], "preLaunchTask": "g++.exe build active file", "internalConsoleOptions": "neverOpen" > ] >Файл settings.json - как то отвечает за файловые ассоциации, возможно даже, что он не особо нужен. Но лишним не будет:
Файл c_cpp_properties.json - отвечает за расположение include - файлов:
< "configurations": [ < "name": "Win32", "includePath": [ "$/**", "C:/Programs/msys64/mingw64/include/**" ], "defines": [ "_DEBUG", "UNICODE", "_UNICODE" ], "windowsSdkVersion": "8.1", "compilerPath": "C:\\Programs\\msys64\\mingw64\\bin\\g++.exe", "cStandard": "c11", "cppStandard": "c++17", "intelliSenseMode": "gcc-x86" > ], "version": 4 >Если Вы создадите эти файлы, а потом заново запустите в этой директории VSC - то всё уже должно работать. То есть, программы на C++ будут компилироваться, запускаться в отладке (по F5) и показывать значения переменных в окне отладчика.
Теперь - самое важное. Как только заработает - Вам нужно эту папку .vscode копировать к корень каждой папки с проектом на C++. Это позволит VSC запускаться с Вашими настройками.
Даже если мой способ Вам не подходит напрямую - у Вас теперь есть все необходимые ключевые слова, чтобы использовать их для гуглежа.
PS. Время от времени попадаются полезные дополнительные возможности для настройки.
Вот такой фрагмент файла tasks.json позволяет очищать окно терминала перед каждым билдом - полезно, чтобы уже не видеть уже исправленных ошибок, оставшихся от предыдущей попытки сборки (Источник):
"presentation": < "clear": true //