
В чём разница между PAP и CHAP
PAP и CHAP – протоколы аутентификации, использующиеся в протоколе PPP. PAP расшифровывается банально – Password Authentication Protocol. Возможно такая простая расшифровка связана с тем, что протокол был одним из первых. CHAP расшифровывается как Challenge Handshake Authentication Protocol. В курсе CCNA затрагиваются оба этих протокола.
Как работает PAP?
Клиент хочет подключиться к серверу, он отправляет серверу пароль, сервер отвечает либо «Да», либо «Нет». Казалось бы, всё просто – зачем добавлять что-то ещё? Однако, всё становится сложнее, в случае если мы в силу каких-то обстоятельств обратились не к серверу, к, которому собирались, а к устройству злоумышленника. В этом случае получается, что спрашивая его, нравится ли ему наш пароль, мы по сути просто передаём ему пароль, с которым он в дальнейшем может делать всё что угодно. Чтобы избежать такой ситуации был придуман CHAP.
Как работает CHAP?
Клиент хочет обратиться к серверу, сервер передаёт клиенту случайную строку, клиент берёт пароль и эту строку и вычисляет от неё MD5 хеш, который возвращает серверу. Сервер проделывает те же операции (если он сам, конечно, знает правильный пароль). Если хеши слвпадают – клиент авторизован. Что мы получаем? Если клиент не знает пароль – хеши не совпадут, если вместо сервера злоумышленник – он получит только хеш, из которого ничего не выудить.
Таким образом, в реальных ситуациях лучше использовать протокол CHAP.
CHAP и PAP в настройках сим-карты телефона Android ? Инструкция
Password Authentication Protocol (PAP) — это самый распространенный и быстрый протокол аутентификации, который используется в протоколе PPP.
Как работает PAP?
При подключении клиента к серверу пароль передается в незашифрованном виде. Сервер дает ответ клиенту либо да пароль верный, либо нет. За счет этого PAP работает быстрее. Но некоторые «хакеры» пользуются этой особенностью, устанавливая ретранслятор сигнала от сотовой вышки в близи интересуемого объекта.
Телефон по умолчанию подключается к самому мощному источнику сигнала. В этом случае может оказаться ретранслятор хакеров. Собрав данные, отправленные методом аутентификации PAP, хакеры могут приступить к расшифровке. Как избежать утечки данных рассмотрим далее.
Что такое CHAP?
Challenge Handshake Authentication Protocol (CHAP) — это более современный и надежный протокол аутентификации, использующийся в протоколе PPP.
Как работает CHAP?
Сервер, при попытке подключения клиента, отправляет ему случайную строку (набор цифр и букв). Компьютер / телефон пользователя берет эту строку, добавляет к ней имеющийся пароль и хеширует по алгоритму MD5. Далее хэш отправляется на сервер, который делает то же самое и сравнивает хеши. Если они совпали, значит пароль верный.
В таком случае у злоумышленников, которые собирают данные остается только случайная строка в незашифрованном виде и хеш MD5. Это является главным преимуществом протокола проверки подлинности CHAP перед PAP.
MD5 — это односторонняя хэш-функция. В процессе преобразования пароля длиннее 6 символов в хэш большая часть исходных данных теряется, поэтому обратный процесс преобразования не даст восстановить пароль.
А так как в пароль добавлена случайная строка из цифр и букв, то это защищает от вероятности получения одинаковых хэшей.
Как настроить телефон / планшет в режиме CHAP?
Заходим в настройки

- сим карты и мобильные сети
- выбираете свою симку (Мегафон, Би лайн, МТС, ТЕЛЕ 2, Ростелеком)
- точки доступа (APN)
- Megafon internet (своего сотового оператора Beeline, Tele2, MTS, YOTA)
- Тип аутентификации и выбираем CHAP.
Чтобы настройки сохранились нужно нажать кнопку «еще» и «сохранить».
Как увеличить скорость работы интернета?
Можно в этих же настройках пролистать ниже и нажать пункт канал. Здесь снимаем галочку не указано и ставим галочки:

- LTE
- HSPAP
- HSPA
- HSUPA
- HSDPA
- UMTS
- EDGE
- GPRS
- eHRPD
Configure and Understand the PPP CHAP Authentication
The documentation set for this product strives to use bias-free language. For the purposes of this documentation set, bias-free is defined as language that does not imply discrimination based on age, disability, gender, racial identity, ethnic identity, sexual orientation, socioeconomic status, and intersectionality. Exceptions may be present in the documentation due to language that is hardcoded in the user interfaces of the product software, language used based on RFP documentation, or language that is used by a referenced third-party product. Learn more about how Cisco is using Inclusive Language.
Contents
Introduction
This document describes how the Challenge Handshake Authentication Protocol (CHAP) verifies the identity of a peer by means of a three-way handshake.
Prerequisites
Requirements
Cisco recommends that you have knowledge of these topics:
- How to enable PPP on the interface through the encapsulation ppp command.
- The debug ppp negotiation command output. Refer to Understand debug ppp negotiation Output for more information.
- How to troubleshoot when the Link Control Protocol (LCP) phase is not in the open state. This is because, the PPP authentication phase does not begin until the LCP phase is complete and is in the open state. If the debug ppp negotiation command does not indicate that LCP is open, you need to troubleshoot this issue before you proceed.
Note: This document does not address MS-CHAP (Version 1 or Version 2).
Components Used
This document is not restricted to specific software and hardware versions.
The information in this document was created from the devices in a specific lab environment. All of the devices used in this document started with a cleared (default) configuration. If your network is live, ensure that you understand the potential impact of any command.
Conventions
For more information on document conventions, see the Cisco Technical Tips Conventions.
Background Information
The Challenge Handshake Authentication Protocol (CHAP) (defined in RFC 1994 ) verifies the identity of the peer by means of a three-way handshake. These are the general steps performed in CHAP:
- After the LCP (Link Control Protocol) phase is complete, and CHAP is negotiated between both devices, the authenticator sends a challenge message to the peer.
- The peer responds with a value calculated through a one-way hash function (Message Digest 5 (MD5)).
- The authenticator checks the response against its own calculation of the expected hash value. If the values match, the authentication is successful. Otherwise, the connection is terminated.
This authentication method depends on a «secret» known only to the authenticator and the peer. The secret is not sent over the link. Although the authentication is only one-way, you can negotiate CHAP in both directions, with the help of the same secret set for mutual authentication.
For more information on the advantages and disadvantages of CHAP, refer to RFC 1994.
Configure CHAP
The procedure to configure CHAP is fairly straightforward. For example, assume that you have two routers, left and right, connected across a network, as shown in Figure 1.
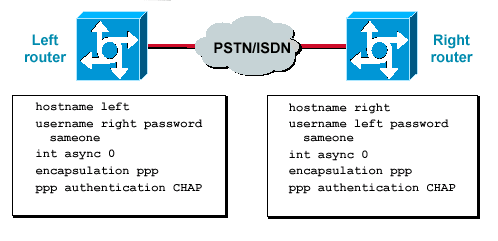
Two Routers Connected Across a Network
Figure 1 — Two Routers Connected Across a Network
To configure CHAP authentication, complete these steps:
- On the interface, issue the encapsulation ppp command.
- Enable the use of CHAP authentication on both routers with the ppp authentication chap command.
- Configure the usernames and passwords. To do so, issue the username username password password command, whereusernameis the hostname of the peer. Ensure that:
- Passwords are identical at both ends.
- The router name and password are exactly the same, because they are case-sensitive.
Note: By default, the router uses its hostname to identify itself to the peer. However, this CHAP username can be changed through the ppp chap hostname command. Refer to PPP Authentication with the ppp chap hostname and ppp authentication chap callin Commands for more information.
One-Way and Two-Way Authentication
CHAP is defined as a one-way authentication method. However, you use CHAP in both directions to create a two-way authentication. Hence, with two-way CHAP, a separate three-way handshake is initiated by each side.
In the Cisco CHAP implementation, by default, the called party must authenticate the calling party (unless authentication is completely turned off). Therefore, a one-way authentication initiated by the called party is the minimum possible authentication. However, the calling party can also verify the identity of the called party, and this results in a two-way authentication.
One-way authentication is often required when you connect to non-Cisco devices.
For one-way authentication, configure the ppp authentication chap callin command on the calling router.
Table 1 shows when to configure the callin option.
Table 1: When to Configure the Callin Option
| Authentication Type | Client (calling) | NAS (called) |
|---|---|---|
| One-way (unidirectional) | ppp authentication chap callin | ppp authentication chap |
| Two-way (bidirectional) | ppp authentication chap | ppp authentication chap |
CHAP Configuration Commands and Options
Table 2 lists the CHAP commands and options:
Table 2: CHAP Commands and Options
| Command | Description |
|---|---|
| ppp authentication < chap | ms-chap | ms-chap-v2 | eap |pap >[ callin ] | This command enables local authentication of the remote PPP peer with the specified protocol. |
| ppp chap hostname username | This command defines an interface-specific CHAP hostname. Refer to PPP Authentication with the ppp chap hostname and ppp authentication chap callin Commands for more information. |
| ppp chap password password | This command defines an interface-specific CHAP password. |
| ppp direction callin | callout | dedicated | This command forces a call direction. Use this command when a router is confused as to whether the call is incoming or outgoing (for example, when connected back-to-back or connected by leased lines and the Channel Service Unit or Data Service Unit (CSU/DSU) or ISDN Terminal Adapter (TA) are configured to dial). |
| ppp chap refuse [ callin ] | This command disables remote authentication by a peer (default enabled). With this command, CHAP authentication is disabled for all calls, which means that all attempts by the peer to force the user to authenticate with the help of CHAP are refused. The callin option specifies that the router refuses to answer CHAP authentication challenges received from the peer, but still requires the peer to answer any CHAP challenges that the router sends. |
| ppp chap wait | This command specifies that the caller must authenticate first (default enabled). This command specifies that the router does not authenticate to a peer that requests CHAP authentication until after the peer has authenticated itself to the router. |
| ppp max-bad-auth value | This command specifies the allowed number of authentication retries (the default value is 0). This command configures a point-to-point interface not to reset itself immediately after an authentication failure, but instead to allow a specified number of authentication retries. |
| ppp chap splitnames | This hidden command allows different hostnames for a CHAP challenge and response (the default value is disabled). |
| ppp chap ignoreus | This hidden command ignores CHAP challenges with the local name (the default value is enabled). |
Transactional Example
The diagrams in this section show the series of events that occur during a CHAP authentication between two routers. These do not represent the actual messages seen in the debug ppp negotiation command output. For more information, refer to Understand debug ppp negotiation Output.
Call
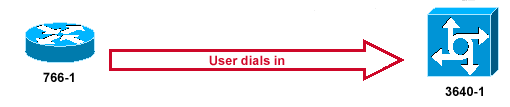
The Call Comes In
Figure 2 — The Call Comes In
Figure 2 displays these steps:
- The call comes in to 3640-1. The incoming interface is configured with the ppp authentication chap command.
- LCP negotiates CHAP and MD5. For more information on how to determine this, refer to Understand debug ppp negotiation Output.
- A CHAP challenge from 3640-1 to the calling router is required on this call.
Challenge
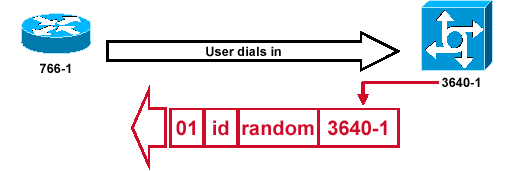
CHAP Challenge Packet is Built
Figure 3 — A CHAP Challenge Packet is Built
Figure 3illustrates these steps in the CHAP authentication between the two routers:
- A CHAP challenge packet is built with these characteristics:
- 01 = challenge packet type identifier.
- number that identifies the challenge.
- random = a reasonably random number generated by the router.
- 3640-1 = the authentication name of the challenger.
- The ID and random values are kept on the called router.
- The challenge packet is sent to the calling router. A list of outstanding challenges is maintained.
Response
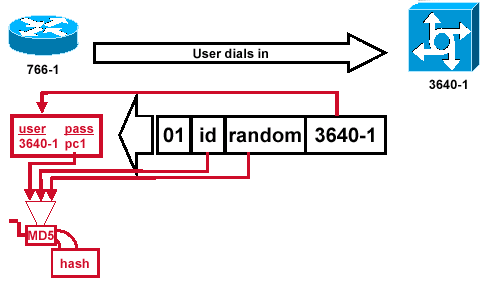
Receipt and MD5 Processing of the Challenge Packet from the Peer
Figure 4 — Receipt and MD5 Processing of the Challenge Packet from the Peer
Figure 4 illustrates the how the challenge packet is received from the peer, and processed (MD5). The router processes the incoming CHAP challenge packet in this way:
- The ID value is fed into the MD5 hash generator.
- The random value is fed into the MD5 hash generator.
- The name 3640-1 is used to look up the password. The router looks for an entry that matches the username in the challenge. In this example, it looks for:
username 3640-1 password pc1
4. The password is fed into the MD5 hash generator.
The result is the one-way MD5-hashed CHAP challenge that is sent back in the CHAP response.
Response (Continued)
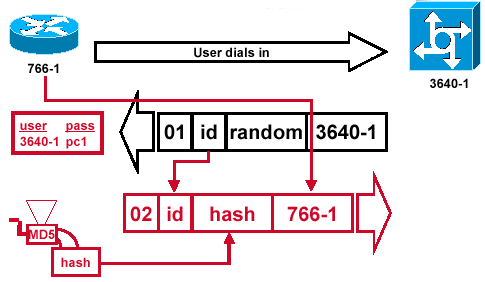
CHAP Response Packet Sent to the Authenticator is Built
Figure 5 — The CHAP Response Packet Sent to the Authenticator is Built
Figure 5 illustrates how the CHAP response packet sent to the authenticator is built. This diagram shows these steps:
- The response packet is assembled from these components:
- 02 = CHAP response packet type identifier.
- from the challenge packet.
- hash = the output from the MD5 hash generator (the hashed information from the challenge packet).
- 766-1 = the authentication name of this device. This is needed for the peer to look up the username and password entry needed to verify identity (this is explained in more detail in the Verify CHAP section).
- The response packet is then sent to the challenger.
Verify CHAP
This section provides tips on how to verify your configuration.
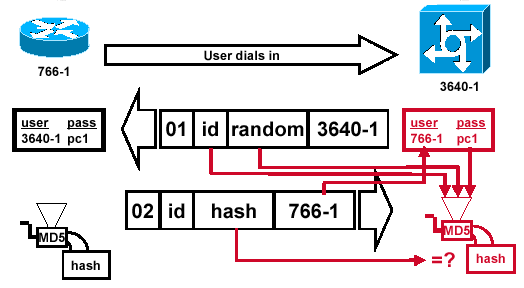
Challenger Processes the Response Packet
Figure 6 — The Challenger Processes the Response Packet
Figure 6 shows how the challenger processes the response packet. Here are the steps involved when the CHAP response packet is processed (on the authenticator):
- The ID is used to find the original challenge packet.
- The ID is fed into the MD5 hash generator.
- The original challenge random value is fed into the MD5 hash generator.
- The name 766-1 is used to look up the password from one of these sources:
- Local username and password database.
- RADIUS or TACACS+ server.
- The password is fed into the MD5 hash generator.
- The hash value received in the response packet is then compared with the calculated MD5 hash value. CHAP authentication succeeds if the calculated and the received hash values are equal.
Result
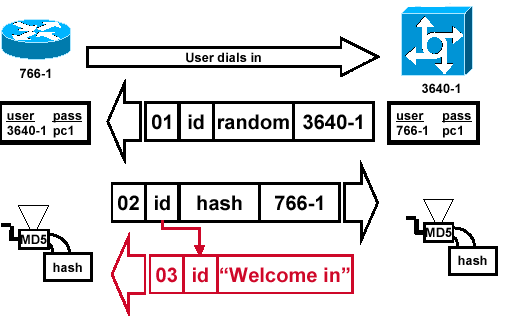
Success Message is Sent to the Calling Router
Figure 7 — Success Message is Sent to the Calling Router
Figure 7 illustrates the success message sent to the calling router. This involves these steps:
- If authentication is successful, a CHAP success packet is built from these components:
- 03 = CHAP success message type.
- from the response packet.
- «Welcome in» is simply a text message that provides a user-readable explanation.
- If authentication fails, a CHAP failure packet is built from these components:
- 04 = CHAP failure message type.
- from the response packet.
- «Authentication failure» or other text message, that provides a user-readable explanation.
- The success or failure packet is then sent to the calling router.
Note: This example depicts a one-way authentication. In a two-way authentication, this entire process is repeated. However the calling router initiates the initial challenge.
Troubleshoot CHAP
Refer to Troubleshoot PPP (CHAP or PAP) Authentication for information on how to troubleshoot any issues.
Related Information
- Understand debug ppp negotiation Output
- PPP Authentication with the ppp chap hostname and ppp authentication chap callin Commands
- Cisco Technical Support & Downloads
Что такое на телефоне chap
До сих пор наш скрипт сам выполнял аутентификацию, то есть, вводил имя и пароль в ответ на запросы удалённой стороны. Но PPP предусматривает и свои способы аутентификации PAP (Password Authentication Protocol) и CHAP (Challenge Handshake Authentication Protocol) и мы можем ими воспользоваться, если удалённая сторона достаточна сообразительна, чтобы не только выдать «login:«, но и провести PAP или CHAP аутентификацию.
Нужно заметить, что комбинация FreeBSD + getty до недавнего времени не была таким сообразительным прибором, но, начиная с getty распознает начальные LCP-кадры PPP-соединения и может вызывать, скажем, pppd, который и решает, что делать дальше. До этого getty умел только выдать этот самый «login:» и приходилось использовать mgetty .
Так как наш скрипт дозвонки больше не будет заниматься аутентификацией, нужно убрать из него имя пользователя «igor«, его пароль «1234567» и ошибку аутентификации
ABORT "ERROR" \ ABORT "NO DIALTONE" \ TIMEOUT 5 \ "" "AT" \ "OK" "ATZ" \ "OK" "ATS7=120" \ ABORT "BUSY" \ ABORT "NO ANSWER" \ ABORT "NO CARRIER" \ "OK" "ATDP$1" \ TIMEOUT 125 \ "CONNECT" "\\с" \ TIMEOUT 30 \ "login:" "\\с" if [ "$?" = "0" ]; then exit 0 fi
Теперь скрипт заканчивает работу сразу же, как получит строку «login:«. Отметим, что приглашение «login:» не имеет никакого отношения к PAP и CHAP, и pppd воспринимает его не более, как шум в линии, поэтому вместо этой строки может быть любое другое приглашение провайдера, в крайнем случае, «>«.
PAP аутентификация происходит следующим образом при установлении PPP-соединения удалённая сторона предлагает нам аутентификацию PAP. Мы соглашаемся и затем передаём наше имя и пароль открытом текстом. Если удалённую сторону имя и пароль устраивает, то аутентификация считается успешной. Имена и пароли для PAP хранятся в файле /etc/ppp/pap-secrets . У него должны быть такие права доступа Для нашего случая мы запишем в этот файл:
igor cool 1234567
Формат этой строки таков наше имя, имя удалённой стороны и пароль. В PAP используется только наше имя и пароль, а имя удалённой стороны «cool» может быть произвольным. В принципе, оно нужно только для того, чтобы pppd мог определить, какой пароль нужно использовать в случае, когда Вы используете одно и то же имя у разных провайдеров, например:
igor cool 1234567 igor citynet 7654321
Теперь мы можем звонить провайдеру:
pppd cuaa0 57600 lock connect '/etc/ppp/dial' \ user igor remotename cool \ defaultroute noipdefault debug
Параметры user igor и remotename cool позволяют однозначно определить, какой пароль использовать при аутентификации, в данном случае это 1234567. Как уже говорилось, параметр remotename необходим только, если мы не можем однозначно выбрать пароль из файла /etc/ppp/pap-secrets . Имя нашей стороны можно также задать с помощью параметра name igor, но параметр user имеет больший приоритет. Заметим, что хотя пароль передаётся в открытом виде, удалённая сторона может хранить пароль в виде результата какой-либо хэш-функции, например, MD5, в качестве параметра которой выступает пароль.
CHAP аутентификация происходит следующим образом при установлении PPP-соединения удалённая сторона предлагает нам аутентификацию CHAP. Мы соглашаемся, и удалённая сторона высылает нам ключ (challenge), состоящий из случайной последовательности символов, и своё имя. Мы берём наш пароль и присланный ключ и прогоняем их через алгоритм MD5. Получившийся результат высылаем вместе со своим именем. Удалённая сторона, зная наш пароль и высланный её ключ, в свою очередь, проделывает то же самое у себя, и если её результат совпадает с присланным нами, то аутентификация считается успешной. Таким образом, пароль не передаётся в открытом виде, но удалённая сторона должна хранить наш пароль в открытом виде.
Имена и пароли для CHAP хранятся в файле /etc/ppp/chap-secrets , права доступа у него должны быть такие же, как для PAP: и формат строк тоже совпадает:
igor cool 1234567
Теперь наша строка для звонка провайдеру выглядит так:
pppd cuaa0 57600 lock connect '/etc/ppp/dial' \ user igor \ defaultroute npipdefault debug
Обратите внимание, что она отличается от PAP только отсутствием параметра remotename. Это объясняется тем, что удалённая сторона сама говорит своё имя, поэтому её имя, записанное в файле /etc/ppp/chap-secrets , не может быть произвольным, как это было в случае с PAP. Даже если Вы зададите параметр remotename, имя, сообщённое удалённой стороной, имеет больший приоритет. Что касается имени нашей стороны, то оно может быть также задано с помощью параметра
Может ли pppd аутентифицировать себя в одних случаях через PAP, а в других через CHAP ? Ответ да. При запуске pppd проверяет, как он может аутентифицировать себя, исходя из локального имени и имени удалённой стороны, то есть, есть ли в файлах /etc/ppp/pap-secrets или /etc/ppp/chap-secrets строки с такими именами. И если, скажем, удалённая сторона предлагает CHAP, а pppd не находит пароль в файле /etc/ppp/chap-secrets , то он запросит PAP и если это устраивает удалённую сторону, то аутентификация пройдёт по PAP.
Кроме того, можно указать pppd, чтобы он не соглашался проводить аутентификацию тем или иным способом или же требовал какого-то одного способа с помощью различных комбинаций параметров refuse-pap, refuse-chap, require-pap и require-chap. Раньше эти параметры назывались соответственно -pap, -chap, +pap и +chap.