
Установка базового программного обеспечения
В Установке базового программного обеспечения, мы покажем вам, какие инструменты вам необходимы для простой веб-разработки, и как правильно установить их.
Какие инструменты используют профессионалы?
- Компьютер. Может быть, это звучит очевидно для некоторых людей, но некоторые из вас читают эту статью с телефона или библиотечного компьютера. Для серьёзной веб-разработки, лучше приобрести настольный компьютер (Windows, Mac или Linux).
- Текстовый редактор, чтобы писать код. Это может быть текстовый редактор (например, Visual Studio Code, Notepad++, Sublime Text, Atom, GNU Emacs, или VIM) или гибридный редактор (например, Dreamweaver or WebStorm). Офисные редакторы не подходят для этого, поскольку они зависят от скрытых элементов, которые мешают движкам рендеринга, используемым веб-браузерами.
- Веб-браузеры, для тестирования кода. В настоящее время наиболее часто используемые браузеры это Firefox, Chrome, Opera, Safari, и Internet Explorer. Вы также должны тестировать ваш сайт на то, как он работает на мобильных устройствах и на любых старых браузерах, которые ваша целевая аудитория может все ещё широко использовать (например, IE 6-8). Lynx, текстовый веб-браузер для терминала, отлично подходит для того, чтобы увидеть, как ваш сайт воспринимается слабовидящими пользователями.
- Графический редактор, такие как The Gimp, Paint.NET, или Photoshop, чтобы создавать изображения для ваших веб-страниц.
- Система контроля версий, чтобы управлять файлами на сервере, для совместной работы над проектом с командой, обмениваться кодом и избегать редакторских конфликтов. Сейчас Git является наиболее популярным инструментом контроля версий, и репозиторий кода Github, основанный на Git, также является очень популярным.
- FTP программа, чтобы загружать веб-страницы на сервер для публичного просмотра. Существует обилие таких программ, доступных в том числе Cyberduck, Fetch, и FileZilla.
- Система автоматизации, такая как Grunt или Gulp, для автоматического выполнения повторяющихся задач, например, минимизации кода и запуска тестов.
- Шаблоны, библиотеки, фреймворки и т. д., чтобы ускорить написание общей функциональности.
- А также некоторые другие инструменты!
Какие инструменты на самом деле нужны мне прямо сейчас?
Этот список выглядит страшновато, но, к счастью, вы можете начать веб-разработку, не зная ничего о большинстве из того, что в нем написано. В этой статье мы установим базовый минимум — текстовый редактор и некоторые современные веб-браузеры.
Установка текстового редактора
У вас, наверное, уже есть базовый текстовый редактор на вашем компьютере. По умолчанию Windows включает Блокнот и Mac OS X поставляется с TextEdit. Linux дистрибутивы варьируются; Ubuntu поставляется с gedit по умолчанию.
Для веб-разработки вам, вероятно, понадобится больше, чем могут предложить Notepad или TextEdit. Мы рекомендуем начать с Visual Studio Code, который является бесплатным редактором, который предлагает предварительный просмотр и подсказки во время написания кода.
Установка современных веб-браузеров
На данный момент, мы установим только пару настольных веб-браузеров, чтобы проверять наш код. Выберите вашу операционную систему ниже и нажмите на соответствующие ссылки для загрузки установочных программ ваших любимых браузеров:
- Linux: Firefox, Chrome, Opera, Brave.
- Windows: Firefox, Chrome, Opera, Internet Explorer, Brave (Если у вас есть Windows 8 или выше, вы можете установить IE 10 или более позднюю версию; иначе, вам следует установить альтернативный браузер)
- Mac: Firefox, Chrome, Opera, Safari, Brave (Safari поставляется с iOS и OS X по умолчанию)
Прежде, чем идти дальше, вам следует установить, по крайней мере, два из этих браузеров, чтобы использовать их для тестирования.
Установка локального веб-сервера
Некоторые примеры для успешной работы необходимо будет запустить на веб-сервере. Вы можете узнать, как это сделать в статье Как настроить локальный сервер для тестирования?
- Обзор: Getting started with the web
- Далее
В этом модуле
- Установка базового программного обеспечения
- Каким должен быть ваш веб-сайт?
- Работа с файлами
- Основы HTML
- Основы CSS
- Основы JavaScript
- Публикация вашего веб-сайта
- Как работает Веб
Found a content problem with this page?
- Edit the page on GitHub.
- Report the content issue.
- View the source on GitHub.
This page was last modified on 3 авг. 2023 г. by MDN contributors.
Your blueprint for a better internet.
html-loader
Disclaimer: html-loader is a third-party package maintained by community members, it potentially does not have the same support, security policy or license as webpack, and it is not maintained by webpack.
Exports HTML as string. HTML is minimized when the compiler demands.
Getting Started
To begin, you’ll need to install html-loader :
npm install --save-dev html-loader yarn add -D html-loader pnpm add -D html-loader Then add the plugin to your webpack config. For example:
file.js
import html from "./file.html";webpack.config.js
module.exports = module: rules: [ test: /\.html$/i, loader: "html-loader", >, ], >, >;Options
sources
type sources = | boolean | list?: Array tag?: string; attribute?: string; type?: string; filter?: ( tag: string, attribute: string, attributes: string, resourcePath: string ) => boolean; >>; urlFilter?: ( attribute: string, value: string, resourcePath: string ) => boolean; scriptingEnabled?: boolean; >;
By default every loadable attribute (for example — ) is imported ( const img = require(‘./image.png’) or import img from «./image.png»» ). You may need to specify loaders for images in your configuration (recommended asset modules ).
Supported tags and attributes:
- the src attribute of the audio tag
- the src attribute of the embed tag
- the src attribute of the img tag
- the srcset attribute of the img tag
- the src attribute of the input tag
- the data attribute of the object tag
- the src attribute of the script tag
- the href attribute of the script tag
- the xlink:href attribute of the script tag
- the src attribute of the source tag
- the srcset attribute of the source tag
- the src attribute of the track tag
- the poster attribute of the video tag
- the src attribute of the video tag
- the xlink:href attribute of the image tag
- the href attribute of the image tag
- the xlink:href attribute of the use tag
- the href attribute of the use tag
- the href attribute of the link tag when the rel attribute contains stylesheet , icon , shortcut icon , mask-icon , apple-touch-icon , apple-touch-icon-precomposed , apple-touch-startup-image , manifest , prefetch , preload or when the itemprop attribute is image , logo , screenshot , thumbnailurl , contenturl , downloadurl , duringmedia , embedurl , installurl , layoutimage
- the imagesrcset attribute of the link tag when the rel attribute contains stylesheet , icon , shortcut icon , mask-icon , apple-touch-icon , apple-touch-icon-precomposed , apple-touch-startup-image , manifest , prefetch , preload
- the content attribute of the meta tag when the name attribute is msapplication-tileimage , msapplication-square70x70logo , msapplication-square150x150logo , msapplication-wide310x150logo , msapplication-square310x310logo , msapplication-config , twitter:image or when the property attribute is og:image , og:image:url , og:image:secure_url , og:audio , og:audio:secure_url , og:video , og:video:secure_url , vk:image or when the itemprop attribute is image , logo , screenshot , thumbnailurl , contenturl , downloadurl , duringmedia , embedurl , installurl , layoutimage
- the icon-uri value component in content attribute of the meta tag when the name attribute is msapplication-task
boolean
The true value enables the processing of all default elements and attributes, the false value disables the processing of all attributes.
webpack.config.js
module.exports = module: rules: [ test: /\.html$/i, loader: "html-loader", options: // Disables attributes processing sources: false, >, >, ], >, >;object
Allows you to specify which tags and attributes to process, filter them, filter urls and process sources starting with / .
webpack.config.js
module.exports = module: rules: [ test: /\.html$/i, loader: "html-loader", options: sources: list: [ // All default supported tags and attributes ". ", tag: "img", attribute: "data-src", type: "src", >, tag: "img", attribute: "data-srcset", type: "srcset", >, ], urlFilter: (attribute, value, resourcePath) => // The `attribute` argument contains a name of the HTML attribute. // The `value` argument contains a value of the HTML attribute. // The `resourcePath` argument contains a path to the loaded HTML file. if (/example\.pdf$/.test(value)) return false; > return true; >, >, >, >, ], >, >;list
type list = Array tag?: string; attribute?: string; type?: string; filter?: ( tag: string, attribute: string, attributes: string, resourcePath: string ) => boolean; >>;Allows to setup which tags and attributes to process and how, as well as the ability to filter some of them.
webpack.config.js
module.exports = module: rules: [ test: /\.html$/i, loader: "html-loader", options: sources: list: [ // All default supported tags and attributes ". ", tag: "img", attribute: "data-src", type: "src", >, tag: "img", attribute: "data-srcset", type: "srcset", >, // Tag name tag: "link", // Attribute name attribute: "href", // Type of processing, can be `src` or `scrset` type: "src", // Allow to filter some attributes filter: (tag, attribute, attributes, resourcePath) => // The `tag` argument contains a name of the HTML tag. // The `attribute` argument contains a name of the HTML attribute. // The `attributes` argument contains all attributes of the tag. // The `resourcePath` argument contains a path to the loaded HTML file. if (/my-html\.html$/.test(resourcePath)) return false; > if (!/stylesheet/i.test(attributes.rel)) return false; > if ( attributes.type && attributes.type.trim().toLowerCase() !== "text/css" ) return false; > return true; >, >, ], >, >, >, ], >, >;If the tag name is not specified it will process all the tags.
You can use your custom filter to specify html elements to be processed.
webpack.config.js
module.exports = module: rules: [ test: /\.html$/i, loader: "html-loader", options: sources: list: [ // Attribute name attribute: "src", // Type of processing, can be `src` or `scrset` type: "src", // Allow to filter some attributes (optional) filter: (tag, attribute, attributes, resourcePath) => // The `tag` argument contains a name of the HTML tag. // The `attribute` argument contains a name of the HTML attribute. // The `attributes` argument contains all attributes of the tag. // The `resourcePath` argument contains a path to the loaded HTML file. // choose all HTML tags except img tag return tag.toLowerCase() !== "img"; >, >, ], >, >, >, ], >, >;Filter can also be used to extend the supported elements and attributes.
For example, filter can help process meta tags that reference assets:
module.exports = module: rules: [ test: /\.html$/i, loader: "html-loader", options: sources: list: [ tag: "meta", attribute: "content", type: "src", filter: (tag, attribute, attributes, resourcePath) => if ( attributes.value === "og:image" || attributes.name === "twitter:image" ) return true; > return false; >, >, ], >, >, >, ], >, >;Note
source with a tag option takes precedence over source without.
Filter can be used to disable default sources.
module.exports = module: rules: [ test: /\.html$/i, loader: "html-loader", options: sources: list: [ ". ", tag: "img", attribute: "src", type: "src", filter: () => false, >, ], >, >, >, ], >, >;urlFilter
type urlFilter = ( attribute: string, value: string, resourcePath: string ) => boolean;Allow to filter urls. All filtered urls will not be resolved (left in the code as they were written). Non-requestable sources (for example ) are not handled by default.
module.exports = module: rules: [ test: /\.html$/i, loader: "html-loader", options: sources: urlFilter: (attribute, value, resourcePath) => // The `attribute` argument contains a name of the HTML attribute. // The `value` argument contains a value of the HTML attribute. // The `resourcePath` argument contains a path to the loaded HTML file. if (/example\.pdf$/.test(value)) return false; > return true; >, >, >, >, ], >, >;scriptingEnabled
type scriptingEnabled = boolean;By default, the parser in html-loader interprets content inside tags as #text , so processing of content inside this tag will be ignored.
In order to enable processing inside for content recognition by the parser as #AST , set this parameter to: false
webpack.config.js
module.exports = module: rules: [ test: /\.html$/i, loader: "html-loader", options: sources: // Enables processing inside the tag scriptingEnabled: false, >, >, >, ], >, >;preprocessor
type preprocessor = ( content: string | Buffer, loaderContext: LoaderContext ) => HTMLElement;Allows pre-processing of content before handling.
Warning
You should always return valid HTML
file.hbs
> >
function
You can set the preprocessor option as a function instance.
webpack.config.js
const Handlebars = require("handlebars"); module.exports = module: rules: [ test: /\.hbs$/i, loader: "html-loader", options: preprocessor: (content, loaderContext) => let result; try result = Handlebars.compile(content)( firstname: "Value", lastname: "OtherValue", >); > catch (error) loaderContext.emitError(error); return content; > return result; >, >, >, ], >, >;You can also set the preprocessor option as an asynchronous function instance.
webpack.config.js
const Handlebars = require("handlebars"); module.exports = module: rules: [ test: /\.hbs$/i, loader: "html-loader", options: preprocessor: async (content, loaderContext) => let result; try result = await Handlebars.compile(content)( firstname: "Value", lastname: "OtherValue", >); > catch (error) await loaderContext.emitError(error); return content; > return result; >, >, >, ], >, >;minimize
type minimize = | boolean | caseSensitive?: boolean; collapseWhitespace?: boolean; conservativeCollapse?: boolean; keepClosingSlash?: boolean; minifyCSS?: boolean; minifyJS?: boolean; removeComments?: boolean; removeRedundantAttributes?: boolean; removeScriptTypeAttributes?: boolean; removeStyleLinkTypeAttributes?: boolean; >;Default: true in production mode, otherwise false
Tell html-loader to minimize HTML.
boolean
The enabled rules for minimizing by default are the following ones:
( caseSensitive: true, collapseWhitespace: true, conservativeCollapse: true, keepClosingSlash: true, minifyCSS: true, minifyJS: true, removeComments: true, removeRedundantAttributes: true, removeScriptTypeAttributes: true, removeStyleLinkTypeAttributes: true, >);webpack.config.js
module.exports = module: rules: [ test: /\.html$/i, loader: "html-loader", options: minimize: true, >, >, ], >, >;object
webpack.config.js
See html-minifier-terser’s documentation for more information on the available options.
The default rules can be overridden using the following options in your webpack.conf.js
webpack.config.js
module.exports = module: rules: [ test: /\.html$/i, loader: "html-loader", options: minimize: removeComments: false, collapseWhitespace: false, >, >, >, ], >, >;The default rules can be extended:
webpack.config.js
const defaultMinimizerOptions > = require("html-loader"); module.exports = module: rules: [ test: /\.html$/i, loader: "html-loader", options: minimize: . defaultMinimizerOptions, removeComments: false, collapseWhitespace: false, >, >, >, ], >, >;esModule
type esModule = boolean;By default, html-loader generates JS modules that use the ES modules syntax. There are some cases in which using ES modules is beneficial, such as module concatenation and tree shaking.
You can enable a CommonJS modules syntax using:
webpack.config.js
module.exports = module: rules: [ test: /\.html$/i, loader: "html-loader", options: esModule: false, >, >, ], >, >;Examples
Disable url resolving using the « comment
With « comment, one can disable sources handling for next tag.
img src="image.png" /> img srcset="image.png 480w, image.png 768w" src="image.png" alt="Elva dressed as a fairy" /> meta itemprop="image" content="./image.png" /> link rel="icon" type="image/png" sizes="192x192" href="./image.png" />
roots
With resolve.roots one can specify a list of directories where requests of server-relative URLs (starting with ‘/’) are resolved.
webpack.config.js
module.exports = context: __dirname, module: rules: [ test: /\.html$/i, loader: "html-loader", options: >, >, test: /\.jpg$/, type: "asset/resource", >, ], >, resolve: roots: [path.resolve(__dirname, "fixtures")], >, >;file.html
img src="/image.jpg" />// => image.jpg in __dirname/fixtures will be resolvedCDN
webpack.config.js
module.exports = module: rules: [ test: /\.jpg$/, type: "asset/resource", >, test: /\.png$/, type: "asset/inline", >, ], >, output: publicPath: "http://cdn.example.com/[fullhash]/", >, >;file.html
img src="image.jpg" data-src="image2x.png" />index.js
require("html-loader!./file.html"); // => ' '
' '
'require('html-loader?<"sources":<"list":[<"tag":"img","attribute":"data-src","type":"src">]>>!./file.html'); // => ' 'require('html-loader?<"sources":<"list":[<"tag":"img","attribute":"src","type":"src">,]>>!./file.html'); // => ' 'Process script and link tags
script.file.js
console.log(document);style.file.css
a color: red; >file.html
DOCTYPE html> html> head> meta charset="UTF-8" /> title>Title of the documenttitle> link rel="stylesheet" type="text/css" href="./style.file.css" /> head> body> Content of the document. script src="./script.file.js"> script> body> html>webpack.config.js
module.exports = module: rules: [ test: /\.html$/, type: "asset/resource", generator: filename: "[name][ext]", >, >, test: /\.html$/i, use: ["html-loader"], >, test: /\.js$/i, exclude: /\.file.js$/i, loader: "babel-loader", >, test: /\.file.js$/i, type: "asset/resource", >, test: /\.css$/i, exclude: /\.file.css$/i, loader: "css-loader", >, test: /\.file.css$/i, type: "asset/resource", >, ], >, >;Templating
You can use any template system. Below is an example for handlebars.
file.hbs
> >
webpack.config.js
const Handlebars = require("handlebars"); module.exports = module: rules: [ test: /\.hbs$/i, loader: "html-loader", options: preprocessor: (content, loaderContext) => let result; try result = Handlebars.compile(content)( firstname: "Value", lastname: "OtherValue", >); > catch (error) loaderContext.emitError(error); return content; > return result; >, >, >, ], >, >;PostHTML
You can use PostHTML without any additional loaders.
file.html
img src="image.jpg" />webpack.config.js
const posthtml = require("posthtml"); const posthtmlWebp = require("posthtml-webp"); module.exports = module: rules: [ test: /\.hbs$/i, loader: "html-loader", options: preprocessor: (content, loaderContext) => let result; try result = posthtml().use(plugin).process(content, sync: true >); > catch (error) loaderContext.emitError(error); return content; > return result.html; >, >, >, ], >, >;Export into HTML files
A very common scenario is exporting the HTML into their own .html file, to serve them directly instead of injecting with javascript. This can be achieved with a combination of 2 loaders:
The html-loader will parse the URLs, require the images and everything you expect. The extract loader will parse the javascript back into a proper html file, ensuring images are required and point to proper path, and the asset modules will write the .html file for you. Example:
webpack.config.js
module.exports = output: assetModuleFilename: "[name][ext]", >, module: rules: [ test: /\.html$/, type: "asset/resource", generator: filename: "[name][ext]", >, >, test: /\.html$/i, use: ["html-loader"], >, ], >, >;Contributing
Please take a moment to read our contributing guidelines if you haven’t yet done so.
Добавьте Firebase в свой проект JavaScript
Оптимизируйте свои подборки Сохраняйте и классифицируйте контент в соответствии со своими настройками.
Следуйте этому руководству, чтобы использовать Firebase JavaScript SDK в своем веб-приложении или в качестве клиента для доступа конечных пользователей, например, на рабочем столе Node.js или в приложении IoT.
Шаг 1. Создайте проект Firebase и зарегистрируйте свое приложение.
Прежде чем вы сможете добавить Firebase в свое приложение JavaScript, вам необходимо создать проект Firebase и зарегистрировать свое приложение в этом проекте. Зарегистрировав свое приложение в Firebase, вы получите объект конфигурации Firebase, который будете использовать для подключения своего приложения к ресурсам проекта Firebase.
Примечание. Обновление Firebase SDK версии 8? Ознакомьтесь с нашим руководством по обновлению .
Посетите раздел «Понимание проектов Firebase» , чтобы узнать больше о проектах Firebase и лучших методах добавления приложений в проекты.
Создать проект Firebase
Либо выберите существующую учетную запись Google Analytics , либо создайте новую учетную запись.
Если вы создаете новую учетную запись, выберите местоположение для отчетов Analytics , затем примите настройки совместного использования данных и условия Google Analytics для вашего проекта.
Firebase автоматически выделяет ресурсы для вашего проекта Firebase. Когда процесс завершится, вы перейдете на страницу обзора вашего проекта Firebase в консоли Firebase.
Зарегистрируйте свое приложение
После того как у вас есть проект Firebase, вы можете зарегистрировать свое веб-приложение в этом проекте.
- В центре страницы обзора проекта консоли Firebase щелкните значок Интернета ( plat_web ), чтобы запустить рабочий процесс установки. Если вы уже добавили приложение в свой проект Firebase, нажмите «Добавить приложение» , чтобы отобразить параметры платформы.
- Введите псевдоним вашего приложения.
Этот псевдоним является внутренним удобным идентификатором и виден только вам в консоли Firebase. - Нажмите Зарегистрировать приложение .
- Следуйте инструкциям на экране, чтобы добавить и инициализировать Firebase SDK в своем приложении. Вы также можете найти более подробные инструкции по добавлению, инициализации и использованию Firebase SDK на следующих шагах этой страницы начала работы.
Если у вас еще нет проекта JavaScript и вы просто хотите опробовать продукт Firebase, вы можете загрузить один из наших примеров быстрого запуска .
Шаг 2. Установите SDK и инициализируйте Firebase.
На этой странице описаны инструкции по настройке модульного API Firebase JS SDK, который использует формат модуля JavaScript .
В этом рабочем процессе используется npm и требуются сборщики модулей или инструменты платформы JavaScript, поскольку модульный API оптимизирован для работы с сборщиками модулей , чтобы исключить неиспользуемый код (встряхивание дерева) и уменьшить размер SDK.
-
Установите Firebase с помощью npm:
npm install firebase
import < initializeApp >from 'firebase/app'; // TODO: Replace the following with your app's Firebase project configuration const firebaseConfig = < //. >; const app = initializeApp(firebaseConfig);
Шаг 3. Получите доступ к Firebase в своем приложении.
Сервисы Firebase (такие как Cloud Firestore, аутентификация, база данных реального времени, удаленная настройка и т. д.) доступны для импорта в рамках отдельных подпакетов.
В приведенном ниже примере показано, как вы можете использовать Cloud Firestore Lite SDK для получения списка данных.
import < initializeApp >from 'firebase/app'; import < getFirestore, collection, getDocs >from 'firebase/firestore/lite'; // Follow this pattern to import other Firebase services // import < >from 'firebase/'; // TODO: Replace the following with your app's Firebase project configuration const firebaseConfig = < //. >; const app = initializeApp(firebaseConfig); const db = getFirestore(app); // Get a list of cities from your database async function getCities(db) < const citiesCol = collection(db, 'cities'); const citySnapshot = await getDocs(citiesCol); const cityList = citySnapshot.docs.map(doc =>doc.data()); return cityList; >
Шаг 4. Используйте сборщик модулей (webpack/rollup) для уменьшения размера.
Примечание. Вы можете пропустить этот шаг, если используете инструмент CLI платформы JavaScript, такой как Angular CLI , Next.js , Vue CLI или Create React App . Для получения дополнительной информации ознакомьтесь с нашим руководством по объединению модулей .
Firebase Web SDK предназначен для работы с сборщиками модулей для удаления любого неиспользуемого кода (встряхивания дерева). Мы настоятельно рекомендуем использовать этот подход для рабочих приложений. Такие инструменты, как Angular CLI , Next.js , Vue CLI или Create React App, автоматически обрабатывают объединение модулей для библиотек, установленных через npm и импортированных в вашу кодовую базу.
Дополнительную информацию см. в нашем руководстве «Использование сборщиков модулей с Firebase» .
Доступные сервисы Firebase для Интернета
Теперь, когда вы настроены на использование Firebase, вы можете начать добавлять и использовать любую из следующих доступных служб Firebase в своем веб-приложении.
Следующие команды показывают, как импортировать библиотеки Firebase, установленные локально, с помощью npm . Альтернативные варианты импорта см. в документации доступных библиотек .
Следующие шаги
Узнайте больше о Firebase:
- Ознакомьтесь с примерами приложений Firebase .
- Получите практический опыт работы с Firebase Web Codelab .
- Изучите открытый исходный код на GitHub .
- Ознакомьтесь с поддерживаемыми средами для Firebase JavaScript SDK.
- Ускорьте разработку с помощью дополнительных библиотек с открытым исходным кодом, поддерживаемых Firebase, таких как AngularFire , RxFire и FirebaseUI для Интернета .
- Подготовьтесь к запуску приложения:
- Настройте оповещения о бюджете для своего проекта в Google Cloud Console.
- Отслеживайте панель «Использование и выставление счетов» в консоли Firebase, чтобы получить общую картину использования вашего проекта в нескольких сервисах Firebase.
- Ознакомьтесь с контрольным списком запуска Firebase .
Отправить отзыв
Если не указано иное, контент на этой странице предоставляется по лицензии Creative Commons «С указанием авторства 4.0», а примеры кода – по лицензии Apache 2.0. Подробнее об этом написано в правилах сайта. Java – это зарегистрированный товарный знак корпорации Oracle и ее аффилированных лиц.
Последнее обновление: 2023-10-31 UTC.
HTML Webpack Plugin
This is a webpack plugin that simplifies creation of HTML files to serve your webpack bundles. This is especially useful for webpack bundles that include a hash in the filename which changes every compilation. You can either let the plugin generate an HTML file for you, supply your own template using lodash templates or use your own loader.
Sponsors
Thanks for supporting the ongoing improvements to the html-webpack-plugin!
Zero Config
The html-webpack-plugin works without configuration.
It’s a great addition to the ⚙️ webpack-config-plugins.Plugins
The html-webpack-plugin provides hooks to extend it to your needs. There are already some really powerful plugins which can be integrated with zero configuration
- webpack-subresource-integrity for enhanced asset security
- appcache-webpack-plugin for iOS and Android offline usage
- favicons-webpack-plugin which generates favicons and icons for iOS, Android and desktop browsers
- html-webpack-harddisk-plugin can be used to always write to disk the html file, useful when webpack-dev-server / HMR are being used
- html-webpack-inline-svg-plugin to inline SVGs in the resulting HTML file.
- html-webpack-exclude-assets-plugin for excluding assets using regular expressions
- html-webpack-include-assets-plugin for including lists of js or css file paths (such as those copied by the copy-webpack-plugin).
- html-webpack-injector to inject chunks in head or body (different locations ) of same html document.
- resource-hints-webpack-plugin to add resource hints for faster initial page loads using and
- link-media-html-webpack-plugin allows for injected stylesheet tags to have their media attribute set automatically; useful for providing specific desktop/mobile/print etc. stylesheets that the browser will conditionally download
- html-webpack-inline-style-plugin for inlining styles to HTML elements using juice. Useful for email generation automatisation.
- html-webpack-exclude-empty-assets-plugin removes empty assets from being added to the html. This fixes some problems with extract-text-plugin with webpack 4.
- webpack-concat-plugin for concat and uglify files that needn’t to be webpack bundles(for legacy files) and inject to html-webpack-plugin.
- html-webpack-link-type-plugin adds a configurable mimetype to resources injected as links (such as adding type=»text/css» to external stylesheets) for compatibility with «strict mode».
- csp-html-webpack-plugin to add Content Security Policy meta tags to the HTML output
- strict-csp-html-webpack-plugin to add a strict Content-Security-Policy (CSP) as a meta tag to the HTML output. A strict CSP is specifically efficient against XSS attacks.
- webpack-nomodule-plugin allows you to add a nomodule attribute to specific injected scripts, which prevents the scripts from being loaded by newer browsers. Good for limiting loads of polyfills.
- html-webpack-skip-assets-plugin Skip adding certain output files to the html file. Built as a drop-in replacement for html-webpack-exclude-assets-plugin and works with newer html-webpack-plugin versions
- html-webpack-inject-preload allows to add preload links anywhere you want.
- inject-body-webpack-plugin is a simple method of injecting a custom HTML string into the body.
- html-webpack-plugin-django a Webpack plugin to inject Django static tags.
Usage
The plugin will generate an HTML5 file for you that includes all your webpack bundles in the head using script tags. Just add the plugin to your webpack config as follows:
webpack.config.js
const HtmlWebpackPlugin = require('html-webpack-plugin') module.exports = entry: 'index.js', output: path: __dirname + '/dist', filename: 'index_bundle.js' >, plugins: [ new HtmlWebpackPlugin() ] >
This will generate a file dist/index.html containing the following
> html> head> meta charset pl-s">utf-8"> title>Webpack Apptitle> script defer src pl-s">index_bundle.js">script> head> body> body> html>
If you have multiple webpack entry points, they will all be included with script tags in the generated HTML.
If you have any CSS assets in webpack’s output (for example, CSS extracted with the mini-css-extract-plugin) then these will be included with tags in the HTML head.
If you have plugins that make use of it, html-webpack-plugin should be ordered first before any of the integrated Plugins.
Options
You can pass a hash of configuration options to html-webpack-plugin . Allowed values are as follows:
Name Type Default Description title Webpack App The title to use for the generated HTML document filename ‘index.html’ The file to write the HTML to. Defaults to index.html . You can specify a subdirectory here too (eg: assets/admin.html ). The [name] placeholder will be replaced with the entry name. Can also be a function e.g. (entryName) => entryName + ‘.html’ . template « webpack relative or absolute path to the template. By default it will use src/index.ejs if it exists. Please see the docs for details templateContent false Can be used instead of template to provide an inline template — please read the Writing Your Own Templates section templateParameters false Allows to overwrite the parameters used in the template — see example inject true true || ‘head’ || ‘body’ || false Inject all assets into the given template or templateContent . When passing ‘body’ all javascript resources will be placed at the bottom of the body element. ‘head’ will place the scripts in the head element. Passing true will add it to the head/body depending on the scriptLoading option. Passing false will disable automatic injections. — see the inject:false example publicPath ‘auto’ The publicPath used for script and link tags scriptLoading ‘defer’ Modern browsers support non blocking javascript loading ( ‘defer’ ) to improve the page startup performance. Setting to ‘module’ adds attribute type=»module» . This also implies «defer», since modules are automatically deferred. favicon « Adds the given favicon path to the output HTML meta <> Allows to inject meta -tags. E.g. meta: base false Inject a base tag. E.g. base: «https://example.com/path/page.html minify true if mode is ‘production’ , otherwise false Controls if and in what ways the output should be minified. See minification below for more details. hash false If true then append a unique webpack compilation hash to all included scripts and CSS files. This is useful for cache busting cache true Emit the file only if it was changed showErrors true Errors details will be written into the HTML page chunks ? Allows you to add only some chunks (e.g only the unit-test chunk) chunksSortMode auto Allows to control how chunks should be sorted before they are included to the HTML. Allowed values are ‘none’ | ‘auto’ | ‘manual’ | excludeChunks > « Allows you to skip some chunks (e.g don’t add the unit-test chunk) xhtml false If true render the link tags as self-closing (XHTML compliant) Here’s an example webpack config illustrating how to use these options
webpack.config.js
entry: 'index.js', output: path: __dirname + '/dist', filename: 'index_bundle.js' >, plugins: [ new HtmlWebpackPlugin( title: 'My App', filename: 'assets/admin.html' >) ] >Generating Multiple HTML Files
To generate more than one HTML file, declare the plugin more than once in your plugins array
webpack.config.js
entry: 'index.js', output: path: __dirname + '/dist', filename: 'index_bundle.js' >, plugins: [ new HtmlWebpackPlugin(), // Generates default index.html new HtmlWebpackPlugin( // Also generate a test.html filename: 'test.html', template: 'src/assets/test.html' >) ] >Writing Your Own Templates
If the default generated HTML doesn’t meet your needs you can supply your own template. The easiest way is to use the template option and pass a custom HTML file. The html-webpack-plugin will automatically inject all necessary CSS, JS, manifest and favicon files into the markup.
Details of other template loaders are documented here.
plugins: [ new HtmlWebpackPlugin( title: 'Custom template', // Load a custom template (lodash by default) template: 'index.html' >) ]
index.html
> html> head> meta charset pl-s">utf-8"/> title>%= htmlWebpackPlugin.options.title %>title> head> body> body> html>
If you already have a template loader, you can use it to parse the template. Please note that this will also happen if you specify the html-loader and use .html file as template.
webpack.config.js
module: loaders: [ test: /\.hbs$/, loader: "handlebars-loader" > ] >, plugins: [ new HtmlWebpackPlugin( title: 'Custom template using Handlebars', template: 'index.hbs' >) ]You can use the lodash syntax out of the box. If the inject feature doesn’t fit your needs and you want full control over the asset placement use the default template of the html-webpack-template project as a starting point for writing your own.
The following variables are available in the template by default (you can extend them using the templateParameters option):
- htmlWebpackPlugin : data specific to this plugin
- htmlWebpackPlugin.options : the options hash that was passed to the plugin. In addition to the options actually used by this plugin, you can use this hash to pass arbitrary data through to your template.
- htmlWebpackPlugin.tags : the prepared headTags and bodyTags Array to render the , , and tags. Can be used directly in templates and literals. For example:
html> head> %= htmlWebpackPlugin.tags.headTags %> head> body> %= htmlWebpackPlugin.tags.bodyTags %> body> html>publicPath: string; js: string[ ]; css: string[ ]; manifest?: string; favicon?: string;
The template can also be directly inlined directly into the options object.
⚠️ templateContent does not allow to use webpack loaders for your template and will not watch for template file changeswebpack.config.js
new HtmlWebpackPlugin( templateContent: `
Hello World
` >)The templateContent can also access all templateParameters values.
⚠️ templateContent does not allow to use webpack loaders for your template and will not watch for template file changeswebpack.config.js
new HtmlWebpackPlugin( inject: false, templateContent: (htmlWebpackPlugin>) => ` $htmlWebpackPlugin.tags.headTags>
Hello World
$htmlWebpackPlugin.tags.bodyTags> ` >)Filtering Chunks
To include only certain chunks you can limit the chunks being used
webpack.config.js
plugins: [ new HtmlWebpackPlugin( chunks: ['app'] >) ]
It is also possible to exclude certain chunks by setting the excludeChunks option
webpack.config.js
plugins: [ new HtmlWebpackPlugin( excludeChunks: [ 'dev-helper' ] >) ]
Minification
If the minify option is set to true (the default when webpack’s mode is ‘production’ ), the generated HTML will be minified using html-minifier-terser and the following options:
collapseWhitespace: true, keepClosingSlash: true, removeComments: true, removeRedundantAttributes: true, removeScriptTypeAttributes: true, removeStyleLinkTypeAttributes: true, useShortDoctype: true >To use custom html-minifier options pass an object to minify instead. This object will not be merged with the defaults above.
To disable minification during production mode set the minify option to false .
Meta Tags
If the meta option is set the html-webpack-plugin will inject meta tags.
For the default template the html-webpack-plugin will already provide a default for the viewport meta tag.Please take a look at this well maintained list of almost all possible meta tags.
name/content meta tags
Most meta tags are configured by setting a name and a content attribute.
To add those use a key/value pair:webpack.config.js
plugins: [ new HtmlWebpackPlugin( 'meta': 'viewport': 'width=device-width, initial-scale=1, shrink-to-fit=no', // Will generate: 'theme-color': '#4285f4' // Will generate: > >) ]
Simulate http response headers
The http-equiv attribute is essentially used to simulate a HTTP response header.
This format is supported using an object notation which allows you to add any attribute:webpack.config.js
plugins: [ new HtmlWebpackPlugin( 'meta': 'Content-Security-Policy': 'http-equiv': 'Content-Security-Policy', 'content': 'default-src https:' >, // Will generate: // Which equals to the following http header: `Content-Security-Policy: default-src https:` 'set-cookie': 'http-equiv': 'set-cookie', content: 'name=value; expires=date; path=url' >, // Will generate: // Which equals to the following http header: `set-cookie: value; expires=date; path=url` > >) ]
Base Tag
When the base option is used, html-webpack-plugin will inject a base tag. By default, a base tag will not be injected.
The following two are identical and will both insert :
new HtmlWebpackPlugin( 'base': 'http://example.com/some/page.html' >)
new HtmlWebpackPlugin( 'base': 'href': 'http://example.com/some/page.html' > >)
The target can be specified with the corresponding key:
new HtmlWebpackPlugin( 'base': 'href': 'http://example.com/some/page.html', 'target': '_blank' > >)
Long Term Caching
For long term caching add contenthash to the filename.
Example:
plugins: [ new HtmlWebpackPlugin( filename: 'index.[contenthash].html' >) ]
contenthash is the hash of the content of the output file.
Refer webpack’s Template Strings for more details
Events
To allow other plugins to alter the HTML this plugin executes tapable hooks.
The lib/hooks.js contains all information about which values are passed.
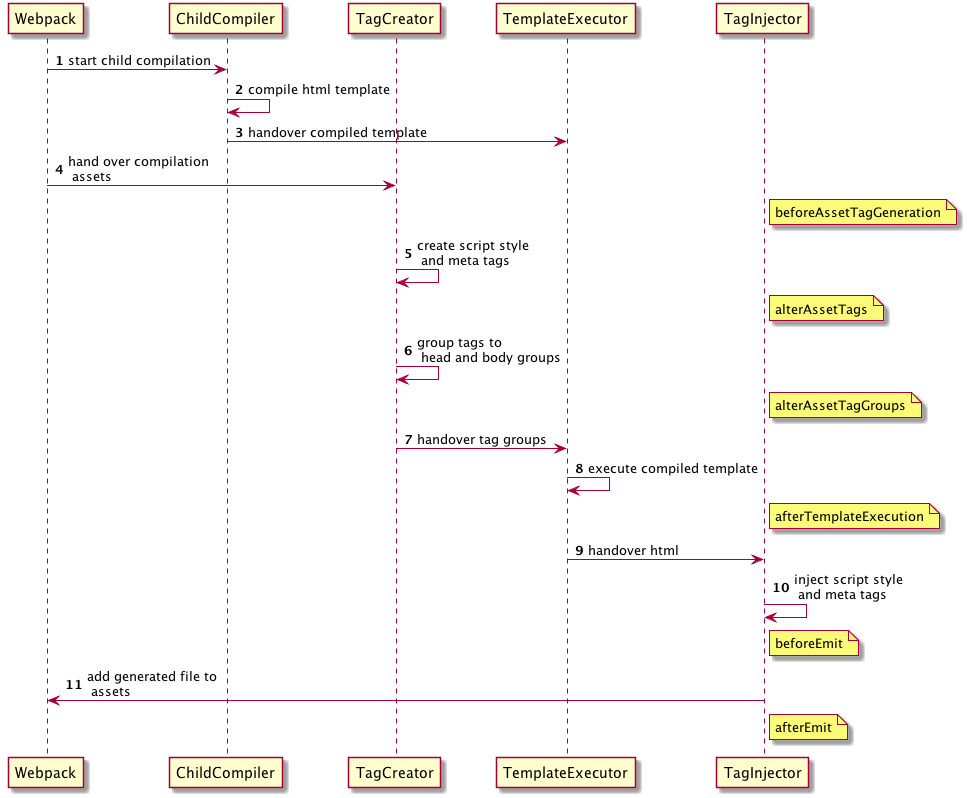
beforeAssetTagGeneration hook
AsyncSeriesWaterfallHook>, css: Array>, favicon?: string | undefined, manifest?: string | undefined >, outputName: string, plugin: HtmlWebpackPlugin >>alterAssetTags hook
AsyncSeriesWaterfallHook, styles: Array, meta: Array, >, publicPath: string, outputName: string, plugin: HtmlWebpackPlugin >>alterAssetTagGroups hook
AsyncSeriesWaterfallHook, bodyTags: Array, publicPath: string, outputName: string, plugin: HtmlWebpackPlugin >>afterTemplateExecution hook
AsyncSeriesWaterfallHook, bodyTags: Array, outputName: string, plugin: HtmlWebpackPlugin, >>beforeEmit hook
AsyncSeriesWaterfallHook>afterEmit hook
AsyncSeriesWaterfallHook>plugin.js
// If your plugin is direct dependent to the html webpack plugin: const HtmlWebpackPlugin = require('html-webpack-plugin'); // If your plugin is using html-webpack-plugin as an optional dependency // you can use https://github.com/tallesl/node-safe-require instead: const HtmlWebpackPlugin = require('safe-require')('html-webpack-plugin'); class MyPlugin apply (compiler) compiler.hooks.compilation.tap('MyPlugin', (compilation) => console.log('The compiler is starting a new compilation. ') // Static Plugin interface |compilation |HOOK NAME | register listener HtmlWebpackPlugin.getHooks(compilation).beforeEmit.tapAsync( 'MyPlugin', // (data, cb) => // Manipulate the content data.html += 'The Magic Footer' // Tell webpack to move on cb(null, data) > ) >) > > module.exports = MyPlugin
webpack.config.js
plugins: [ new MyPlugin( options: '' >) ]
Note that the callback must be passed the HtmlWebpackPluginData in order to pass this onto any other plugins listening on the same beforeEmit event
Maintainers
Backers
Thank you to all our backers!
If you want to support the project as well become a sponsor or a a backer.Contributors
This project exists thanks to all the people who contribute.
You’re free to contribute to this project by submitting issues and/or pull requests. This project is test-driven, so keep in mind that every change and new feature should be covered by tests.