Онлайн конвертер векторной графики
Сконвертируйте онлайн файлы векторной графики любого формата
Выберите файлы
Выберите файлы
Перетащите файлы сюда. 100 MB максимальный размер файла или Регистрация
Легко пользоваться
Добавьте нужный векторный файл с устройства, Dropbox, Google Диска или, вставив ссылку, нажмите кнопку «Конвертировать». Подождите немного и сохраните результат. Обычно процесс занимает одну-две минуты.
Преобразование в облаке
Convertio работает в нашем облаке, избавляя ваш компьютер или телефон от всей тяжелой работы.
Онлайн конвертер
Конвертер работает онлайн, а значит, у вас нет необходимости скачивать и устанавливать на ваше устройство какую-либо программу, и вы можете получить доступ к конвертированию из любого места.
Конфиденциальность гарантирована
Веб-сайт защищен с помощью шифрования SSL, что обеспечивает полную безопасность и конфиденциальность ваших исходных и результирующих векторных файлов. Узнать больше о безопасности.
Простой интерфейс
Интерфейс простой и интуитивно понятный, для использования требуется всего один клик мыши! Вам даже не нужно понимать, как устроены процессы конвертации, чтобы использовать конвертер.
Поддерживает все платформы
Независимо от того, какое устройство вы используете, инструмент работает на любом из них — будь то Windows, Mac, Linux, Android или iPhone.
Как из procreate перевести в вектор
Convert Procreate Designs into Vector Format (iPad only) – Tutorial
In recent years, the app Procreate has become a favorite for many t-shirt designers, but it can only create artwork in a pixel format.
The most popular vector apps on the iPad are Affinity Designer and Adobe Illustrator. But unfortunately, neither can automatically trace images and convert them to vector format directly on the iPad. So the most common workaround was to export your Procreate graphic and edit it further on the computer. Or to open it in a vector program and redraw it.
But it is possible to automatically trace the graphic and turn your Procreate image into a vector right on your iPad. Let’s find out how!
Why should you convert your Procreate files into a vector?
The drawing experience with the Apple Pencil on iPad is very intuitive and great. And it’s very accessible to many budding t-shirt designers. The iPad costs less than a graphics tablet, and instead of paying for expensive Adobe subscriptions, Procreate is only about $10 as a one-time payment.
But there’s a downside. Depending on the power of your iPad and the size of your canvas, Procreate has a limited number of layers. T-shirt design files are usually huge. For example, we design in 4500 x 5400 pixels. That’s a size of almost 39 x 45 cm at 300 dpi.
On the iPad mini, we end up with 7 layers at that size. On the more powerful iPad Pro, it’s 16 layers.
So if that number of layers isn’t enough, it’s a fantastic solution to turn your art into a vector. And you can do that right on the iPad.
Vector graphics can be scaled indefinitely without sacrificing quality. If you did that with pixel files, they would become blurry and pixelated. If you convert your Procreate files to vector files, you can design with a smaller file size. This gives you more layers to work with. And after you vectorize your design, you can scale it to the size you want.
Creating a Vector from Procreate Graphics (Simple Designs)
The easiest way is to create a vector from a design made with just one color.
Maggi posted a YouTube tutorial on how to turn your Procreate graphic into a vector. And you don’t have to redraw your graphic in a vector program. It will be traced and vectorized automatically.
She explains two different methods. For the first option, she shows how you can use free tools on the internet.
The second option is Adobe Caption. If you already have an Adobe subscription, you can install it on your iPad at no additional cost. With this app, you have the option to trace your design automatically.
Convert Procreate graphics with multiple colors into a vector
However, this method is not only limited to single-colored designs. You can also use it to create vectors from more complicated designs. But since the process takes a bit longer, Maggi shows you how in one of her Skillshare courses.
If you’re new to Skillshare, you can sign up for a free trial using this link. You’ll get a free trial (currently two weeks) and can watch the course for free. (Affiliate link – We get a small commission at no extra cost to you, and it helps us to keep this channel going!)
Procreate to Illustrator: How to Convert Procreate Drawings into Vectors
Convert Procreate files into vectors with this easy tutorial! You will love using Procreate with Illustrator! Speed up your illustration workflow with this easy tutorial.
You might also like this guide on how to use Procreate.

This post contains affiliate links. By purchasing an item through an affiliate link, I earn a small commission at no extra cost to you. As an Amazon Associate I earn from qualifying purchases.
Vectorizing Procreate Drawing FAQs
What is the difference between Procreate and Illustrator?
Procreate is a drawing app on the iPad that allows you to use the Apple pencil to create artwork. It feels very natural to draw with a pencil versus a mouse. Procreate is very easy to learn.
However, Procreate is raster-based, which means that it used pixels and loses quality when scaled larger.
Adobe Illustrator is a drawing program for the computer (there is an app available, but it’s limited.) Illustrator is professional art software so the learning curve is a bit steeper, but it’s still possible to teach yourself.
Illustrator is vector-based, which means that the art can be scaled infinitely without losing quality.
I find it much easier to recolor artwork using Illustrator as well. It has a lot of fun features like the pattern maker, the recolor tool, and image trace, which make it unlike any of its cheaper competitors.
Why Use Procreate with Illustrator?
I love using Procreate with Illustrator because it feels so natural to draw with the Apple pencil.
This makes it really easy to create files for my Cricut (SVG files) or create elements for patterns.
Recently, I discovered just how easy and FAST it is to import drawing from Procreate to Illustrator.
I’m working on adding floral elements to an old pattern listing in my Etsy shop and I was thrilled with how much easier it is to create the illustration in Procreate and bring them to Illustrator.
Can you use another program besides Illustrator?
As far as I know, no other vector-based software has the image trace function. It’s very possible that I’m wrong though.
Other programs might have workarounds for this process, but I’m not familiar with them.
I understand that Adobe is expensive, but it’s totally possible to pay for it by selling your art on Etsy.
Converting a Procreate Drawing into a Vector
This is a 2-step process. The first part involves you drawing in Procreate, but there are a few differences to how you normally work.
After that, we bring the artwork into Illustrator. (If you have a Mac, this part is so easy. )
Getting Your Drawing Ready on Procreate
There are 2 really important things to know about creating your artwork in Procreate.
The first is that every single element needs to be on it’s own layer.
The second is that you will need to make every single item black. (Illustrator can handle colored files, but it works so much better with black shapes.)
If I had to add one more tip, I would say save textured brushes for textured layers only, not the actual artwork. I love using my monoline brush.
- Create a large canvas to work on. I used 2048 x 2048 pixels.
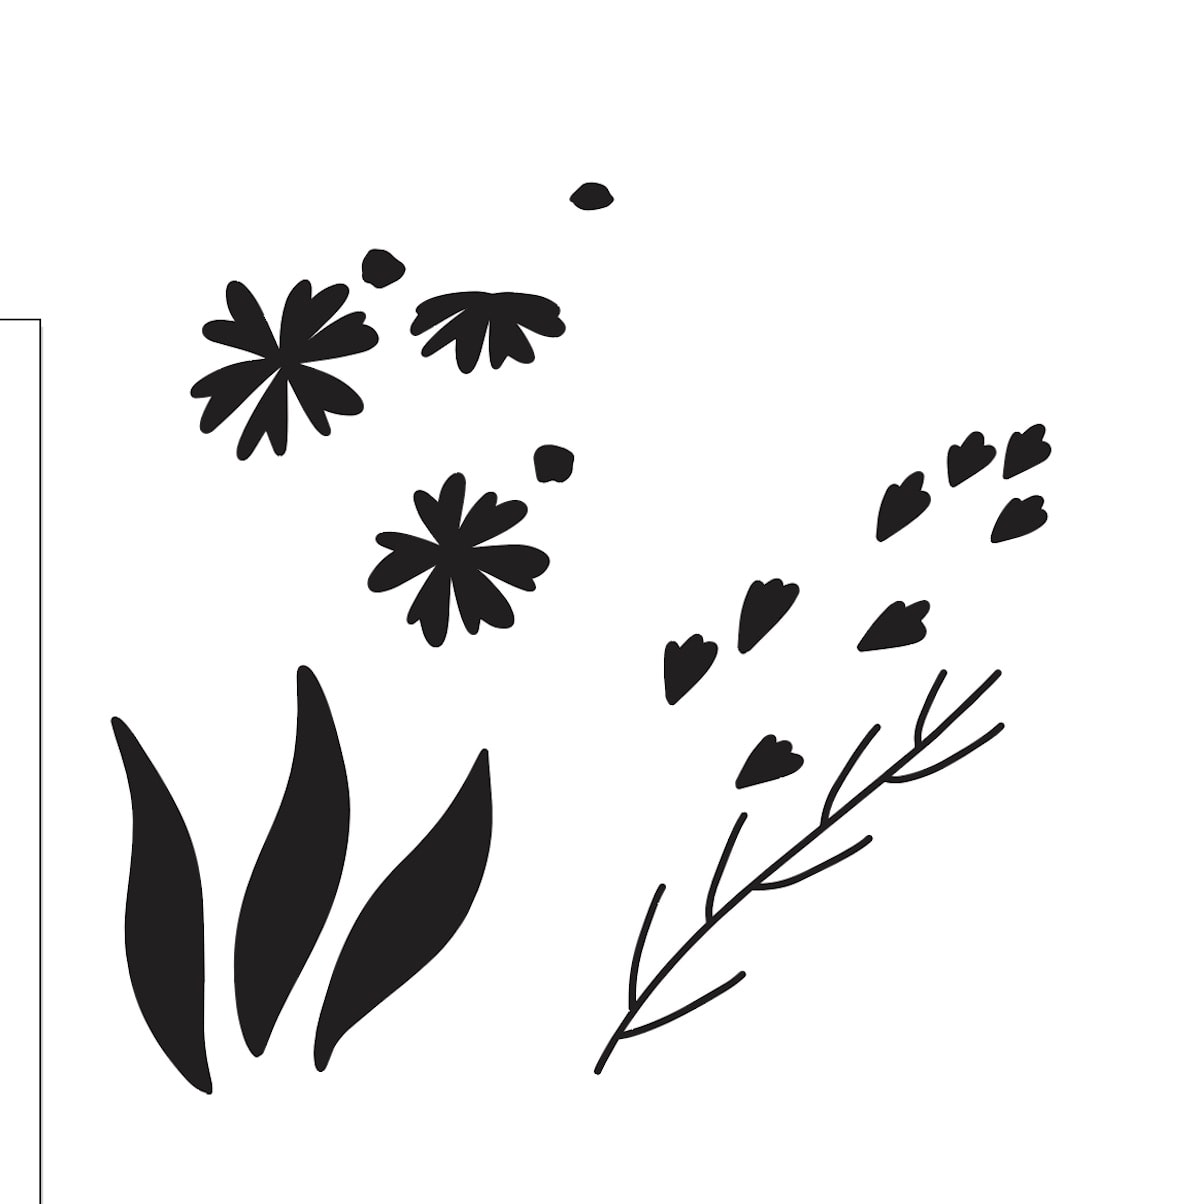
- Draw your artwork using a new layer for every single element. For my florals, I use one layer for the petals, another for the flower center, another for any other flower details.

- You can draw these using colors or you can lower the opacity to be able to see the placement for the flower details.
- Draw as many layers as you want (or that your iPad allows.) Even 25 layers don’t take very long to vectorize! Hide layers as you go so that you can see what you’re working on.

- Make every layer black. Select alpha lock for each layer, select black, and then click fill layer.
- Turn the layers back on that you want to import. You will have a big black blob.

- Turn off the background layer. (If you forget this step, it’s not a huge deal.)
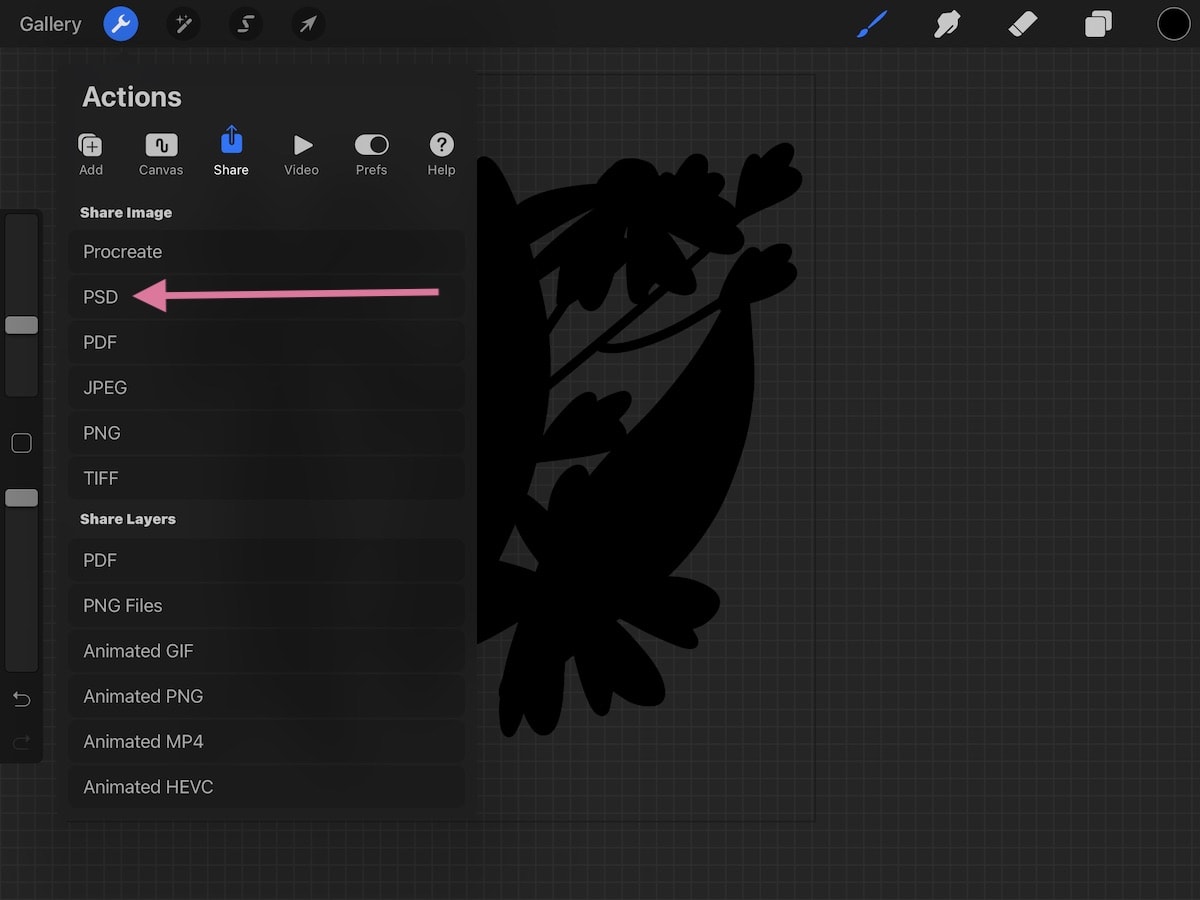
- Share as a PSD file. This brings the entire file with the layers preserved.
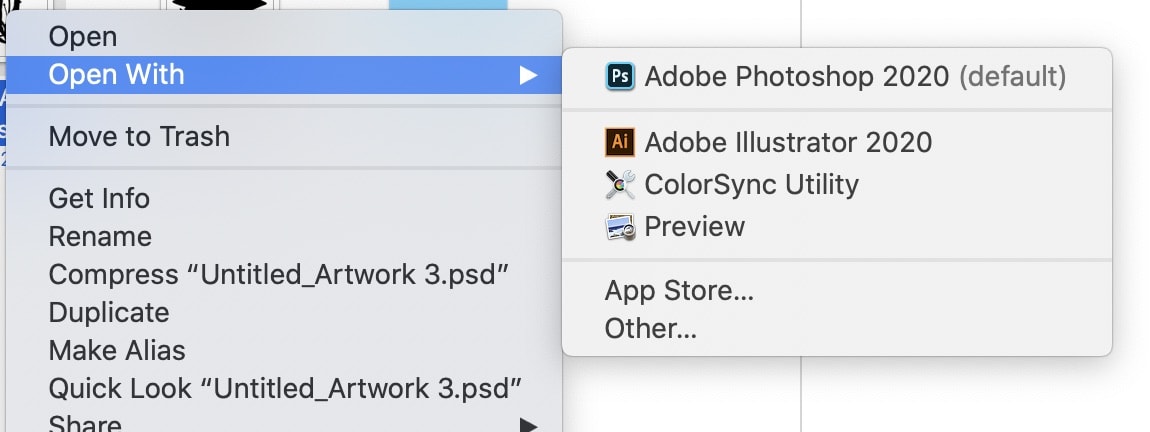
- If you have a Mac, airdrop this file into your computer. If you have Windows, you will need to get them on your computer using google drive or emailing the file if it’s small enough.
Using Illustrator to Convert Drawing to Vectors
- Open the PSD file with Illustrator. You will have to manually select this or it will open in Photoshop.
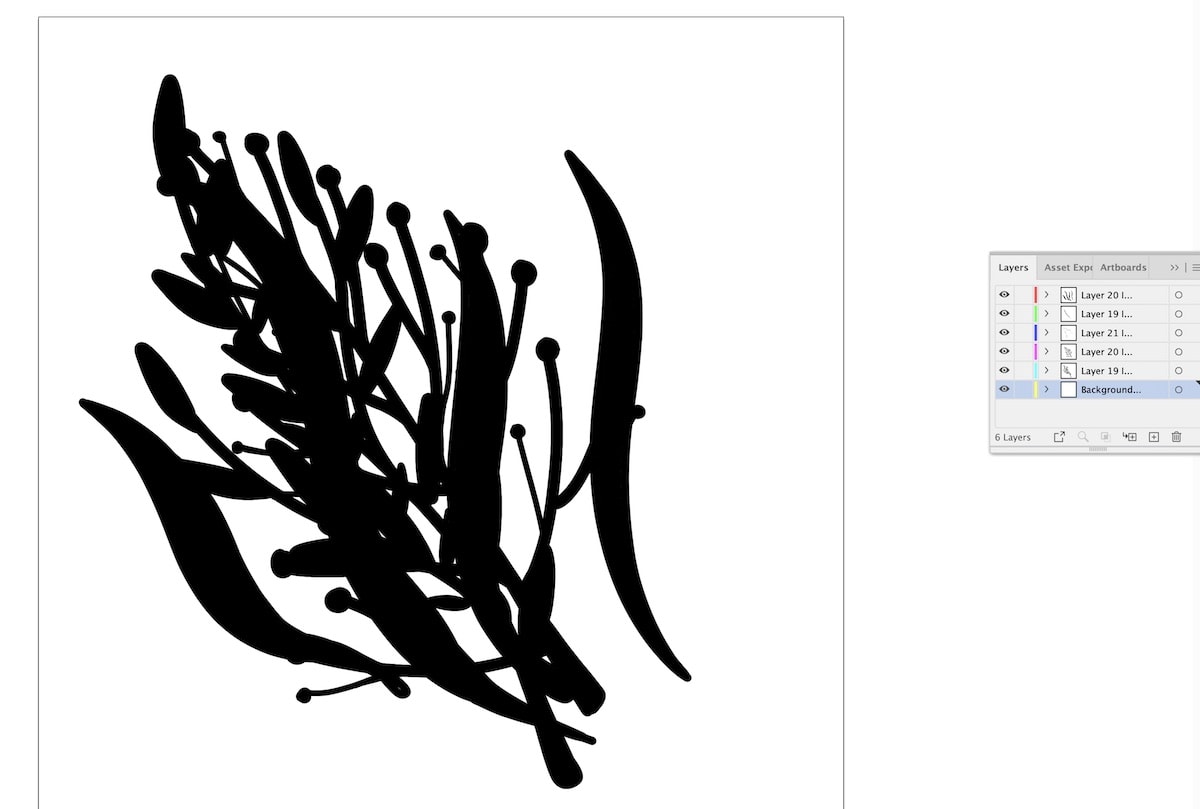
- Select «Convert Layers to Objects» and click okay.

- This brings the layered file into your artboard.
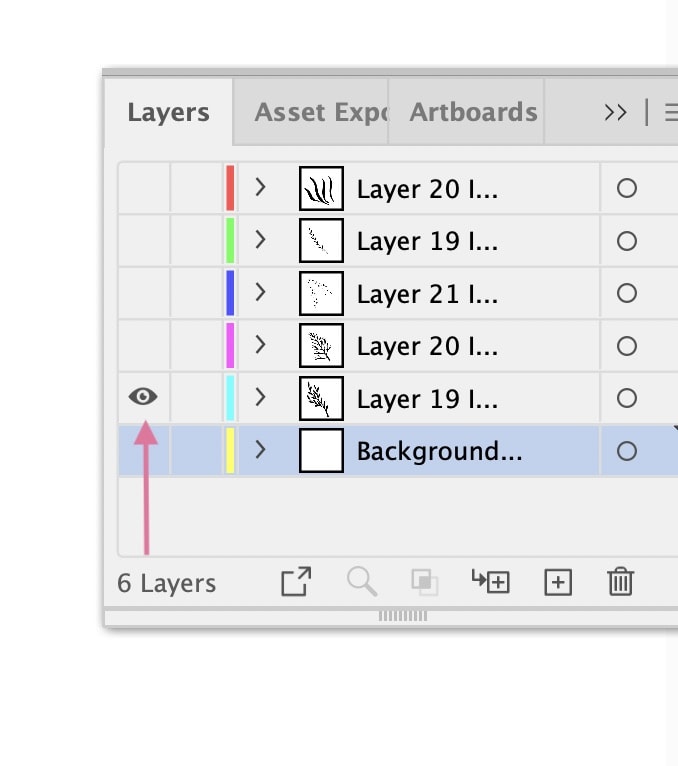
- Turn off all of the layers except the 1st one (not the background.)
- When you click on the layers, you will see Image Trace at the top, but we’re going to need to whole window panel open so go to window > Image trace.
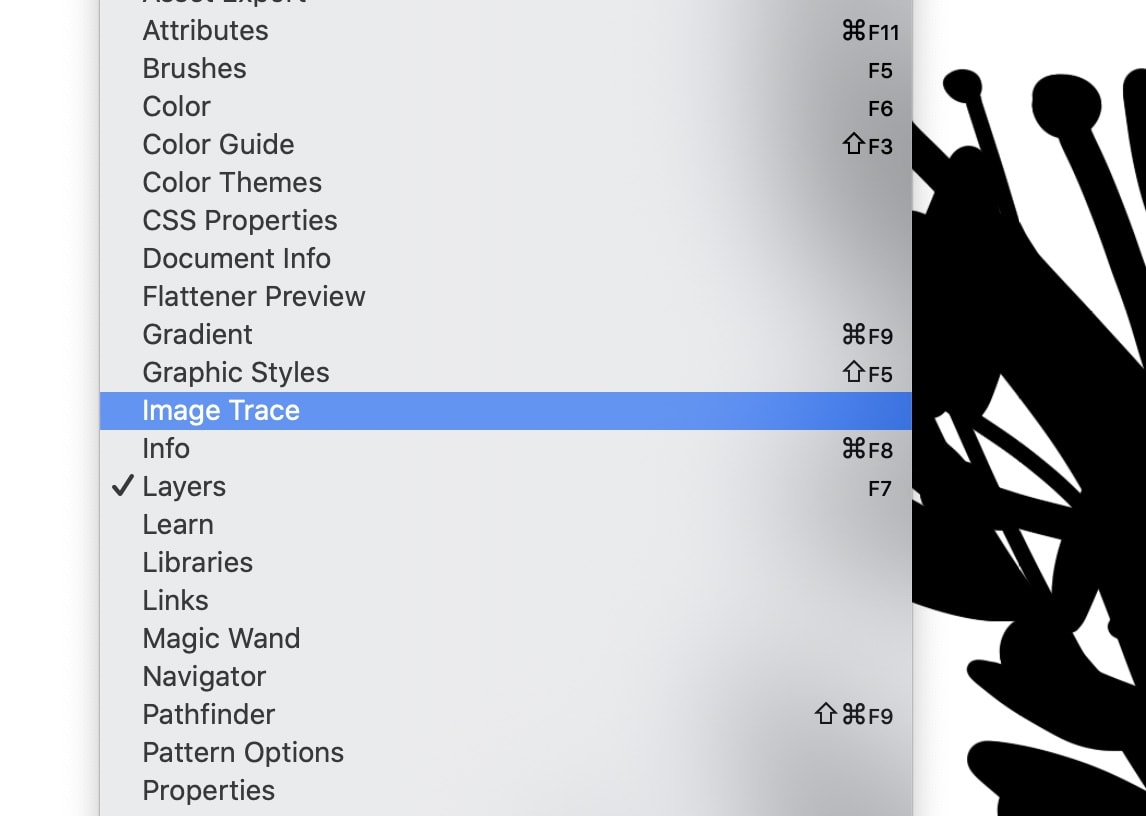
- It brings up a small window. Click advanced to get all of the options.
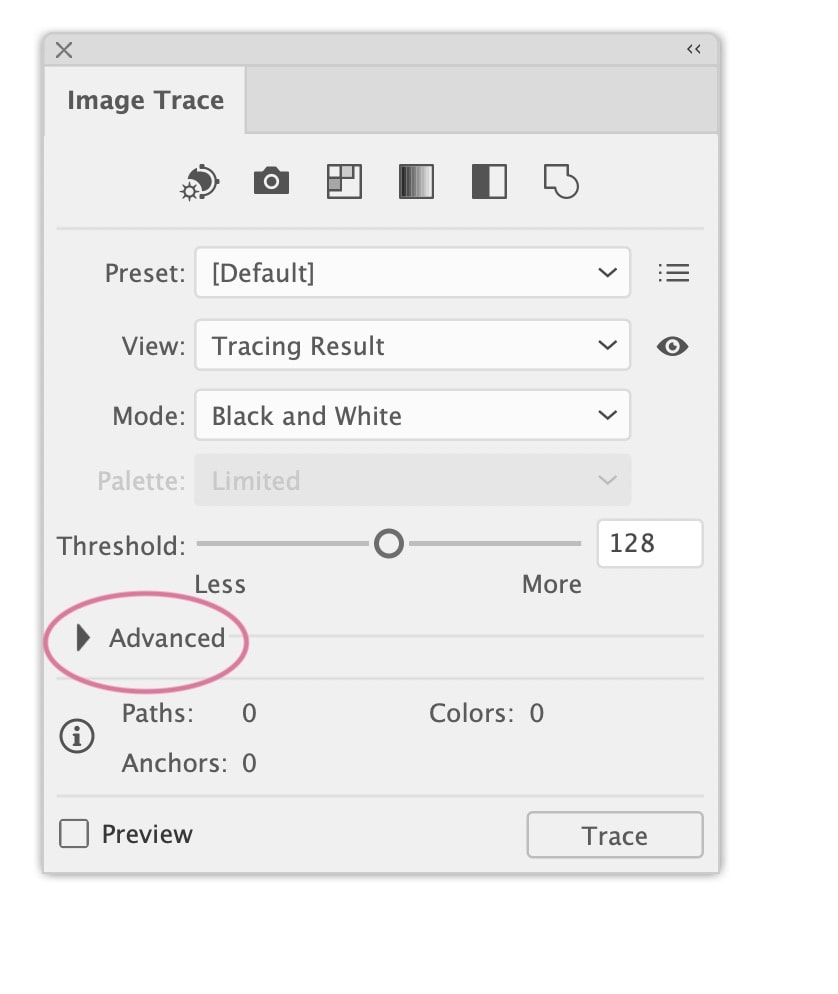
- Click ignore white.*
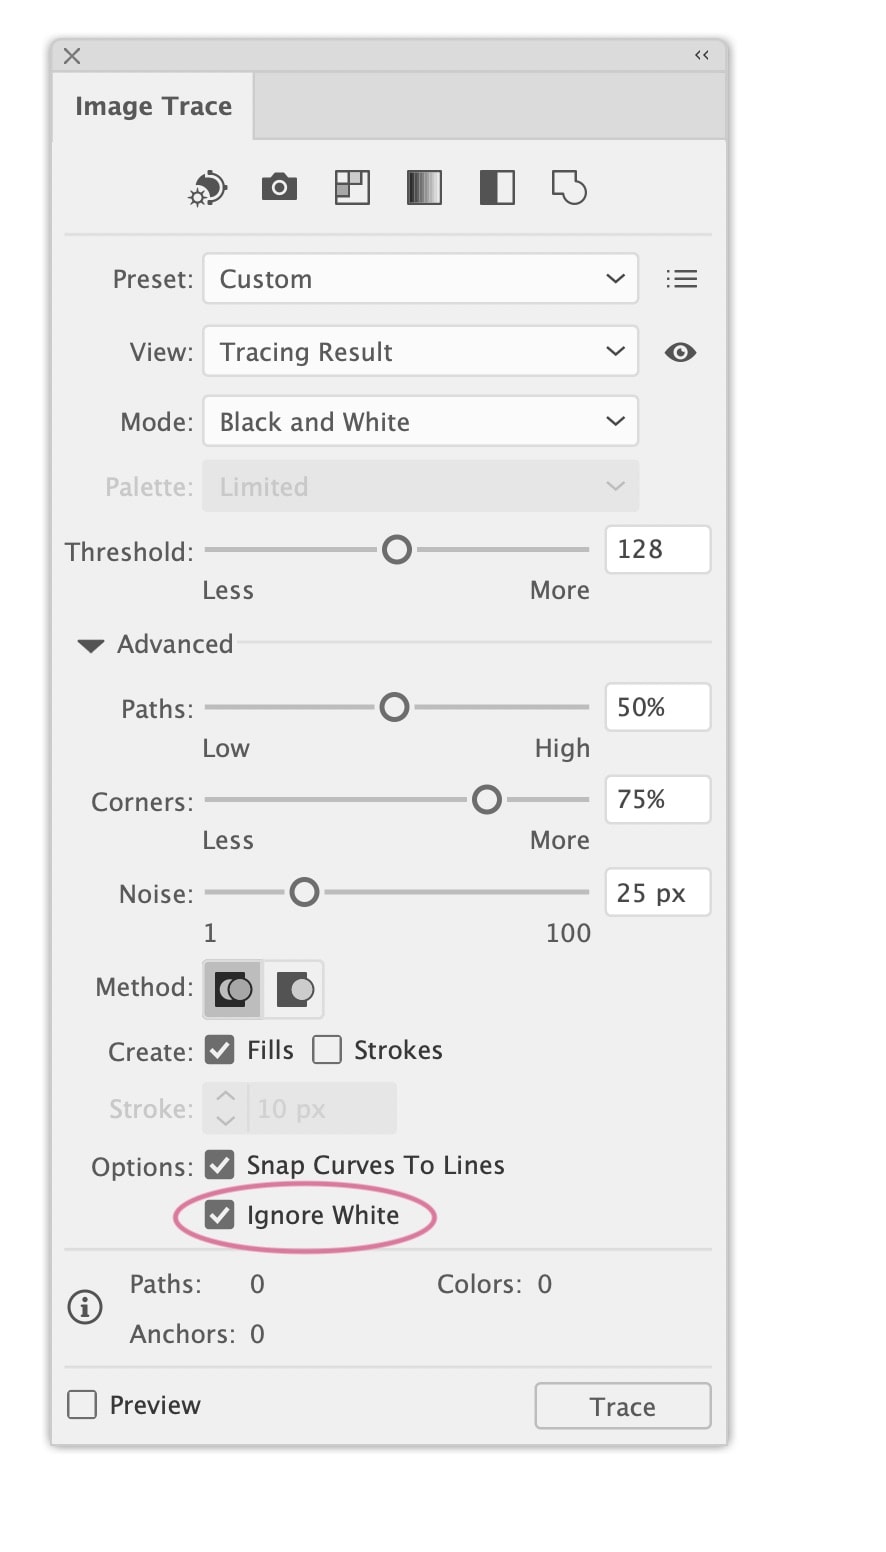
- You can play with the modes and settings to get better results for the image trace.
- Click Trace. (This isn’t permanent, so don’t worry about it messing it up.) You will get a message about it taking a while since the image is large.
- If you’re not happy with the results, play with the settings until you are happy.
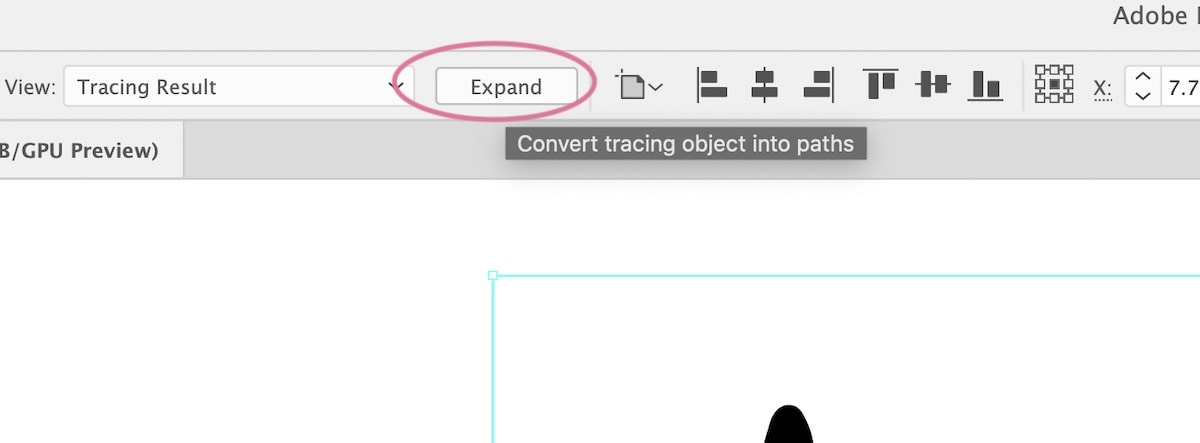
- When you’re happy, click expand at the top of the screen.
- Continue for all of the layers, hiding them and revealing them as needed. I find it helpful to move the completed layers to the side of the artboard.
*If you forget to hit «ignore white», it’s no big deal. Ungroup the shape and delete the background.
Clean Up the Shapes
From there, you have the option to clean up the shapes using the nodes.
You can manipulate each node using the direct select tool or you can use the pencil tool or the smooth tool to draw along the wonky area. It will magically straighten it out. Just make sure that you start drawing on the line.
You can zoom way in if you need to.
Just keep in mind that if you make things too perfect, you lose that beautiful hand-drawn quality that makes it so special.
Now that your drawings are vectorized, they can be resized as much as you want.
Recoloring is super easy and fun too.

From here, you can do whatever you want with the elements. It’s easy to save them as SVG files to use with the Cricut. Or you can make simple patterns. Tutorial coming soon.
Hope you enjoyed this tutorial. When I realized how easy it is to use Procreate with Illustrator, it felt life-changing.
I’m looking forward to sharing a lot more Illustrator tutorials. If there’s anything specific that you want to know, leave me a comment with your suggestion.
Как создать файлы SVG в Cricut?
Во-первых, я должен указать, что вы не можете экспортировать в формат SVG напрямую из Procreate. Вам понадобится другая программа, чтобы превратить ваш файл Procreate в SVG. Я использую Adobe Illustrator, но вы также можете конвертировать в SVG с помощью бесплатного Inkscape.
Как мне сделать файлы SVG?
Выберите «Файл» > «Сохранить как» в строке меню. Вы можете создать файл, а затем выбрать «Файл» > «Сохранить как», чтобы сохранить файл. В окне сохранения измените Формат на SVG (svg) и нажмите Сохранить. Измените формат на SVG.
Как сделать PNG в procreate?
Вот как это сделать:
- Убедитесь, что ваш фон исчез. …
- Нажмите на гаечный ключ, чтобы открыть вкладку действий.
- Нажмите кнопку поделиться.
- Выберите PNG в списке «Поделиться изображением». …
- Решите, куда вы хотите экспортировать свое искусство Procreate, и нажмите на него.
Как преобразовать JPEG в SVG?
Как конвертировать JPEG в SVG
- Загрузить jpeg-файл(ы) Выберите файлы с компьютера, Google Диска, Dropbox, URL-адреса или перетащив их на страницу.
- Выберите «в svg». Выберите svg или любой другой формат, который вам нужен в результате (поддерживается более 200 форматов)
- Загрузите ваш файл svg.
Создает ли procreate векторные файлы?
Procreate работает только с пикселями, вы не можете создавать векторы в Procreate. Если вы хотите создать шрифты, логотипы или вырезать файлы для Cricut или Silhouette, вам нужно будет преобразовать ваши надписи в векторный формат. Это сделает файл полностью масштабируемым.
Какое программное обеспечение используется для создания файлов SVG?
Вероятно, самым известным программным обеспечением для создания файлов SVG является Adobe Illustrator. Функция создания файлов SVG из растровых изображений называется «Трассировка изображения». Вы можете получить доступ к панели инструментов, выбрав «Окно» > «Трассировка изображения».
How to Vectorise your Procreate Lettering
**Please Note: if you are looking for Vector instructions using your iPad only (without need for a desktop), please click here.
So you’ve been practicing hard, your lettering and calligraphy skills are improving leaps and bounds. You post your work to instagram and other social media channels and your friends are starting to notice.
Maybe one of them has asked you to design a logo for their business. Or maybe you were asked to help with a wedding invitation or a commissioned print. What do you do? You haven’t worked in print design before and are worried you’ll do something wrong and don’t know where to start.
Don’t worry. Today, I’m going to show you a very simple method for getting your Procreate lettering into vector format so you can scale it up or down easily without loosing quality. This will ensure the artwork is ready for print at whatever size and format you need.
What is a Vector & Why is it Important?
Let’s first look at the difference between working with pixels (like we do in Procreate), and Vector art. Pixels are made up of tiny little squares. When you paint or draw in Procreate you are filling those physical pixel squares with colour. The problem is, if you want to then scale your lettering to a larger size, you will start to see some fuzziness around the edges as you stretch the pixels. After all the effort you put into perfecting those curves, this is the last thing we want!
![]()
This is where vectors come in. Vector artwork is mapped by the curved outline of the shape (from point to point). This means the artwork keeps its form at any size. You can scale it up or down as many times as you like, and the design will still appear crisp without any loss in quality. It is rendered by those points and their relationship to one another.
In most cases (almost all), logos are created in vector format. This will suit the various instances it needs to be published, like a website, a business card, or even a 10 foot billboard. The format of the artwork file might change back to pixels for delivery to the printer or web designer (ie. .jpg, .png, .tiff), but the master file you use to size and export that image will be a vector (file extension ‘.ai’ in illustrator).
I’ve given you a very simplified overview but if you want to geek out over it, you can find other articles online for more in depth information.
Now we know what a vector is, how do we make one?
How to Create a Vector
In order to create vector art, you need Vector software installed on your computer. A few of the most popular choices include Sketch, Inkscape, or Adobe Illustrator. In this tutorial, we’ll be working in Illustrator. If you haven’t got a copy, you can download a trial version which you can then use free for 30 days. It is a skill worth knowing if you want to create something you can use in these situations.
The best way to learn something new is by doing it. Now is the time to get out your iPad, find a piece of lettering you have created in Procreate so you can follow along. It doesn’t have to be the perfect lettering. For best results, I recommend using a piece that is fairly simple. Preferably black and white, without lots of shading and texture. Got one ready?

1. Export your Lettering from Procreate
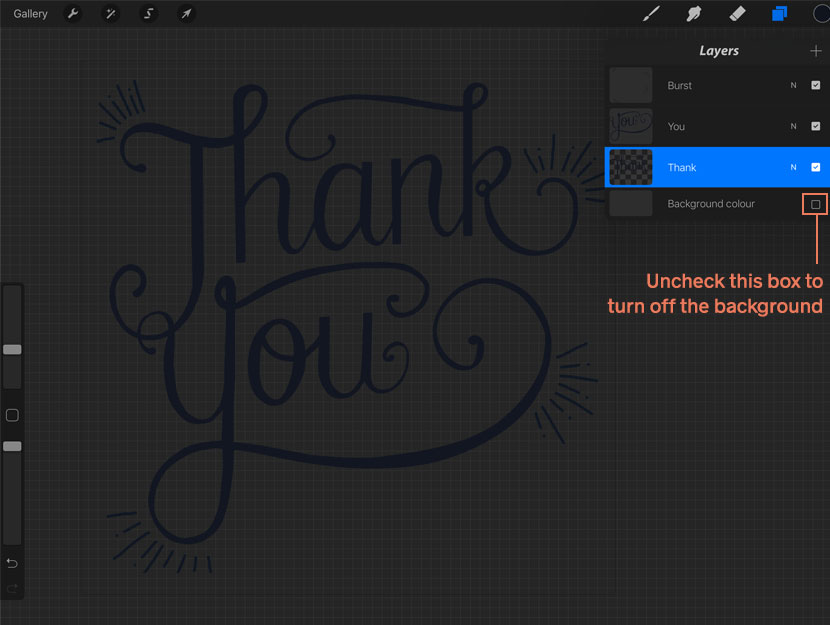
Step 1
Open your artwork in Procreate and turn off your background layer (tap the the check box next to the layer thumbnail in the layer panel). You should now see the lettering on the Procreate grid background.
Step 2
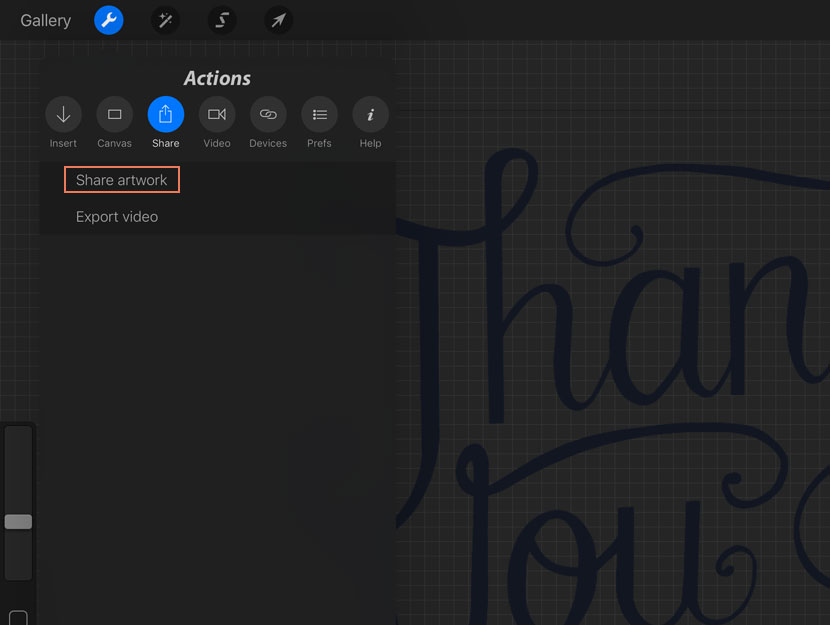
Next we’ll export the artwork as a .png file. This file format allows you to keep the transparency and save it without a background.
To do this tap on the wrench icon in the top toolbar. Select the ‘Share’ menu panel, and tap ‘Share artwork’. Choose ‘.png’ as the format and save in a location you can access from your computer (like Dropbox or iCloud). If you’re not set up on either of those, you can save the image locally to your iPad and email it yourself to pick up on your computer.
2. Open your Artwork File in Illustrator
Step 1
Fire up Adobe Illustrator on your computer. Choose ‘Open’ from the ‘File’ menu drop down and locate your png file. This will open the artwork on a canvas in Illustrator.
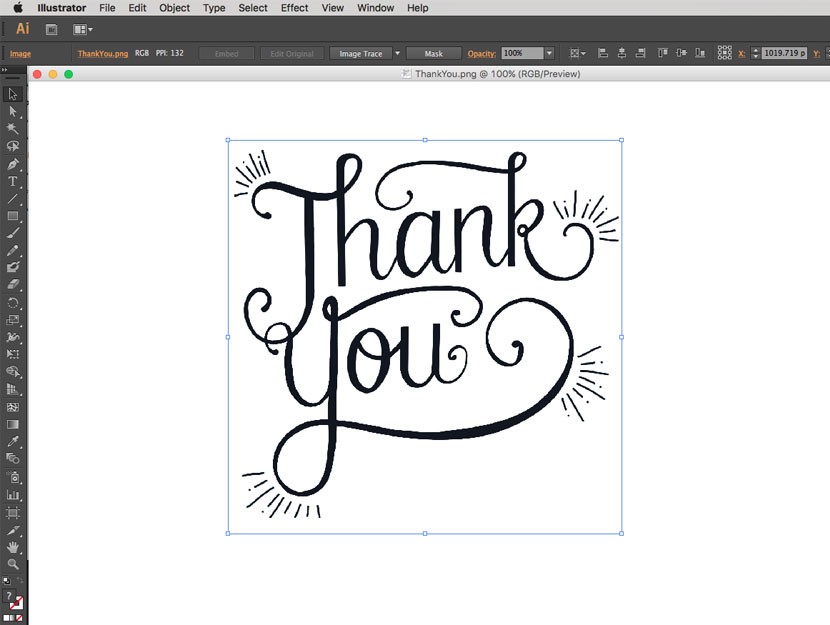
3. Create your Vector with Image Trace
Step 1
Next, open the ‘Window’ drop down from the main menu and choose ‘Image Trace’. This will reveal the Image Trace panel and give us access to the settings.
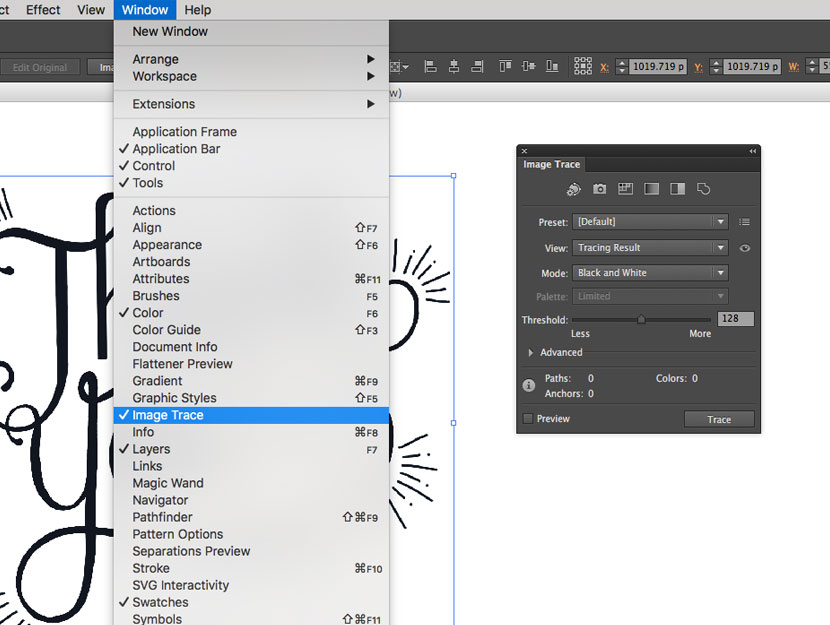
Step 2
Now with your Image Trace Panel open, we can adjust the settings to create our vector art. There is no hard and fast rule about this, but adjusting the values will get us closer to the look of the original drawing.
Expand the ‘Advanced’ settings of your Image Trace options. You’ll see you have a few levels available to play with. Rolling your mouse over the each will give more information of what each setting controls.
Make sure you select the ‘Preview’ check box. This allows you to see the effects of any changes you make. You might want play around and see what suits your work most. Zoom in to see how the levels are adjusting the shape.
I like to increase the value of my ‘Paths’. This gives a tighter fit and is more accurate to the drawing (especially if you have a really hand drawn look you are trying to preserve).
Decrease your ‘Corners’ setting to smooth out the path.
Bring your ‘Noise’ setting right down too.
Finally , tick the ‘Ignore White’ box. This will extract the white background from the vector so you have your lettering as one shape. As we saved the lettering out as a transparent png, we don’t really need to do this. If you had a flattened black and white image, this setting is very helpful and allows you to easily remove the background.
Похожие публикации:
- Как загрузить свою игру в play market
- Как установить приложение на андроид без google play
- Language not selected при установке microsoft office 2019 что делать
- Где заполнить стаж сотрудника в 1с 8 бухгалтерия для больничного
Как из procreate перевести в вектор
Procreate to Illustrator: How to Convert Procreate Drawings into Vectors
Convert Procreate files into vectors with this easy tutorial! You will love using Procreate with Illustrator! Speed up your illustration workflow with this easy tutorial.
You might also like this guide on how to use Procreate.
This post contains affiliate links. By purchasing an item through an affiliate link, I earn a small commission at no extra cost to you. As an Amazon Associate I earn from qualifying purchases.
Vectorizing Procreate Drawing FAQs
What is the difference between Procreate and Illustrator?
Procreate is a drawing app on the iPad that allows you to use the Apple pencil to create artwork. It feels very natural to draw with a pencil versus a mouse. Procreate is very easy to learn.
However, Procreate is raster-based, which means that it used pixels and loses quality when scaled larger.
Adobe Illustrator is a drawing program for the computer (there is an app available, but it’s limited.) Illustrator is professional art software so the learning curve is a bit steeper, but it’s still possible to teach yourself.
Illustrator is vector-based, which means that the art can be scaled infinitely without losing quality.
I find it much easier to recolor artwork using Illustrator as well. It has a lot of fun features like the pattern maker, the recolor tool, and image trace, which make it unlike any of its cheaper competitors.
Why Use Procreate with Illustrator?
I love using Procreate with Illustrator because it feels so natural to draw with the Apple pencil.
This makes it really easy to create files for my Cricut (SVG files) or create elements for patterns.
Recently, I discovered just how easy and FAST it is to import drawing from Procreate to Illustrator.
I’m working on adding floral elements to an old pattern listing in my Etsy shop and I was thrilled with how much easier it is to create the illustration in Procreate and bring them to Illustrator.
Can you use another program besides Illustrator?
As far as I know, no other vector-based software has the image trace function. It’s very possible that I’m wrong though.
Other programs might have workarounds for this process, but I’m not familiar with them.
I understand that Adobe is expensive, but it’s totally possible to pay for it by selling your art on Etsy.
Converting a Procreate Drawing into a Vector
This is a 2-step process. The first part involves you drawing in Procreate, but there are a few differences to how you normally work.
After that, we bring the artwork into Illustrator. (If you have a Mac, this part is so easy. )
Getting Your Drawing Ready on Procreate
There are 2 really important things to know about creating your artwork in Procreate.
The first is that every single element needs to be on it’s own layer.
The second is that you will need to make every single item black. (Illustrator can handle colored files, but it works so much better with black shapes.)
If I had to add one more tip, I would say save textured brushes for textured layers only, not the actual artwork. I love using my monoline brush.
- Create a large canvas to work on. I used 2048 x 2048 pixels.
- Draw your artwork using a new layer for every single element. For my florals, I use one layer for the petals, another for the flower center, another for any other flower details.
- You can draw these using colors or you can lower the opacity to be able to see the placement for the flower details.
- Draw as many layers as you want (or that your iPad allows.) Even 25 layers don’t take very long to vectorize! Hide layers as you go so that you can see what you’re working on.
- Make every layer black. Select alpha lock for each layer, select black, and then click fill layer.
- Turn the layers back on that you want to import. You will have a big black blob.
- Turn off the background layer. (If you forget this step, it’s not a huge deal.)
- Share as a PSD file. This brings the entire file with the layers preserved.
- If you have a Mac, airdrop this file into your computer. If you have Windows, you will need to get them on your computer using google drive or emailing the file if it’s small enough.
Using Illustrator to Convert Drawing to Vectors
- Open the PSD file with Illustrator. You will have to manually select this or it will open in Photoshop.
- Select «Convert Layers to Objects» and click okay.
- This brings the layered file into your artboard.
- Turn off all of the layers except the 1st one (not the background.)
- When you click on the layers, you will see Image Trace at the top, but we’re going to need to whole window panel open so go to window > Image trace.
- It brings up a small window. Click advanced to get all of the options.
- Click ignore white.*
- You can play with the modes and settings to get better results for the image trace.
- Click Trace. (This isn’t permanent, so don’t worry about it messing it up.) You will get a message about it taking a while since the image is large.
- If you’re not happy with the results, play with the settings until you are happy.
- When you’re happy, click expand at the top of the screen.
- Continue for all of the layers, hiding them and revealing them as needed. I find it helpful to move the completed layers to the side of the artboard.
*If you forget to hit «ignore white», it’s no big deal. Ungroup the shape and delete the background.
Clean Up the Shapes
From there, you have the option to clean up the shapes using the nodes.
You can manipulate each node using the direct select tool or you can use the pencil tool or the smooth tool to draw along the wonky area. It will magically straighten it out. Just make sure that you start drawing on the line.
You can zoom way in if you need to.
Just keep in mind that if you make things too perfect, you lose that beautiful hand-drawn quality that makes it so special.
Now that your drawings are vectorized, they can be resized as much as you want.
Recoloring is super easy and fun too.
From here, you can do whatever you want with the elements. It’s easy to save them as SVG files to use with the Cricut. Or you can make simple patterns. Tutorial coming soon.
Hope you enjoyed this tutorial. When I realized how easy it is to use Procreate with Illustrator, it felt life-changing.
I’m looking forward to sharing a lot more Illustrator tutorials. If there’s anything specific that you want to know, leave me a comment with your suggestion.
Convert Procreate Artwork to Vector with Illustrator

Learn how to go from Procreate to Illustrator
This post contains affiliate links. If you click through & make a purchase, I earn a small commission at no cost to you.
In today’s blog post, I’m going to teach you how to convert your designs from Procreate into vector graphics using Adobe Illustrator.
If you clicked on this post, I’m sure you already have some motivation for why you want to convert your art to vector format. But if you don’t, here are some super neat things you can do with vector art:
- Scale it infinitely to any size. Pixels are so last century.
- Save it as an SVG for vinyl cutting. Such as with your Cricut machine.
- Use it to create products.Onesies, tumblers, .svg craft files, etc.
By the way, if this is your first time hearing the term vector, then you should check out my blog post Everything You Need to Know About Vector and Raster Graphics as a Designer. I lay it all out in a way that’s easy to understand.
And without further ado, let’s fire up Procreate and Illustrator and get to work.
What You Need to Know Before Converting Your Artwork from Procreate to Vector Format
Before we begin, let’s cover some best practices when converting your artwork from Procreate into vector format with Illustrator.
First of all, artwork that is extremely detailed is never going to perfectly translate as a vector, especially if you’ve included gradient shading or drop shadows or intricate patterns, etc…
For the best results, use simple art work that is high quality resolution and isn’t overly detailed. Line art, or artwork with only a few high-contrast colors is going to render much more easily into vector format.
Technically you can use more detailed art, which I will also show you in this post, but expect to lose a lot of detail and/or be prepared to use your most advanced Illustrator skills to clean it up.
Speaking of which, if you want to learn Illustrator, check out my Free Illustrator Course for Beginners. You’ll find 12 short videos that will guide you through creating (and bonus: animating in Photoshop!) your first vector Illustration.
Step 1 : Save Your Procreate Art for Illustrator
Now that we’ve covered some best practices and adjusted our expectations, the first step in this process is to save your artwork from Procreate to open in Illustrator. All the file-types in Procreate are raster (as opposed to vector) format.
You can either save it as a .PNG or a .JPEG – the choice is yours! In my example, I saved as .png.
Then, transfer your file from your iPad to your computer either through Airdrop or by emailing it to yourself. I’ve chosen this floral letter G that I drew in Procreate- the resolution/quality isn’t stellar.
In Illustrator, choose Open and select your new artwork.

Step 2: Open Your File in Illustrator
Since Illustrator CC knows I’m opening a .PNG file, it automatically shows me the Image Trace option in the top menu bar.
If you don’t see it go to Window > Image Trace.
Also notice the blue bounding box around your artwork. Because this is a .PNG file, there is nothing editable about this art right now other than the ability to scale it up or down, but it’s also pixel based (aka raster), so the larger you go the lower in quality it will appear.
Our goal here is turn those art lines into editable paths (vector).

Image Trace Option Appears!
Step 3: Make an Image Trace
Image trace is a super-powerful tool in Illustrator. So amazing. And also one of those things you can totally use for evil. If you can’t think of how you would use it for shady practices, then good on you! I’m not going to let my dark-side corrupt you.
But there are a few things to know about Image Trace. Click the arrow next to Image Trace in your top toolbar to see the different options.

Image Trace Options
You’ll see a list of preset Image Trace Options such as Default, High Fidelity Photo, Low Fidelity Photo, 3 Colors, and so on…
I can usually get something good with the built-in tracing options, but you can also open the Image Trace Options Panel, (find it under Window > Image Trace) and tinker with the settings to get a custom result. This may be necessary if your image is stubborn, aka low resolution, low contrast, or very detailed.

Result of 3 Color Image Trace
Step 4: Expand and Ungroup the Image Trace
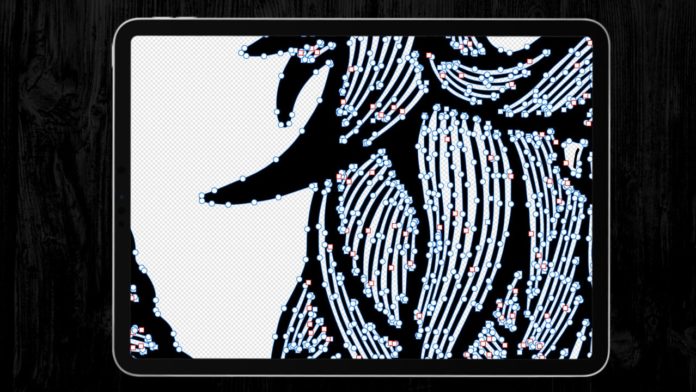
Unfortunately, the initial Image Trace is only half the battle here! We need to do a few more steps to really get the result we’re looking for.
Did you notice how after your Image Trace finished a new option appeared in the top toolbar that says Expand? We need to expand this artwork in order to make adjustments and get rid of the pieces we don’t need.
Click Expand in the top toolbar.
You’ll see the result instantly, like in the image below. Notice how all the artwork is outlined? Cool, cool. That’s what we want.

After you Expand the artwork, right click on it with your Selection Tool (V is the keyboard shortcut) and select Ungroup.

Right Click and Ungroup the newly Expanded Artwork
Now that the artwork is ungrouped, click once outside of the blue bounding box to deselect everything, then click again in the area where the blue bounding box is to select only that.
What you may not realize is that when we made our Image Trace, Illustrator traced EVERYTHING about our photo, including the white background on our image. But you may not even realize it’s there.
Hit Delete on your keyboard. You won’t notice anything change, but you just deleted the white background of the image. We’re going to further emphasize this point in the next step.
Because spoiler alert: there are even more things we need to get rid of in this artwork! It’s a little tedious, but it’s part of the process.
Step 5: Understanding the Results of Image Trace
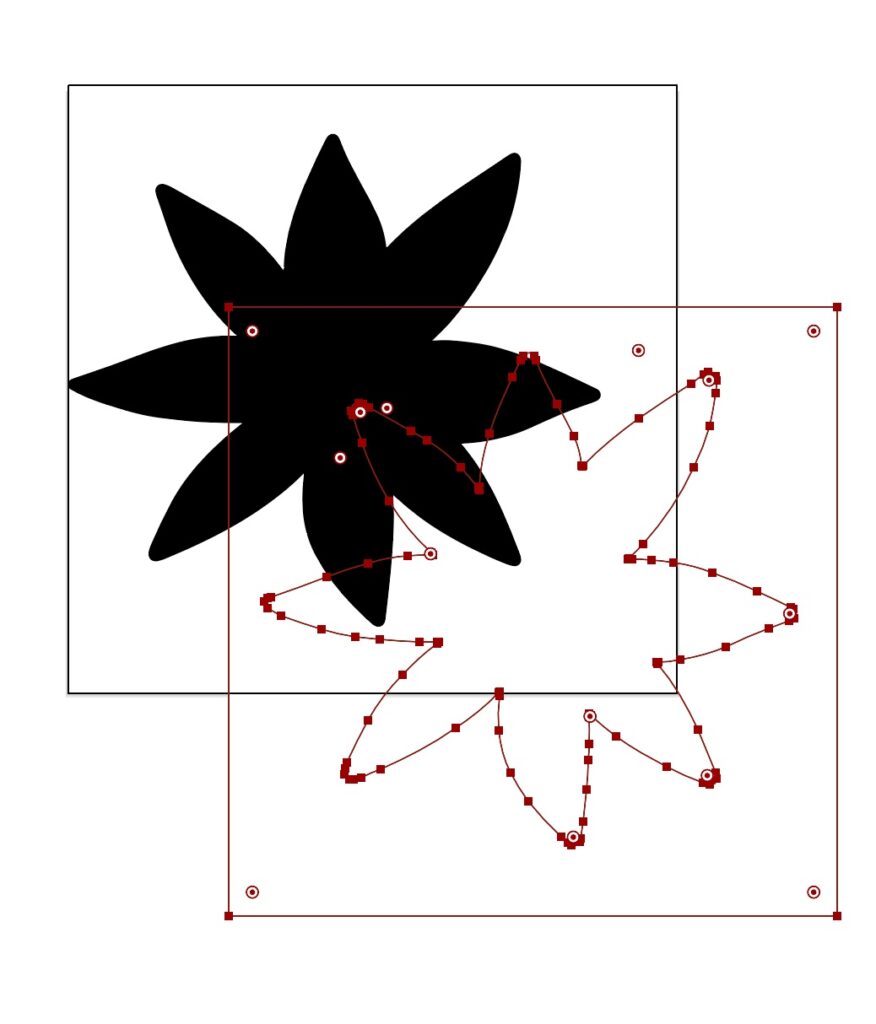
Next, Select the Magic Wand Tool from the Toolbar.

I know this image looks like line art, but it isn’t. Inside of the pink, there is white fill in the flowers. To demonstrate this, I will click once with my magic wand tool on anything that’s colored white inside my G.
The magic wand tool selects everything that is white, which you can see in the image below. The blue outlines are all inside the flowers, and the pink parts of my image are not selected.

Now let’s do something scary to demonstrate a point. Don’t worry, we’ll undo it.
With all the white parts of our artwork selected, hit Delete on your keyboard. Do you see now what I meant when I said the pink stuff wasn’t really an outline and that there was white fill in my image?

After you do this, hit Cmd + Z or Ctrl + Z on your keyboard to undo the damage and restore our art.
Step 6: Cleaning Up Your Artwork
Now that we understand what results we’re working with, let’s talk about how to proceed next.
I want to mention that not everyone will need to follow these next steps. It really depends on what your end goal is for your artwork. For example, if you are ok with the white fill in the flowers, you can just let it be. You can turn them green or tie-dye if you want. Whatever.
I, however, want my art to be an outline only – no white fill! So how do I accomplish this? I’m going to use the Pathfinder Tool, but I need to get my artwork prepped first.
I use my Magic Wand Tool to select everything white again. After I’ve selected it, I will right click and choose Group.
Now all my white elements are grouped together.
Then I will use the magic wand tool to select all the pink parts of my artwork, and again: right click and choose Group.
Now all my pink elements are also grouped together. You may need to right click on your pink group and select Arrange > Send to Back to send the pink elements behind the white ones again.

Step 7: Use the Pathfinder Tool to Minus Front
Good news: we’re nearly there! And again I want to reiterate: this step may be completely optional for you, depending on what your goals are.
I’m going to drag over and select my whole piece: all the pink parts and all the white parts.
Open the Pathfinder Panel. Window > Pathfinder.
Choose the second option under Shape Modes: Minus Front.

What we’ve just done is cut the white part out of the pink part so that all the white fill is gone, resulting in the “outline” art I want.
I’m now realizing this step would’ve been a lot more visually impactful if I’d changed the white fill to another color so you could really see the results, but hindsight is 20/20.
In the image below, I’ve sized my artwork up to demonstrate the scalability of vector formatting, and you’ll notice in the areas where my art extends over my canvas… the white fill is totally gone!

Success: no more white fill!
Congrats! Your procreate masterpiece has been converted to vector format by the power of Adobe Illustrator.
I recommend saving your art as an Illustrator .AI file so you can edit it anytime, change the colors, start using it for graphics, and all that jazz..

Try Image Trace on Detailed Artwork
I mentioned at the beginning of this tutorial that I would show you an example of how to do this with more detailed artwork.
I created a bunch of Harry Potter art in Procreate and saved it as a JPEG file. As you can see, some of the illustrations are detailed and others are more simple. I would argue that even though there are visually a lot of colors, each individual piece has only a few colors, and for the most part: high contrast.

Harry Potter artwork made in Procreate
So let’s try converting it to vector format! I’m following the same exact steps as listed above.
The only difference is that I went with High Fidelity Photo as my Image Trace option.
This is one of those instances where Illustrator warned me this could take awhile since the file is so large, but then it only took 10 seconds. I freaking love my Macbook Pro.

*Drum Roll Please*
Here are the results!

I used Illustrator’s selection tool and also the lasso tool to select each little picture and group it together, so that’s why they’re all moved around in the results image. But more importantly: I think they turned out great!
I showed you this so that you could see it’s possible, but I will say- depending on how I plan to use these files, they could potentially need a LOT of work to clean up.
And really- I’m not sure I need most of these as vector files!
Also, when I scaled them up in size, I noticed that I lost quite a bit of detail, specifically on the Hogwarts Express Ticket. I know you can’t really tell because you weren’t as up-close and personal with this art as I was, but trust me: the loss of detail is real.

This has been a LOT of information about converting your procreate art into vector format with Illustrator, but I hope you found it helpful.
If you have any questions at all, please feel free to comment below so I can answer them.
Otherwise, would you share this post with your friends by pinning the image below? It would mean so much to me!
Convert Procreate Designs into Vector Format (iPad only) – Tutorial
In recent years, the app Procreate has become a favorite for many t-shirt designers, but it can only create artwork in a pixel format.
The most popular vector apps on the iPad are Affinity Designer and Adobe Illustrator. But unfortunately, neither can automatically trace images and convert them to vector format directly on the iPad. So the most common workaround was to export your Procreate graphic and edit it further on the computer. Or to open it in a vector program and redraw it.
But it is possible to automatically trace the graphic and turn your Procreate image into a vector right on your iPad. Let’s find out how!
Why should you convert your Procreate files into a vector?
The drawing experience with the Apple Pencil on iPad is very intuitive and great. And it’s very accessible to many budding t-shirt designers. The iPad costs less than a graphics tablet, and instead of paying for expensive Adobe subscriptions, Procreate is only about $10 as a one-time payment.
But there’s a downside. Depending on the power of your iPad and the size of your canvas, Procreate has a limited number of layers. T-shirt design files are usually huge. For example, we design in 4500 x 5400 pixels. That’s a size of almost 39 x 45 cm at 300 dpi.
On the iPad mini, we end up with 7 layers at that size. On the more powerful iPad Pro, it’s 16 layers.
So if that number of layers isn’t enough, it’s a fantastic solution to turn your art into a vector. And you can do that right on the iPad.
Vector graphics can be scaled indefinitely without sacrificing quality. If you did that with pixel files, they would become blurry and pixelated. If you convert your Procreate files to vector files, you can design with a smaller file size. This gives you more layers to work with. And after you vectorize your design, you can scale it to the size you want.
Creating a Vector from Procreate Graphics (Simple Designs)
The easiest way is to create a vector from a design made with just one color.
Maggi posted a YouTube tutorial on how to turn your Procreate graphic into a vector. And you don’t have to redraw your graphic in a vector program. It will be traced and vectorized automatically.
She explains two different methods. For the first option, she shows how you can use free tools on the internet.
The second option is Adobe Caption. If you already have an Adobe subscription, you can install it on your iPad at no additional cost. With this app, you have the option to trace your design automatically.
Convert Procreate graphics with multiple colors into a vector
However, this method is not only limited to single-colored designs. You can also use it to create vectors from more complicated designs. But since the process takes a bit longer, Maggi shows you how in one of her Skillshare courses.
If you’re new to Skillshare, you can sign up for a free trial using this link. You’ll get a free trial (currently two weeks) and can watch the course for free. (Affiliate link – We get a small commission at no extra cost to you, and it helps us to keep this channel going!)
Похожие публикации:
- Как закрепить вкладку в хроме
- Как закрыть все вкладки в edge
- Как замазать в ворде картинку
- Как заменить подрулевой переключатель на ларгусе
Что такое растровая и векторная графика
Рассказываем, чем они различаются и как их лучше использовать.
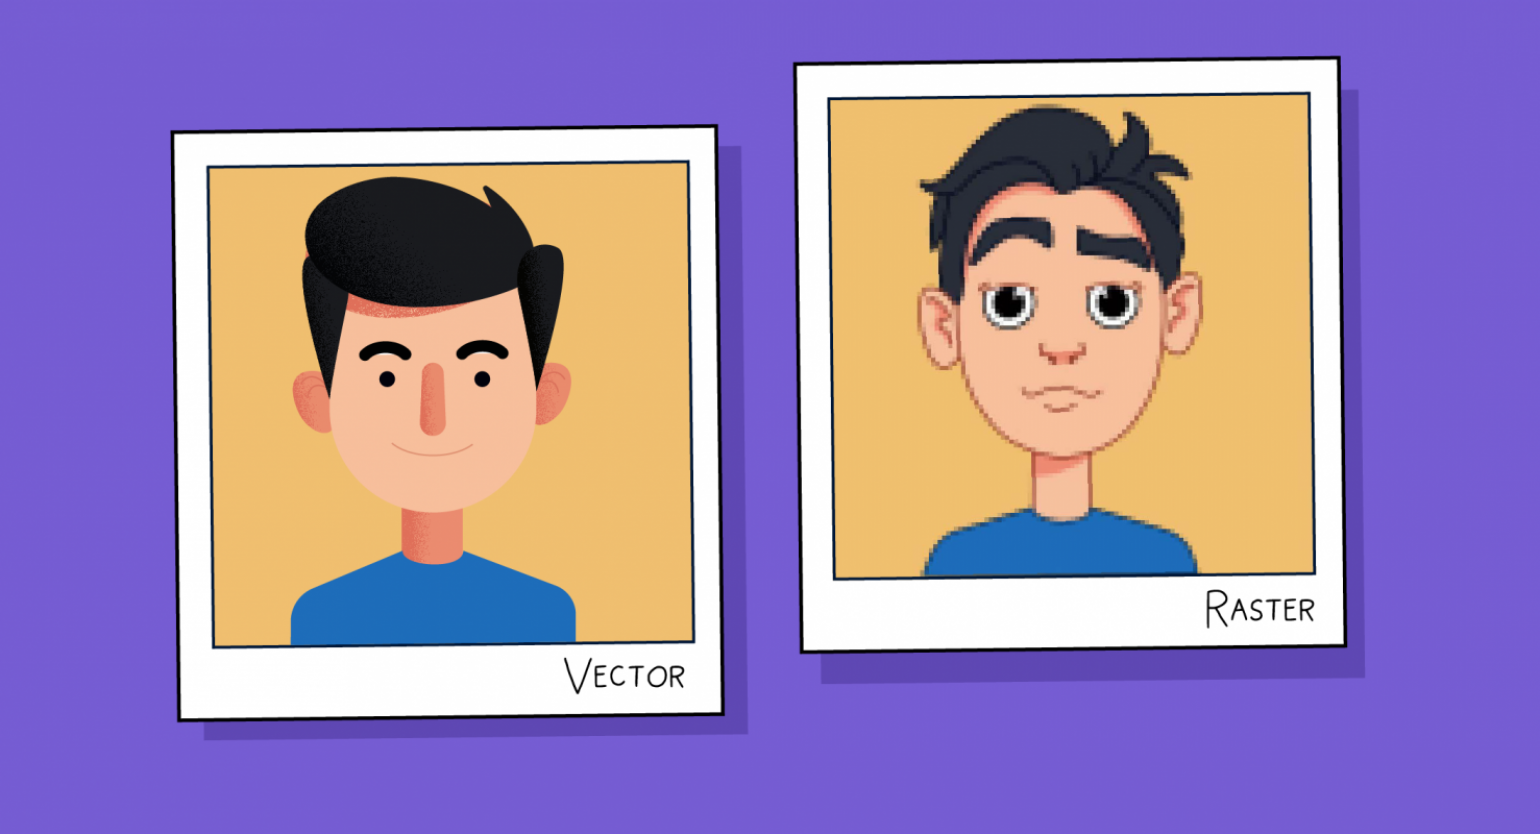
Иллюстрация: Оля Ежак для Skillbox Media

Дарья Тамилина
Пишет о дизайне в Skillbox Media, а в перерывах и сама орудует графическим планшетом. Влюблена в советские шрифты, японскую рекламу и русский язык.
Что это вообще за понятия?
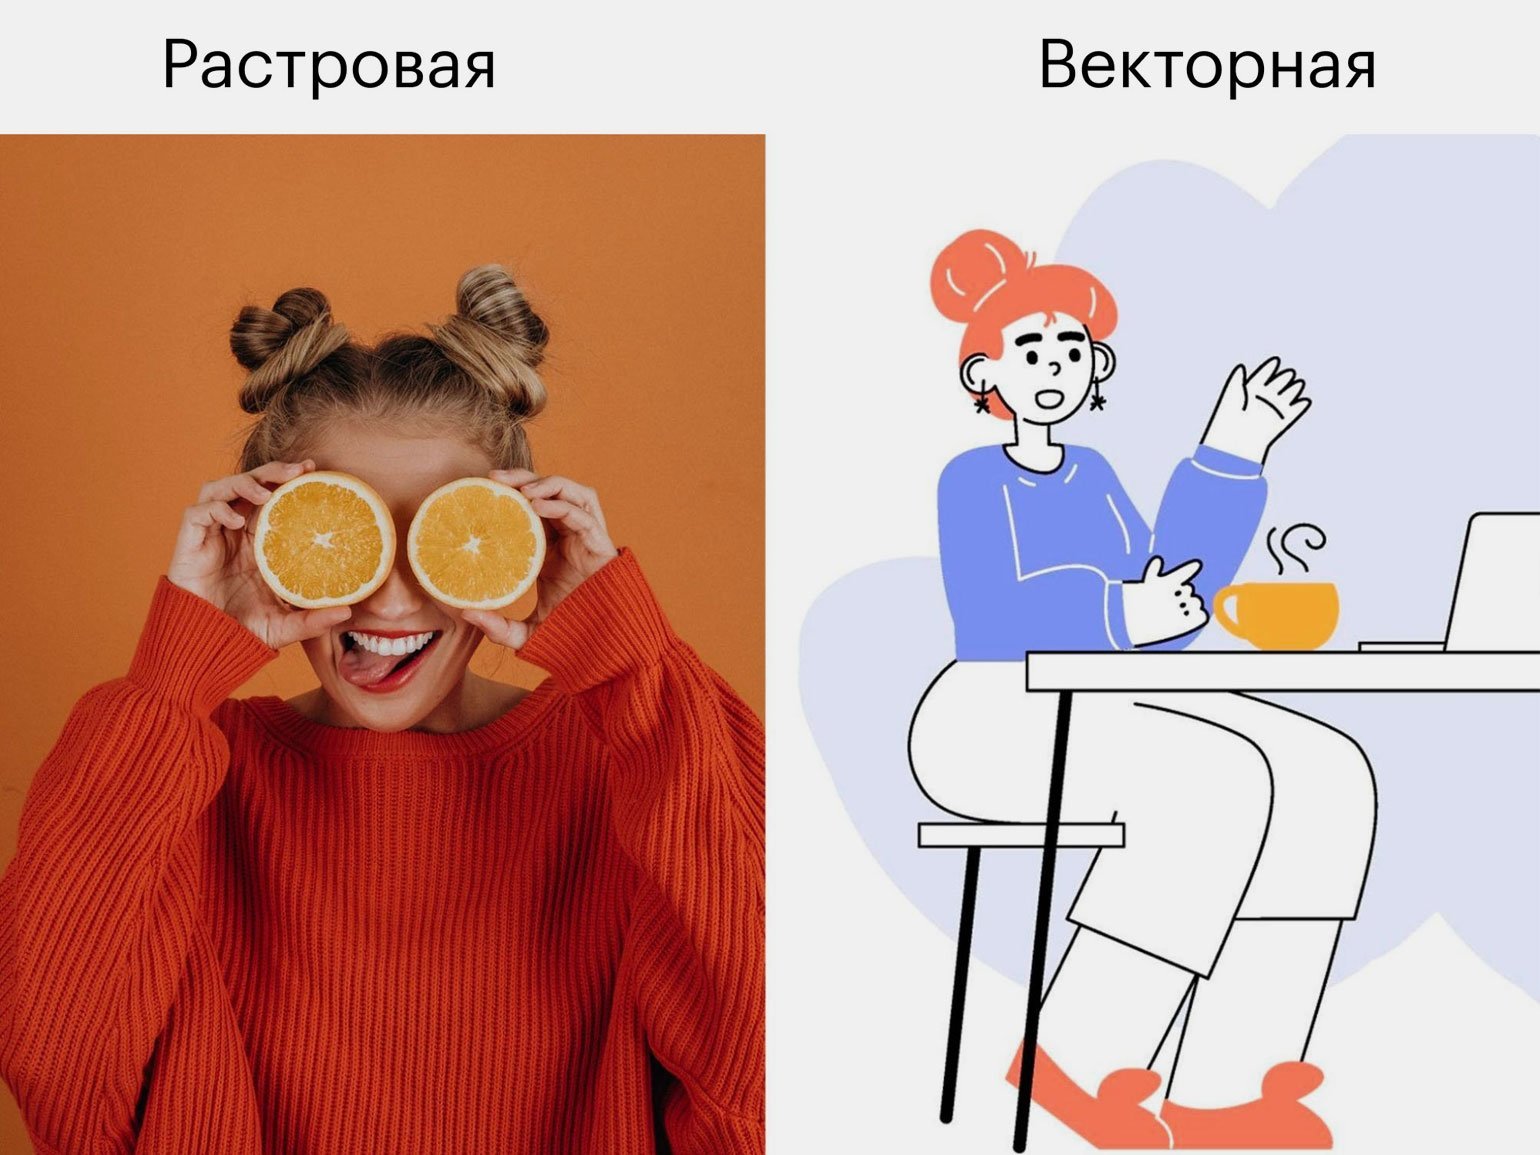
В компьютерной графике изображение может формироваться двумя способами:
- из маленьких точек (пикселей) — это растровая графика;
- с помощью кривых линий, заданных математической формулой, — это векторная графика.
Давайте поподробнее про изображения из точек. Почему мне такие никогда не попадались?
Растровые изображения повсюду — например, фотографии. На качественном изображении вы не увидите точек. Но если начать его увеличивать, вы увидите пиксели, из которых оно состоит:
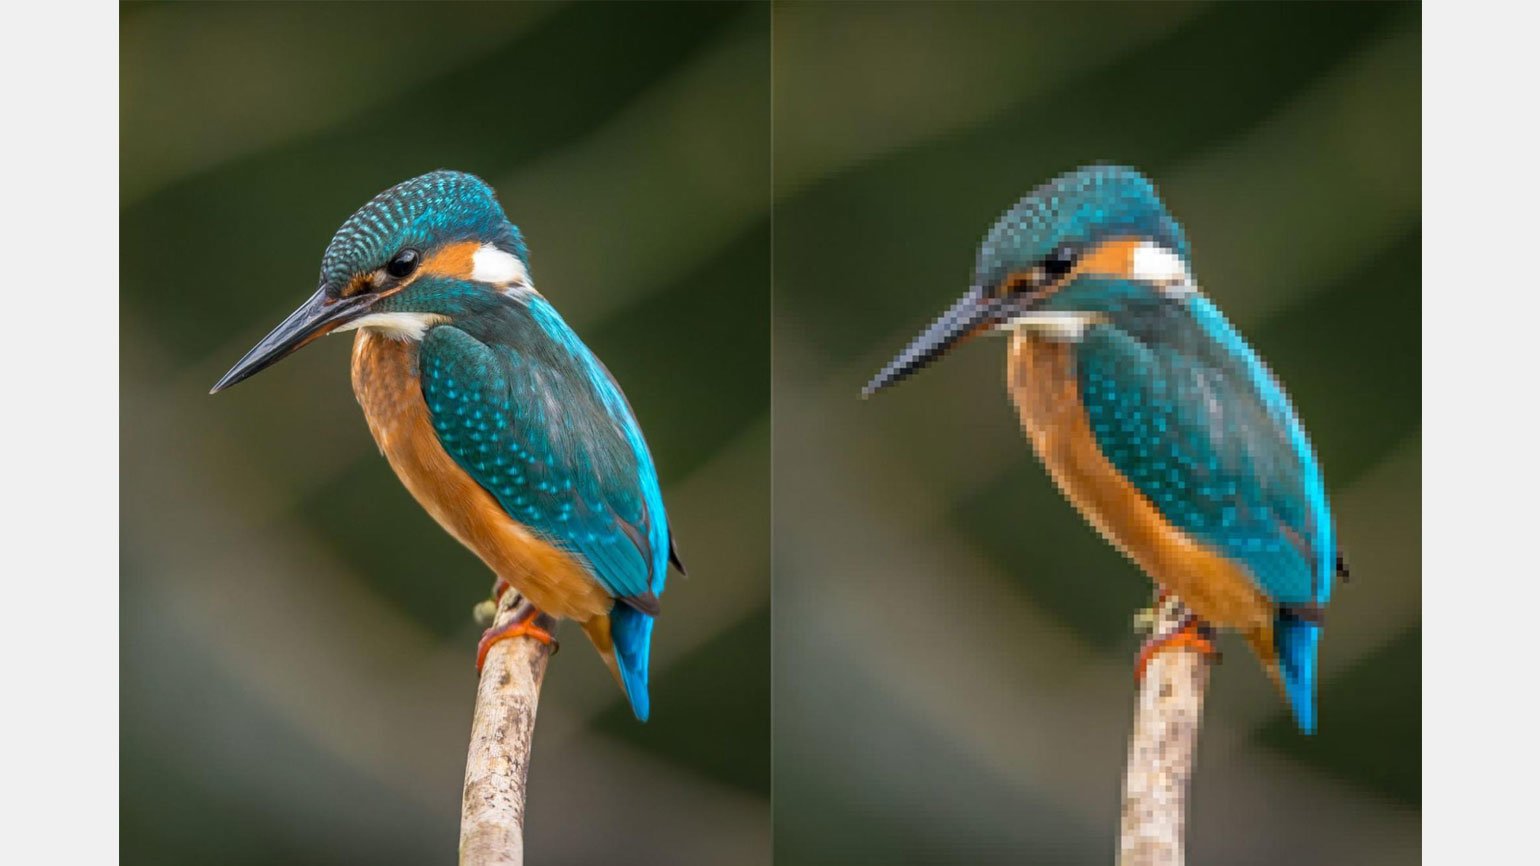
Понятно! А что ещё относится к растровой графике, помимо фотографий?
Это могут быть рисунки, сканы документов и всё, что можно нарисовать в растровых редакторах: в Photoshop, Procreate, Paint.
Самые популярные растровые форматы: gif, jpeg, png. Gif позволяет создавать анимированные изображения, а jpeg и png — только статичные.
А можно тогда примеры векторных изображений?
Обычно вектор используют для создания логотипов, элементов интерфейса и шрифтов. Их составляющие — контур и заливка. Компьютер рассчитывает контур по математической формуле, поэтому изображение не будет расплывчатым независимо от размера. А ещё такие файлы имеют гораздо меньший вес, чем растровые картинки.

Самые популярные векторные форматы — eps и svg. Eps чаще используют в полиграфии, а svg — в веб-дизайне.
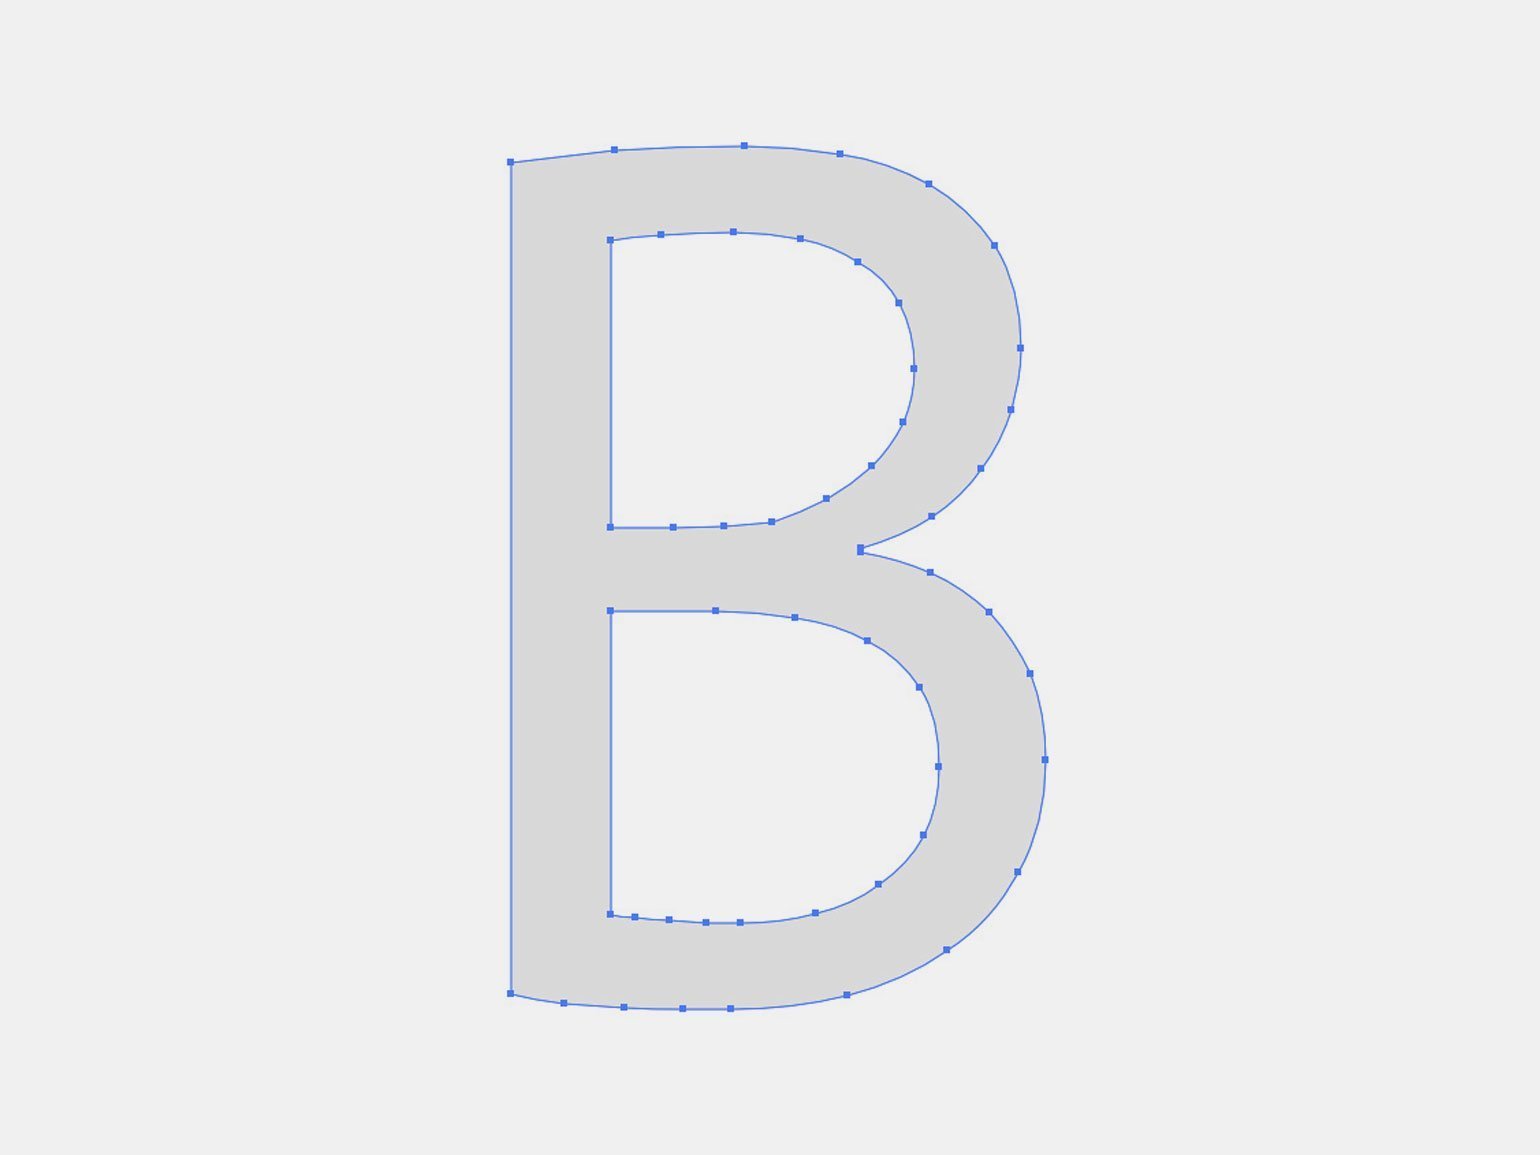
Как делают эти контуры?
Обычно кривые делают в векторных редакторах — Adobe Illustrator, Figma, CorelDRAW. Иногда и в коде на HTML — но с этим обычно никто не заморачивается.
В графических редакторах кривые создают по опорным точкам — на них линия может изгибаться и менять своё направление.
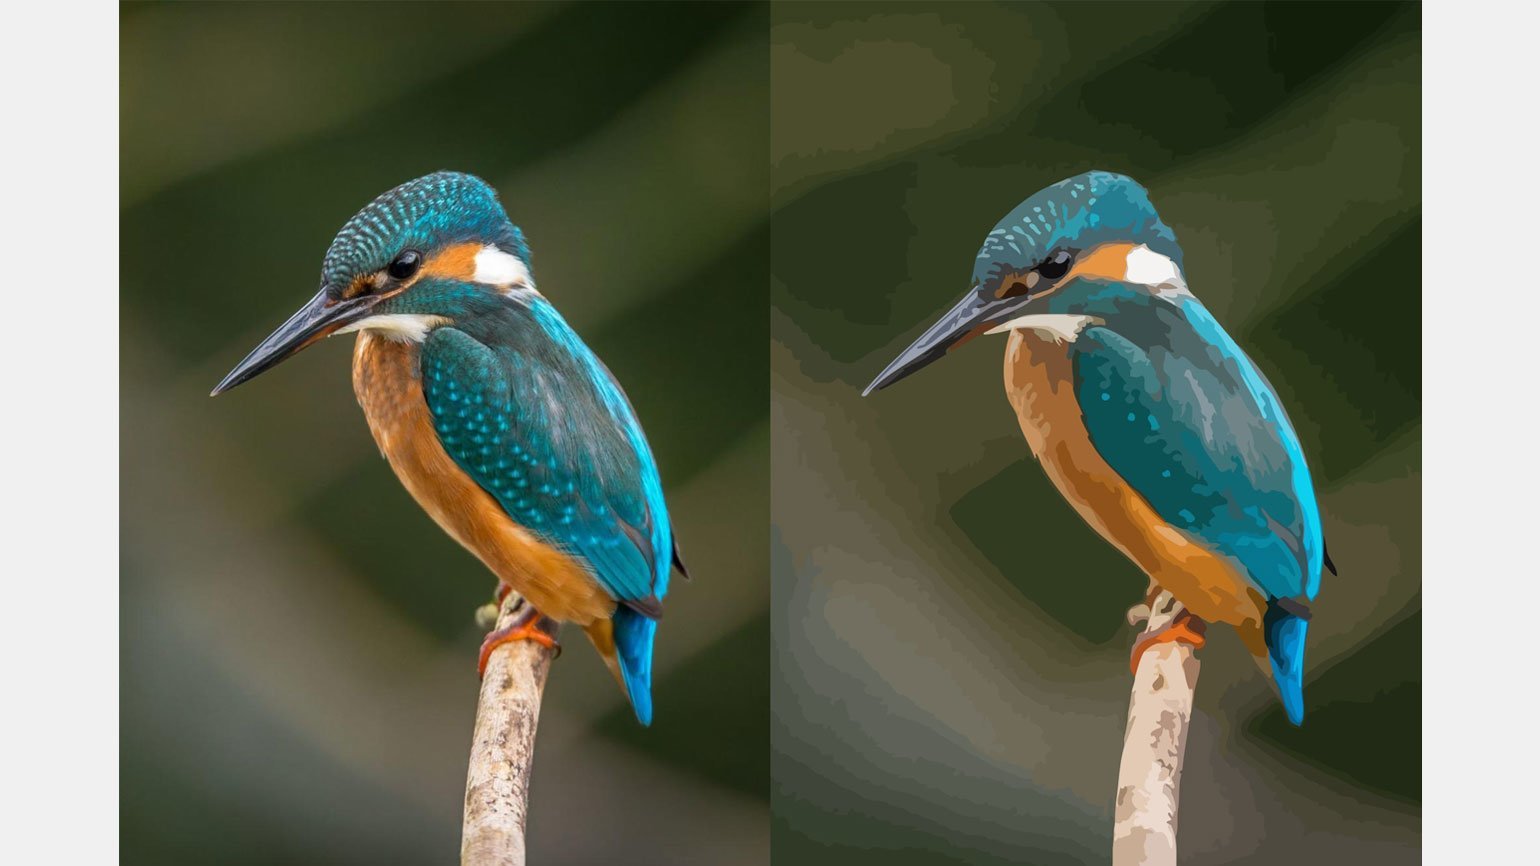
Ух ты! А растровую картинку — скажем, фотографию — можно перевести в такие кривые?
Растровое изображение не получится перевести в вектор с сохранением цветовой гаммы. Внутри одной векторной фигуры может быть только однотонная заливка или градиент — это не даёт такого многообразия цветовых переходов, как пиксели.
Если автоматически перевести фото в вектор, итоговая картинка будет казаться очень размытой:
Вот если в Paint вы нарисуете закорючку из одного-двух цветов, по ней можно будет сделать векторный контур. Но обычно векторные изображения сразу рисуют с помощью кривых.
Зато вектор в растр перевести можно в один клик в любом графическом редакторе.
А что в итоге лучше использовать? Растр или вектор?
Зависит от вашей задачи. Оба формата имеют и преимущества, и недостатки.
Преимущество растровой графики — в цветовых возможностях. Она позволяет хорошо передавать градиенты и цветовые переходы на сложных иллюстрациях. Но при увеличении изображения его качество будет ухудшаться.
Преимущество векторной графики — в бесконечном размере. Логотип в формате svg можно увеличивать сколько угодно, и его контур не пострадает. Но сделать сложную иллюстрацию со множеством цветов и мелких деталей будет сложнее.
Для фотографий и сложных иллюстраций лучше всего подойдёт растровая графика. Для простых иллюстраций и логотипов — векторная.
Больше интересного про дизайн в нашем телеграм-канале. Подписывайтесь!
А что ещё у вас почитать о работе с изображениями?
- Градиенты: большой обзор
- Что такое цветовой круг Иттена и как с его помощью подбирать красивые сочетания
- «Модульные системы в графическом дизайне»: основы швейцарской вёрстки
- Как заработать на фотостоке: простая инструкция для начинающих стокеров
- 4 полезных плагина для Figma: создание иллюстраций
- 7 трендов дизайна в 2022 году