
Как установить и настроить phpMyAdmin на Windows Server
С помощью phpMyAdmin можно создавать, настраивать, редактировать, удалять базы данных и объекты баз данных на сервере под управлением MySQL.
Для работы веб-приложения phpMyAdmin, на сервере уже должны быть установлены и настроены веб-сервер IIS, работающий в связке с PHP и сервер баз данных MySQL.
Если указанные приложения не установлены, можно воспользоваться инструкциями: Как установить и настроить PHP на Windows Server, Как установить и настроить веб-сервер IIS на Windows Server, Как установить и настроить MySQL на Windows Server.
Для выполнения всех дальнейших действий, предполагается, что программы IIS, PHP, MySQL уже установлены и работают.
Приступим к установке.
1. В папке C:\inetpub\wwwroot создайте папку phpmyadmin
2. Перейдите на страницу Download phpMyAdmin и скачайте мультиязычный пакет *.all-languages.zip

3. Разархивируйте скачанный архив в ранее созданную папку C:\inetpub\wwwroot\phpmyadmin

4. Установка завершена. Откройте страницу http://localhost/phpmyadmin/ , должна отобразиться стандартная форма входа в панель phpmyadmin

4.1 Примечание к установке.
На этом этапе при открытии страницы http://localhost/phpmyadmin/ , возможны такие ошибки:
4.1.1 Ошибка 1. Не найден обработчик. При этом страница с ошибкой выглядит так:

Решение: создать обработчик php файлов для веб-сервера. На скриншотах ниже указано как это можно сделать.


4.1.2 Ошибка 2. Не найдено PHP расширение (модуль). Например, mysqli (как на скриншоте)

Решение: включить необходимое расширение в файле php.ini и перезапустить веб-сервер IIS. Файл php.ini находится в папке, куда ранее был установлен PHP (в нашем примере это папка C:\php\). Для включения необходимого расширения, необходимо найти его по названию в файле php.ini и раскомментировать (убрать вначале строки символ ; ) строку с именем расширения.

После сохранения файла php.ini необходимо перезапустить веб-сервер

5. В корневой папке phpmyadmin необходимо найти файл config.sample.inc.php и переименовать его в config.inc.php. Далее откройте config.inc.php в блокноте или другом тектовом редакторе (рекомендуем Notepad++) и раскомментируйте (уберите вначале строки символы //) такие строки:
$cfg[‘Servers’][$i][‘pmadb’] = ‘phpmyadmin’;
$cfg[‘Servers’][$i][‘bookmarktable’] = ‘pma__bookmark’;
$cfg[‘Servers’][$i][‘relation’] = ‘pma__relation’;
$cfg[‘Servers’][$i][‘table_info’] = ‘pma__table_info’;
$cfg[‘Servers’][$i][‘table_coords’] = ‘pma__table_coords’;
$cfg[‘Servers’][$i][‘pdf_pages’] = ‘pma__pdf_pages’;
$cfg[‘Servers’][$i][‘column_info’] = ‘pma__column_info’;
$cfg[‘Servers’][$i][‘history’] = ‘pma__history’;
$cfg[‘Servers’][$i][‘table_uiprefs’] = ‘pma__table_uiprefs’;
$cfg[‘Servers’][$i][‘tracking’] = ‘pma__tracking’;
Дополнительно замените слово localhost на 127.0.0.1

Сохраните файл config.inc.php.
6. В браузере переходим на страницу http://127.0.0.1/phpmyadmin и логинимся с учетными данными пользователя root, пароль которого был создан при установке на сервер MySQL.

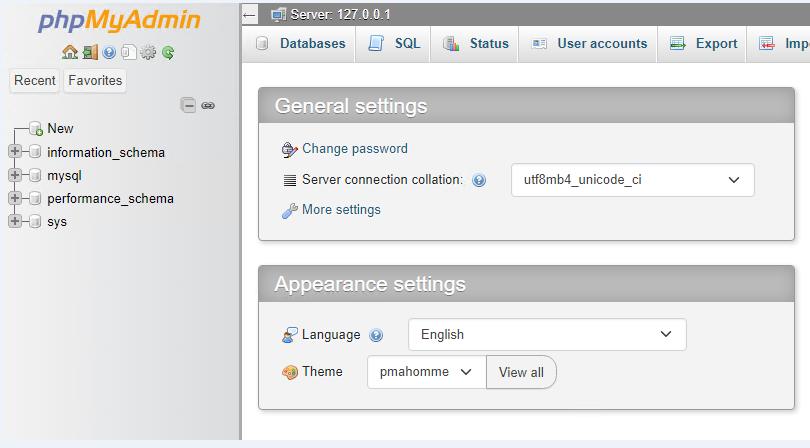
7. Для хранения служебной информации, phpmyadmin использует собственную базу данных, которую мы сейчас создадим. Также создадим пользовател с полными правами на данную базу данных.
Для создания базы данных, воспользуемся готовым дампом, предоставленным разработчиками в файле create_tables.sql. Данный файл находится в подпапке sql. Для импорта данного дампа, находясь на главной странице phpmyadmin перейдите на вкладку Импорт


выберите файл create_tables.sql

нажмите кнопку Import (в самом низу формы) и дождитесь завершения импорта базы данных.
Теперь в списке должна появиться база данных phpmyadmin

Теперь создадим учетную запись MySQL и предоставим права доступа на только что созданную базу данных. Для этого перейдите в базу данных phpmyadmin и нажмите Привелегии / Privileges — Добавить пользователя / Add user account

Заполните поля формы, как указано на скриншоте

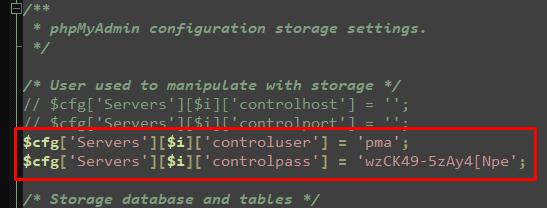
В файле config.inc.php необходимо раскомментировать строки и прописать данные доступа ранее созданного пользователя pma
pmapass — пароль пользователя pma
В данной статье мы научились устанавливать phpmyadmin на Windows Server.
phpMyAdmin Download

phpMyAdmin is a popular application for MySQL DBMS and can be used to create, drop, delete, alter, export and import database tables.
Software description
phpMyAdmin is a web based solution for managing databases including MySQL and MariaDB. It is an open source application that can easily run on almost all operating systems for free. It is a portable tool through which you can create tables or views, store records, manipulate data and assign privileges to users by executing queries. It was initially developed in 1998 using PHP but now JavaScript is also embedded. It possesses a clean graphical interface where operations can be easily performed. It is suitable for beginners who want to carry out data related functions in online mode.
Database:
phpMyAdmin is a reliable tool through which databases can be easily created and managed. It lets you create a database by entering database name, table name and choosing number of columns. Moreover, you can specify name, type, length, default value, attribute and null acceptability for each column in the table. Once the required information is entered, you can enter data in rows and save it for using in web based applications. Each database can contain multiple tables that are associated through relations. Either the processes can be performed by entering SQL queries or with the help of its graphical user interface.
Privileges:
Privileges are assigned to specify the functions that can be performed by individual users. You can add as many user accounts as needed along with other credentials such as password, type, host name and grant. You can choose the actions they can perform on data, database structure, administration and resources. These privileges are assigned by website administrator who is allowed to access user accounts and modify settings as per requirement. In a live website, these privileges determine guest visitors, editors, posts writers and other relevant users.
Import and Export:
Since phpMyAdmin is a web based solution, thus it can be accessed on any PC with internet connection. However, database is stored on local PC and needs to be carried through proper means. After database is successfully created, it can be exported as CSV, XML, SQL, Word document, Excel Spreadsheet, JSON, PDF or LaTeX. Available options include Quick export for minimal options while Custom export for all options. The file can be taken in a removable storage device and imported quickly by browsing through system memory. This feature makes it possible to access same data on multiple PCs without creating databases on individual PCs.
Features:
It is a database management tool compatible with MariaDB and MySQL. It brings database functionalities to internet and can be used easily with its intuitive interface. It provides access to multiple servers and requires dedicated accounts for security sake. It simplifies the process of manipulating data and performs tasks at fast speed. You can easily import and export database files and perform global search operation with complex queries.
phpMyAdmin is a free database manager that deploys stored data in PHP applications. It is preferred by beginners as almost all functions can be performed through mouse clicks without the need of writing queries. It is an open source application capable of running on multiple operating systems and web browsers.
Как установить phpMyAdmin
phpMyAdmin – простое приложение с открытым исходным кодом, позволяющее управлять базами данных MySQL. С его помощью можно администрировать пользователей, создавать и редактировать таблицы, а также проводить экспорт и импорт данных в них. Удобство состоит в том, что все эти операции можно проводить в веб-интерфейсе. Я расскажу, как установить phpMyAdmin на компьютер и на сервер.
Установка phpMyAdmin на компьютер
Прежде чем начать установку phpMyAdmin, убедитесь, что у вас установлены и настроены сервер Apache, PHP и базы данных MySQL. Еще нужно соединение с сервером по защищенному туннелю SSH. Этот способ скорее можно назвать ручным.
Сперва советуем скачать архив приложения с официального русскоязычного сайта. Выбираем любую удобную версию и жмем по ссылке для начала загрузки.
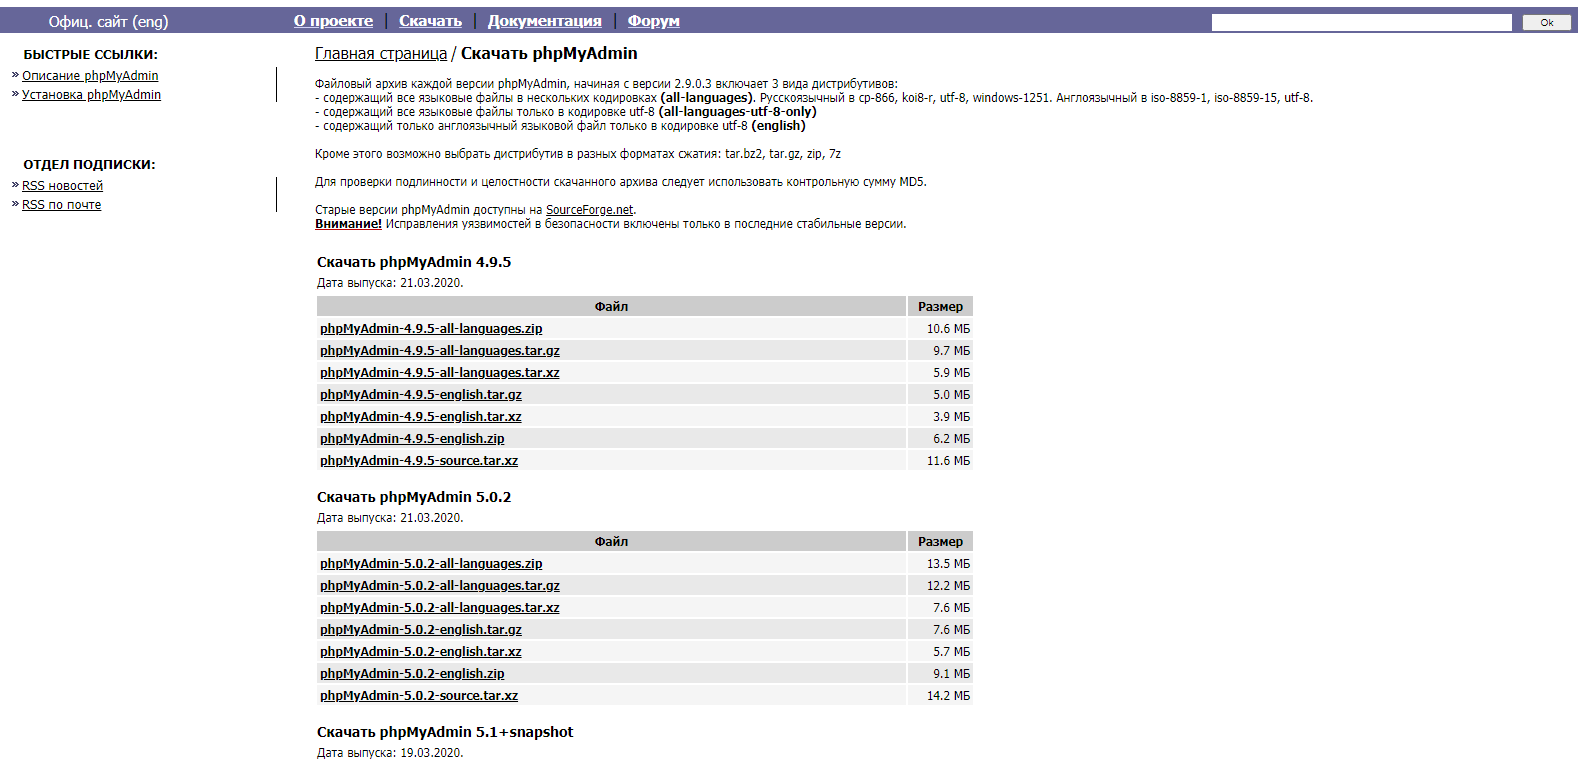
Как только процесс загрузки завершится, распакуем архив. Затем переходим в папку htdocs, расположенную на системном диске в директории «Apache». Сюда вставляем папку из архива, потом переименовываем ее в phpmyadmin.
Теперь открываем папку «PHP» и находим в ней файл «php.ini-production». Переименовываем его в php.ini, а потом открываем с помощью «Блокнота». Находим в тексте строчки «extension=php_mysqli.dll» и «extension=php_mbstring.dll» и удаляем в них символ точки с запятой. Сохраняем изменения, выходим из блокнота.
Если все сделано правильно, то после введения в адресной строке браузера запроса http://localhost будет открываться страница авторизации phpMyAdmin.
Комьюнити теперь в Телеграм
Подпишитесь и будьте в курсе последних IT-новостей
Установка phpMyAdmin на сервер
Процедура установки инструмента phpMyAdmin на сервер отличается для разных операционных систем. Требования примерно те же – соединение по защищенному туннелю SSH, предустановленное программное обеспечение PHP, MySQL, Nginx или Apache.
Ubuntu
Перед установкой phpMyAdmin на сервере с ОС Ubuntu прежде всего необходимо проверить, имеется ли расширение PHP для редактирования текстовых строк в формате юникода. Для этого в командной строке вводим вот такой запрос:
sudo apt install php-mbstring
После завершения обновления можно приступать к установке нужного нам инструмента на сервер.
sudo apt install phpmyadmin
Как только данная команда активируется, откроется установщик. В нем будет предложен выбор веб-сервера для работы с приложением в дальнейшем. С помощью пробела выбираем пункт «apache», потом отмечаем кнопку ОК для применения изменений.
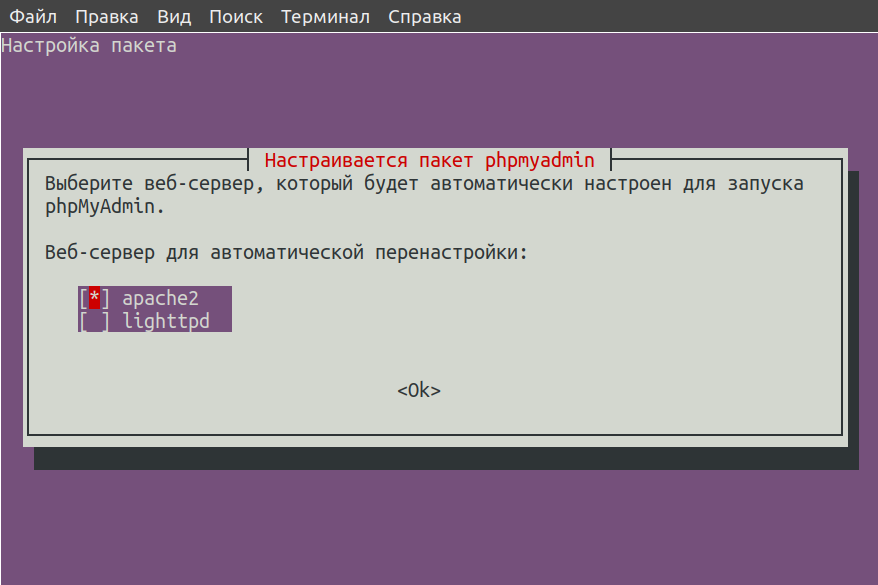
Если на вашем сервере установлен Nginx, на этом моменте просто выберите соответствующий пункт.
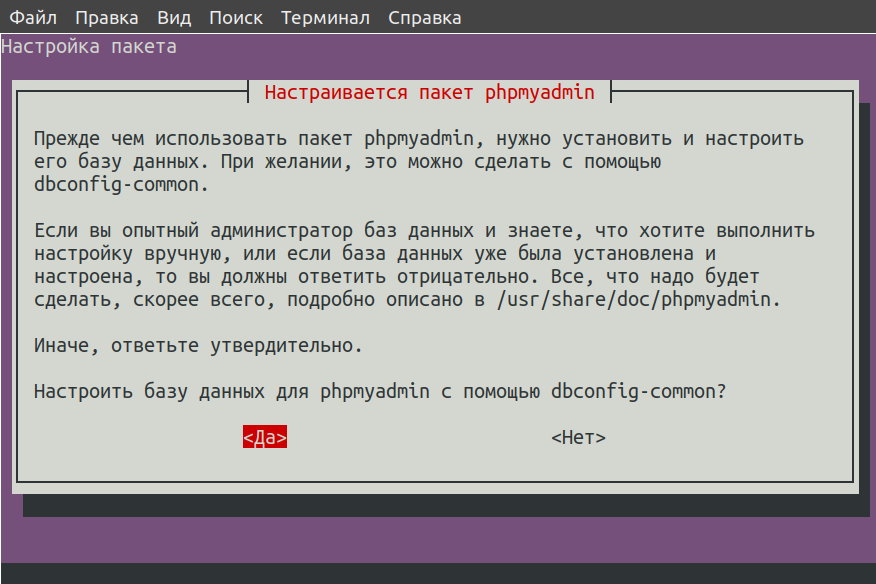
Далее будет предложено создание баз данных для данного ПО, в которой будет вся служебная информация. Соглашаемся, нажав на кнопку «Да», и идем дальше.
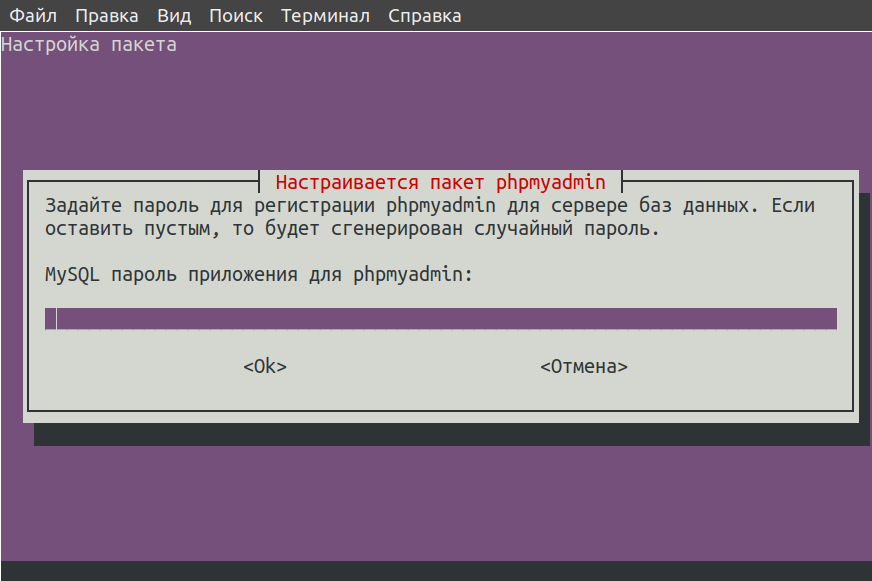
Следующий этап – создание пароля для собственного профиля. Можно придумать новый или оставить поле пустым, чтобы сервис сгенерировал случайную комбинацию. Потом, если мы все же придумали свой пароль, его следует подтвердить.
Но установка phpMyAdmin на сервер не завершена. Нам необходимо включить расширения PHP mcrypt и mbstring, используя для этого нижеуказанные команды:
sudo phpenmod mcrypt sudo phpenmod mbstring
Чтобы применить все изменения, перезапускаем сервер Apache с помощью специального запроса:
sudo systemctl restart apache2
Debian
В случае с Debian был заранее предустановлен стек LEMP, включающий NGINX, MySQL и PHP. Но если что-то из всего этого на сервере отсутствует, можно задать в терминале вот такую команду:
apt install nginx php-fpm mysql-server
Ждем завершения скачивания и установки всех пакетов. Еще для защиты аутентификации рекомендуется установить сертификат SSL/TLS для передачи зашифрованного трафика.
Так как в Debian большинство программ в репозиториях отсутствует, необходимо будет вручную добавить пункт с phpMyAdmin. Сперва открываем файл «sources.list» в редакторе вот такой командой:
nano /etc/apt/sources.list
Теперь вносим кое-какие изменения в самом конце файла, добавив следующие строчки:
deb http://deb.debian.org/debian/ stretch main contrib non-free deb-src http://deb.debian.org/debian/ stretch main contrib non-free
Сохраняем изменения и выходим из редактора. Теперь надо обновить базы данных в терминале с помощью такого запроса:
apt-get update
А вот теперь можно приступать непосредственно к скачиванию нужного нам приложения. Вписываем следующую команду:
apt-get install phpmyadmin
Так как у нас заранее предустановлен Nginx, в момент настройки нам не нужно будет выбирать веб-сервер. Просто пропускаем этот пункт, нажав на кнопку «Tab», а затем кликнув на ОК.
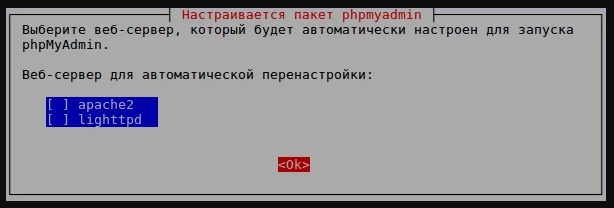
Выйдет новое окно в мастере установки, запрашивающее разрешение на использование «dbconfig-common». Данный параметр позволит настроить базу данных и пользователя с правами администратора для программы phpMyAdmin. Поэтому выбираем пункт «Да» и идем дальше.
Точно так же, как было описано ранее, создаем собственный пароль или оставляем поле пустым для генерации случайного. Теперь ждем, когда все пакеты ПО будут до конца установлены. Для проверки в адресной строке браузера вбиваем адрес http://доменное_имя или IP/phpmyadmin.
CentOS
Здесь тоже заранее инсталлированы модули PHP и Apache. Чтобы установить phpMyAdmin на CentOS, прежде всего понадобится скачать расширенный репозиторий EPEL. Для этого мы задаем вот такую команду:
yum install epel-release
Если указанный репозиторий не скачать, командная строка может дать ошибку типа «пакета с названием phpmyadmin не найдено».
Скачивание пакета завершено, теперь можем приступать к скачиванию самой программы, и даем для этого следующий запрос:
yum install phpmyadmin
Потом устанавливаем модули PHP для нормальной работы панели управления базами данных, и делается это одним запросом:
yum install php-json php-mbstring php-mysqli
Возможно, они уже были установлены ранее, но все же стоит дополнительно выполнить проверку. Потом перезапускаем сервер для принятия всех внесенных изменений.
systemctl restart httpd
Понадобится настроить виртуальный домен, создав для этого специальный конфигурационный файл.
vi /etc/httpd/conf.d/phpMyAdmin.conf
Define root_domain phpmyadmin.dmosk.local Define root_path /usr/share/phpMyAdmin ServerName $ ServerAlias www.$ DocumentRoot $ AllowOverride All Options Indexes ExecCGI FollowSymLinks Require all granted
Сохраняем изменения и закрываем редактор. Затем проверяем корректность настроек вот такой командой:
apachectl configtest
Если ошибки не возникли, перезапускаем сервер. Если же возникли, заново вносим изменения в только что созданный файл.
Дополнительно можно еще создать отдельный каталог для хранения временных файлов с помощью такого запроса:
mkdir /usr/share/phpMyAdmin/tmp
Потом потребуется задать для нее владельца и соответствующие права специальными командами:
chown apache:apache /usr/share/phpMyAdmin/tmp chmod 755 /usr/share/phpMyAdmin/tmp
Настройка завершена. Теперь можно открыть страницу с виртуальным доменом. В результате мы должны попасть на страницу с формой для ввода имени пользователя и пароля.
How to Install phpMyAdmin on Your Server: A Comprehensive Guide

Database is essential to any web-based application for saving records and user data.
If you’re a web developer, you’ve probably heard of phpMyAdmin. It’s a powerful and user-friendly web-based interface for managing MySQL databases, and it’s an essential tool for any developer who works with databases regularly.
Developers can easily find and run commands on the terminal to work with MySQL queries. Also, non-tech-savvy individuals who do not want to go into technical details can perform simple database operations using pre-defined MySQL queries.
The platform allows users to perform complex database operations in just a few clicks and write queries with debugging.
In this article, we’ll tell you how to install phpMyAdmin on your server, from start to finish. We’ll cover everything you need to know, including system requirements, installation methods, and configuration options.
- Why Should You Consider Installing PHPMyAdmin on Debian
- How to Install PHPMyAdmin on Debian
- Install PHPMyAdmin on Cloudways
- How to Secure phpMyAdmin by Enabling Authentication
- How to Secure Phpmyadmin by Configuring SSL
- How to Secure By Limiting Access to Specific IP Addresses
- Common Phpmyadmin Installation Issues and Their Possible Solutions
- Wrapping Up!
Why Should You Consider Installing PHPMyAdmin on Debian
The reasons for choosing an operating system to run PHPMyAdmin may vary depending on individual circumstances and preferences. However, here are some reasons why you might choose to use PHPMyAdmin on Debian over Mac OS or Ubuntu.
| Reason | Debian | Mac OS | Ubuntu |
| Security | Strong security features make it a safer choice for managing sensitive data. | Has some built-in security features, but it may not be as strong as Debian. | Has some built-in security features, but it may not be as robust as Debian. |
| Stability | Well Known for its stability and reliability, which is important for critical applications like database servers. | Stable, but may not be as reliable as Debian. | Generally stable but may not be as reliable as Debian. |
| Compatibility | If using Debian as your server OS, it may be easier to install and configure PHPMyAdmin on the same system. | May require additional steps to install and configure PHPMyAdmin on a separate system. | May require additional steps to install and configure PHPMyAdmin on a separate system. |
| Familiarity | If already familiar with Debian, it may be easier to work with PHPMyAdmin on this OS. | May require some learning if not familiar with Mac OS. | May require some learning if not familiar with Ubuntu. |
Nothing as Easy as Deploying PHP Apps on Cloud
With Cloudways, you can have your PHP apps up and running on managed cloud servers in just a few minutes.
How to Install PHPMyAdmin on Debian
Installing phpMyAdmin with Debian on Cloudways is a relatively straightforward process. Here are the steps to follow:
Installation Requirements
- Server: Debian-based cloud servers on Cloudways
- Database: MySQL or MariaDB 5.5 or newer
- Web Browser: Javascript, cookies, and Bootstrap 4.5
- PHP Version: PHP 8.x
Deploying on a Debian Server
There are not only non-techie people who want a better GUI to handle complex database functions, but developers too need such a kind of platform to save their precious time. That’s why the best platform recommended for handling database jobs is PHPMyAdmin. It’s is an open source GUI which helps in managing MySQL database. Let’s first setup an SSL with Apache, so that our password isn’t sent in plain text form. Type the following command to install an SSL with Apache server.
apt-get install mcrypt
Now, restart your Apache server with the following command.
service apache2 restart
Now, begin PHPMyAdmin installation by typing the following command.
apt-get install phpmyadmin
During PHPMyAdmin installation process, a prompt will open which will ask you about the web server you are using. Select Apache and press the Enter key. After that it will ask about the root user password. Enter the password and press Enter, once again.
PHPMyAdmin will be installed in /usr/share/phpmyadmin. We will create its symlink inside the public_html folder. Type the following commands to route to public_html folder and create a symlink:
cd /var/www/public_html ln -s /usr/share/phpmyadmin
Now type ‘ ls ’ to verify whether the symlink has been created or not. Once verified, open this in browser through [server ip address] /phpmyadmin where you’ll see that it is installed. Now, let’s secure it by creating a .htaccess file using vim file inside PHPMyAdmin folder and allow only your server IP to access it.
order allow,deny allow from
Now, you can easily use PHPMyAdmin and work with databases.
Host PHP Websites with Ease [Starts at $11 Credit]
- Free Staging
- Free backup
- PHP 8.0
- Unlimited Websites

But, the next question is how to open PHPMyAdmin on Cloudways managed servers? To do that you need to follow some steps.
Install PHPMyAdmin on Cloudways
You can install PHPMyAdmin on the app you are using or can launch a new PHP stack application.
Once you have launched the PHP stack application, follow the following steps in order to install PHPMyAdmin.
Improve Your PHP App Speed by 300%
Cloudways offers you dedicated servers with SSD storage, custom performance, an optimized stack, and more for 300% faster load times.
Step 1: Launch SSH Terminal
Login to Cloudways Platform, launch SSH terminal and login using Master Credentials.
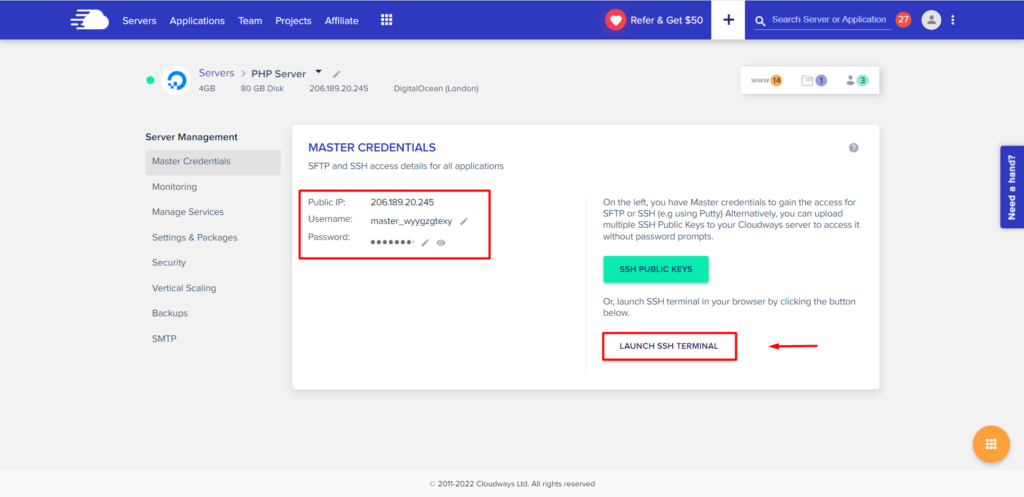
After successful login, head to the application folder where you want to download PHPMyAdmin by using the following command.
cd applications//public_html
Step 2: Downloading And Installing PHPMyAdmin
Now go to the PHPMyAdmin website and copy the download URL of the latest version of PHPMyAdmin (zipped format)
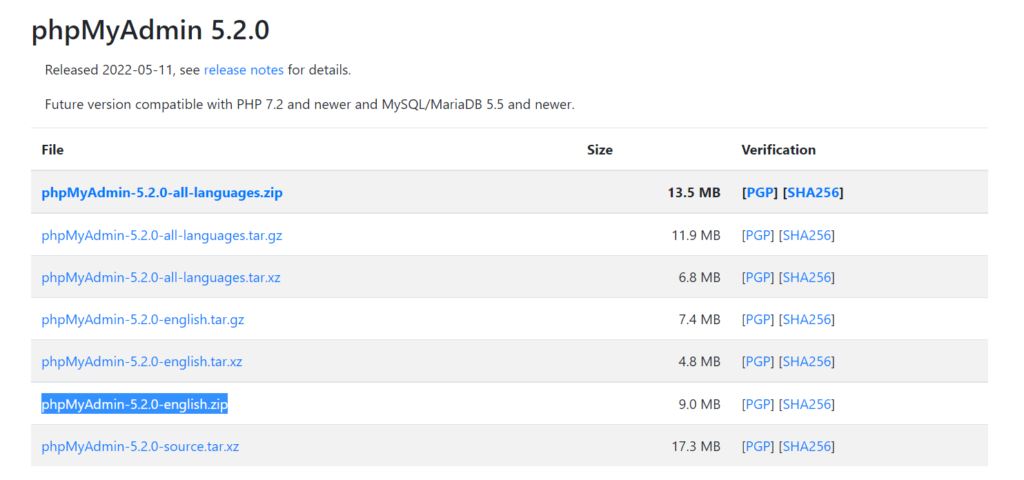
Now go to SSH Terminal, type the following command and paste the download URL.
wget https://files.phpmyadmin.net/phpMyAdmin/5.2.0/phpMyAdmin-5.2.0-english.zip
Press Enter and let the server download the file.
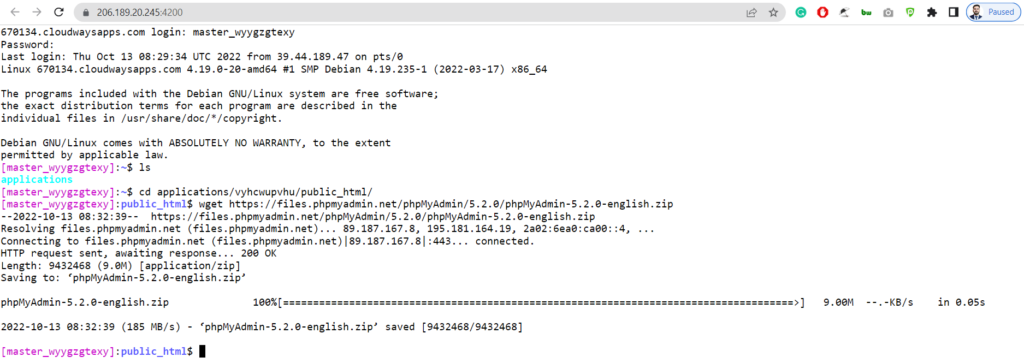
Once the file has been downloaded, run the following command to unzip it.
unzip phpMyAdmin-5.2.0-english.zip
Wait for the command to finish its process.
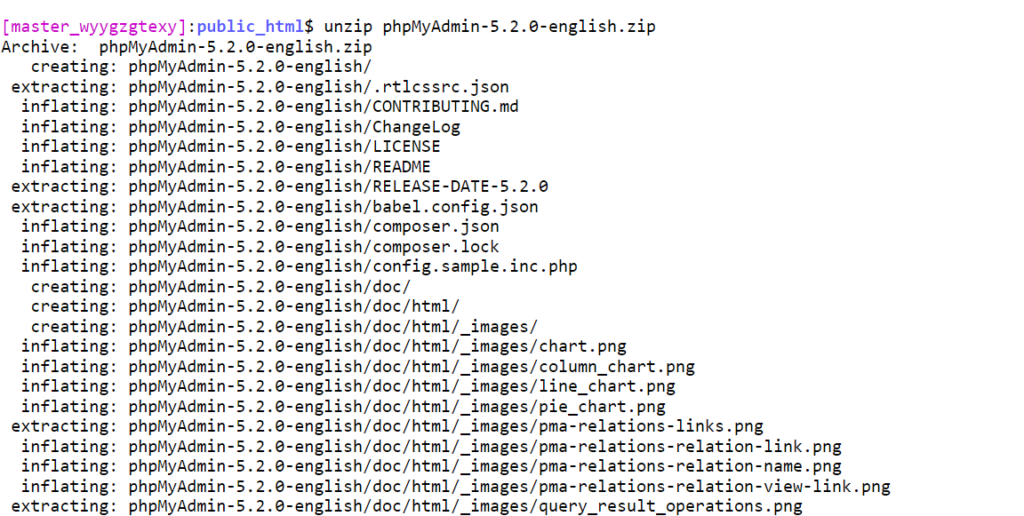
Once done, run the following command to delete the zip.
rm phpMyAdmin-5.2.0-english.zip

Let’s rename the folder so that we can access it easily by running the following command.
mv phpMyAdmin-5.2.0-english phpmyadmin

Note: Go here to learn more about useful SSH commands .
Now head to the application URL and add /PHPMyAdmin at the end of the URL. You will see that PHPMyAdmin has been installed and you will see its login page.
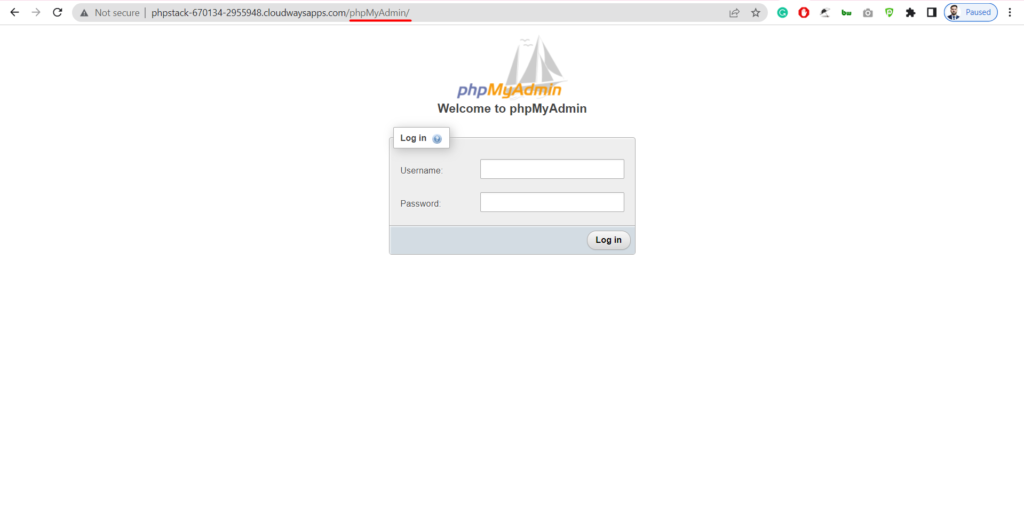
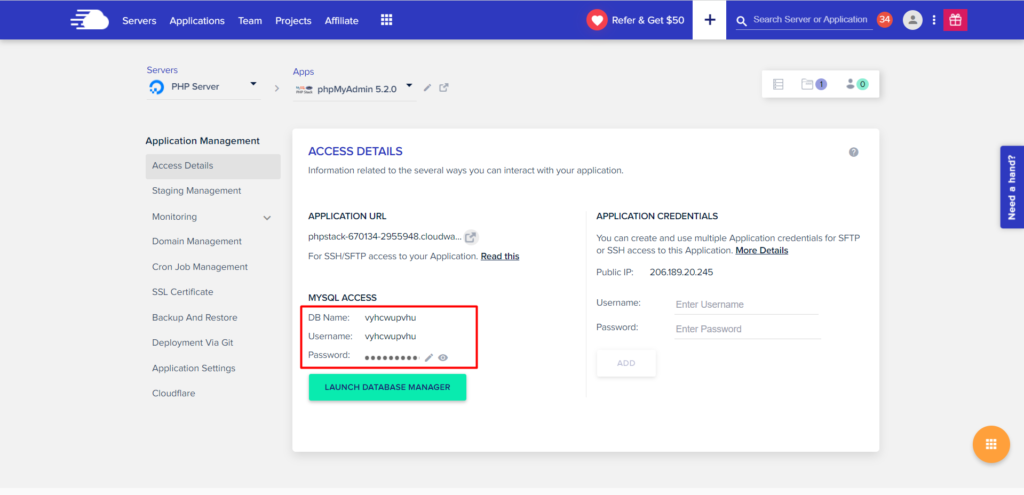
Now login using the database credentials.
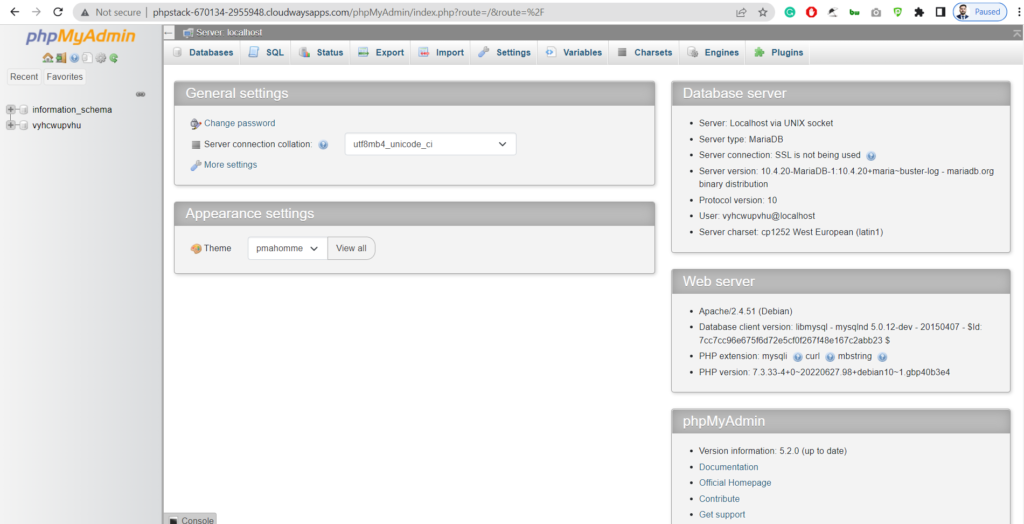
Once you have logged in with your database credentials, you can successfully access the PHPMyAdmin page.
You have successfully installed PHPMyAdmin. You can use it to access all your applications’ databases on the server on which it is installed. And when combined with the excellence of PHP web hosting, your database management experience reaches a whole new level of efficiency and convenience.
How to Secure phpMyAdmin by Enabling Authentication
To secure phpMyAdmin, one way is to enable authentication, which requires users to enter a valid username and password to access the application.
Here’s how to enable authentication in phpMyAdmin:
- Create a new user account in MySQL with limited permissions. This account will be used to access PhpMyAdmin.
- You can use the following command to create a user account named “pmauser” with the password “pmapass” and limited privileges:
CREATE USER 'pmauser'@'localhost' IDENTIFIED BY 'pmapass'; GRANT SELECT, INSERT, UPDATE, DELETE ON *.* TO 'pmauser'@'localhost'; FLUSH PRIVILEGES;
- This will create a new user account named “pmauser” with the password “pmapass” and limited privileges to access all databases.
- Open the PhpMyAdmin configuration file called “config.inc.php” which is located in the root directory of PhpMyAdmin.
- Search for the line that starts with “$cfg[‘Servers’][$i][‘auth_type’]“. By default, this line is set to “cookie” which means that PhpMyAdmin uses cookies to authenticate users.
- Change the value of “auth_type” from “cookie” to “http” to enable HTTP authentication. This will prompt users to enter a valid username and password to access PhpMyAdmin.
$cfg['Servers'][$i]['auth_type'] = 'http';
- Save the changes to the configuration file and exit.
- Restart the webserver to apply the changes.
How to Secure Phpmyadmin by Configuring SSL
SSL encrypts the data to prevent it from being intercepted by unauthorized parties. Here are the steps to configure SSL for phpMyAdmin:
- Obtain an SSL certificate from a trusted certificate authority. There are many certificate authorities that offer SSL certificates, such as Comodo, Let’s Encrypt and VeriSign.
- Install the SSL certificate on the web server. The steps to install an SSL certificate may vary depending on your web server software.
- Configure the webserver to use SSL for phpMyAdmin. If you are using an Apache web server, open the configuration file called “httpd.conf” and add the following lines:
SSLEngine On SSLCertificateFile /path/to/ssl/certificate.crt SSLCertificateKeyFile /path/to/ssl/private.key DocumentRoot /path/to/phpmyadmin Options FollowSymLinks AllowOverride All Order allow,deny Allow from all
- This configuration file sets up a virtual host that listens on port 443, enables SSL encryption, and specifies the SSL certificate and private key file paths.
- Replace “/path/to/ssl/certificate.crt” and “/path/to/ssl/private.key” with the actual file paths of your SSL certificate and private key.
- Restart the webserver to apply the changes.
How to Secure By Limiting Access to Specific IP Addresses
By restricting access to a specific IP address or range of IP addresses, you can control who can access phpMyAdmin and protect it from unauthorized access. Here are the steps to limit access to specific IP addresses:
- Open the configuration file of your web server that hosts phpMyAdmin. The configuration file is typically located at /etc/httpd/conf/httpd.conf.
- Find the location where phpMyAdmin is hosted. This could be a directory such as “/usr/share/phpmyadmin” or a virtual host configuration.
- Add the following lines to restrict access to a specific IP address or range of IP addresses:
Order deny,allow Deny from all Allow from 192.168.1.10
- Replace “/path/to/phpmyadmin” with the actual path to the directory where phpMyAdmin is hosted.
- Replace “192.168.1.10” with the IP address or range of IP addresses that you want to allow access to.
Allow from 192.168.1.0/24
- This allows access from all IP addresses in the range 192.168.1.0 to 192.168.1.255.
- Save the configuration file and restart the webserver to apply the changes.
Common Phpmyadmin Installation Issues and Their Possible Solutions
Session Error
“Cannot start session without errors; please check errors given in your PHP and/or webserver log file and configure your PHP installation properly.”
Possible Solution
This error usually occurs due to an incorrect prompt set for the session directory in PHP. To fix this, you can change the permissions of the session directory to 0777 or 0775 (depending on your server configuration) using the following command:
chmod -R 0777 /var/lib/php/sessions/
Mysqli Extension Is Missing Error
The mysqli extension is missing. Please check your PHP configuration.
Possible Solution
This error occurs when the mysqli extension is not installed or enabled on your server. To fix this, you need to install and enable the mysqli extension. You can do this by running the following command:
sudo apt-get install php-mysqli
After installing the extension, you need to restart your web server to enable it.
Connection Error
Cannot connect: invalid settings
Possible Solution
This error usually occurs due to incorrect login credentials or configuration settings. To fix this, you should check the following:
- Make sure that the host name, username, and password are correct.
- Make sure that the MySQL server is running and accepting connections.
- Make sure that the port number and socket path are correct.
- Check the config.inc.php file for any errors or typos in the configuration settings.
Server Not Found Error
The requested URL /phpmyadmin was not found on this server.
Possible Solution
This error occurs when the phpMyAdmin directory is not installed or configured properly. To fix this, you can try the following:
- Check if the phpMyAdmin directory exists in the correct location on your server.
- Check if the Apache web server is configured to serve the phpMyAdmin directory. You can do this by editing the Apache configuration file (httpd.conf) and adding the following lines:
Alias /phpmyadmin "/usr/share/phpmyadmin/"Options Indexes FollowSymLinks MultiViews AllowOverride all Require all granted
- >Restart the Apache web server to apply the changes.
Wrapping Up!
In conclusion, installing phpMyAdmin on Cloudways is a simple process that can be completed in just a few steps. With phpMyAdmin, managing your databases becomes much easier, allowing you to perform a wide range of database operations with just a few clicks.
Following the steps outlined in this tutorial, you can quickly install phpMyAdmin on your Cloudways server and manage your databases more efficiently comes even more streamlined and potent.
Whether you’re a developer or a website owner, having a tool like phpMyAdmin at your disposal can be incredibly useful, so don’t hesitate to give it a try!
Q: How to use PHPMyAdmin after installation?
A: Once phpMyAdmin installation is completed, visit your staging app link to access it. For example, http://phpstack-123.cloudwaysapps.com/phpmyadmin.
Q: How to find the port for PHPMyAdmin?
A: On the PHPMyAdmin home screen, click on Home, and move to the Variables option available on the top. Search for port settings, the values are available there.
Q: How to start/install the phpMyAdmin from the command line on Ubuntu?
A: Access the terminal window on your Ubuntu server. Issue the command sudo apt-get install phpmyadmin php-mbstring php-gettext -y. Type in your sudo password when prompted, and then allow the installation to complete.
Q: How to start phpMyAdmin on a Linux-based System?
A: To start the phpMyAdmin, type in the URL: http:///phpmyadmin/index.php and login using the MySQL root/admin username and password.
Share your opinion in the comment section. COMMENT NOW
Share This Article
Save EXTRA With the Hosting Pricing Calculator!
Get a detailed cost comparison of the leading hosting providers for FREE. Find the optimum hosting solution that optimizes your savings.
Shahzeb Ahmed
Shahzeb is a Digital Marketer with a Software Engineering background, works as a Community Manager — PHP Community at Cloudways. He is growth ambitious and aims to learn & share information about PHP & Laravel Development through practice and experimentation. He loves to travel and explore new ideas whenever he finds time. Get in touch with him at [email protected]