
Как загрузить файлы на веб-сервер
Данная статья покажет, как можно опубликовать сайт в Интернет с помощью инструментов передачи файлов(file transfer tools).
| Необходимые знания: | Вы должны знать что такое веб-сервер и как работают доменные имена. Также вы должны знать, как установить базовую среду и как написать простую веб-страницу. |
|---|---|
| Цель: | Научиться передавать файлы на сервер используя различные доступные инструменты передачи файлов(file transfer tools). |
Сводка
Если вы создали простую веб-страницу (для примера смотрите Основы HTML), вы, вероятно, захотите отобразить её онлайн, на веб-сервере. В данной статье мы обсудим как сделать это, используя различные доступные настройки, такие как SFTP клиенты, RSync и GitHub.
SFTP (Безопасный Протокол Передачи Файлов)
Существуют различные варианты SFTP клиентов. В нашем примере мы будем использовать FileZilla, тк он бесплатен и подходит для Windows, macOS и Linux. Чтобы установить менеджер перейдите на страницу загрузки FileZilla downloads page, нажмите на кнопку загрузки, затем установите пакет из установочного файла обычным способом.
Примечание: Конечно, есть много других вариантов. Смотрите Publishing tools для других способов.
Откройте приложение FileZilla; вы должны увидеть что-то вроде этого:
Вход в систему
В этом примере мы предположим, что наш хостинг-провайдер (сервис, на котором находится наш HTTP веб сервер) является фиктивной компанией «Example Hosting Provider», чьи URL адреса выглядят следующим образом: mypersonalwebsite.examplehostingprovider.net .
Сейчас мы создали аккаунт и получили от хостинг-провайдера следующую информацию:
- SFTP сервер: sftp://demozilla.examplehostingprovider.net
- Имя пользователя: demozilla
- Пароль: quickbrownfox
- Порт: 5548
- Для публикации в интернет, поместите ваши файлы в папку Public/htdocs .
Давайте сначала посмотрим на http://demozilla.examplehostingprovider.net/ — как вы можете видеть, то здесь пока ничего нет:
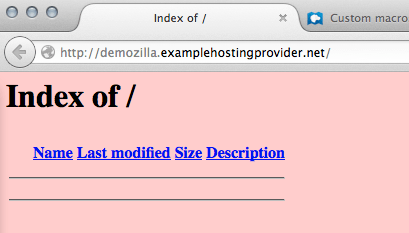
Примечание: В зависимости от вашего хостинг-провайдера, когда вы впервые заходите на свой веб-адрес, большую часть времени вы будете видеть страницу, на которой написано что-то вроде этого: «This website is hosted by [Hosting Service].»
Чтобы подключить SFTP клиент к удалённому серверу, выполните следующие действия:
- Выберите File > Site Manager. в главном меню.
- В окне Site Manager, нажмите кнопку New Site, затем введите название сайта как demozilla в предоставленном месте.
- Укажите SFTP-сервер вашего хоста в предоставленном поле: Host.
- В раскрывающемся списке Logon Type: выберите Normal, затем введите предоставленные имя пользователя и пароль в соответствующие поля.
- Введите правильный порт и другую информацию.
Ваше окно должно выглядеть как показано ниже:
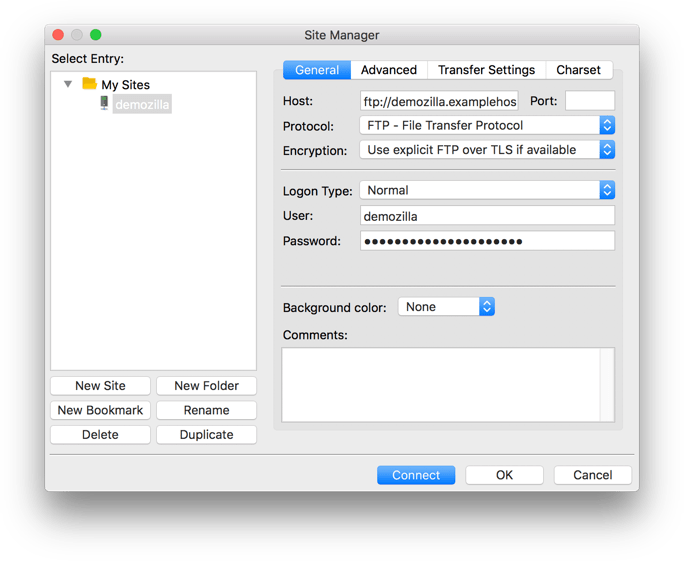
Теперь нажмите Connect для подключения к SFTP-серверу.
Примечание: Убедитесь, что ваш хостинг-провайдер предлагает SFTP (безопасный FTP) подключение к вашему хостинговому пространству. FTP по своей сути небезопасен, и вам не следует его использовать.
Здесь и там: локальный и удалённый просмотр
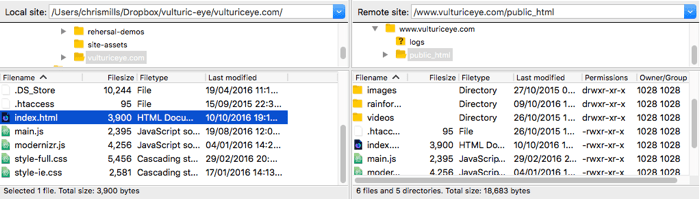
После подключения ваш экран должен выглядеть примерно так (мы подключились к нашему собственному примеру, чтобы дать вам представление):
Давайте посмотрим, что вы видите:
- По центру левой панели вы можете видеть локальные файлы. Перейдите в каталог, в котором вы храните свой веб-сайт (например, mdn ).
- По центру правой панели вы увидеть удалённые файлы. Мы вошли в наш удалённый корень FTP (в данном случае: users/demozilla )
- Вы можете пока игнорировать нижнюю и верхнюю панели. Соответственно, это журнал сообщений, показывающий состояние соединения между вашим компьютером и SFTP-сервером, и журнал в реальном времени каждого взаимодействия между вашим SFTP-клиентом и сервером.
Загрузка на сервер
Наш пример инструкций для хостинга указывает нам следующее: «Чтобы опубликовать в Интернете, поместите свои файлы в каталог: Public/htdocs .» Вам нужно перейти в указанный каталог на правой панели. Этот каталог фактически является корнем вашего веб-сайта, где находятся ваши index.html , откуда ваши файл и другие активы будут отправлены.
После того, как вы нашли правильный удалённый каталог для размещения файлов, чтобы загрузить файлы на сервер, вам необходимо переместить их с левой панели на правую.
Как узнать, что они online?
Пока все хорошо, но действительно ли файлы в сети? Вы можете перепроверить, перейдя на ваш сайт (например, http://demozilla.examplehostingprovider.net/ ) в вашем браузере:
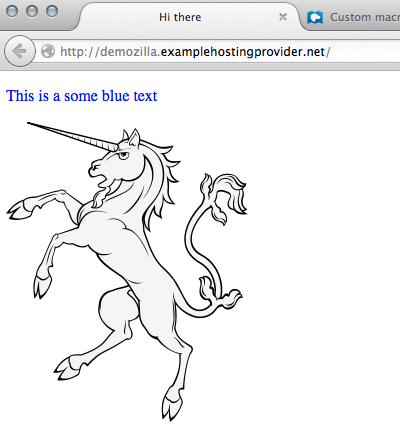
И вуаля! Наш сайт работает!
Rsync
Rsync (en-US) is a local-to-remote file synchronizing tool, which is generally available on most Unix-based systems (like macOS and Linux), but Windows versions exist too.
It is seen as a more advanced tool than SFTP, beause by default it is used on the command line. A basic command looks like so:
rsync [-options] SOURCE user@x.x.x.x:DESTINATION
- -options is a dash followed by a one or more letters, for example -v for verbose error messages, and -b to make backups. You can see the full list at the rsync man page (search for «Options summary»).
- SOURCE is the path to the local file or directory that you want to copy files over from.
- user@ is the credentials of the user on the remote server you want to copy files over to.
- x.x.x.x is the IP address of the remote server.
- DESTINATION is the path to the location you want to copy your directory or files to on the remote server.
You’d need to get such details from your hosting provider.
Of course, it is a good idea to use a secure connection, like with FTP. In the case of Rsync, you specify SSH details to make the connection over SSH, using the -e option. For example:
rsync [-options] -e "ssh [SSH DETAILS GO HERE]" SOURCE user@x.x.x.x:DESTINATION
You can find more details of what is needed at How To Copy Files With Rsync Over SSH.
Rsync GUI tools
As with other command line tools, GUI tools also exist for Rsync, for those who are not as comfortable with using the command line. Acrosync is one such tool, and it is available for Windows and macOS.
Again, you would have to get the connection credentials from your hosting provider, but this way you’d have a GUI to enter them in.
GitHub
GitHub allows you to publish websites via GitHub pages (gh-pages).
We’ve covered the basics of using this in the Publishing your website article from our Getting started with the Web guide, so we aren’t going to repeat it all here.
However, it is worth knowing that you can also host a website on GitHub, but use a custom domain with it. See Using a custom domain with GitHub Pages for a detailed guide.
Other methods to upload files
The FTP protocol is one well-known method for publishing a website, but not the only one. Here are a few other possibilities:
- Web interfaces. An HTML interface acting as front-end for a remote file upload service. Provided by your hosting service.
- WebDAV (en-US). An extension of the HTTP protocol to allow more advanced file management.
Found a content problem with this page?
- Edit the page on GitHub.
- Report the content issue.
- View the source on GitHub.
This page was last modified on 3 авг. 2023 г. by MDN contributors.
Your blueprint for a better internet.
What does HTML stand for
HTML stands for HyperText Markup Language. It is a programming language for creating the structure and the contents of the website.
Every website you visit including this one which you are reading right now is built with the help of HTML. The texts, videos, images, buttons, hyperlinks, and so much more are what HTML can do.
HTML is important because it allows us to add contents to the web page, and it is one of the three main tools for creating websites. The other three tools are CSS and JavaScript.
The cool thing about HTML is despite its long name and the importance of building the website — it is surprisingly simple to learn the skill.
You can learn the basics of HTML in just a few weeks, and with another month of practice, you can expect to be proficient in it. Everyone can learn to code in HTML regardless of their age, education and work background, and prior experience in programming.
Because of this, it often acts as a gateway to the world of programming and web development in particular.
To learn more about HTML, check out this article where you will learn the basics of HTML from the beginning.
If you find the concept of HTML interesting, and you want to get a job in programming, sign up for the course today.
You will learn top programming skills like HTML, CSS, JavaScript, and much more that are in high demand, and you will be able to practice them in a real-world scenario.
Plus, you will also practice technical interviews by answering common questions asked during the job interview. All these will help you to become a professional software engineer one year from now.
Загрузка файлов
Для того чтобы можно было загружать на сервер один или несколько файлов, в форме применяется специальное поле. В браузерах Firefox, IE и Opera такой элемент отображается как текстовое поле, рядом с которым располагается кнопка с надписью «Обзор. » (рис. 1). В Safari и Chrome доступна только кнопка «Выберите файл» (рис. 2).

Рис. 1. Вид поля для загрузки файла в Firefox

Рис. 2. Загрузка файлов в Chrome
При нажатии на кнопку открывается окно для выбора файла, где можно указать, какой файл пользователь желает использовать.
Синтаксис поля для отправки файла следующий.
Атрибуты перечислены в табл. 1.
| Атрибут | Описание |
|---|---|
| accept | Устанавливает фильтр на типы файлов, которые вы можете отправить через поле загрузки файлов. |
| size | Ширина текстового поля, которое определяется числом символов моноширинного шрифта. |
| multiple | Позволяет выбирать и загружать сразу несколько файлов. |
| name | Имя поля, используется для его идентификации обработчиком формы. |
Прежде, чем использовать данное поле, в форме необходимо сделать следующее:
- задать метод отправки данных POST ( method=»post» );
- установить у атрибута enctype значение multipart/form-data .
Форма для загрузки файла продемонстрирована в примере 1.
Пример 1. Создание поля для отправки файла
HTML5 IE Cr Op Sa Fx
Отправка файла на сервер Хотя можно установить ширину поля через атрибут size , в действительности ширина никак не влияет на результат работы формы. В браузерах Safari и Chrome этот атрибут вообще никакого воздействия не оказывает.
Атрибут multiple более важен, он позволяет не ограничиваться одним файлом для выбора, а указать их сразу несколько для одновременной загрузки.
Если атрибут accept не указывать, тогда добавляются и загружаются файлы любого типа. Наличие accept позволяет ограничить выбор файла, что особенно важно, когда требуется загрузить только изображение или видео. В качестве значения выступает MIME-тип, несколько значений разделяются между собой запятой. Также можно использовать следующие ключевые слова:
- audio/* — выбор музыкальных файлов любого типа;
- image/* — графические файлы;
- video/* — видеофайлы.
В табл. 2 показаны некоторые допустимые значения атрибута accept .
| Значение | Описание |
|---|---|
| image/jpeg | Только файлы в формате JPEG. |
| image/jpeg,image/png | Только файлы в формате JPEG и PNG. |
| image/* | Любые графические файлы. |
| image/*,video/* | Любые графические и видеофайлы. |
Использование дополнительных атрибутов показано в примере 2.
Пример 2. Загрузка фотографий
HTML5 IE 10+ Cr Op Sa Fx
Загрузка файла Не все браузеры поддерживают новые атрибуты. IE полностью игнорирует multiple и accept , Safari не поддерживает accept , а Firefox не работает с MIME-типом, только с ключевыми словами. Поэтому в примере выше специально для Firefox установлено значение image/*,image/jpeg . Также учтите странную ошибку в Опере, она не допускает пробелы после запятой внутри accept .
Результат примера показан на рис. 3. Обратите внимание, что из-за наличия multiple несколько изменился вид поля.
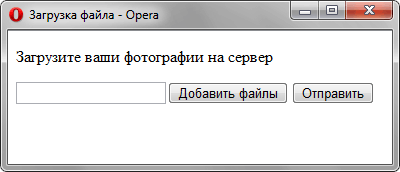
Рис. 3. Загрузка файлов в Opera
HTML JavaScript
In this tutorial, you will learn what is javascript, how to use javascript in HTML, how to include external javascript in HTML, and will see few examples related to this.
What is JavaScript?
Javascript is a scripting language that is mainly used in web development. Using javascript you can write programs that can interact with a webpage’s element.
It can control HTML element’s behavior and makes HTML pages dynamic and more interactive by giving users a way to interact with the webpage. HTML use javascript for client-side scripting.
Nowadays JavaScript is compatible to works on both front-end and back-end��. But here we will only talk about the front end.
How to use JavaScript in HTML?
Both HTML and javascript are different languages. So for them to work together you first have to connect then in some way.
There are two ways by which javascript programs can be added to the HTML webpage:
- By writing javascript code within the webpage ( Internal javascript )
- By writing javascript code in an extern js file and then connecting it to the webpage ( External javascript )
1. Internal JavaScript
One way to use javascript in HTML is by writing javascript within the HTML file.
To write javascript within the HTML file, you have to add a script tag in the HTML file.
Now you can write the javascript code within the script tag.
This is the javascript code within the HTML file.
Here is the complete code of a javascript within the HTML file. You can insert a script tag anywhere within the head or body of the document, also you can add as many scripts as you want.
Document First script tag in body.
Second script tag in body.
2. External JavaScript
Another way to use javascript in HTML is by writing javascript in an external js file and then connecting it to the HTML file.
Here is the external javascript file. You can put it anywhere you want.
alert('Hello world!');Now connect the external javascript file to HTML with a script tag. Here is the complete code.
Document External JavaScript file added to this html document.
Use of javascript
Javascript is mainly used in developing websites. It can perform various tasks on the webpage like it can change or modify the content of any element, can change the size of the container, can change the color of the text, can create animations, and many more.
Here we are going to see a few usages of javascript.
1. Changing the color of the text
Javascript can change the color of text on the webpage. Here is the code to change the color of the text.
Here is the complete code.
Document
2. Changing the size of container
Javascript can change the size of the container on the webpage. Here is the code to change the size of the container.
Document
3. Changing element content using javascript
Javascript can change the content of any element on the webpage.
You are learning HTML function changeContent()
4. Changing box sizing using javascript
Javascript can change the container sizing of any element on the webpage. You can change the width or height of the container by selecting it from the document.
function changeSize()
Changing other style using javascript
Javascript can change the style of any element on the webpage.
function changeStyle()
The noscript tag
The noscript tag is used to hide the content of the page from non-javascript enabled browsers. It displays a message in case your browser does not support javascript. It is used to hide the content of the page from non-javascript enabled browsers.
Предыдущая запись